Unlock a world of possibilities! Login now and discover the exclusive benefits awaiting you.
- Subscribe to RSS Feed
- Mark as New
- Mark as Read
- Bookmark
- Subscribe
- Printer Friendly Page
- Report Inappropriate Content
For those of you who are interested in how tickets can be used in Qlik Sense to integrate authentication with identity providers, you should continue reading.
Tickets as a means to give users access to things was used long before the invention of computers. When you go to the cinema, you first need to buy a ticket from a cashier or from the Internet – a ticket that is valid for one movie at a certain time. The ticket is later validated by the person letting you into the correct theatre for the movie for which the ticket is valid.
One benefit of a ticket system is that it is independent of how you get the ticket. The ticket is valid for access to the movie, no matter what.
So how can we use the same concept to gain the same flexibility when we authenticate users in Qlik Sense? We use tickets, but this time the tickets are digital.
In QlikView 11.0 we introduced a concept that called Web Tickets. In Qlik Sense we have developed this idea further and this is now the normal way to make the authentication.
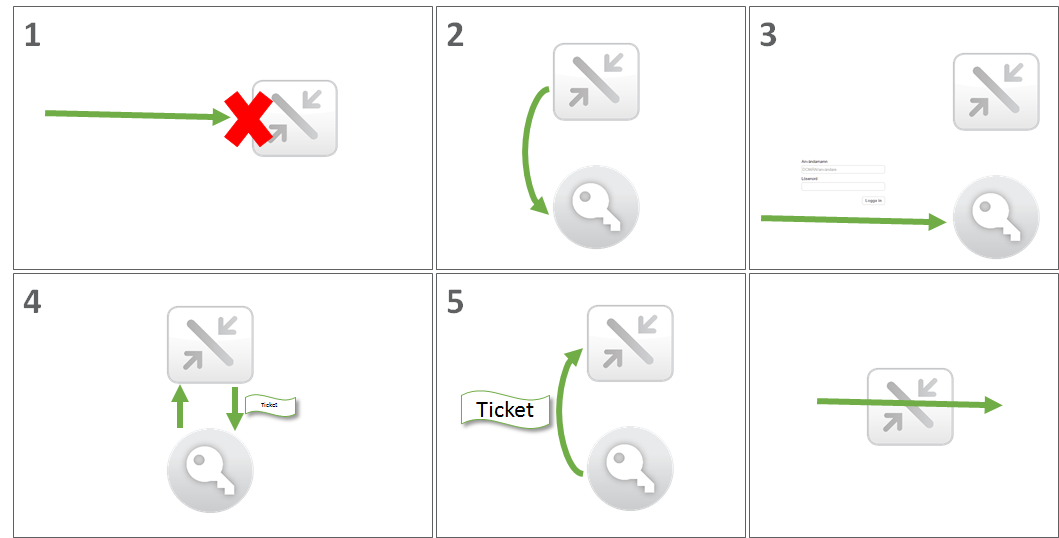
So how does this work in Qlik Sense?
- You connect to Qlik Sense Proxy and try to gain access, but as you don’t have a session yet the proxy will ask you to go to an authentication module.
- You go to the authentication module that can validate that you are who you say you are.
- You get validated by the authentication module based on something you are, something you have, or something you know.
- If successfully validated, the authentication module will request a ticket from the proxy. As the proxy trust the authentication module it will grant a ticket. The ticket is special in that it is only valid for the person you say you are for a short period of time.
- You can now return to the proxy with the ticket. The proxy will validate the ticket and grant you access to Qlik Sense.
So how do this look in real life if we wanted to integrate with Salesforce?
- You enter https://[Server name]/hub in your browser
- You get redirected to an authentication module by the proxy with an identifier of where the module can request a ticket, the proxyRestUri, and a token that can be used to get the proxy to tell you where it should send you back, the targetId
- You get validated by the authentication module that uses Salesforce to authenticate the user based on something you are, something you have or something you know.
- The authentication module sends a request (HTTP POST) for a ticket to the proxyRestUri/ticket in JSON format like this.
{
"UserDirectory":"SalesForce",
"UserId":"hkp",
"Attributes":[
{
"org":"Qlik"
}
],
"TargetId":"7f9c12ab-d656-4dbe-8d14-a2d55fa52f6c"
}
And gets a response like this
{
"UserDirectory":" SalesForce",
"UserId":"hkp",
"Attributes":[
{
"org":"Qlik"
}
],
"Ticket":"iokrVXS-IndQgEON",
"TargetUri":"https://testsrv.test.com/hub"
} - You redirect the user back to the targetUri with the ticket (https://testsrv.test.com/hub/?QlikTicket=iokrVXS-IndQgEON) and the user will be granted access to Qlik Sense
But for this to be secure, there are two requirements:
- The call to the proxy is only allowed if the authentication module is trusted by the proxy. This is achieved by the use of certificates (which can be exported from the QMC).
- The request for a ticket to the proxy must contain a Cross Site Request key in the header (X-Qlik-Xrfkey) and the same key must exist in the URL (Xrfkey).
If you would like to get your hands dirty, you will find examples on ticketing on Qlik Branch and more documentation on the Qlik Sense help site
- « Previous
-
- 1
- 2
- Next »
You must be a registered user to add a comment. If you've already registered, sign in. Otherwise, register and sign in.