Unlock a world of possibilities! Login now and discover the exclusive benefits awaiting you.
- Qlik Community
- :
- All Forums
- :
- Qlik NPrinting
- :
- Re: Create a Qlik NPrinting 17.1 Connection to Qli...
- Subscribe to RSS Feed
- Mark Topic as New
- Mark Topic as Read
- Float this Topic for Current User
- Bookmark
- Subscribe
- Mute
- Printer Friendly Page
- Mark as New
- Bookmark
- Subscribe
- Mute
- Subscribe to RSS Feed
- Permalink
- Report Inappropriate Content
Create a Qlik NPrinting 17.1 Connection to QlikSense Server
Hi Dear Qlik Community
I'm triying to create a QlikSense Connection in NPrinting 17.1, i have the following error mesage

1) I installed the QlikSense certificates and the installation process was sucesfully
2) On the Help Site one of the Requirements of QlikSense connections are "The Qlik NPrinting user who is creating the connection must also have RootAdmin authorization in Qlik Sense"
2.1) How can i make this process.I have the two servers (Qlik NPrinting and Qlik Sense) in the same AD Domain.
2.2) How can i add the AD in Qlik NPriting configuration for login with AD User ?
Thans for ur help
- « Previous Replies
- Next Replies »
- Mark as New
- Bookmark
- Subscribe
- Mute
- Subscribe to RSS Feed
- Permalink
- Report Inappropriate Content
Hi Ali
Thanks for the answer, the user that run the NPrinting services is a local administrator and is not roor in QlikSense Server because QlikSense Server is not connected to the local users from NPrinting Server. The user that run the services in NPrinting cannot be changed for a Domain User because the services not works not run.
The RabbitMQ works fine because the service are running ans i restart and works fine
- Mark as New
- Bookmark
- Subscribe
- Mute
- Subscribe to RSS Feed
- Permalink
- Report Inappropriate Content
Hi Ali
I tried change the user for the Domain Account (QLIK\qlikservices: Domain Account user, this user is RootAdmin in QlikSense Server) only on to the "Qlik NPrinting Scheduler service",the services and NPrinting Web Console works fine but the error on the conection persist
- Mark as New
- Bookmark
- Subscribe
- Mute
- Subscribe to RSS Feed
- Permalink
- Report Inappropriate Content
Hi Marcos, your both machine it's on domain?
You tryed access Qlik Sense Server from NPrinting Server and use a HUB?
If you can't access from NPrinting Server and your machine isn't on domain, you must insert a host ip from NPrinting Server in a White list in Qlik Sense QMC / Virtual Proxy / Advanced Options.
- Mark as New
- Bookmark
- Subscribe
- Mute
- Subscribe to RSS Feed
- Permalink
- Report Inappropriate Content
Hi Fabio
Thanks for ur answer and sorry for the delay, yes the NPrinting server and Qlik Sense Server are in the same domain and i can open the HUB from a browser in Qlik NPrinting Server and works fine https://win-1p9h8gchos1.qlik.ms/hub/
All addresses in Qlik Sense QMC / Virtual Proxy / Advanced Options are included
- Mark as New
- Bookmark
- Subscribe
- Mute
- Subscribe to RSS Feed
- Permalink
- Report Inappropriate Content
Hello marcos.herrera,
I had the same error where I was trying to connect to Qlik Sense and generate meta data for the given Qlik Sense App which was giving me error : "Request has been purged due to connection errors"
Schedular Log file was showing error :
Connection navigator=qliksense;proxyurl=https://<servername>/;appid=<appid>;identity=QLIK\qlikservices has reached ERROR status
I had already followed the steps for certificates export and import as mentioned in Qlik Site but that didn't help me to solve that error either. However, below steps helped me to get rid of that.
1. Go to start and search for "mmc".
2. Right click and open file location.
3. Locate mmc.exe, press shift and right click, select run as different user.
4. Give credentials for the user with which Qlik Sense services are running
5. Once mmc is opened, File -> Add or Remove snap-ins -> Certificates -> Add -> My User Account -> Finish
6. Expand to Locate Certificates - Current User -> Personal -> Certificates
7. Select Qlik Sense certificate available there, Right Click -> Open Tasks -> Export.
8. Export with Private Key, Check "Include all certificates", uncheck "Delete the private key if export is successful".
9. Give some password and remember, give proper file path along with file name (note that the file will automatically be created at given path).
10. Finish.
11. Repeat steps 7-10 to export Certificate from Certificates - Current User -> Trusted Root Certification -> Certificates
12. Repeat Steps 1-3. Give credentials for the user with which Nprinting Services are running.
13. Repeat Step 5-6.
14. Right click and import certificates, give password that was given while exporting certificates. Import respective certificates in respective locations (Personal and Trusted Root).
15. Restart Nprinting Services.
Hope that helps !
Regards,
Hardik
- Mark as New
- Bookmark
- Subscribe
- Mute
- Subscribe to RSS Feed
- Permalink
- Report Inappropriate Content
Could you send me a log error? A log file it is in c:\programdata\nprinting\logs
Follow it's a print with a example to make correct connection.
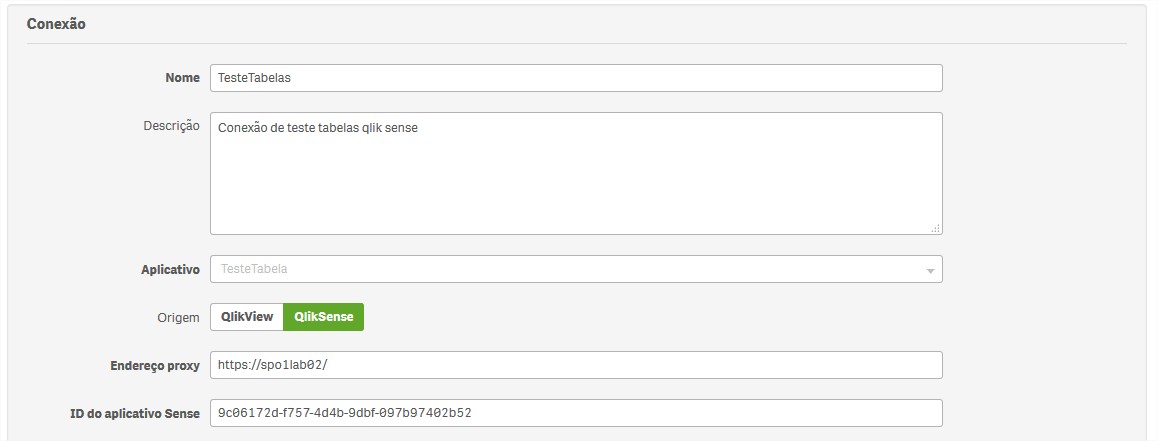
There are many errors in this version, I recommend you upgrade to 17.2.
Remember to upgrade you must do version by version, if you are using 17.1.0 you must upgrade to 17.1.1, them 17.1.2 and finally to 17.2.
- « Previous Replies
- Next Replies »