Unlock a world of possibilities! Login now and discover the exclusive benefits awaiting you.
- Qlik Community
- :
- Blogs
- :
- Technical
- :
- Design
- :
- Building your own selections bar
- Subscribe to RSS Feed
- Mark as New
- Mark as Read
- Bookmark
- Subscribe
- Printer Friendly Page
- Report Inappropriate Content
When you're building a Qlik Sense mashup, you have the option of including the selections bar, which is pretty awesome. The selections bar not only keeps track of and displays selections made, it has step back and step forward functionality to undo or redo selection changes, a search tool, and a drop down selections tool.
It's possible, however, that for whatever reason you may not want to use the selections bar, but you still want to give your users some control over selections. The simplest way to do this probably is to include a clear selections button, as we do in quite a few of our mashups. You can see how to do that in a previous post on this blog here - How to create a “clear selections” HTML button for your next mashup project.
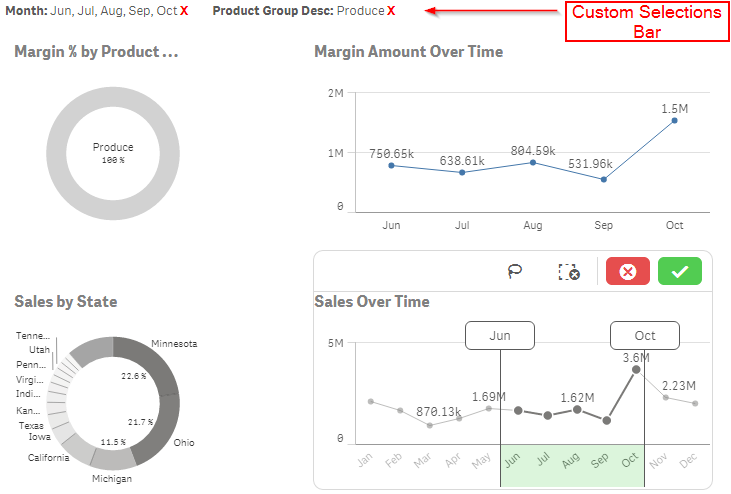
But if you want to show a little more information on current selections, and give users a little more granular control over what selections they are clearing, you can build a custom selections bar. I'm going to walk through building a very simple selections bar, and you can follow along and build on the idea, adding your own styling and customizing it even further.
NOTE - I'm going to assume that you have some prerequisite knowledge of building a mashup. If you do not, here are a few links to get you started -
Qlik Sense Workbench. The visualization and Mash-Up Editor
Qlik Sense Mash-Up API Tutorials
Qlik Sense Help - Building Mashups
The first thing you need to do is actually get the selections currently made. You can do that like this -
app.getList("SelectionObject", function(reply){
  // STUFF TO DO IN CALLBACK
});
That will get you the selection object as the reply. The rest of our code will go inside of the callback function, which will execute every time the selections change. Now in the callback, we need to grab the DOM node we're going to use for the selections bar, and make sure it's clear of any previous content so that every time the callback function is called we are not appending duplicate content.
$selections = $("#selections");  //DOM node to append selections to
$selections.html("");  //Clear node of any previous selections
Now comes the bulk of our code. We have to loop through the array of fields that have selections, and for each field that has selections, grab some variables, including the field name, number of selections made in field, the total values in the field, a string of the names of the values selected, and something called the selection threshold. If the number of selections is greater than the selection threshold, the selection object will not return the name of every value selected, so at that point we no longer display the names of the values selected, and instead display the number of selections. You could also choose to always display just the number of selections as well, instead of the names of the values selected. Here, I've chosen to display the names of values selected, when possible.
//Loop through array of fields that have selections
$.each(reply.qSelectionObject.qSelections, function(key, value) {

  var field = value.qField;  //The field name
  var numSelected = value.qSelectedCount;  //Number of selections in field
  var total = value.qTotal;  //Total number of values in field
  var threshold = value.qSelectionThreshold;  //Threshold in which to display a number count instead of each value
  var selectedStr = value.qSelected;  //When numSelected is less than or equal to threshold, a string of the names of each value selected


  //If numSelected is below or equal to threshold, show string of names of each value selected
  if (numSelected <= threshold) {
    var html = "";
    html += "<span class='selected-field-container' id='" + field + "'>";
    html += "<span class='selected-field'>" + field + ": </span>";
    html += selectedStr;
    html += " <span class='clear-field'>X</span>";
    html += "</span>";
    $selections.append(html);
  }

  // If numSelected is greater than threshold, show the numSelected of total values
  else {
    var html = "";
    html += "<span class='selected-field-container' id='" + field + "'>";
    html += "<span class='selected-field'>" + field + ": </span>";
    html += numSelected + " of " + total;
    html += " <span class='clear-field'>X</span>";
    html += "</span>";
    $selections.append(html);
  }

});
Notice that I've include a span with class 'clear-field'. We're going to attach an event listener to that, so that when that span is clicked, the corresponding field has its selections cleared.
//Event listener on .clear-field to clear that field's selections when clicked
$(".clear-field").click(function() {
  var field = $(this).parent().attr("id");  //Field associated with the .clear-field that was clicked
  app.field(field).clear();  //API method to clear the field
});
And that's it. I've attached a folder of the entire project where you can see all of the code, and you can place it into the extensions folder of Qlik Sense Desktop to see this in action and play around with it (you'll also need the Consumer_Sales.qvf if you don't already have it).
You must be a registered user to add a comment. If you've already registered, sign in. Otherwise, register and sign in.