Unlock a world of possibilities! Login now and discover the exclusive benefits awaiting you.
- Qlik Community
- :
- Support
- :
- Support
- :
- Knowledge
- :
- Member Articles
- :
- How to Distribute User Specific QlikView Reports t...
- Edit Document
- Move Document
- Delete Document
- Subscribe to RSS Feed
- Mark as New
- Mark as Read
- Bookmark
- Subscribe
- Printer Friendly Page
- Report Inappropriate Content
How to Distribute User Specific QlikView Reports to User Folders
- Move Document
- Delete Document and Replies
- Mark as New
- Bookmark
- Subscribe
- Mute
- Subscribe to RSS Feed
- Permalink
- Report Inappropriate Content
How to Distribute User Specific QlikView Reports to User Folders
Nov 9, 2015 11:56:59 AM
Nov 9, 2015 11:56:59 AM
NPrinting allows you to create reports which are filtered according to parameters you set for your recipients. These reports can then be sent directly to a recipient folder that has been specified in the Recipient. Output to be sent can be in PDF or an image format such as JPEG or PNG, see How to Create Reports Based on QlikView Entities.
Create New Report Task
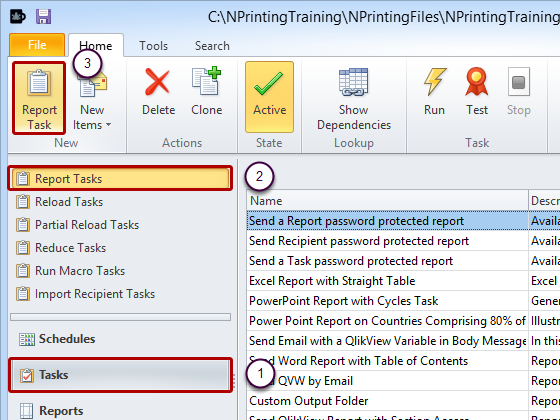
- Select Tasks
- Select Report Tasks
- Click on Report Task
Set up New Task
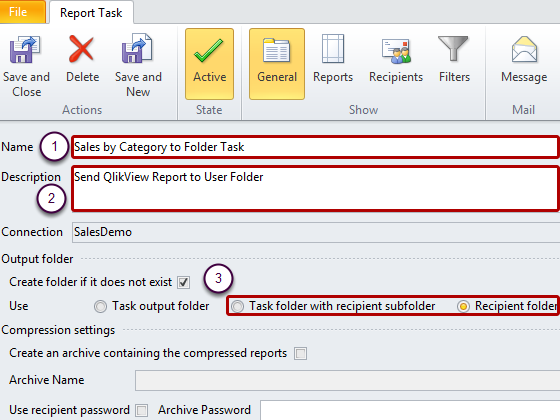
- Enter a Name for the task
- Enter a Description optionally
- Select a Recipient/User output folder for the task by selecting either the Task folder with recipient subfolder or the Recipient folder radio button. This is the folder specified in the Recipient where output for this task will be saved automatically (you can save output to different folders; details are in another tutorial). NPrinting will save a copy of all output also if you send the report as an e-mail attachment.
Select One or More QlikView Entity Reports
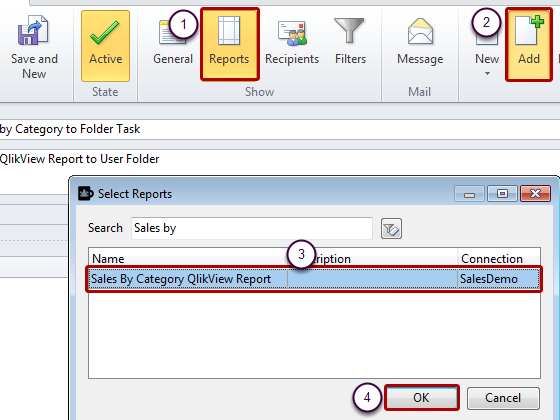
- Click on Reports. You can insert any kind of reports, but, for this tutorial, we'll select only a QlikView Entity Reports. They are integrated with all other kind of reports, with the same features.
- Click on Add
- Type "Sales by" in the Search form, then select the report "Sales by Category QlikView Report"
- Click on OK
Add Recipients
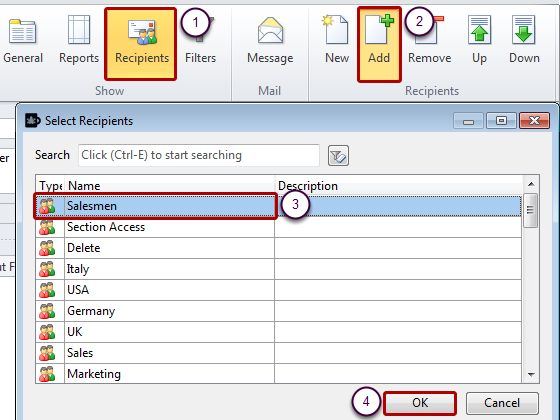
- Select the Recipients icon
- Click on the Add icon
- Select one or more recipients or groups from the list in the Select Recipients window
- Click on OK
You can add as many Recipients to a Task as you want. Separate output, filtered using each Recipient's filter(s), will be created for each recipient. You can see and modify Recipient details by double clicking on a Recipient (modifications are saved in the Recipient and will be reflected in all future output which that recipient receives).
Create New Recipient
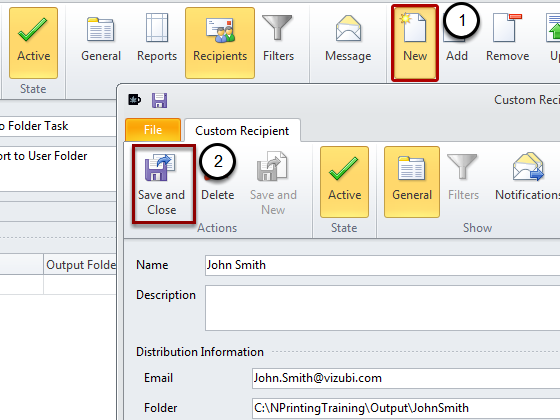
You can also create new recipients by clicking on the New button in the Recipients section of the tool ribbon. Than click on "Save and Close".
Preserving Newly Created Custom Recipient

- Recipients created from within a Task are not saved in the Recipient list and are visible only in the Task where they are created, unless you check the Add to recipient list check box at the bottom of the CustomRecipient form
- Click on the Save and Close icon to save the new Custom Recipient in the Task
Add Filters

Add as many filters to your Task as are necessary. All Task output will be filtered using the Task filters. This will be in addition to Report filters and Recipient filters which are applied to specific Reports and/or Recipients
- Add filters to the Task by clicking on the Filters button in the Show group of the tool ribbon.
- Click on the Add button in the Filters group in the ribbon. You can also create new filters by clicking on the New button.
- Select the filter you want to add.
- Click on OK to confirm your selection.
Run Task Manually
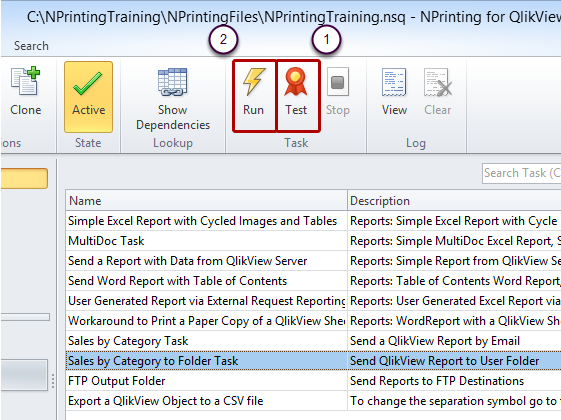
- Check to make sure the Task functions properly by clicking on the Test button in the Task group of the tool ribbon. Also see "How to Test a Task without Involving Recipients"
- Run the job manually by clicking on the Run button in the Task group in the tool ribbon
Check that Report was Distributed to User Folder

Each Salesman Folder did not exist before the task was run, but was created by the task.
- Move Comment
- Delete Comment
- Mark as Read
- Mark as New
- Bookmark
- Permalink
- Report Inappropriate Content
Hi Bjorn.
Is the any reason to refresh all N-Printing documents at once?
Would it not better to create one topic with links to all documents?