Unlock a world of possibilities! Login now and discover the exclusive benefits awaiting you.
- Qlik Community
- :
- All Forums
- :
- Qlik NPrinting
- :
- How to delete NPrinting files?
- Subscribe to RSS Feed
- Mark Topic as New
- Mark Topic as Read
- Float this Topic for Current User
- Bookmark
- Subscribe
- Mute
- Printer Friendly Page
- Mark as New
- Bookmark
- Subscribe
- Mute
- Subscribe to RSS Feed
- Permalink
- Report Inappropriate Content
How to delete NPrinting files?
Hi,
I couldn't find the right way to delete NPrinting project file.
If the NSQ file is deleted, the project is still listed under File menu.
Thanks!
Accepted Solutions
- Mark as New
- Bookmark
- Subscribe
- Mute
- Subscribe to RSS Feed
- Permalink
- Report Inappropriate Content
- Mark as New
- Bookmark
- Subscribe
- Mute
- Subscribe to RSS Feed
- Permalink
- Report Inappropriate Content
Hi Dafnis,
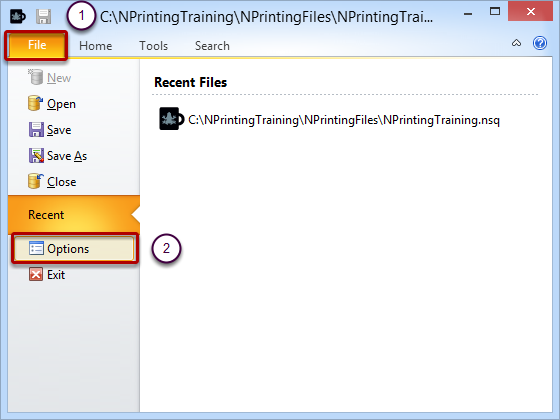
File > Options

HTH - Daniel.
- Mark as New
- Bookmark
- Subscribe
- Mute
- Subscribe to RSS Feed
- Permalink
- Report Inappropriate Content
Hi Dafnis,
This may help for you.
NPrinting has several configuration settings to customize and make functional some program features that are not active by default. This tutorial will explain the purpose of many parameters and provide links to other tutorials that provide detailed instructions.
Configuration settings for NPrinting Service are found in the NPrinting Management Console. Some settings, like SMTP parameters, are common between NPrinting Client and Server and they can be configured once if both NPrinting Client and Server are installed on the same computer.
Access Options Dialog Window
Set General Options
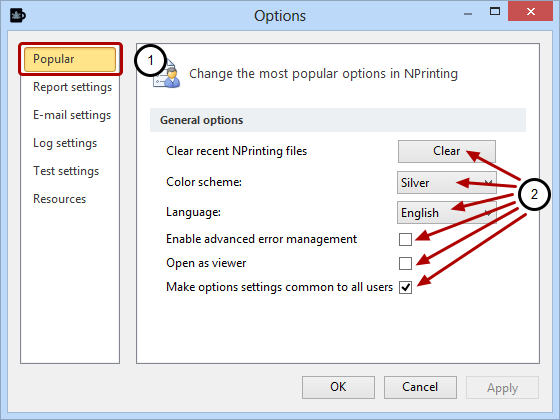
- Select Popular from the column of choices on the left-hand side of your screen.
- Set General options:
Report Settings
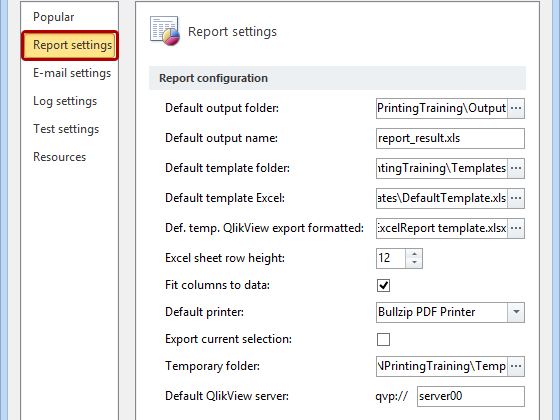 Select Report Settings from the column of choices on the left-hand side of your screen and set:
- Default output folder: insert the path to the folder where you want to save output files.
- Default output name: insert a default name for output files.
- Default template folder: insert the path to the folder where you want to keep templates.
- Default template Excel: note the default folder before changing this setting so that you can transfer its contents to the new folder. When you install NPrinting, a default template is saved to this directory. You can modify your default template in any way you wish, but you must always have a default template in .xls or .xlsx format in this folder.
- Def. temp. QlikView export formatted: note the default folder before changing this setting so that you can transfer its contents to the new folder. It contains a default QlikView template installed with NPrinting.
- Excel sheet row height: insert a value to set the row height.
- Fit columns to data: checking this box causes the width of each column to be set automatically to accommodate the data.
- Default printer: insert the path and the name of the printer to be used by default.
- Export current selection: checking this box causes current selection values to be included in report output.
- Temporary folder: is the folder where NPrinting temporary save the reports create. Clear it periodically.
- Default QlikView server: when creating new connections to a QlikView server this value will be presented.
Legacy Settings
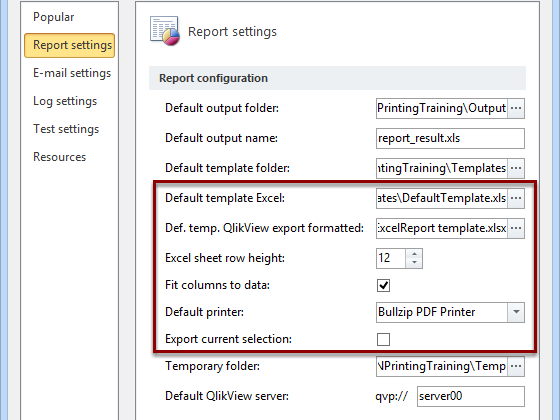 Highlighted Settings affect only Legacy reports and they will be removed in a future version.
E-mail Settings
 The E-mail settings page gives access to settings that must be configured before NPrinting can distribute your reports by E-mail. Have a look at the following tutorial for detailed instructions: How do I set up the e-mail in NPrinting?
Log Settings: Log Files and Notification alerts
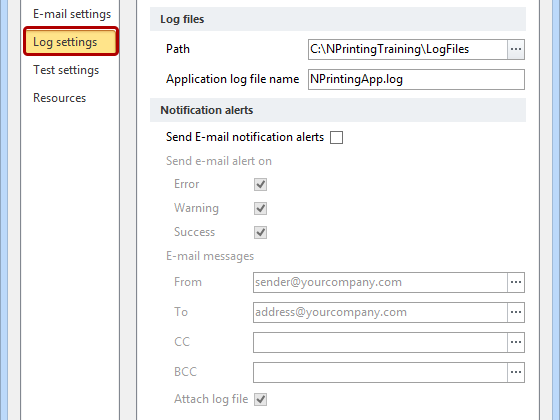 The Log settings page gives access to two groups of configuration parameters: Log files and Notification alerts.Under Log files:Enter the path to the folder you prefer to find your log files under Path or browse to and select the folder by clicking on the browse button at the extreme right .Assign a file name to save a general log file under Application log file name.To set Service log files use the NPrinting Management Console.
Log Settings: Notification alerts
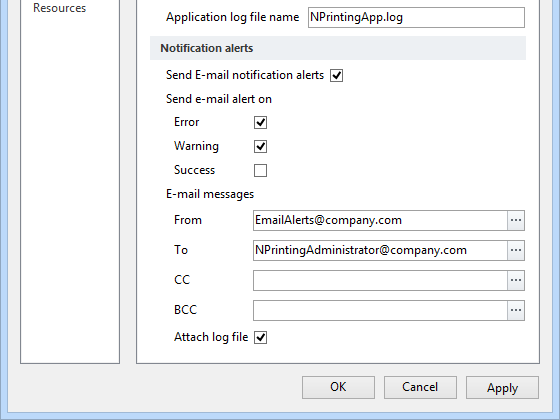 When the Send E-mail notification alerts box is checked, an alert is sent out automatically by e-mail each time a schedule is executed by clicking the Start button, when NPrinting Service is run, or when a batch file triggers Schedule execution.Activate the option "Send e-mail alert on Error"NPrinting sends email alerts when one or more of the following conditions are verified and their box is checked: Error,Warning, or Success.You can enter one or more valid e-mail addresses for each of the following fields manually or by selecting them from the Recipient list by clicking on the browse button.Attach log file: by checking this box will cause an NPrinting log file to be attached to every notification sent out.
Test Settings
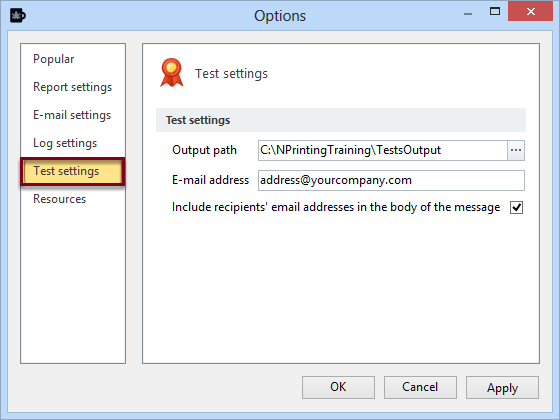 This feature allows you to test your task, without sending reports to the active 'report task' output destinations or e-mail the recipients' addresses. Test button is available only for Report Task.Select Test Settings from the column of choices on the left-hand side of your screen and set:
- Output path: insert the test output path
- E-mail address: insert the developer's or other test e-mail address
- Include recipients' email addresses in the body of the message: checking this box NPrinting will include in the e-mail message body the recipient's names
Resources
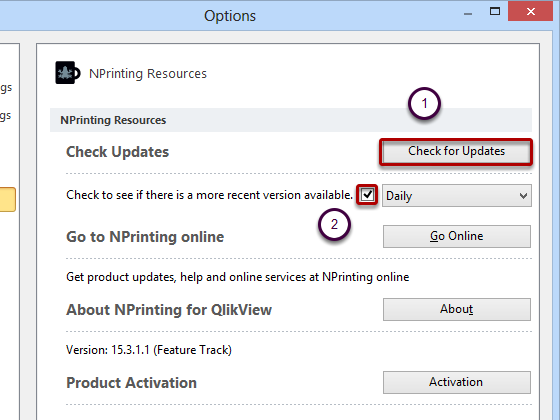 The NPrinting Resources page gives access to a series of buttons that trigger procedures, lead to a page of information, or set a parameter.
- Check Updates
- Check for Updates button: click on this to see whether you have the latest version or not.
- If the box immediately below Check Updates is checked, you will be notified if there is a newer version available on opening NPrinting at the frequency you select from the menu that drops down when you click on the button below the Check for updates button.
- Go to NPrinting online: find regular updates, help, and tutorials on our website by clicking on the Go Onlinebutton
- About NPrinting: clicking on the About button opens a a window providing information about NPrinting. Find the NPrinting version number and the version of QlikView that it is compatible with just under About NPrinting.
- Product Activation: clicking on the Activation button takes you to another dialog window where you can begin one of two activation processes
Thanks,
Nandu.
- Mark as New
- Bookmark
- Subscribe
- Mute
- Subscribe to RSS Feed
- Permalink
- Report Inappropriate Content
Great! Thanks!
