Unlock a world of possibilities! Login now and discover the exclusive benefits awaiting you.
- Qlik Community
- :
- Support
- :
- Support
- :
- Knowledge
- :
- Member Articles
- :
- Dynamic Report Naming
- Edit Document
- Move Document
- Delete Document
- Subscribe to RSS Feed
- Mark as New
- Mark as Read
- Bookmark
- Subscribe
- Printer Friendly Page
- Report Inappropriate Content
Dynamic Report Naming
- Move Document
- Delete Document and Replies
- Mark as New
- Bookmark
- Subscribe
- Mute
- Subscribe to RSS Feed
- Permalink
- Report Inappropriate Content
Dynamic Report Naming
Nov 9, 2015 10:07:24 AM
Nov 9, 2015 10:07:24 AM
The names you give your reports can be crucial for aiding people to access the right information quickly. Control the names assigned to your reports with NPrinting by creating static elements in report names as well as inserting arbitrary text, variable elements like cycle field values, and the values of QlikView variables. This tutorial explains how to use the NPrinting dynamic report naming feature.
Enable Dynamic Naming
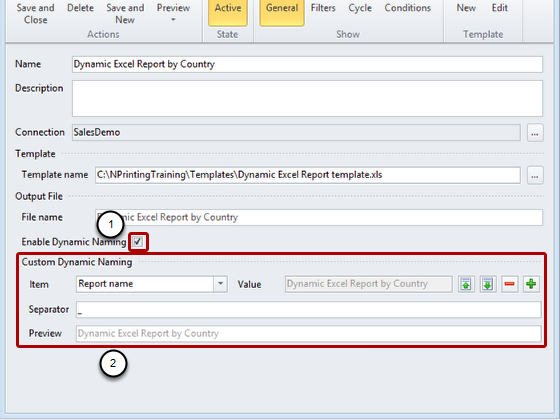
- Put a check mark in the dynamic naming check box by clicking on it
- The Custom Dynamic Naming section appears. This allows you to add different elements to your report names
Add Elements to Your Report Names
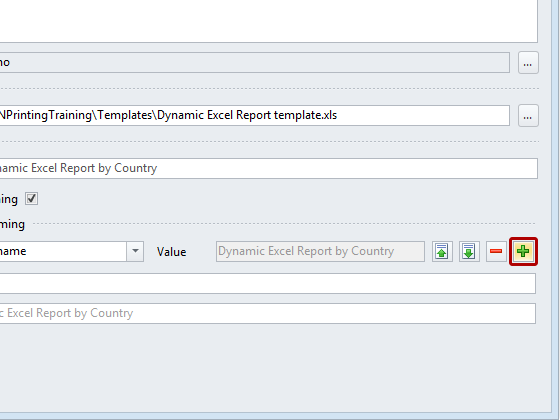
Click on the green '+' sign to add another element to the names of your reports. Add more that one if need be.
Select Item Type
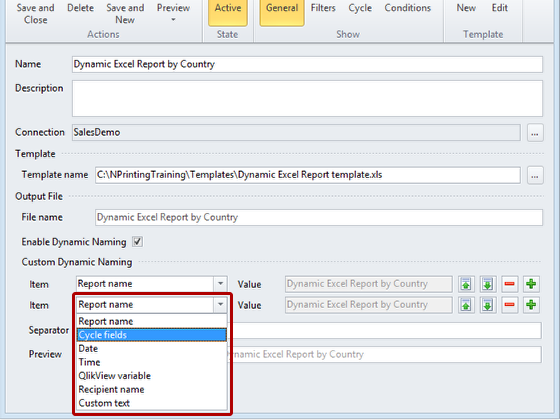
Select the element you want to use from the drop down menu; the following elements are available:
- Report name
- Cycle fields
- Date the report was generated
- Time of day the report was generated
- QlikView variable value of any QlikView variable existing at the time the report is produced
- Recipient name
- Custom text conforming to Windows file name standards
Select from Various Format Options for Date

Open the drop-down menu and select a format.
Choose Separator
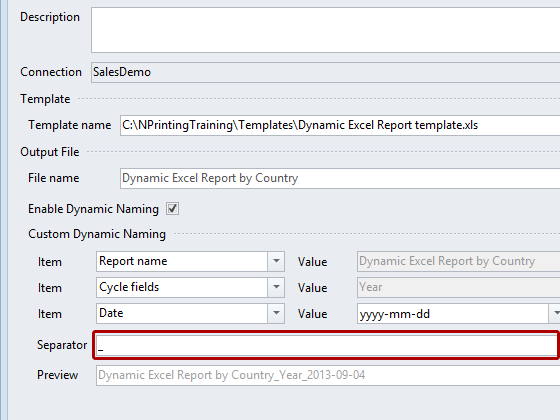
Select a Separator to divide the elements of the report name, the underscore is the default.
Preview The Report Name
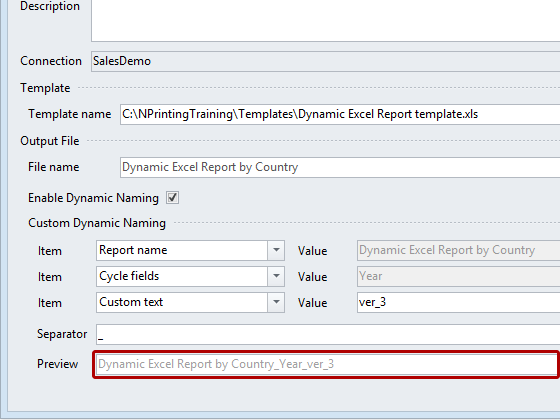
The report name is displayed in the Preview field at the bottom of the Output File area; variable values are represented by the name of the variable. Note the Custom text field added here in place of the Date field.
Changing The Order Of Elements In Report Names
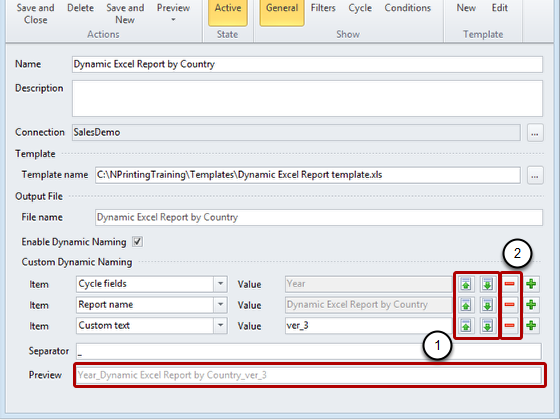
- You can move elements to the left and right in the report name by clicking on the green up and down arrows. Moving an element up shifts it to the left in the name.
- You can delete single elements by clicking on the red '-'
- Move Comment
- Delete Comment
- Mark as Read
- Mark as New
- Bookmark
- Permalink
- Report Inappropriate Content
If the user would like to see this dynamic report name in the newsstand, how do you do it?