- Subscribe to RSS Feed
- Mark as New
- Mark as Read
- Bookmark
- Subscribe
- Printer Friendly Page
- Report Inappropriate Content
In today's data-driven world, where every byte of information matters, integrating artificial intelligence with analytical tools opens up a new realm of possibilities. Following Qlik’s annoucement of its new OpenAI Connector, we will be trying it out in this post and seeing different ways it can be used to seamlessly bring generative AI content to augment your Qlik data.
The OpenAI connector serves as a bridge between your Qlik Sense apps and OpenAI's robust generative AI models, such as the ones powering ChatGPT.
With it, you can bring a new level of contextual understanding and analytical depth to your applications, enhancing the way you comprehend and utilize your data.
In the upcoming sections of this post, we will start by taking a look at how you can directly tap into OpenAI’s completion API using the simple REST connector, then we will jump into how to do the same in a much simpler way using the new OpenAI Analytics connector.
Before you start, you need to:
- Sign up for an OpenAI account: https://platform.openai.com/
- Create a new API key
- In Qlik Cloud Managment console, make sure to enable “Learning endpoints” under “Feature control” in the Settings section:
1/ Using the REST connector to call OpenAI’s completion API:
First, let’s prepare our data. After loading our customer reviews table, we need to prepare both our data and prompt so that we can send it as part of the request body to the completion API endpoint.
You can view all the details on the documentation: https://platform.openai.com/docs/api-reference/completions/create
But we basically need to first convert our data into JSON format, concatenate it with our prompt sentence, then inject it into the request body.
[Reviews]:
First 25
LOAD
    review_id,
    product_id,
    product_name,
    customer_id,
    customer_name,
    review_title,
    review_text,
    review_date,
    verified_purchase,
    recommend_product
FROM [lib://DataFiles/reviews-data.csv]
(txt, codepage is 28591, embedded labels, delimiter is ',', msq);

// turn data into json:
[InputField_JSON]:
Load
 'Reviews: [' & Concat( '{review_date: ' & review_date & ', review_title: ' & review_title & ', review_text: ' & review_text & ', product_name: ' & product_name & ', customer_name: ' & customer_name & ', recommend_product: ' & recommend_product & ' }', ',') & ']' as json
RESIDENT Reviews;
LET vDataInput = Peek('json');

// construct prompt
LET prompt = 'You are a data analyst, you will summarize the following data into the top products based on reviews and give the names of customers who made negative comments.';

TRACE vprompt = '$(prompt)';

// construct request body for openAI request
LET requestBody = '{
  "model": "text-davinci-003",
  "prompt": "$(prompt) Source: $(vDataInput)",
  "max_tokens": 2048,
  "temperature": 0
}';

LET requestBody = Replace(requestBody, '"', Chr(34)&Chr(34));

TRACE vRequestBody = '$(requestBody)';
In the above script, we turned the Reviews data into a JSON-formatted string and stored it in the “vDataInput” variable, we then created the prompt phrase asking the model to summarize the data and return top products based on the reviews as well as the names of customers who gave bad reviews.
Finally, we constructed the request body for the POST request that will be used in the REST API call below.
Notice that the model chosen is text-davinci-003, the prompt is the combination of our 2 variables, and max_tokens is set to a higher number to allow for a bigger response.
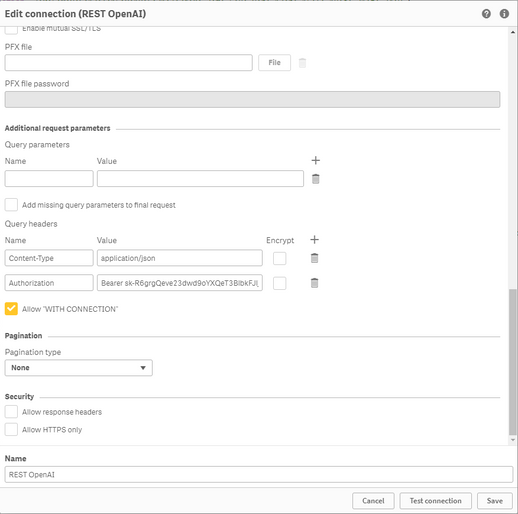
Next, we create the REST API connection and make sure to to check “Allow With Connection”:
Finally, Save the newly created connection, then click on “Select Data” under the connection name, choose Root and insert Script to get the following:
(P.S: I have edited the generated script to add the “WITH CONNECTION statement injecting the requestBody variable as the Body of the request”):
LIB CONNECT TO 'REST OpenAI';

RestConnectorMasterTable:
SQL SELECT
	"id",
	"object",
	"created",
	"model",
	"__KEY_root",
	(SELECT
		"text",
		"index",
		"logprobs",
		"finish_reason",
		"__FK_choices"
	FROM "choices" FK "__FK_choices"),
	(SELECT
		"prompt_tokens",
		"completion_tokens",
		"total_tokens",
		"__FK_usage"
	FROM "usage" FK "__FK_usage")
FROM JSON (wrap on) "root" PK "__KEY_root"

WITH CONNECTION
(BODY "$(requestBody)" );


[OpenAI Response]:
LOAD
	[text] AS response_openai,
	[finish_reason],
	[__FK_choices] AS [__KEY_root]
RESIDENT RestConnectorMasterTable
WHERE NOT IsNull([__FK_choices]);

JOIN([OpenAI Response])
LOAD
	[prompt_tokens],
	[completion_tokens],
	[total_tokens],
	[__FK_usage] AS [__KEY_root]
RESIDENT RestConnectorMasterTable
WHERE NOT IsNull([__FK_usage]);

DROP TABLE RestConnectorMasterTable;
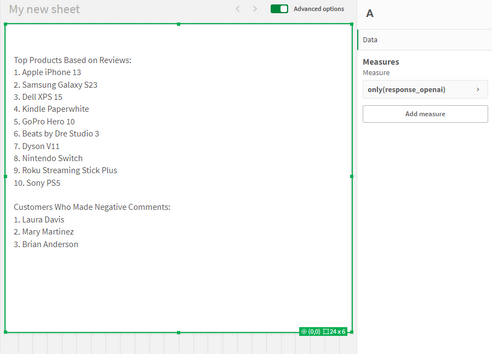
Once we hit “Load Data”, we can jump to a sheet to view the response:
Great, after inserting the “response_openai” field into a Text & Image object, we can see that the model returned the answers accuretly!
Keep in mind that you can use this method in Qlik Enterprise as well.
2/ Using the new OpenAI Connector:
There are 2 different configurations of this connector to send data to the endpoint service:
-
OpenAI Completions (GPT-3) and OpenAI Chat Completions (GPT-3.5, GPT-4) – Rows:
This will send each row of data as a question to the completion api and each response will be stored as text in a table with the same number of rows as the input.
-
OpenAI Completions (GPT-3) – JSON Tables: This will send a request on each row, where the response is expected to be a JSON list of data. The connector will convert the JSON table into a table of data in the Qlik Data Model.
2.1/ Rows:
First, we load the Reviews table into Qlik and include a new field for the prompt, where we ask the model to suggest actions to be taken in order to improve sales based on the reviews customers have left for each product.
[Reviews]:
First 25
LOAD
    review_id,
    product_id,
    product_name,
    customer_id,
    customer_name,
    review_title,
    review_text,
    review_date,
    verified_purchase,
    recommend_product,
    'Based on the review with title: '& review_title & ' about product ' & product_name & ' customer "' & customer_name & '" said ' & review_text & ', what action would you suggest based on this feedback to improve sales?' as prompt
FROM [lib://DataFiles/reviews-data.csv]
(txt, codepage is 28591, embedded labels, delimiter is ',', msq);
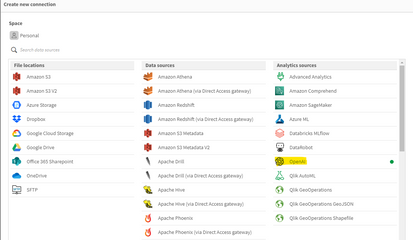
Then, we create a new OpenAI Data Connection:
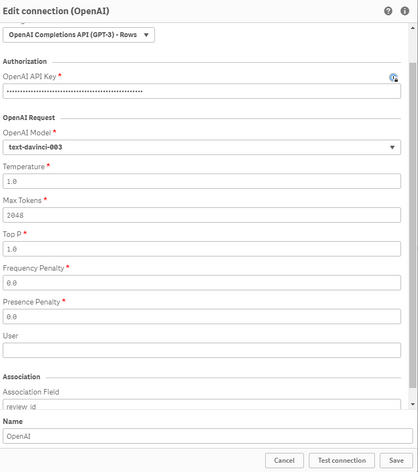
Select OpenAI Completions (GPT-3) - Rows, insert your API Key, and make sure to increase the Max Tokens to a higher number to allow for a bigger response from the API.
We set the association field to “review_id” to connect the OpenAI generated data with our Reviews table.
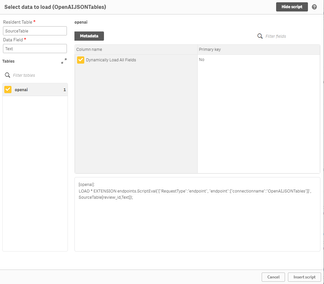
We then use the Select Data wizard and enter “Reviews” as the Resident Table.
The Data Field is the prompt field we previously added to our table.
With that inserted, this is how the complete load script should look like:
[Reviews]:
First 25
LOAD
    review_id,
    product_id,
    product_name,
    customer_id,
    customer_name,
    review_title,
    review_text,
    review_date,
    verified_purchase,
    recommend_product,
    'Based on the review with title: '& review_title & ' about product ' & product_name & ' customer "' & customer_name & '" said ' & review_text & ', what action would you suggest based on this feedback to improve sales?' as prompt
FROM [lib://DataFiles/reviews-data.csv]
(txt, codepage is 28591, embedded labels, delimiter is ',', msq);

[openai]:
LOAD
	[id],
	[object],
	[created],
	[model],
	[prompt_tokens],
	[completion_tokens],
	[total_tokens],
	[choices.text],
	[choices.index],
	[choices.logprobs],
	[choices.finish_reason],
	[review_id]
EXTENSION endpoints.ScriptEval('{"RequestType":"endpoint", "endpoint":{"connectionname":"OpenAI"}}', Reviews{review_id,prompt});
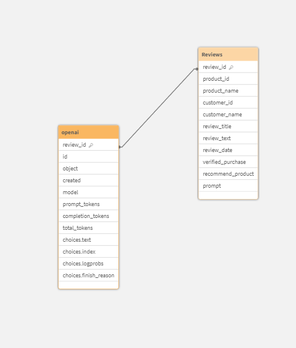
Once the data is loaded, we can now inspect the data model and see the relation between the newly generated openai table and our Reviews table:
Finally, we create a sheet with our Reviews table fields in a table, and a Text & Image object where we put the [choices.text] field which contains the OpenAI response.
For instance:
when selecting a good Review:
when electing a bad Review:
Alternatively, you can call the connection directly from a chart and pass in the prompt.
For instance, here we add a Text & Image object, and add the ScriptAggrStr expression to ask the model to give a general sentiment on a product regarding its price and performance.
If(GetSelectedCount(product_name)>0,
endpoints.ScriptAggrStr('{"RequestType":"endpoint", "endpoint":{"connectionname":"OpenAI","column": "choices.text"}}', 'How do customers feel about ' & product_name & 'in regards to its price and performance')
,'Please select a product to see results')
2.2/ Rows with a JSON prompt
What if instead of sending each row data as a prompt to the completion API, we want to send the whole Reviews dataset and get a general insight based on that.
In this case we can re-use our data to JSON transformation we did in Section 1 of the post, and create and inline table with one row that contains our prompt along with this JSON formatted data, then simply use the “OpenAI Completions - Rows” config to get our response:
Here is how the load script looks like:
// Open AI - Rows call - JSON
[Reviews]:
First 25
LOAD
    review_id,
    product_id,
    product_name,
    customer_id,
    customer_name,
    review_title,
    review_text,
    review_date,
    verified_purchase,
    recommend_product
FROM [lib://DataFiles/reviews-data.csv]
(txt, codepage is 28591, embedded labels, delimiter is ',', msq);

// Turn Reviews Table into JSON

[InputField_JSON]:
Load
 '" {"Reviews" : [' & Concat( '{"review_date": "' & review_date & '", "review_title": "' & review_title & '", "review_text": "' & review_text & '", "product_name": "' & product_name & '", "customer_name": "' & customer_name & '", "recommend_product": "' & recommend_product & '" }', ',') & '] }"' as json
RESIDENT Reviews;

LET vDataInput = Peek('json');

// Build Prompt text

SET vPrompt = 'Based on the following dataset, what insights can you retrieve, what strategies could I implement to improve customer satisfaction, and which products should I focus on to improve their sales. Dataset: ';
SET vText = $(vPrompt) $(vDataInput);
TRACE vdata = $(vText);

// Load into table

[TableWithData]:
LOAD
	RowNo() as RowId,
  '$(vText)' as Text
AUTOGENERATE 1;


[openai]:
LOAD * EXTENSION endpoints.ScriptEval('{"RequestType":"endpoint", "endpoint":{"connectionname":"OpenAIJSONTables"}}', TableWithData{RowId,Text});
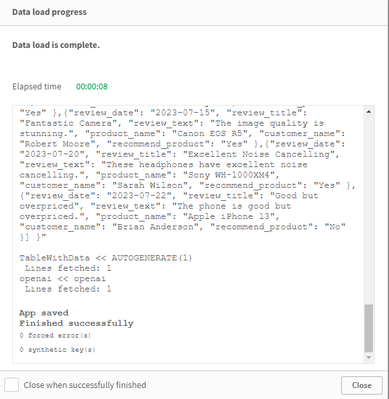
Notice once the data is loaded that all our dataset is sent as part of the prompt.
Once we load the data, we add a Text & Image object and insert the [choices.text] field to view the AI generated response:
2.3/ JSON Tables
Lastly, let’s explore how the JSON Tables config of the OpenAI Connector works to return a table of data:
First, we create the connection and choose the appropriate configuration (make sure to increase the Max Tokens)
The laod script is simple, we have an inline table with a Text field containing our prompt, followed by the OpenAI load statement generated through the Select Data wizard.
SourceTable:
NoConcatenate
LOAD
RowNo() as RowId,
Text
Inline
[Text
top 10 Countries by Population. Extract as JSON list];

[openai]:
LOAD * EXTENSION endpoints.ScriptEval('{"RequestType":"endpoint", "endpoint":{"connectionname":"OpenAI TABLES"}}', SourceTable{RowId,Text});
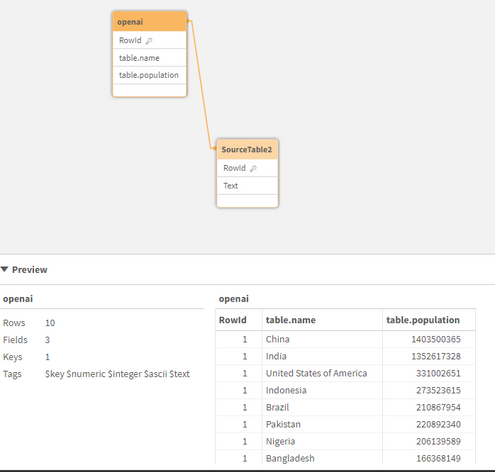
Once the data is loaded, we can check the Data model and preview the openai table.
Notice that we now have a table with the top 10 countries by population. This data can be used to generate analytics content without refering again to openai.
Attached, you will find the QVF of the example app. Within the Data Load Editor, each example is broken into its own section that ends with an EXIT SCRIPT. You can drag the section to the top to only load that specific example.
More things to consider:
- Using OpenAI connector inside Qlik Application Automation: https://community.qlik.com/t5/Official-Support-Articles/How-to-Getting-started-with-the-OpenAI-Conne...
Useful Resources:
- https://www.youtube.com/watch?v=R9ScDzEU9DQ
- https://www.youtube.com/watch?v=XCaaRenozb8&t=502s
- https://www.youtube.com/watch?v=qfGWKXAAKNI
- https://help.qlik.com/en-US/cloud-services/Subsystems/Hub/Content/Sense_Hub/LoadData/ac-openai-use.h...
I hope you found this post useful and you were able to get a better understanding on how the new OpenAI Connector works to bring generative AI content to augment your existing Qlik Sense applications.
Thank you for reading.
You must be a registered user to add a comment. If you've already registered, sign in. Otherwise, register and sign in.


