- Move Document
- Delete Document and Replies
- Mark as New
- Bookmark
- Subscribe
- Mute
- Subscribe to RSS Feed
- Permalink
- Report Inappropriate Content
How to Create and Import Recipients with Filters and Distribution Groups
NPrinting recipients are people, directories or e-mail addresses that you want to send output to. With NPrinting you can create recipients manually or import them from a variety of sources including:
- Directory Service via LDAP
- Excel, Text and Access files
- Databases including Oracle and SQL server
When importing recipients, you can:
- Import rich data related to them including delivery and filtering information
- Assign recipients to distribution groups. This means they will automatically begin receiving reports if the distribution group is associated with a Report Task
- Activate and de-activate recipients; recipients which are de-activated may be associated with Report Tasks, but they will not receive reports because they are not in an active state
- Import security information including an encryption ID and QlikView section access user ID and password
- NPrinting will automatically delete Recipients when the task that imported them is rerun and the Recipients are no longer present in the data source. See: How to Delete Recipients Automatically When Importing
You can save import parameters and create Recipient Import Tasks which will periodically check the data source for new and modified recipients and load these into NPrinting.
Download the NPrinting Training environment which may be found here NPrinting Training Material contains all files show in this tutorial. Extract the NP_Training.zip into the C:\NPrintingTraining folder.
NOTE: do NOT modify the recipient import file such that additional sheets are added. The file is a single sheet only. NPrinting does not support the use of a multi sheet xlsx recipient import file.
Open Recipient Editor to Create Recipient Manually
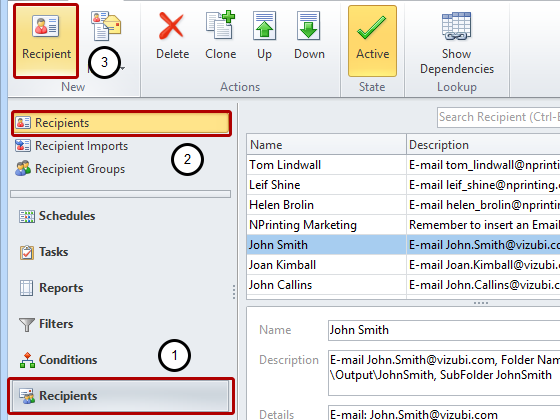
- Select Recipients in the lower left navigation pane
- Select Recipients in the upper left navigation pane
- Click on Recipient in the New group of the tool bar
Configure Recipient - Identity & Distribution
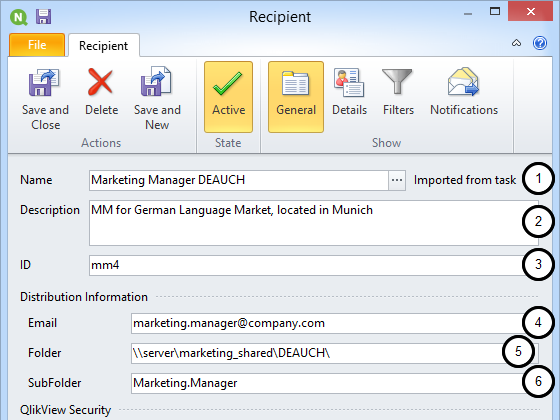
- Name: enter the recipient name, title or other identifier
- Description: (optional) field to help identify recipient
- ID: (optional) alpha-numeric field to assign a unique identifier to the recipient. If empty, entry in Name is used as the primary key in the recipient database. If ID is entered it acts as the primary key in the recipient database and Name becomes a secondary key.
- Email: enter an e-mail address or a comma separated list of multiple e-mail addresses if needed
- Folder: enter the path to a distribution folder where the recipient can find her/his reports (optional)
- SubFolder: enter the name for a subfolder to the above folder (optional)
Configure Recipient - Security & Encryption
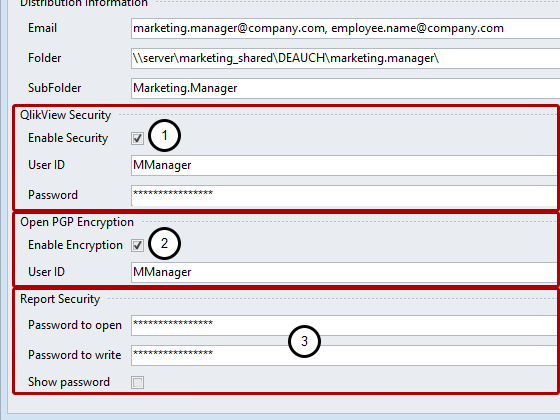
- Optionally enable QlikView Security: activates Section Access filtering of reports. Enter Section Access User ID and Password, see: Can I use Section Access with NPrinting?
- Optionally enable Encryption: activates Open PGP Encryption. Enter User ID registered in Kleopatra, see: How to Use OpenPGP Encryption with NPrinting
- Optionally set a Password to open and/or one to write reports
Configure Recipient - Details
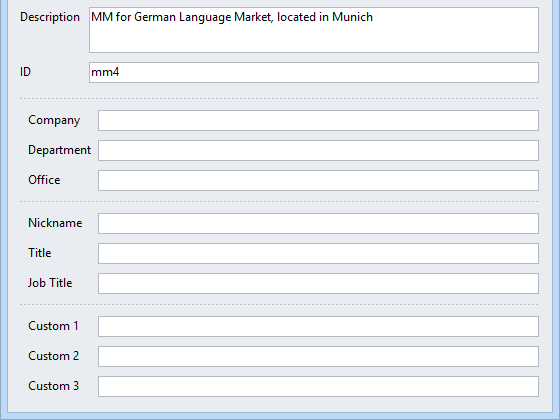
Recipients have the new Details tab that contains the following fields:
- Company
- Department
- Office
- Nickname
- Title
- Job Title
- Custom 1
- Custom 2
- Custom 3
All these fields are usable in email messages and can be set manually or imported by the Recipient Imports entity.
Configure Recipient - Filters
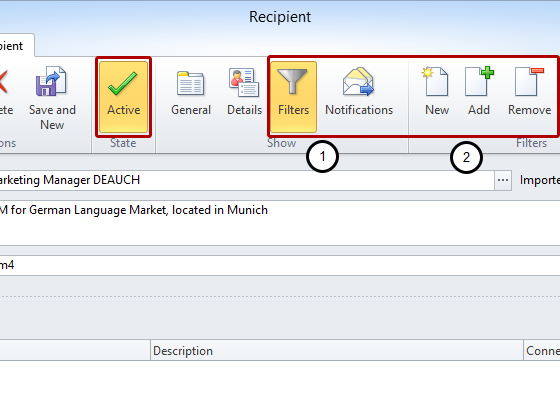
Manage recipient filters manually:
- Select Filters in the Show group of the tool bar
- Create New, Add, Remove, or reorder recipient filters by clicking the icons in the Filters group of the tool bar, see: How to Add Filters to Recipients
When sending reports to a recipient, all active recipient, task and report filters will be applied in the order: Task - Recipient – Report. Filters in an entity are applied sequentially in the listed order from top to bottom.
Filters created in the Recipient are not public and so, not available for independent application.
Define New Import Recipient Entity
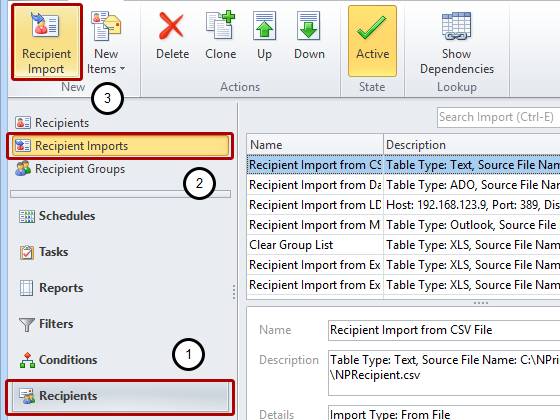
- Select Recipients in the lower left navigation pane
- Select Recipient Imports in the upper left navigation pane
- Click on Recipient Import in the New group of the tool bar
Import from File
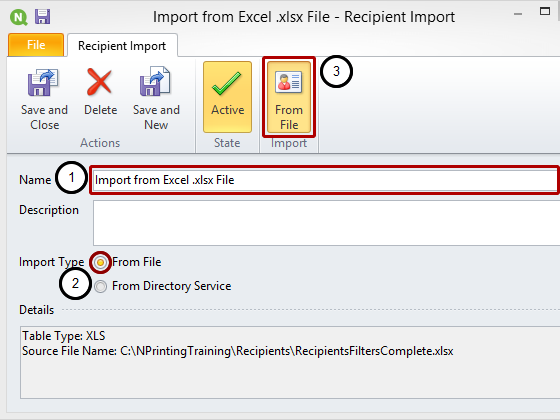
- Enter a Name for your Recipient Import entity
- Select Import Type From File
- Click on the From File icon in the Import group of the tool bar
NPrinting can import recipients from a variety of sources including text and Excel files, directory services using LDAP, as well as from Access, SQL Server, Oracle and many other databases through an ADO connection. When you import recipients, you need to map the information NPrinting needs to the columns in your recipient source. Once you do this, you can save your import parameters. You can then create an "Import Recipients" Task which you can schedule to check your recipient source regularly and import new and modified recipients.
We use an Excel file for simplicity in this example, but the steps are essentially the same for all sources.
Recipient Import Wizard: Select Your Source Type
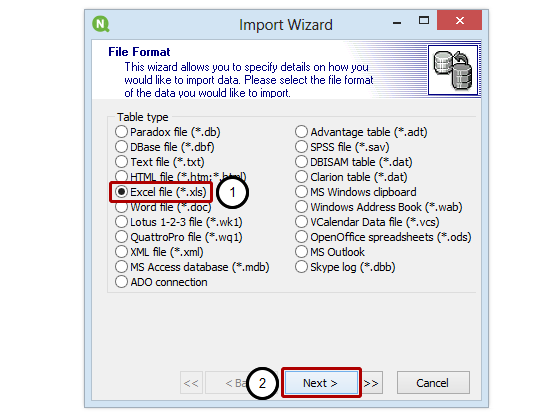
Here we select the File Format of the source for our recipients. Use the ADO connection for databases other than MS Access.
- Select the source File Format, Excel file (*.xls) even if your source file is an Excel 12 Workbook (*.xlsx) file
- Click on the Next button
Recipient Import Wizard: Select Your Source File
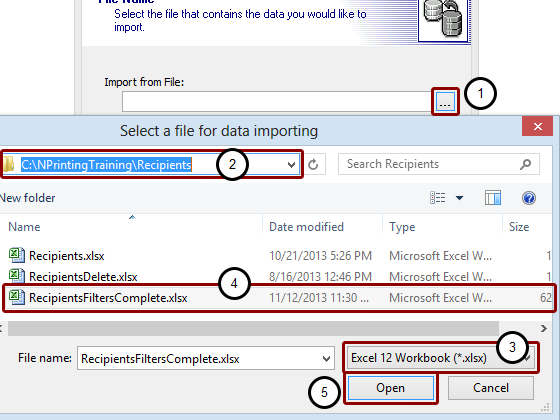
- Click on the browse button to find your source file
- Browse to C:\NPrintingTraining\Recipients\
- You will need to change the file type if it is different from Excel spreadsheet (*.xls)
- Select your source file, RecipientsFiltersComplete.xlsx in our case
- Click on the Open button
Recipient Import Wizard: Confirm File Selection

Click on Next to confirm your selection.
Recipient Import Wizard: Setting format parameters
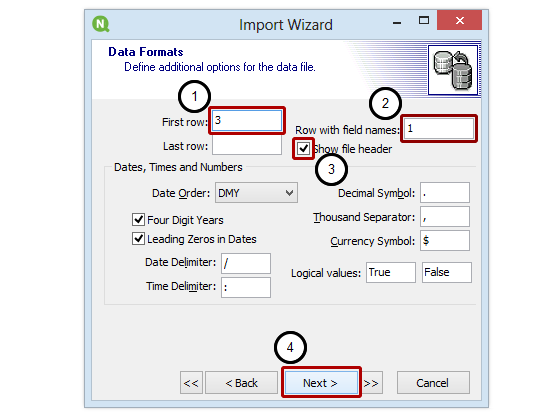
Set the Data Formats parameters for the file you are importing. In this case:
- The First row is set to 3 because the first two rows of the Excel file do not contain data
- The row 1 contains field names
- Show file header is selected because row 3 contains column headings
- Click on Next
Recipient Import Wizard: Mapping Columns
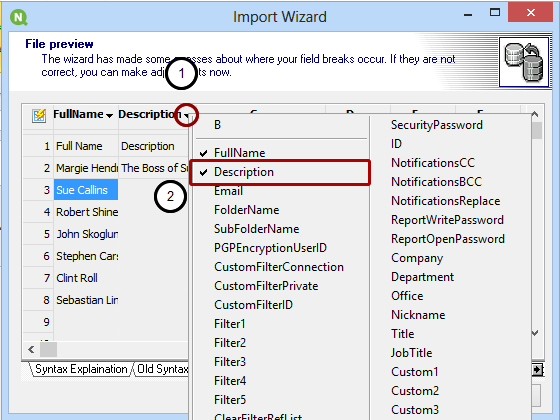
Map the columns in your Excel file to the NPrinting fields to create your recipients. A description of the function of various NPrinting fields and the syntax for them is in the NPrinting Help file under the heading "Import recipients with filters & groups". See also: Filter Syntax, Parameters, and Options for Importing Recipients
- Open the drop-down menu by clicking on the black triangle
- Select the NPrinting field you want to map to that column
- Click on the Next button to confirm your selections after having mapped all the fields that interest you (button hidden under NPrinting field selection window)
The only mandatory field is the Recipient Name (FullName) so be sure to map it. If you don't map an Excel column it will not be imported. You can also map CC and BCC adresses.
Execute Recipient Import
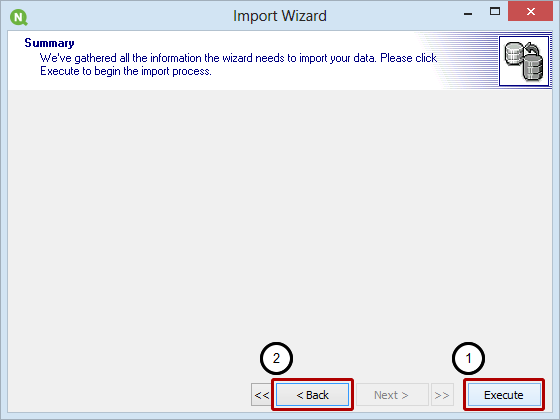
- Click on Execute to import recipients and save import parameters
- Click Back to go back and change import parameters
Load Recipients and Save Configuration

- Click on Import to load recipients from your Excel file
- Click on Save to save the import parameters; you can now create an Import Recipients Task which can check your source file for new and/or modified recipients on a scheduled basis using these parameters
Save Recipient Import Entity
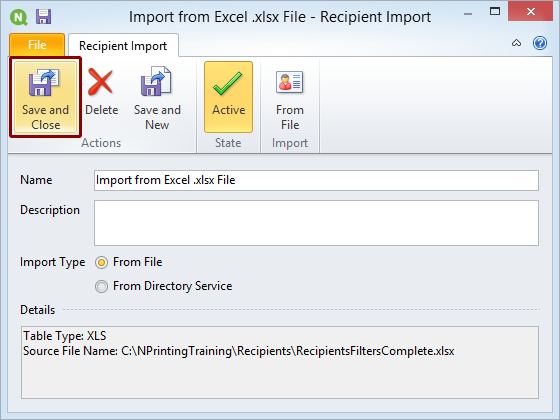
Click on the Save and Close icon to save the Recipient Import entity. It contains all the parameters you set in the previous steps.
Open Import Recipient Task Editor
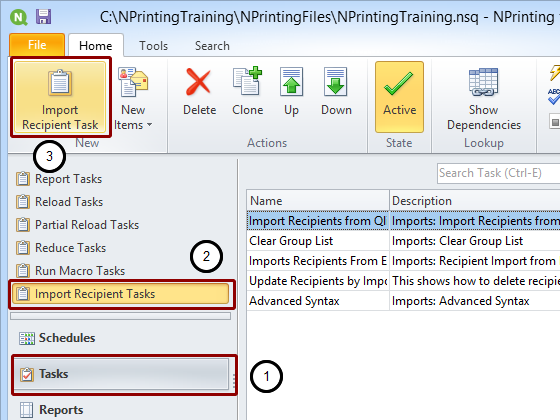
- Select Tasks in the lower left navigation pane
- Select Import Recipient Tasks in the upper left navigation pane
- Click on the Import Recipient Task icon in the New group of the tool bar
Configure Import Recipient Task
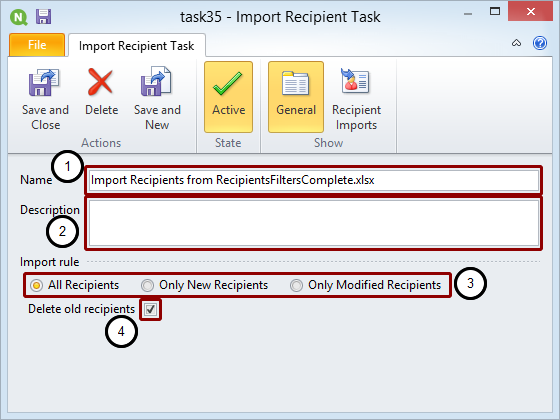
- Enter a Name for your new Import Recipient Task
- Enter a Description (optional)
- Select one of the following:
- All Recipients
- Only New Recipients
- Only Modified Recipients
- Put a check mark in the Delete old recipients box if you want to purge recipients that have been deleted from the data source on this and subsequent runs of this same task. See: How to Delete Recipients Automatically When Importing
Open Select Recipient Imports Window
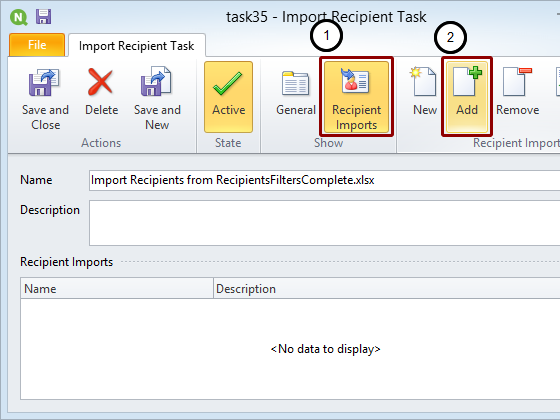
- Select the Recipient Imports icon
- Click on the Add icon
Select Recipient Import Entity
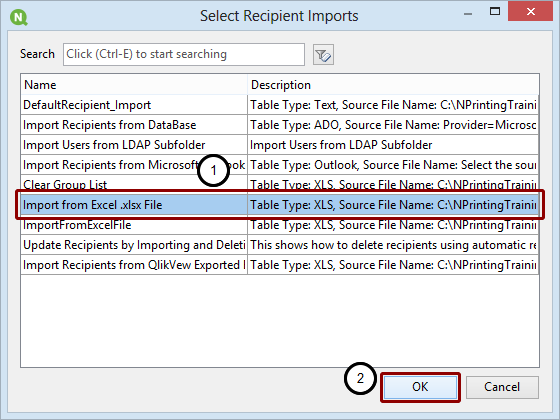
- Select the Import Recipient entity that you prepared previously in this tutorial: Import from Excel .xlsx File
- Click on the OK button
Save Your Import Recipients Task
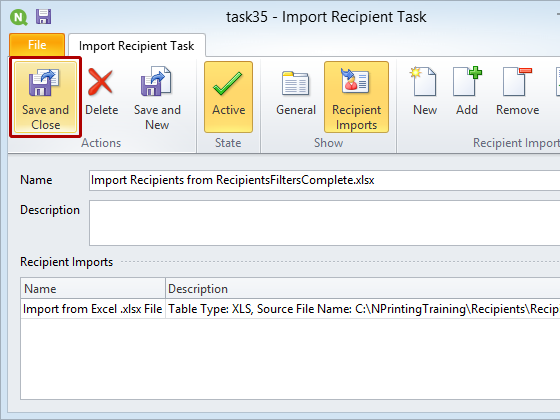
Click on the Save and Close icon.
Check Your Import Recipients Task
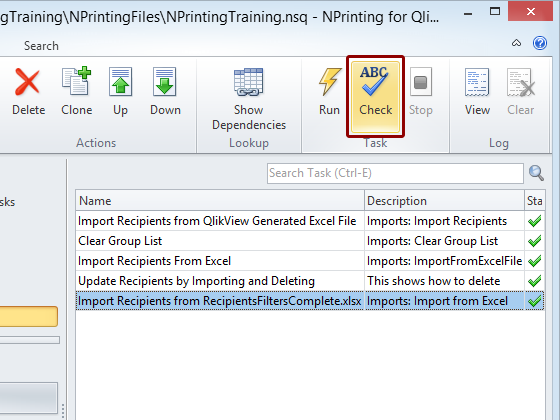
Run your task without sending any output to see if any error messages are registered in the log file.
View Log
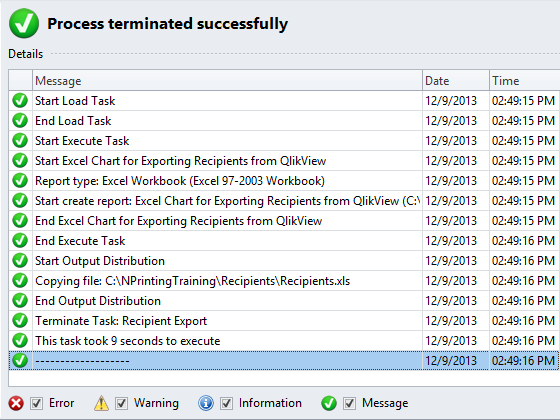
Success!
- Move Comment
- Delete Comment
- Mark as Read
- Mark as New
- Bookmark
- Permalink
- Report Inappropriate Content
Hello,
the link Filter Syntax, Parameters, and Options for Importing Recipients seems not working anymore.
Best regards
Johann
- Move Comment
- Delete Comment
- Mark as Read
- Mark as New
- Bookmark
- Permalink
- Report Inappropriate Content
We are looking into it.
You may refer to this link for the time being.
Filter Syntax, Parameters, and Options for Importing Recipients
- Move Comment
- Delete Comment
- Mark as Read
- Mark as New
- Bookmark
- Permalink
- Report Inappropriate Content
Is it possible to connect to a database table in 17.2? Or rather, what are the import options in 17.2 besides excel?
- Move Comment
- Delete Comment
- Mark as Read
- Mark as New
- Bookmark
- Permalink
- Report Inappropriate Content
It Would be great if there is a newer version for Nprinting 17.