Unlock a world of possibilities! Login now and discover the exclusive benefits awaiting you.
Recent Documents
-
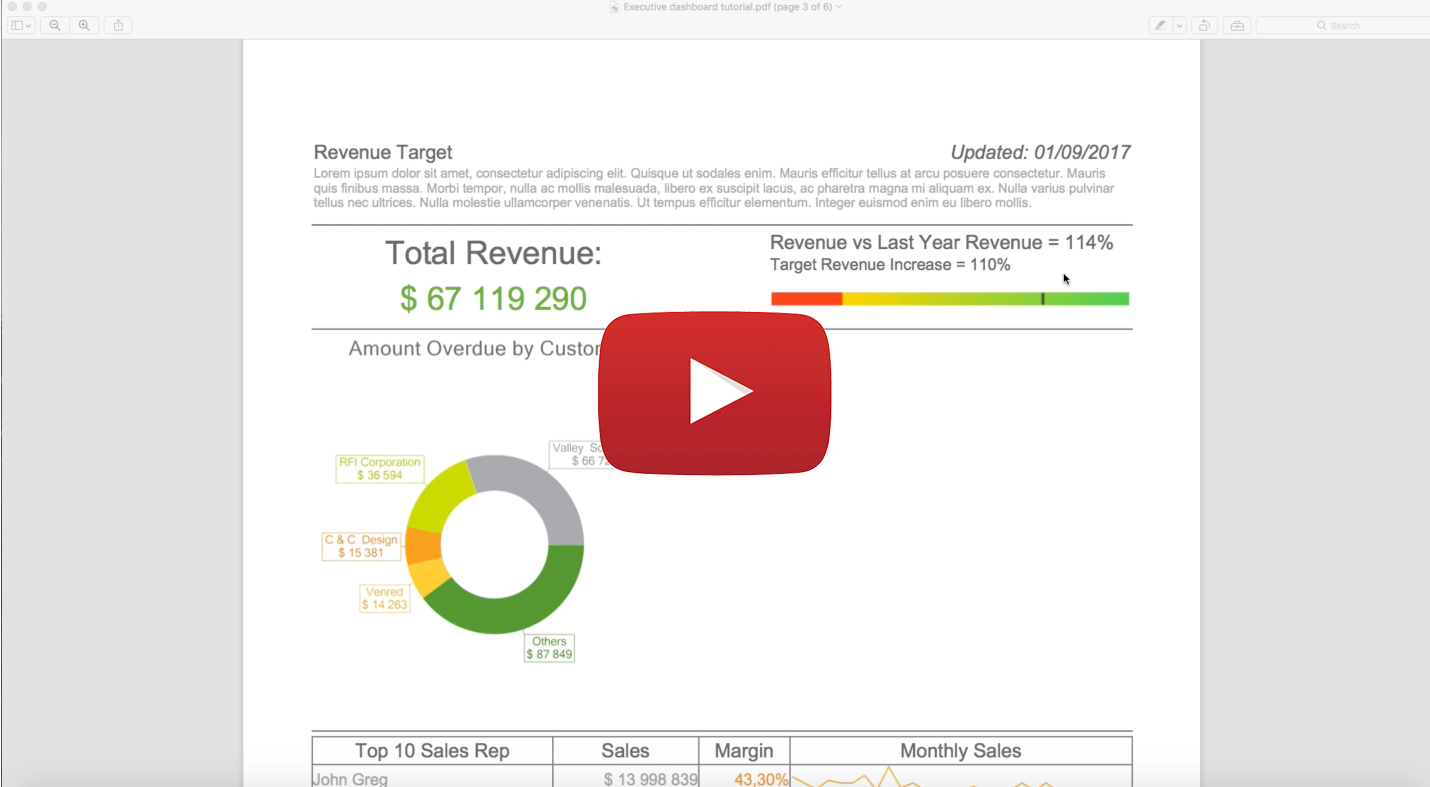
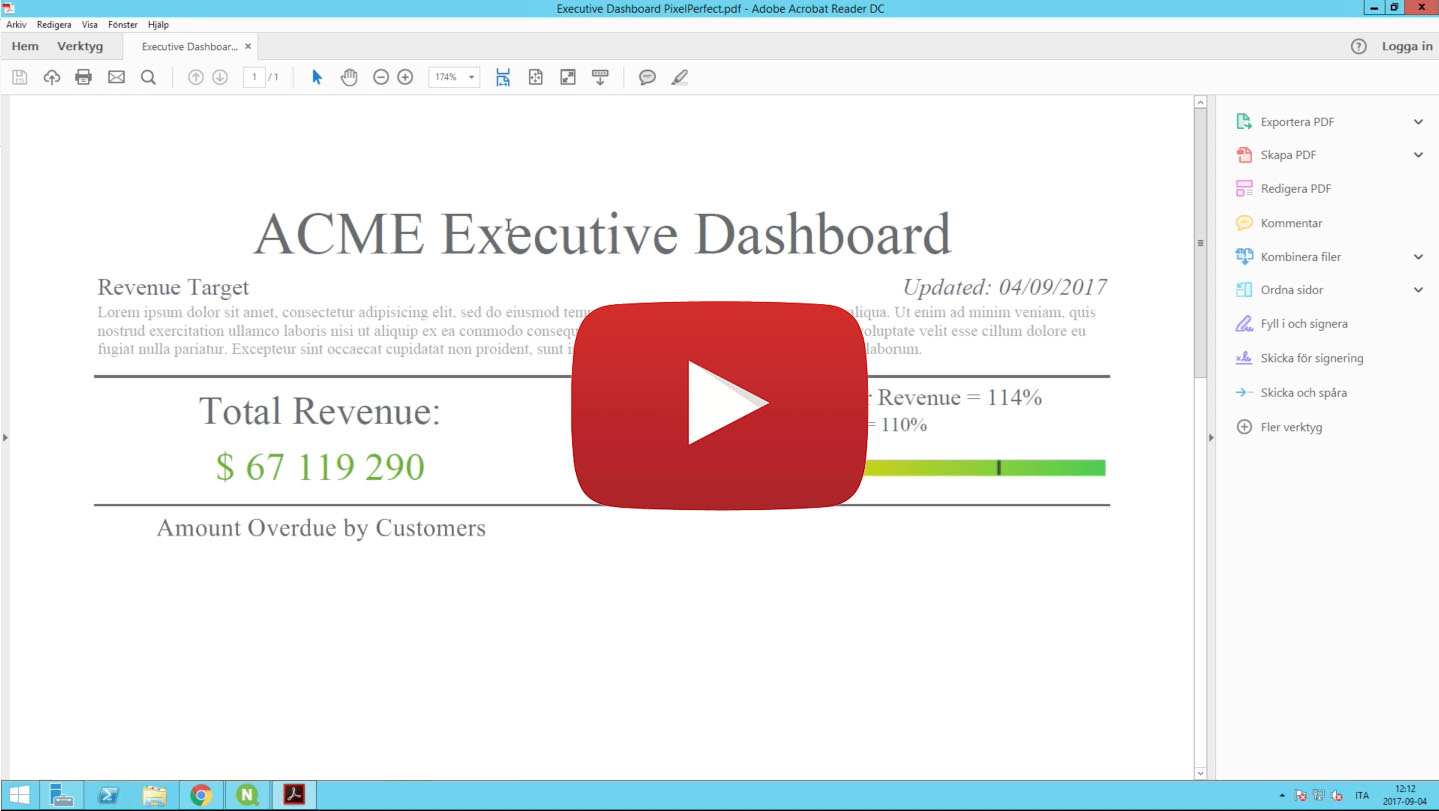
Working with Qlik NPrinting PixelPerfect reports
This video series is designed to introduce you the Qlik NPrinting PixelPerfect report editor.You can download this tutorial version also in PDF. The P... Show MoreThis video series is designed to introduce you the Qlik NPrinting PixelPerfect report editor.
You can download this tutorial version also in PDF. The PDF contains all the formulas that are used in these tutorials.
-
Import a Filter based on More than One Field in Qlik NPrinting via Excel
When importing Qlik NPrinting users from an Excel file, it is possible also to create filters that made selections on more than one field. Be sure to ... Show MoreWhen importing Qlik NPrinting users from an Excel file, it is possible also to create filters that made selections on more than one field.
Be sure to know the content of https://help.qlik.com/en-US/nprinting/May2022/Content/NPrinting/DeployingQVNprinting/Import-Users-Filters.htm#anchor-2 before proceedeing.
This article is valid for all Qlik NPrinting versions that supports users import via Excel file.
The sample file is attached.
In the Filters worksheet of the source Excel file create a row like the following:
In the column Values there are selections based on two fields: [Country]={Austria, Belgium},[CategoryName]={Babywear, Sportswear}. As you can see you have to simply separate the selections on each field by a comma.
In the column Numeric values there is the selection [Year]={2019} that also will be part of the created filter.
Create an Import Task as usual and run it. The result will be a new filter like:
It includes all the selections based on different fields we inserted in the Excel file and:
they have the correct setting in the drop-down menu.

-
NPrinting Audit Trail Application
The NPrinting Audit Trail application is a Qlik Sense application that is intended to be run in Qlik Cloud, Qlik Sense Enterprise Client-Managed, or Q... Show MoreThe NPrinting Audit Trail application is a Qlik Sense application that is intended to be run in Qlik Cloud, Qlik Sense Enterprise Client-Managed, or Qlik Sense Desktop. This application summarizes and profiles the audited report execution activity of one or more NPrinting sites. It provides a view of the quantity of reports produced that is drillable by format, destination and other dimensions.
The application can help quantify dependencies prior to moving to Qlik Cloud and can also serve as a snapshot of raw reporting volume that exists on a production system.
Please see the attached configuration guide for setup instructions in your own Qlik Sense environment.
Note: If you only use NPrinting with QlikView, you can still use this application provided you have access to a Qlik Sense environment.
SHEETS:
Requirements
- NPrinting Audit Trail Enabled
- NPrinting November 2020+
- Qlik Sense Client Managed August 2022+ or Qlik Sense Desktop August 2022+ or Qlik Cloud

-
Advanced Filters Syntax on Recipients Import
Starting with 15.2, it's possible to import filters specifying the ConnectionName and isNumeric and Evaluate parameters. With 15.3.0.1, you can also i... Show MoreStarting with 15.2, it's possible to import filters specifying the ConnectionName and isNumeric and Evaluate parameters. With 15.3.0.1, you can also import a field that seems numeric as text. This tutorial explains this new syntax.
Read "Filter Syntax, Parameters, and Options for Importing Recipients" prior.
NPrinting New Syntax Explanation
From NPrinting 15.2 and forward, you may use the following syntax:
[connectionName].[field] = {value1<isnumeric,evaluate>,value2<isnumeric,evaluate>,...}<drop,unlock,lock,verify,excluded>
- [connectionName] = name of the connection. By specifying this you can create different filters based on fields with the same names from different connections
- [field] = field name
- value1 = first value of the field to select. You can add as many values as you want
- <isnumeric,evaluate> = if one or both are specified, the correspondent flag will be activated
- <drop,unlock,lock,verify,excluded,clearselections> = filter options, the ones you add will be activated
The old syntax still works. If you use the old syntax you don't need to specify the name of the connection, isNumeric and Evaluate parameters.
Open the Excel Recipients Source File
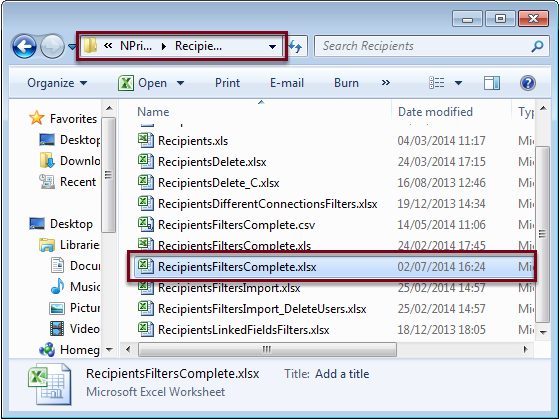
- Go to C:\NPrintingTraining\Recipients
- Double-click on RecipientsFiltersComplete.xlsx
Add a New Worksheet
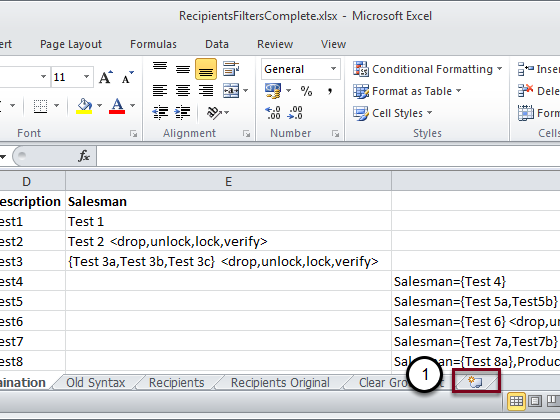
- Click on the New Sheet icon.
Rename the Worksheet
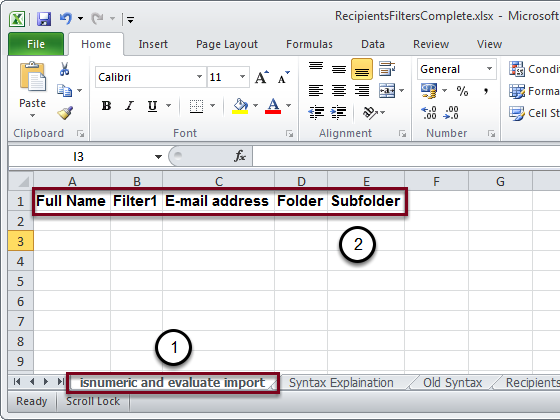
- Rename it to isnumeric and evaluate import
- Create a header row.
Create a New Filter
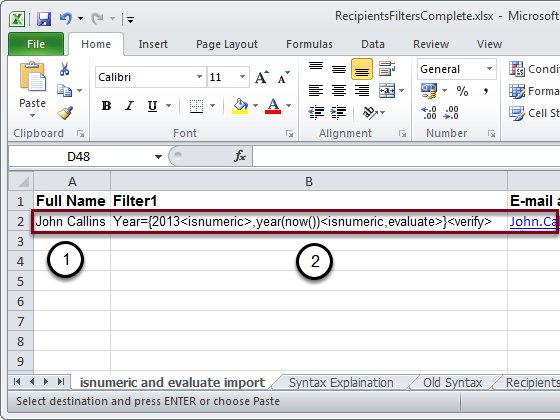
- Full Name: enter a persons name or other identifier
- Filter1: enter Year={2013<isnumeric>,year(now())<isnumeric,evaluate>}<verify>
The other fields aren't mandatory.
If you don't specify the connection name, it will refer to the default connection. Entering this line of code, the Year field is set to two values:
- Numeric value set to 2013
- Formula "year(now())" set to isNumeric and Evaluate. This formula returns the numeric value of the current year. Evaluate is necessary to force the evaluation of the formula.
Verify filter option is activated.
Specify the Connection When Creating a New Filter
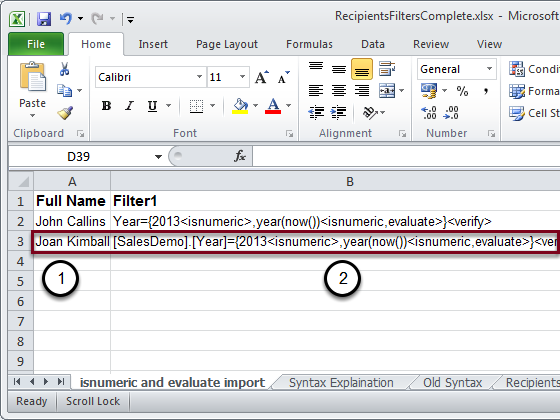
- Full Name: enter another persons name or other identifier
- Filter1: enter [SalesDemo].[Year]={2013<isnumeric>,year(now())<isnumeric,evaluate>}<verify>
In the first part of this line of code the name of the connection of the Field is specified. By specifying this you can create different filters based on Fields from different connections.
Create Two New Filters Referring to Two Different Connections
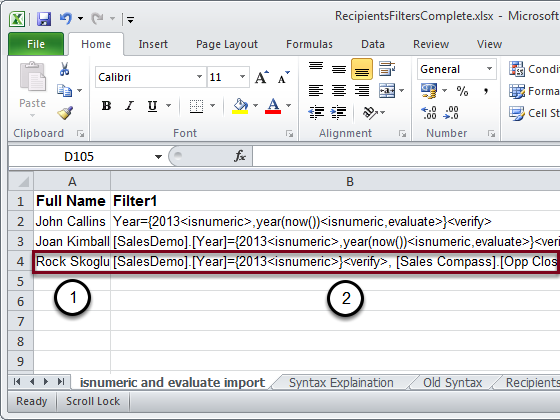
- Full Name: enter another persons name, title or other identifier
- Filter1: enter [SalesDemo].[Year]={2013<isnumeric>}<verify>, [Sales Compass].[Opp Close Year]={2013<isnumeric>}<verify>
In this case two Fields from two different connections are specified. With this new syntax it is possible to create filters based on fields from different connections.
Final Result
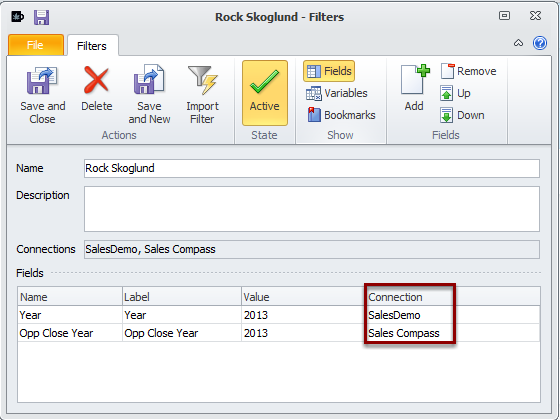
After importing the Recipients, you'll find a new filter with two fields from two different connection.
Specify the Connection Name
Starting with 15.3, it's possible to explicitly set or unset a flag for the isNumeric and Evaluate parameters. Previous syntax will still work.
[connectionName].[field]={value1<isNumeric=yes,Evaluate=no>, value2<isNumeric=True,Evaluate=True>}
You can use "Yes" or "No" or the boolean values "True" or "False".
Explicit Set of isNumeric and Evaluate
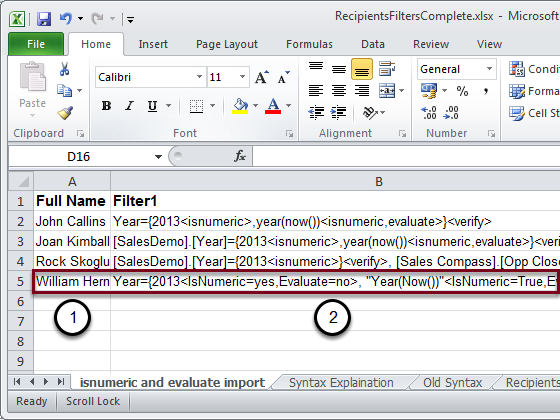
- Full Name: enter another name or identifier
- Filter1: enter Year={2013<IsNumeric=yes,Evaluate=no>, "Year(Now())"<IsNumeric=True,Evaluate=True>}
In the first part, the IsNumeric flag is explicitly set to Yes and Evaluate to No. In the second part the IsNumeric and Evaluate flags are both forced to True, which is synonymous with Yes. This means that the expression will be evaluated and return a numeric value.
Force a Value that Seems to be a Number to be Compared as a String
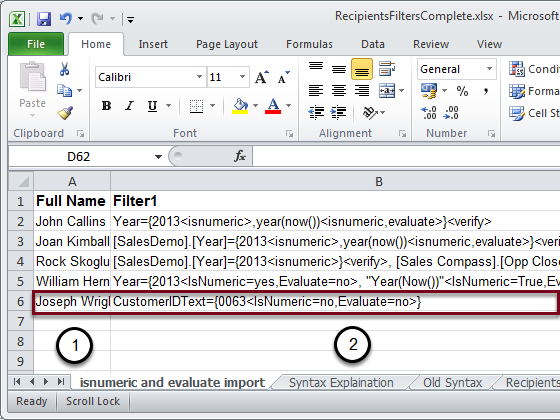
- Full Name: enter another persons name, title or other identifier
- Filter1: enter CustomerIDText={0063<IsNumeric=no,Evaluate=no>}
The QlikView field CustomerIDText is created as a text field but it contains values that seem to be numbers. By inserting "IsNumeric=no" we are sure that the flag will be disabled and the value "0063" will be compared as a string.
Use double quotes (") to import filter values that contain commas
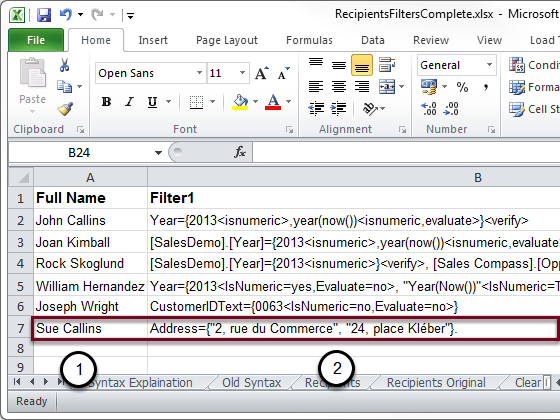
- Full Name: enter another persons name, title or other identifier
- Filter1: enter Address={"2, rue du Commerce", "24, place Kléber"}
You can import filter values that contain commas (,) by enclosing them between double quotes ("). Using a comma outside will continue to be the separator between two value.
Use double quotes (") to import filter values that contain formulas with commas
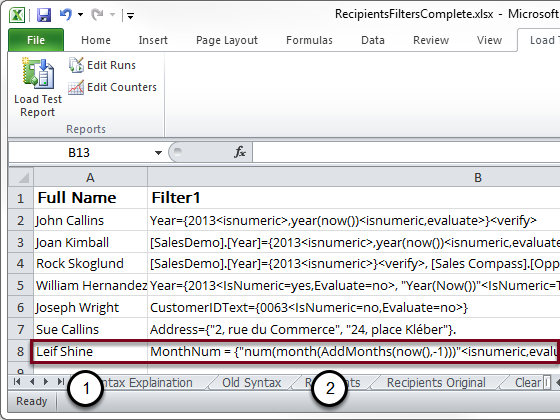
- Full Name: enter another name or identifier
- Filter1: enter MonthNum = {"num(month(AddMonths(now(),-1)))"<isnumeric,evaluate>}
You can import filter values that contain formulas with commas (,) by inserting them between double quotes(").
Recipient import

To import new Recipients refer to "How to Create and Import Recipients with Filters and Distribution Groups".

-
Examples of Advanced Search Filters
From NPrinting June 2019Introduction of a new filter type called Advanced search. Here are a few examples of how it can be used.Note: I have made a fe... Show MoreFrom NPrinting June 2019
- Introduction of a new filter type called Advanced search. Here are a few examples of how it can be used.
Note: I have made a few changes to a copy of the sample Qlik Sense App found here and used that as the Connection source for these examples. The modified App and exported report are attached to this post.
Fields that exist in the source document that we use:
- Date
- Customer
Variables that exist in the source document that we use:
- vStartDate
- vEndDate
Example 1.
Filtering for a date range.
With Advanced search filters you can filter for a date range in any of these ways:
- hard coding the From and To dates. Example: =Date <= Date#('06/22/2019', 'MM/DD/YYYY') and Date>=Date#('06/22/2018', 'MM/DD/YYYY')
- Using expressions. Example: =Date <= num(Today(1)) and Date >=num(Today() - 365)
- Using variables that exist in the source document. Example: =Date>=$(vStartDate) and Date<=$(vEndDate)
Note: The above filters were defined on the Date field. You can also define the same filters for other fields just as you can use expression search in the source document if you want to search for values in associated fields. For example you could use the exact same filter definition for the Customer field to get different results:
Screenshots of the Filter editor showing the difference:
Example 2.
Filtering for the Top n
Here is an example using Advanced search filters and Aggr() to filter for the Top 10 Customers (most Sales). You can of course use a variable or an expression that results in an integer instead of hard-coding the number 10.
=Customer=aggr(if(rank(sum(Sales)) <=10, Customer), Customer)
Example 3.
Filtering for a range
Similar to example 1. Here again you can use variables or expressions instead of hard-coding the numbers.
=sum(Sales)>=300000 and sum(Sales)<=500000
Example using aggr() to get Customers with Sales above average but also less than or equal to $160,000
=sum(Sales)>Avg(TOTAL Aggr(Sum(Sales),Customer)) and sum(Sales)<=160000
Example 4.
Filtering using wildcards
Advance search filters supports the use of wildcards. This example filters for all Customer names that begin with IB or end with EX
=Customer like 'IB*' or Customer like '*EX'
I'm very excited to see the myriad ways this powerful feature will be used going forward. I hope this short introduction gets you started.
- Daniel.
To set up the example project:
- Extract the contents of AdvSearchExamples.zip
- Create a Connection to the Qlik Sense App
- Create the filters as listed in Filter Definitions.pdf
- Import the report. Instructions here

-
QlikView NPrinting 16 Migration Playbook - A reference for migrating customers
The attached Migration Playbook is intended to be a consolidation of references for those who are on a QlikView NPrinting 16 to Qlik NPrinting 19 migr... Show MoreThe attached Migration Playbook is intended to be a consolidation of references for those who are on a QlikView NPrinting 16 to Qlik NPrinting 19 migration journey. It includes migration content from Qlik Community Posts, Qlik YouTube Channels, Qlik Support articles, Qlik Help site references, and guidance from the Qlik NPrinting product team. Read it from front to back or just selectively review the sections that relate to you - I hope you find this useful!
Reminder - this is relevant to QlikView NPrinting 16 customers only. If you are on Qlik NPrinting 17+ this guide is not for you.
For a wider view of additional and important migration considerations 'before' you migrate, please visit:
Updated April 28, 2020: change log in V2 document attached.
-
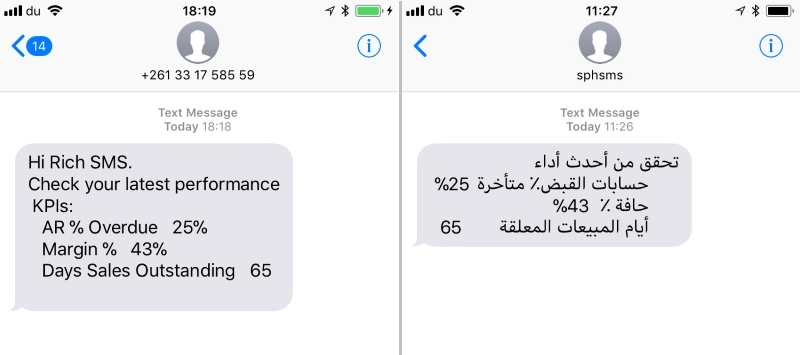
Send an SMS alert using NPrinting
So, how to send KPI results to a user by SMS rather than email so you can get a result like the one below. This could be used for daily or hourly stat... Show MoreSo, how to send KPI results to a user by SMS rather than email so you can get a result like the one below. This could be used for daily or hourly status messages to Senior Execs, for operation direction to the salesforce or the distribution team, or for conditional based alerting when KPI results meet a certain criteria. There are so many use cases here... I've also added an example in Arabic (google translate version) to show right to left language capability in the SMS.
It's actually reasonably simple but you do require a 3rd party SMS gateway to perform the translation of an email to an SMS. All telco operators offer these services, and a number of other web based operators too, and all work in much the same way as the example here.
Step 1 - Setup your SMS Gateway provider account
I have used TextMagic for this example as it's easy to work with and offers a free trial with some minimal credit for testing.
- Create your account.
- Setup the basic settings:
- navigate to Services > Email to SMS
- Add allowed emails (this is the sender of your email from NPrinting) https://my.textmagic.com/online/emailtosms/emails
- Edit the send & receive settings to convert the body of the email to SMS and set a limit to how many SMS's it will be converted to. https://my.textmagic.com/online/emailtosms/settings
Other services that will work in a similar way (and may be cheaper)
- Most local Telco providers
- ClickSend - Bulk SMS Gateway & Email Marketing Platform – Email & SMS Marketing
-
SMS Country - Send your email via SMS- Email to SMS- SMS Country
-
SMS Global - Email To SMS | SMS To Email | Email Text Messages | SMS from Outlook
-
Text Anywhere - TextEmail – Send SMS Text Messages from any Email system and Microsoft OMS – TextAnywhere.net
-
Esendex - Email to SMS - Send and receive SMS via email - Esendex
Step 2 - Setup your NPrinting instance with the user to receive the SMS
Your SMS gateway provider will indicate the email format for the mobile number you wish to send the SMS to. For example, with TextMagic the format is 4470851234567@textmagic.com for the telephone number +44 7085 1234567 (a clearly made up number).
This is the email address to assign to the user in NPrinting. Note: It is likely that you will have 2 NPrinting user accounts for a single individual if they receive SMS alerts and other reports from NPrinting (hub, newstand, email attachments etc).
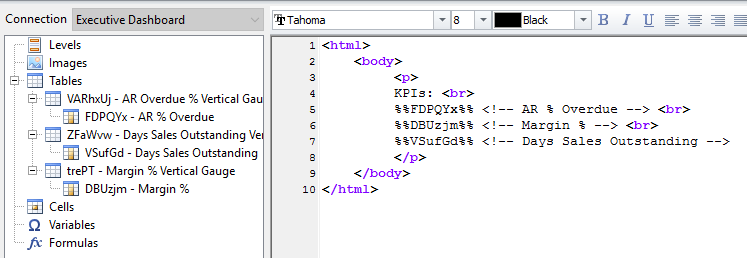
Step 3 - Create your HTML report (or import the one attached along with the example application)
The HTML report is very simple. It looks like this in the NPrinting Designer Editor window and is looking at Gauge objects as tables.
Step 4 - Setup your Publish Task
Go through the normal setup process.
- Add the report you have created in step 3 (as HTML output)
- Assign your users (the SMS user you wish to send to as per step 2)
- Check that the destination for the user is email
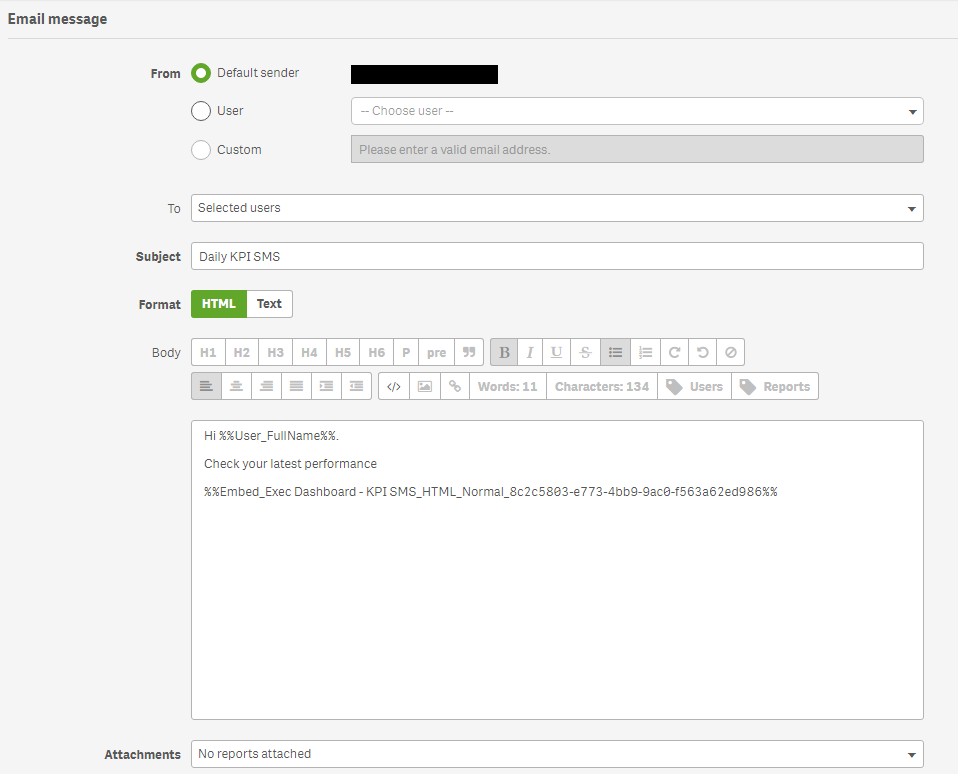
- In the email section use the tags to embed the report content (and perhaps the users name etc)
- Add a trigger to schedule the report
- Save the changes
Step 5 - run the publish task and receive the SMS
It's pretty easy eh!
Troubleshooting:
- Ensure that your user is assigned to a role in NPrinting. If no role is assigned the email will not be sent.
- Ensure the sending email address, as per the email message in step 4, is included in the TextMagic allowed emails
- Ensure you have some credit left on TextMagic as this will stop things working too...
-
Dynamic Report Naming
The names you give your reports can be crucial for aiding people to access the right information quickly. Control the names assigned to your reports w... Show MoreThe names you give your reports can be crucial for aiding people to access the right information quickly. Control the names assigned to your reports with NPrinting by creating static elements in report names as well as inserting arbitrary text, variable elements like cycle field values, and the values of QlikView variables. This tutorial explains how to use the NPrinting dynamic report naming feature.
Enable Dynamic Naming
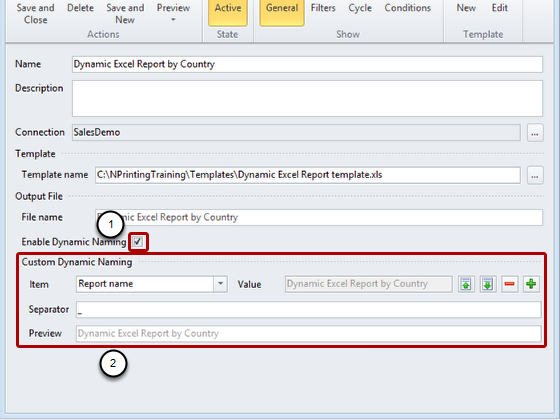
- Put a check mark in the dynamic naming check box by clicking on it
- The Custom Dynamic Naming section appears. This allows you to add different elements to your report names
Add Elements to Your Report Names
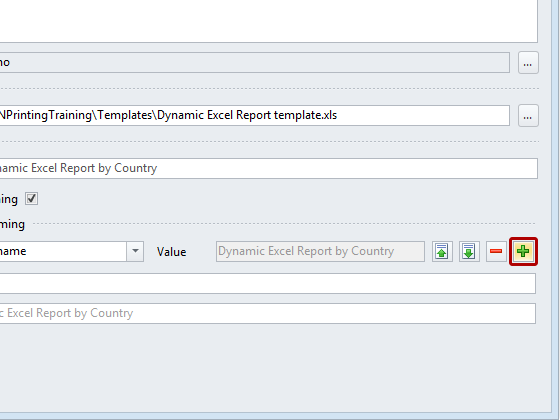
Click on the green '+' sign to add another element to the names of your reports. Add more that one if need be.
Select Item Type
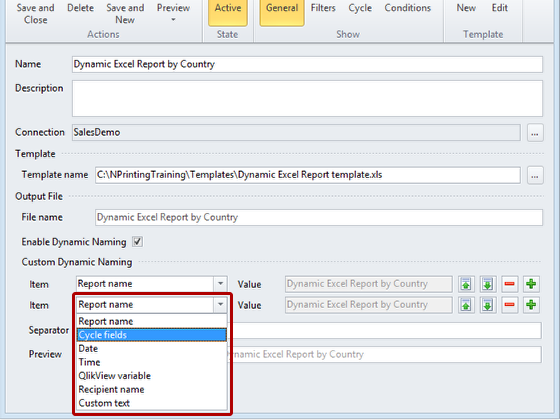
Select the element you want to use from the drop down menu; the following elements are available:
- Report name
- Cycle fields
- Date the report was generated
- Time of day the report was generated
- QlikView variable value of any QlikView variable existing at the time the report is produced
- Recipient name
- Custom text conforming to Windows file name standards
Select from Various Format Options for Date

Open the drop-down menu and select a format.
Choose Separator
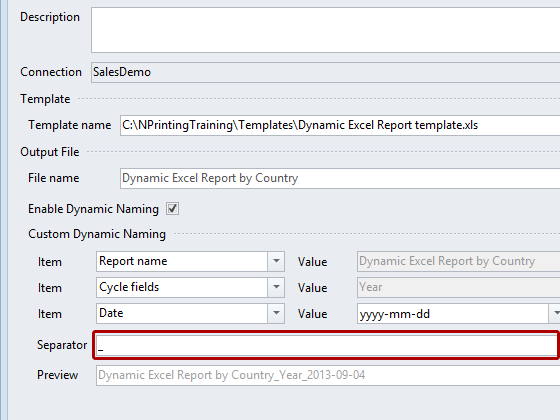
Select a Separator to divide the elements of the report name, the underscore is the default.
Preview The Report Name
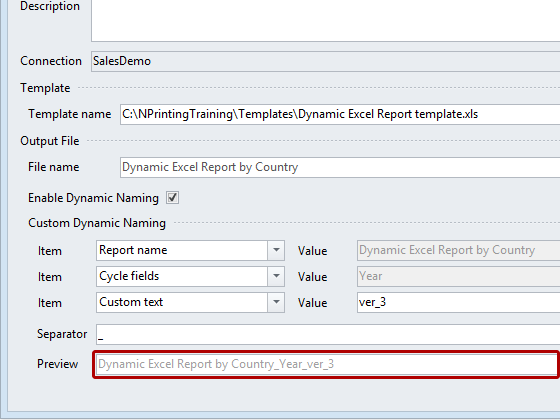
The report name is displayed in the Preview field at the bottom of the Output File area; variable values are represented by the name of the variable. Note the Custom text field added here in place of the Date field.
Changing The Order Of Elements In Report Names
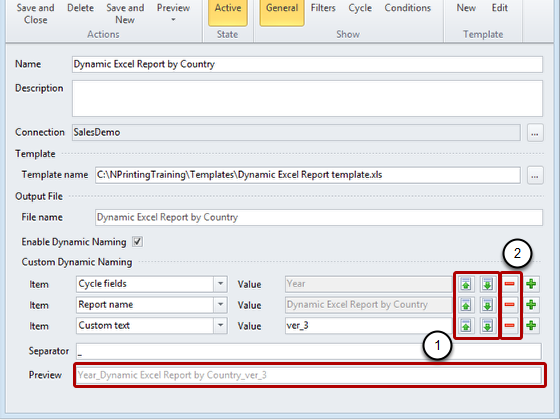
- You can move elements to the left and right in the report name by clicking on the green up and down arrows. Moving an element up shifts it to the left in the name.
- You can delete single elements by clicking on the red '-'
-
Can I apply Excel formatting to my Excel reports?
When creating templates for generating reports, you will sometimes want to present information with the formatting as it is in QlikView. This is the d... Show MoreWhen creating templates for generating reports, you will sometimes want to present information with the formatting as it is in QlikView. This is the default setting. Other times you will want to apply formatting that Excel provides the tools to apply as you create templates in Excel. Table and column formatting using tools provided by Excel works only if you save your template in .xslx format and not if your template is saved in .xls format. Save Excel templates in .xls only if necessary for backward compatibility.
Allow Application of Excel Formatting for the Whole Chart
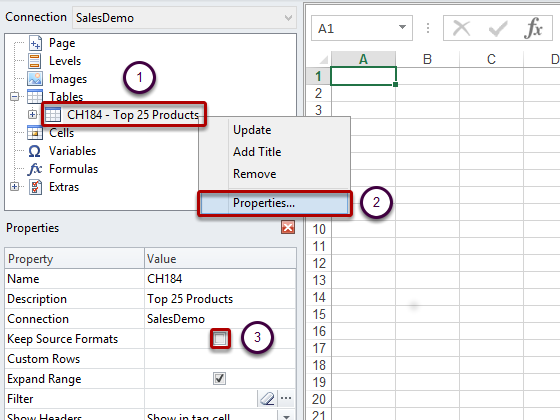
After you have added a QlikView object as a table:
- Right click on the table node
- Select Properties
- Deselect the Keep Source Formats box and click on OK at the bottom of the Properties dialog window
- Click on the Toolbar icon to open the Excel tool ribbon and apply Excel formatting as you desire
This will cause the content for all cells in all columns of the table to be exported from QlikView without formatting and the application of formatting from the Excel tool ribbon that you set in the template.
Allow Application of Excel Formatting for Specific Columns
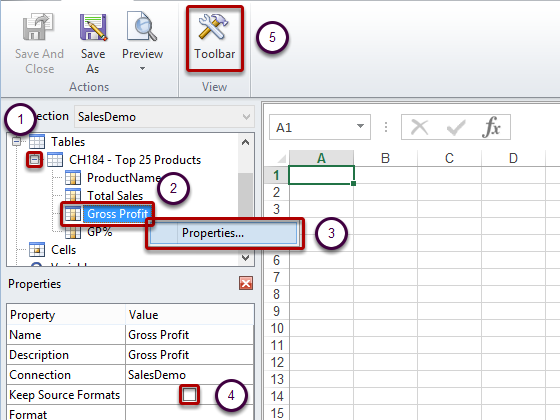
If you want to keep source formatting for the majority of columns, leave the Keep Source Formats box checked for the table as a whole and proceed as follows:
- Expand the table node by clicking on the '+' to its left
- Right click on the node for the column you want to apply Excel formatting to
- Select Properties
- Deselect the Keep Source Formats box and click on OK at the bottom of the Properties dialog window
- Click on the Toolbar icon to open the Excel tool ribbon, here you can see the Excel tool ribbon already visible, and apply the formatting you want
This will cause the content for all cells in the selected column of the table to be exported from QlikView without formatting and you can apply formatting from the Excel tool ribbon. You can do this for as many individual columns as you need.
-
Qlik NPrinting 17.x Repository Backup Batch File
Users should be aware that the NPrinting 17.x repository may be removed in case of a failed upgrade: Upgrading NPrinting? Read this. Taking regular b... Show MoreUsers should be aware that the NPrinting 17.x repository may be removed in case of a failed upgrade: Upgrading NPrinting? Read this. Taking regular backups of your files & data is always a good idea anyway and backing up your NPrinting Repository should be no different. Here is a batch file that you could run using your Windows Task Scheduler to automate Qlik NPrinting Repository backups.
Features:
- Accepts the Repository password as the only parameter. Terminates if no password is provided
- Checks to see if services QlikNPrintingEngine, QlikNPrintingScheduler and QlikNPrintingWebEngine are running and stops them before the backup. Starts them after the backup succeeds or fails. Be sure to schedule your backups when there are no other NPrinting tasks running or scheduled to run
- Creates a new compressed file every time and parses date & time to name it
- Logs each step of the backup process to a log file with the same name
To change manually:
- Change this line to specify the backup destination folder: set BACKUPDIR="C:\NPrintingBackups\
- Uncomment the appropriate line with the names of the services depending on the version of NPrinting. Documented in-line
Disclaimer:
- Provided "as is". If you decide to use this batch file please test to make sure it works for you
HTH - Daniel.
-
How to Distribute Reports after Successful .qvw Reload on a QlikView Server with...
To execute this tutorial you must have QlikView Server and Publisher installed and running. You need also NPrinting Server. Of course, you need relate... Show MoreTo execute this tutorial you must have QlikView Server and Publisher installed and running. You need also NPrinting Server. Of course, you need related licenses.
In this tutorial you'll learn how to schedule the reload of a .qvw in QlikView Server and then distribute reports based on it by using NPrinting only if the reload finished successfully.
This is an advanced tutorial that requires a good knowledge about developing solutions using NPrinting. We'll use examples from the NPrinting Training environment.
Configure your source documents
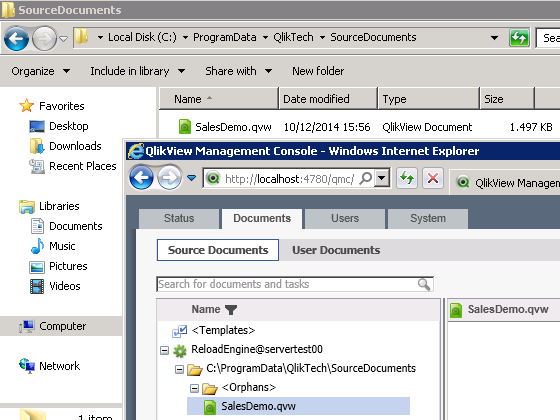
- Copy SalesDemo.qvw in the Source Documents folder (for instance C:\ProgramData\QlikTech\SourceDocuments)
- Log in the QMC (QlikView Management Console) and you'll see the .qvw in the "Source Documents" tab under "Documents"
Create a QlikView Server Reload Task
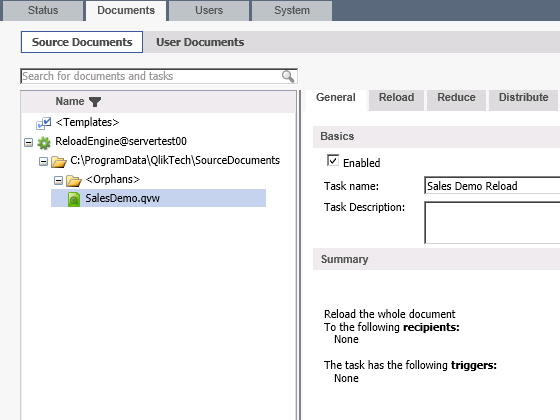
- Click on the green "+" (plus) symbol on the upper right corner of the QMC to add a task
- Insert "Sales Demo Reload" as name.
Distribute the Reloaded Document to a Folder
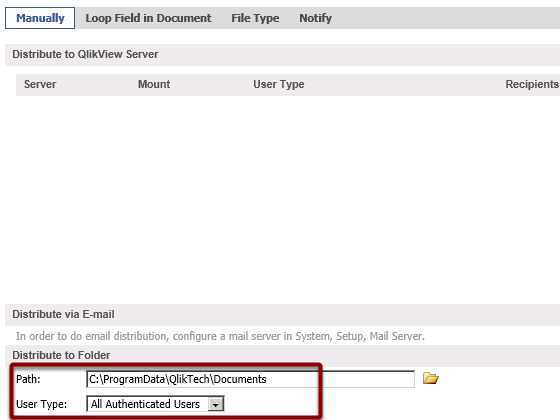
In the "Distribute" tab set C:\ProgramData\QlikTech\Documents as distribute folder and select "All Authenticated Users" in the drop-down menu. Use this document in the source connection of the NPrinting project.
Trigger the Reload
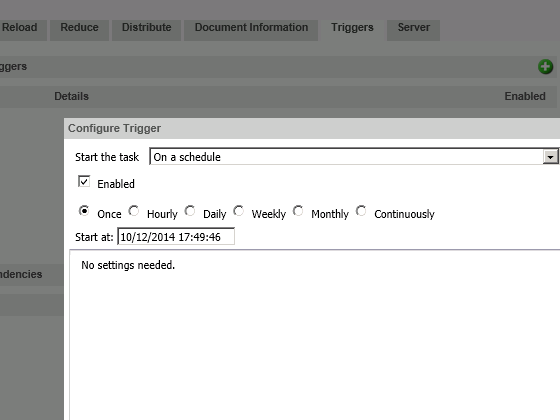
- Open the "Triggers" tab
- Create a schedule based trigger
- Confirm by pressing "Apply" and try to manually run the trigger to be sure that everything is ok
Set NPrinting Service to Accept External Requests
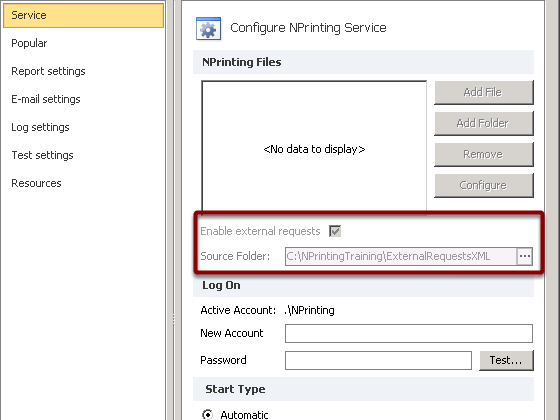
- Open the NPrinting Management Console
- Enable the external requests flag
- Insert the Source Folder. For instance C:\NPrintingTraining\ExternalRequestsXML
- Start the NPrinting Service
It's very important that you know the tutorial "How to Execute NPrinting Reports by External XML" Request very well.
Create the External Request File
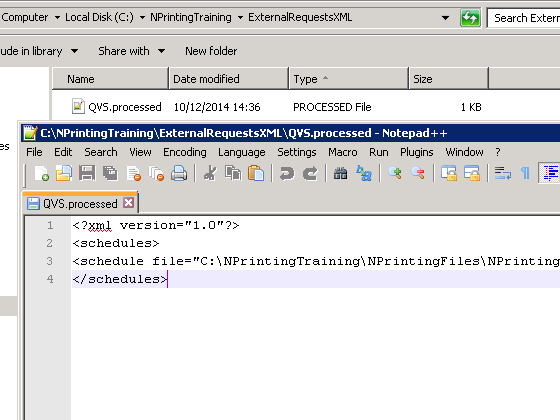
In the folder C:\NPrintingTraining\ExternalRequestsXML create the text file QVS.processed. The code to insert is:
<?xml version="1.0"?><schedules><schedule file="C:\NPrintingTraining\NPrintingFiles\NPrintingTraining.nsq" type="job" entityName="Send a Report via Email" /></schedules>This will run the job "Send a Report via Email" that must be present in the .nsq file. To create a job refer to "How to Create Jobs"
Create the Batch File
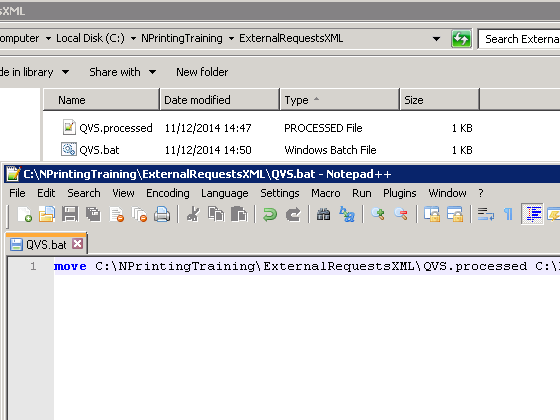
In the folder C:\NPrintingTraining\ExternalRequestsXML create the file QVS.bat with the code:
move C:\NPrintingTraining\ExternalRequestsXML\QVS.processed C:\NPrintingTraining\ExternalRequestsXML\QVS.requestIt will rename the QVS.processed file to QVS.request. When the NPrinting Server find a .request file in the External Requests folder it will execute it.
Open the External Program in QlikView Server

- Select the "System" tab
- Click on "Supporting Tasks"
- Activate the "External Program" folder
Click on the green "+" (plus symbol) button on the right corner to create a new task
Create a new Task
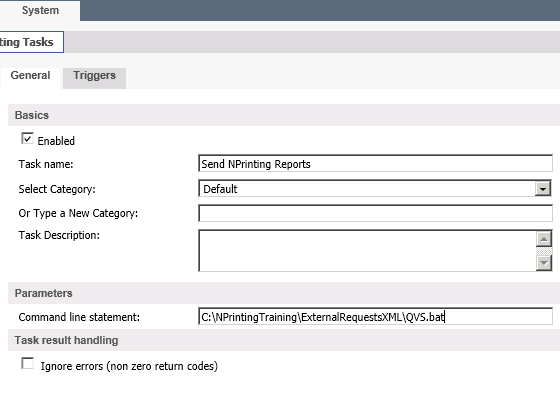
- Set "Send NPrinting Reports" as task name
- In the "Command line statement" insert C:\NPrintingTraining\ExternalRequestsXML\QVS.bat.
When activated this task will run the script we saved in QVS.bat
Trigger the Task
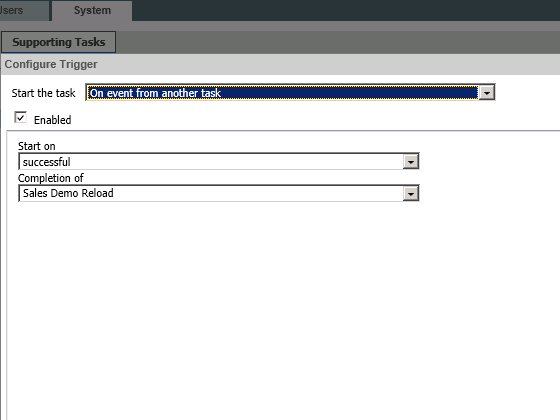
- Click on the green "+" (plus symbol) button to create a new trigger
- In the Start the task drop-down menu select "On event from another task"
- Set "successful" on Start on
- On Completion of set "Sales Demo Reload"
In this way you'll trigger the task to start after the finish of the reload and only if it ended successfully. This task runs the QVS.bat file who rename QVS.processed to QVS.request so NPrinting Server starts to distribute the reports.
-
How to Apply HTML Formatting to NPrinting HTML Reports
When creating templates for generating reports, you will sometimes want to present information with formatting as it appears in QlikView. Keeping Qlik... Show MoreWhen creating templates for generating reports, you will sometimes want to present information with formatting as it appears in QlikView. Keeping Qlikview source formats is the default setting in NPrinting.
In other cases, you may want to apply CSS inline style elements as you create templates in the HTML Template Editor. In order to do this, you need to perform the following steps:
Allow Application of CSS Inline Style Elements for Whole Chart
After you have added a QlikView object as a table:
- Right click on the table node
- Select Properties
- Deselect the Keep Source Formats box
- Click on OK at the bottom of the Properties dialog window
This will cause the content for all cells in all columns of the table to be exported from QlikView without formatting. The application of CSS inline style elements that you set in the HTML template will be applied (See section further below: "Allow Application of CSS Inline Style Elements for Specific Columns").
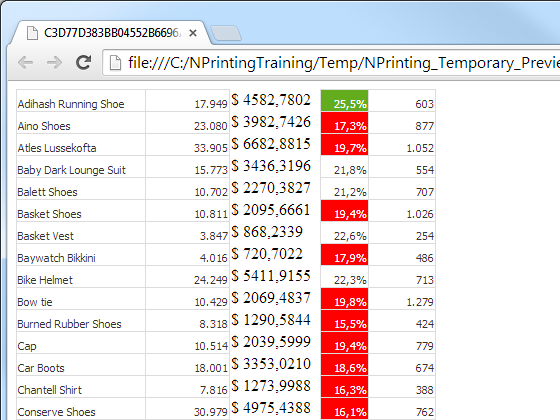
Comparison of Output: With and with out "Keep Source Formats" checked
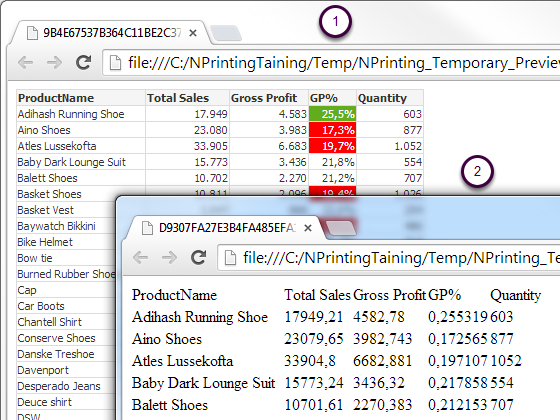
- Output sample with Keep Source Formats checked
- Output sample with Keep Source Formats unchecked
Allow Application of CSS Inline Style Elements for Specific Columns
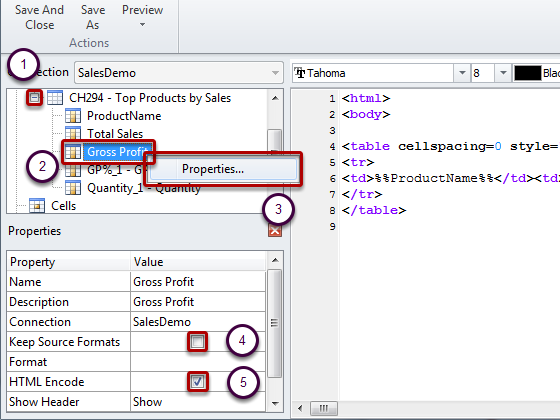
Be sure that your table object is a straight table in QlikView. Qlikview pivot tables must be converted to straight tables before selecting them to be included under the NPrinting Tables node or you will not have access to individual fields/columns.
If you want to keep source formatting for the majority of columns, leave the "Keep Source Formats" box checked for the table as a whole and proceed as follows:- Expand the table node by clicking on the '+' to its left
- Right click on the node for the column(s) you want to apply CSS inline Style elements to
- Select Properties
- Deselect the Keep Source Formats box and click on at the bottom of the Properties dialog window
- When the HTML Encode box is checked, any non alphanumeric symbols (such as < and />) that could be interpreted as HTML tag elements will be converted to HTML entities. (If the HTML Encode box is unchecked, any non alphanumeric symbols that could be interpreted as HTML tag elements will be rendered by the underlying HTML code used in the NPrinting HTML template editor.)This will cause the content for all cells in the selected column of the table to be exported from QlikView without formatting but will contain application of any CSS inline Style elements you have applied within the HTML template. You can do this for as many individual columns as you need.
Apply Format to a Column

- Select Gross Profit
- Enter $#.##,00 in the Format field
Refer to "Which Formats Can I Use in Columns?".
Build Your Table
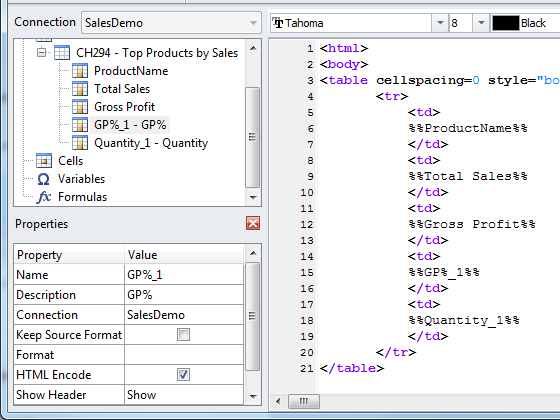
- Construct an HTML table with one row, <tr></tr> of table data cells, <td></td>
- Drag the table column node icons between the table data cell tags. You can select multiple values by keeping CTRL or SHIFT pressed during the columns selection then "drag and drop" them into the template. This will create all tags and insert them into a horizontal series of cells.
Resulting Table
The Keep Source Formats box has been cleared Gross Profit column
Create Column Headings You Can Format Uniformly

- Insert another row above the first
- Insert table heading cells in the new row
- Enter the headings you want
Hide QlikView Table Column Headings
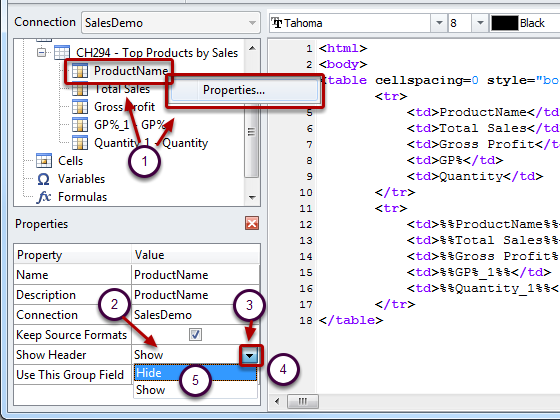
- Reopen the Properties dialog window for each and every column you have added to the template, one at a time
- Click in the Value column of the Show Header row, the cell will have the value Show
- A drop-down menu button will appear at the right
- Click on the drop-down menu button
- Select Hide
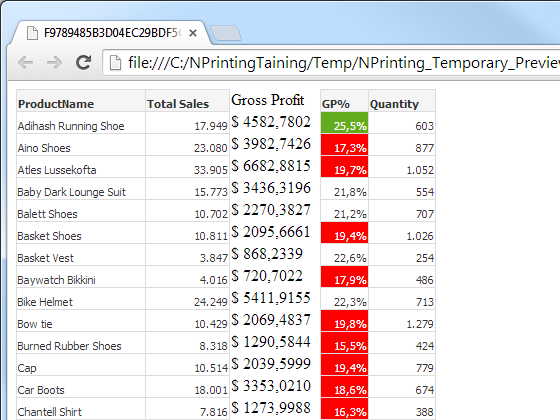
Current Result
This is the original table with Keep Source Formats cleared for the first and last columns, a heading row added, and the original table headings hidden for each and every column.
Apply Inline Style Elements
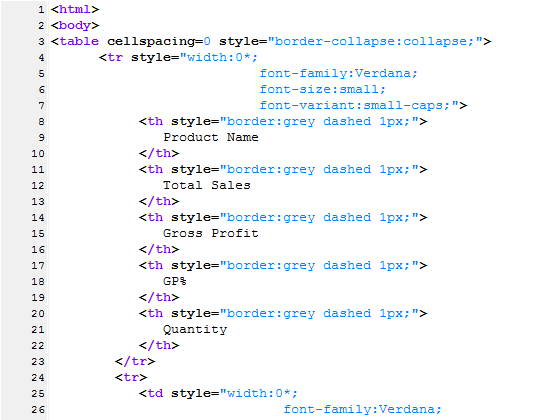
Here is the code in full:
<html>
<body>
<table cellspacing=0 style="border-collapse:collapse;">
      <tr style="width:0*;
                          font-family:Verdana;
                          font-size:small;
                          font-variant:small-caps;">
           <th style="border:grey dashed 1px;">
              Product Name
           </th>
           <th style="border:grey dashed 1px;">
              Total Sales
           </th>
           <th style="border:grey dashed 1px;">
              Gross Profit
           </th>
           <th style="border:grey dashed 1px;">
              GP%
           </th>
           <th style="border:grey dashed 1px;">
              Quantity
           </th>
        </tr>
        <tr>
           <td style="width:0*;
                             font-family:Verdana;
                             font-size:small;
                             font-weight:bold;
                             font-variant:small-caps;">
              %%ProductName%%
           </td>
           <td>
             %%Total Sales%%
           </td>
           <td>
              %%Gross Profit%%
           </td>
           <td>
              %%GP%_1%%
           </td>
           <td style="width:0*;
                              color:red;
                              font-family:Georgia;
                              font-size-adjust:0.40;
                              background-color:Yellow;
                              border:green solid 2px;
                              text-align:right;">
               %%Quantity_1%%
           </td>
        </tr>
</table>
</body>
</html>
Final Result
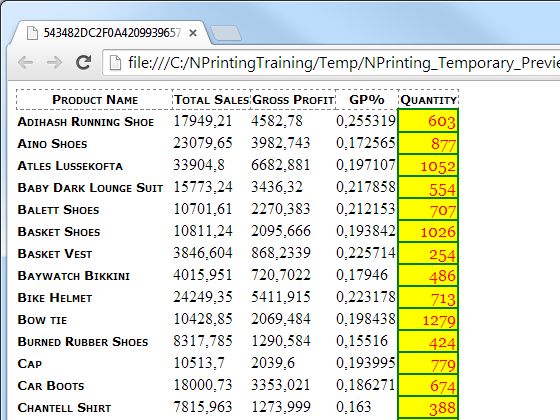
This sample output is simple but it gives you an idea of the possibilities.
-
Import Users from LDAP Directory Subfolders
Individual or lists of recipients can be imported by NPrinting and become an integral part of an NPrinting file. Sources include text and Excel files,... Show MoreIndividual or lists of recipients can be imported by NPrinting and become an integral part of an NPrinting file. Sources include text and Excel files, databases, and LDAP directories. Here is how to import from LDAP directory subfolders.
For the purposes of this tutorial you must:
- launch NPrinting
- open an NPrinting file
- know the IP address of an LDAP directory server, port number, and authentication protocol
- have proper credentials
- know the directory structure parameters
Begin Defining Recipient Import Operation
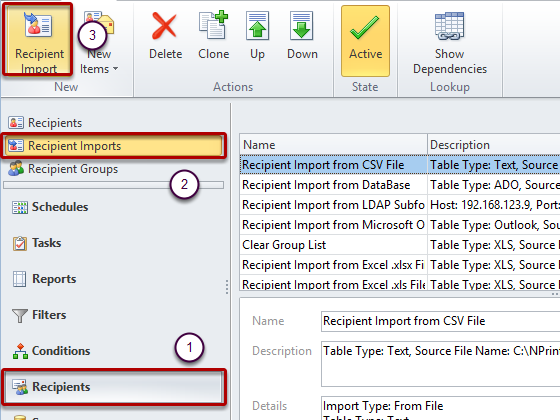
- Select Recipients
- Select Recipient Imports
- Click on Recipient Import
Select Import Type
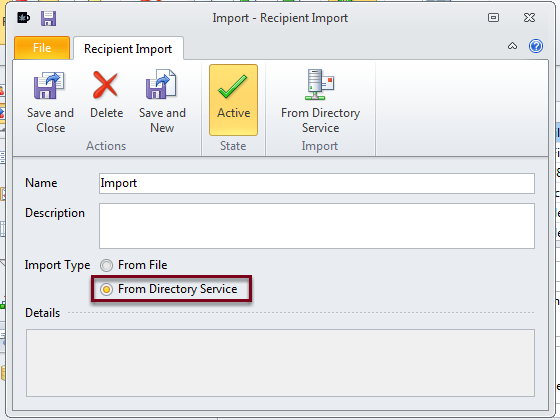
Open "Import from Directory Service" Dialog Window and Begin Entering Parameters
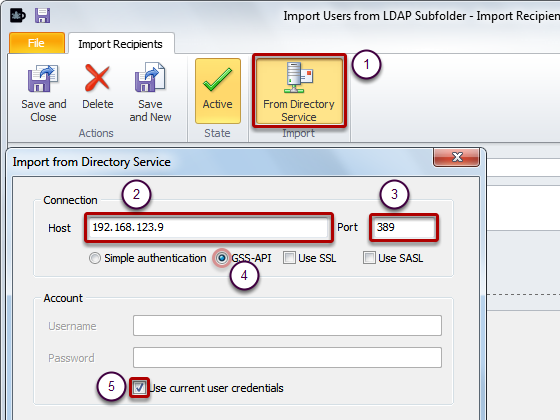
- Click on From Directory Service in the Import section of the menu bar
- Enter the IP address of your LDAP directory or Windows Active Directory server
- Enter the Port number
- Select the appropriate authentication protocol
- Put a check in the Use current user credentials box or enter the credentials you have been furnished
Connect and Select Base Parameters
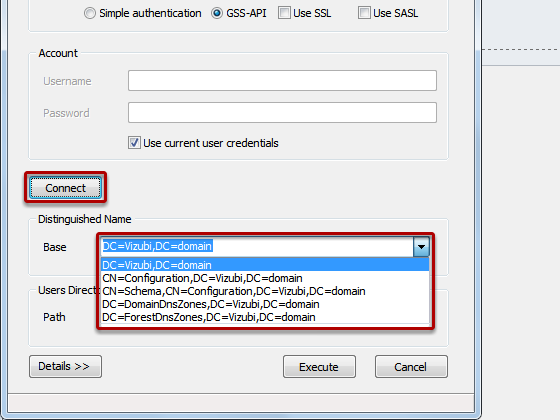
- Click on Connect. If all of the above parameters are correct, the Base drop-down menu will open automatically
- Select the appropriate Base parameter combination
Select Path Parameter
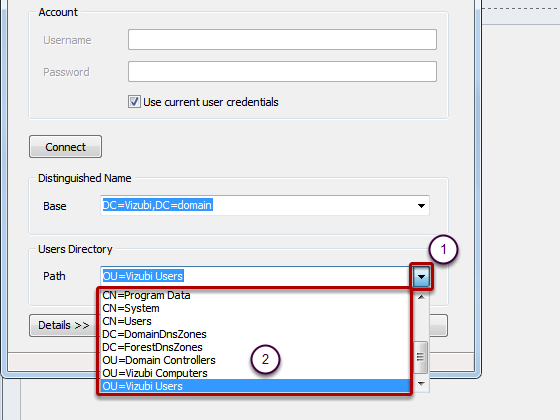
- Click on the arrow at the extreme right of the Path field
- Select the appropriate Path parameter
Conclude Defining Source
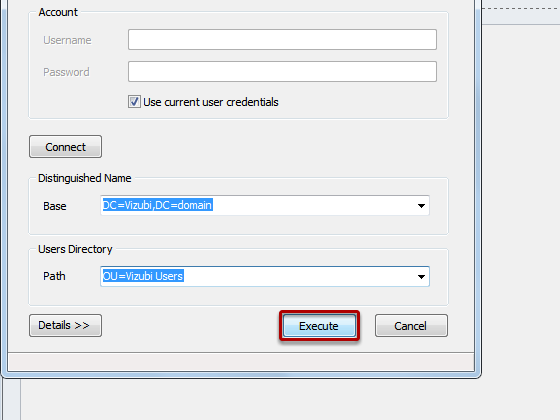
Click on the Execute button
Import Recipient(s)
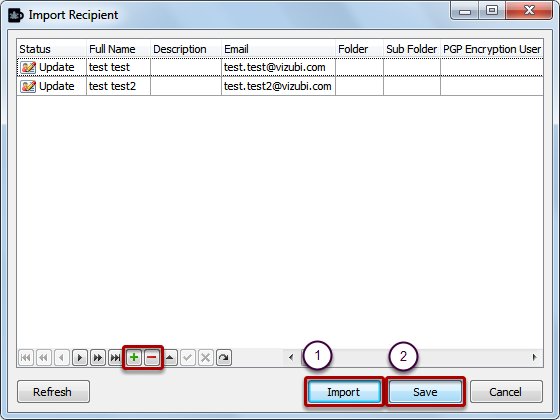
- Click on Import
- Click on Save
Recipients can be added to or eliminated from the list by using the green '+' and red '-'. When you have finished adjusting the list, click on Import to import the recipients that you have specified. Click on Save to save this specified group of recipient import operation parameters in the Recipient Imports list.
Save and Close
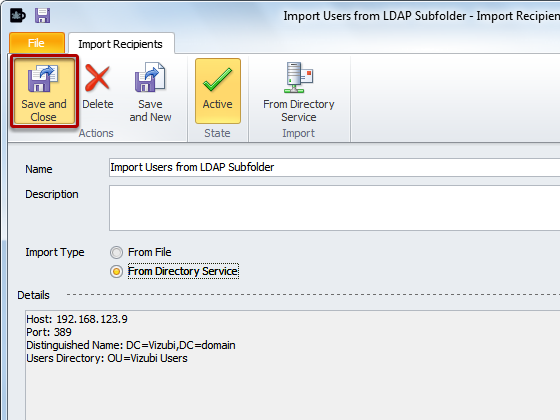
Click on the Save and Close icon
-
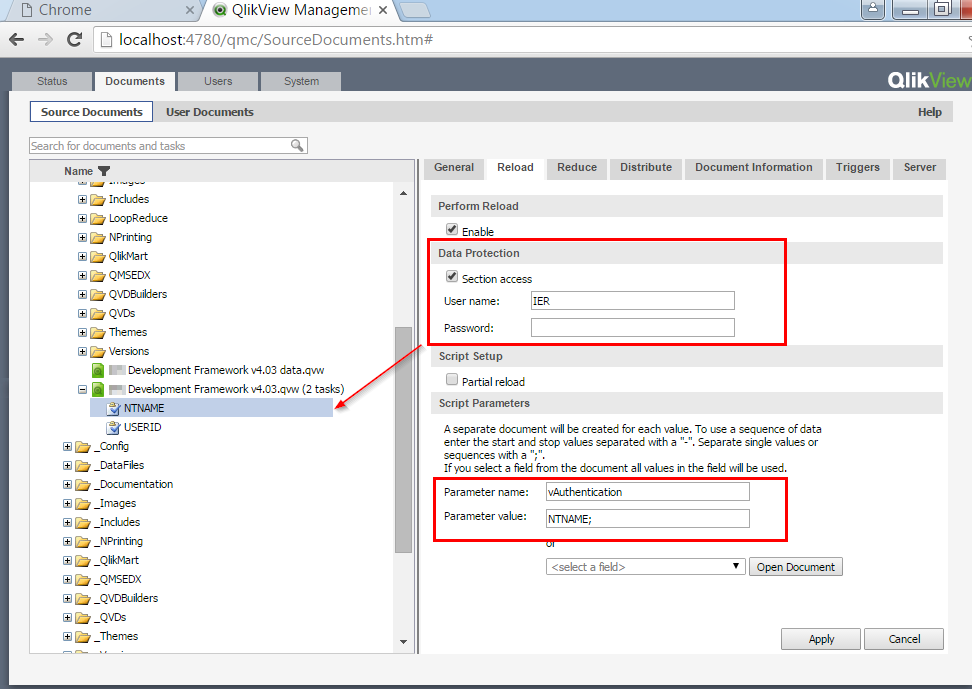
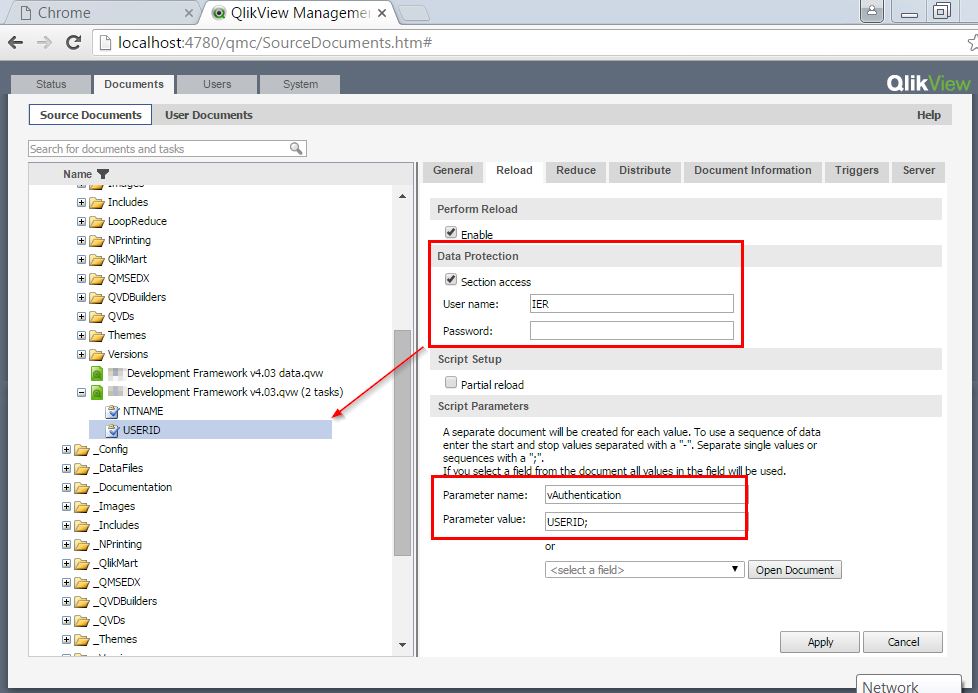
Create NPrinting Reports from an NTNAME Secured Document
BackgroundThis approach utilizes a single Source Document with two Publisher tasks. Each task takes a parameter to define the authentication type. T... Show MoreBackground
This approach utilizes a single Source Document with two Publisher tasks. Each task takes a parameter to define the authentication type. The value passed will either be USERID or NTNAME.
In conjunction with data reduction, NPrinting report writers will be able to create reports on their own data slice. This approach can also be used when creating a table for a Section Access based distribution list.
Steps
- Add a ‘vAuthentication’ variable to your Section Access table to represent the USERID/NTNAME security field.
- Populate the field with user names in DOMAIN\USERID format. When USERID is passed, Domain is parsed out.
 Note that I have not included a password. A password will be necessary for USERID authentication if you want to secure this document after USERID distribution. I recommend adding a PASSWORD column via another variable. The password will need to be pullled in from a table definition dynamically perhaps using something unique to the users such as last 4 digits of SSN. If not using USERID, then vPassword would evaluate to no password column.
a. SET vPassword= ', PASSWORD';
4. Create two tasks in Publisher. Both tasks will be able to run without error regardless of the last saved authentication type.
- One task will distribute the document with NTNAME security to all users.
- Because the same Source Document is used for both tasks, the Section Access check box (reserved for USERID access) must checked and set with a USERID that has full rights. This setting is necessary because the NTNAME task must be able to open the USERID secured document as wells as an NTNAME secured document.
- Set Script Parameter - This setting defines how security will be set in the Section Access table.
- Parameter Name: vAuthentication
- Parameter Value: NTNAME.
- Set Script Parameter - This setting defines how security will be set in the Section Access table.
- Because the same Source Document is used for both tasks, the Section Access check box (reserved for USERID access) must checked and set with a USERID that has full rights. This setting is necessary because the NTNAME task must be able to open the USERID secured document as wells as an NTNAME secured document.
b. The next task will distribute a USERID secured document.
- Check the Section Access check box and set with a USERID that has full rights.
- Set the USERID Script Parameter:
- Parameter Name: vAuthentication
- Parameter Value: USERID.
- Be sure to save this document to a different mount from the NTNAME distributed document. This location should be accessible to NPrinting report designers.
- Set the USERID Script Parameter:
Summary
Either task can be executed in any order multiples times consecutively. Output will be in two separate Document mounts, one with NTNAME security and the other with USERID.
Other Relevant Resources
The approach above can work along-side of the helpful tutorials put together by Jonny Poole on how to use NTNAME with On Demand and user-based filters.
Performance Consideration
Consideration must be made to determine whether report designers should be accessing documents hosted on the QlikView server and connected to applications through QVP or through UNC connections.

-
NPrinting Enablement Course
In this page you will find the PowerPoint slides related to NPrinting Enablement Course
-
Can I use Section Access with NPrinting?
This tutorial illustrates how to create NPrinting reports from QlikView documents created with Section Access. Please refer to the official QlikView d... Show MoreThis tutorial illustrates how to create NPrinting reports from QlikView documents created with Section Access. Please refer to the official QlikView documentation which explains QlikView Section Access in detail very well.
The file C:\NPrintingTraining\QlikViewDocuments\SalesDemoSectionAccess.qvw contains this script at the beginning:
SECTION ACCESS;LOAD * INLINE [ACCESS, USERID, PASSWORD, MAN ADMIN, ADMIN, ADMIN, *USER, Elvis, Elvis, 2 USER, Helen, Helen, 9 ];SECTION APPLICATION;SALES:LOAD * INLINE [MAN, EmployeeID2, 29, 9 ];which creates section access with an admin and two users. Each user can see only his data because of the filter on EmployeeID.
The users and passwords are:
admin admin
Elvis Elvis
Helen Helen
N.B. NPrinting is not compatible with NT security in regards to recipients and associated filters, as things stand now.
QlikView NT security is based on Windows authentication, so it is not directly managed by QlikView. NT security checks the UserName of the user that is logged on the windows machine. This cannot be managed by NPrinting because the service does not log into the Window machine as a new user, so NT security access cannot be guaranteed to the NPrinting service.
It is necessary to remove NT security from the documents that is used by the NPrinting service to create reports.
If it's not possible we suggest you to create a copy of the QlikView document and save it on a protected folder.
Configure Document Properties
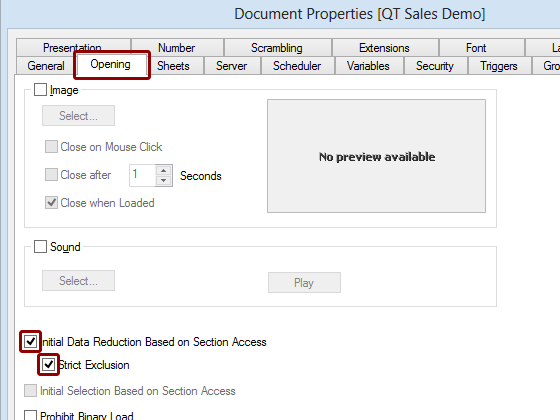
- Open QlikView Document Properties window (Ctrl + Alt + D) or Settings -> Document Properties
- Select the Opening tab
- Put a check mark in both the Initial Data Reduction Based on Section Access and the Strict Exclusion boxes
Open NPrinting File in NPrinting

Click on the Open icon on the File tab and browse to C:\NPrintingTraining\NPrintingFiles\NPrintingTraining.nsq and open it or if C:\NPrintingTraining\NPrintingFiles\NPrintingTraining.nsq is already listed under Recent Files, click directly on it.
Create New Connection
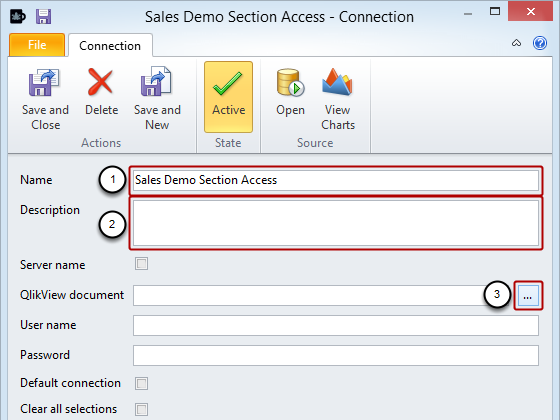
- Enter Sales Demo Section Access as the Name of the Connection
- Enter a Description (optional)
- Click on the browse button at the extreme right of the QlikView document field
Select QlikView Document
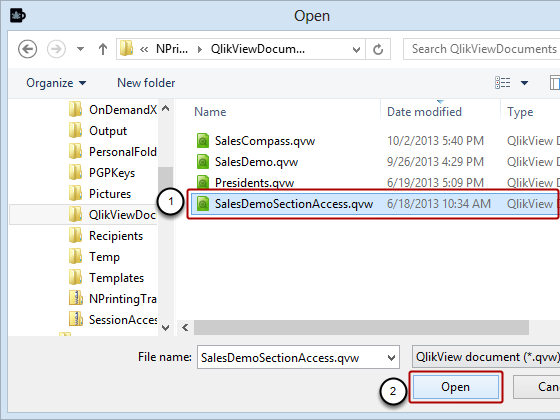
Browse to C:\NPrintingTraining\QlikViewDocuments\ and:
- Select SalesDemoSectionAccess.qvw
- Click on the Open button
Configure Last Parameters
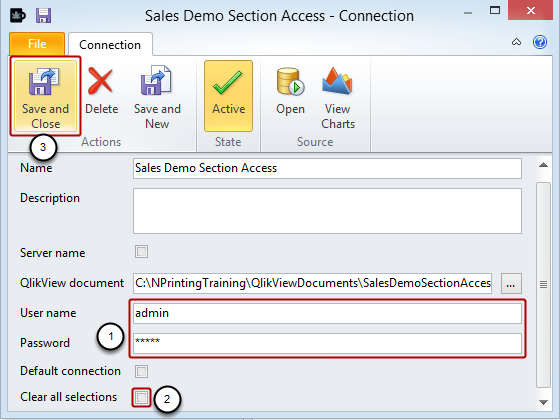
- Enter "admin" both as User name and Password
- Make sure there is no check mark in the Clear all selections box
- Click on the Save and Close icon
Create New Recipient
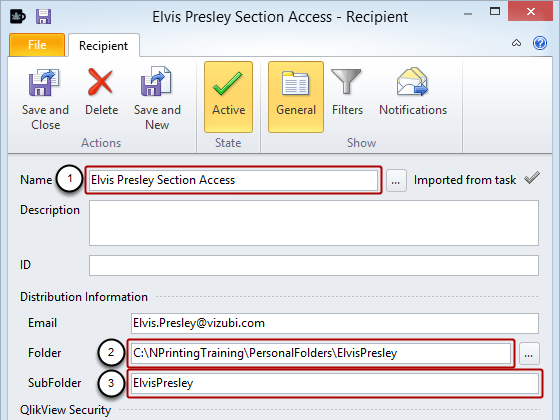
- Enter Elvis Presley Section Access for the RecipientName
- Enter C:\NPrintingTraining\PersonalFolders\ElvisPresley as the Folder name
- Enter ElvisPresley for the SubFolder name
Configure Security
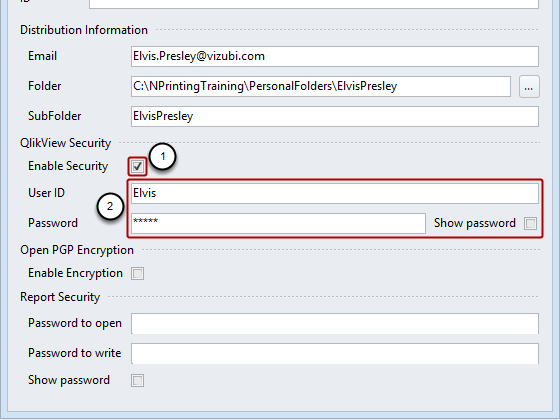
- Put a check mark in the Enable Security box
- Enter "Elvis" as both the User ID and Password
- Click on the Save and Close icon in the Actions group of the tool bar
Configure Helen Brolin Recipient

- Enter Helen Brolin Section Access for the RecipientName
- Enter C:\NPrintingTraining\PersonalFolders\HelenBrolin as the Folder name
- Enter HelenBrolin for the SubFolder name
Configure Helen Brolin Security

- Put a check mark in the Enable Security box
- Enter "Helen" as both the User ID and Password
- Click on the Save and Close icon in the Actions group of the tool bar
Configure New Excel Report

- Enter Section Access as the report Name
- Enter a Description (optional)
- Check the Enable Dynamic Naming box
Enable Dynamic Naming
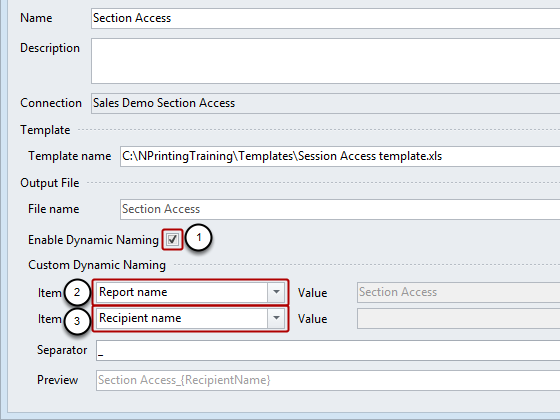
Though this step is optional, it provides for more distinct, understandable file names
- Put a check mark in the Enable Dynamic Naming box
- Make sure that Report name is selected for the first Item that is present
- Add a second Item by clicking on the green '+' at the far right of the Item fields and set it to Recipient name
- Click on the New icon in the Template group to open the Template Editor
Create Template
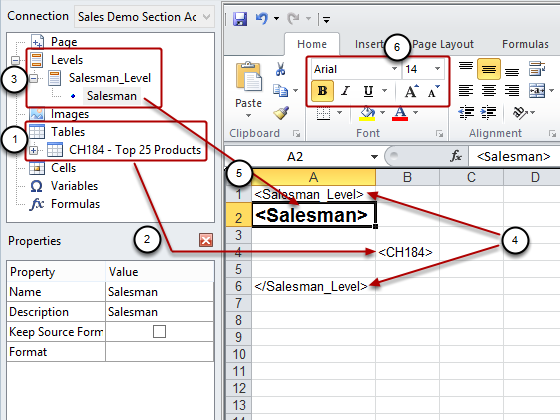
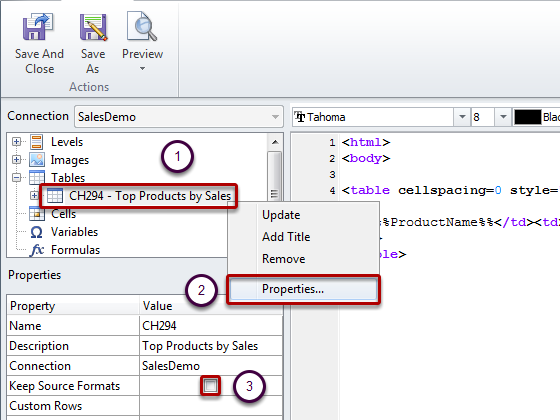
- Add the QlikView object CH184 to the table node
- Drag and drop it in the cell B4
- Add Salesman field as level
- Drag the Salesman_Level node token to A1 and the end tag to A6
- Drag the tag with the field value <Salesman> to A2
- Format it as 14px, Bold
Click on the Save As icon to conclude template development.
Save Template and Report
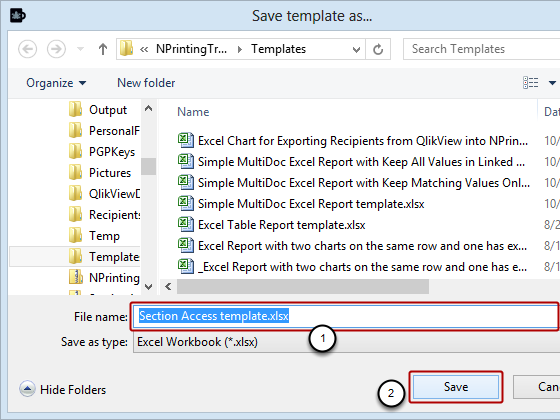
- Enter Section Access template.xlsx for the File name
- Click on the Save button
- Click on the Save and Close icon in the Report Editor window to save the report
Configure New Report Task
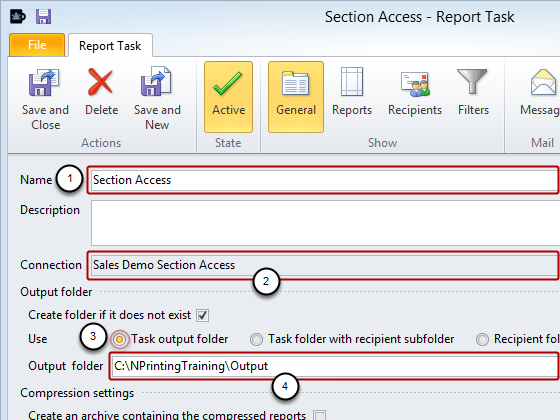
- Create a new Report Task named Section Access
- Set the Connection to Sales Demo Section Access
- Set Use to Task output folder
- Output folder to C:\NPrintingTraining\Output
Add Report to Task
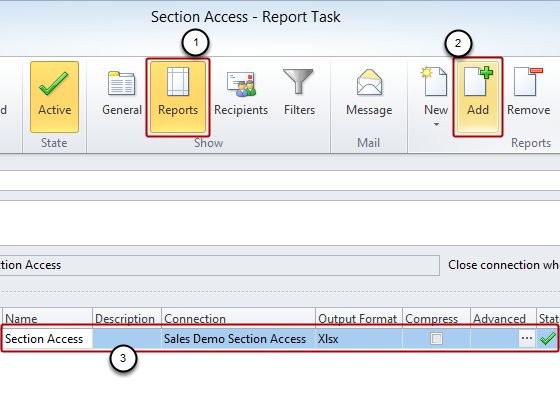
- Select Reports in the Show group
- Click on Add in the Reports group
- Add the Section Access report
Add Recipients to Task
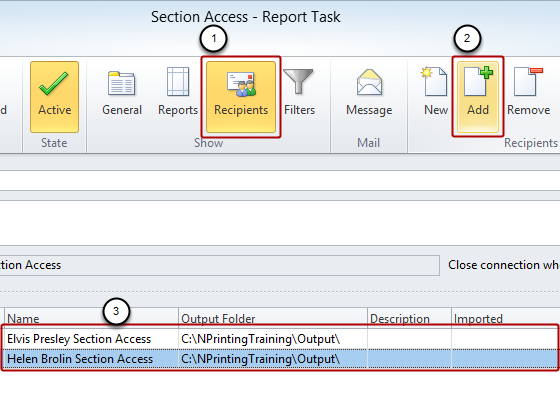
- Select the Recipients icon in the Show group
- Click on the Add icon in the Recipients group
- Select and add Elvis and Helen to the Task
- Click on the Save and Close icon
Run Task
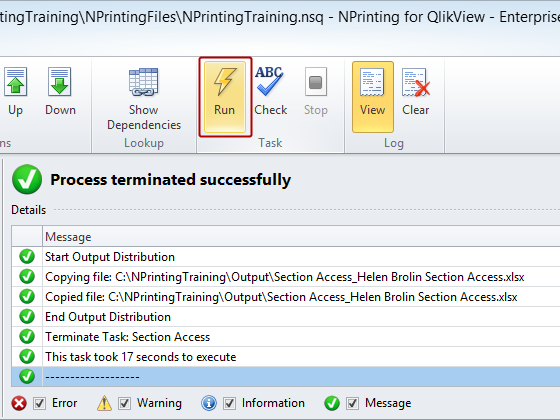
Select the Section Access task in the list and click on the Run icon.
Inspect Log
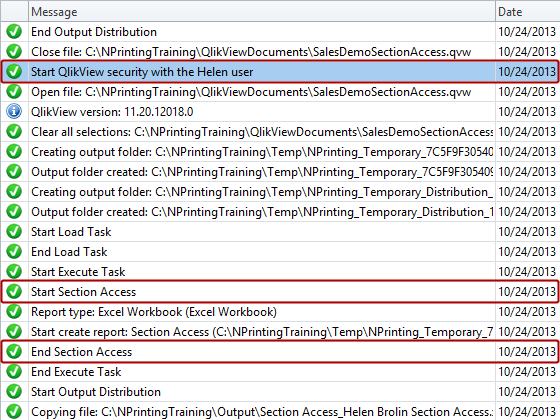
Please note the start of QlikView security with the Helen user, the start of Section Access, and the end of Section Access.
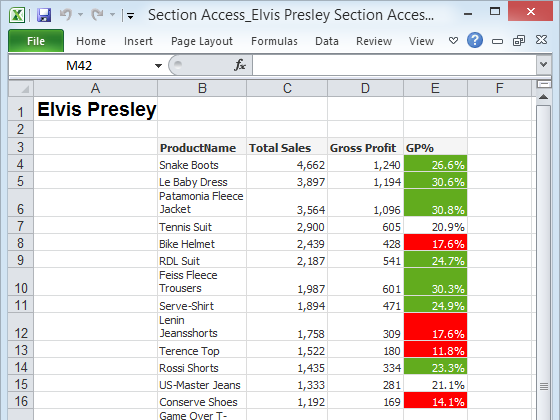
Inspect Elvis Presley Report
Inspect Helen Brolin Report
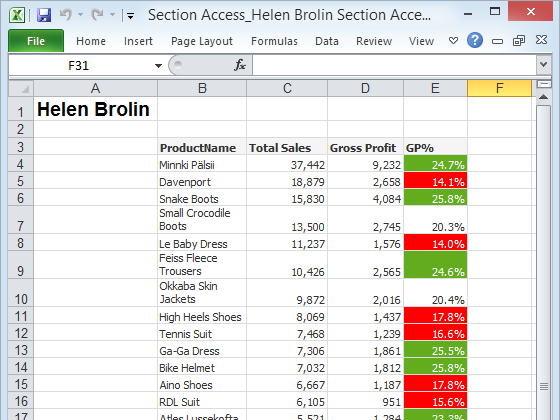
The two reports contain only the data pertinent to the recipient.
-
Workaround for MicroSoft Office 2013 error: "Cannot find a supported template ed...
Some Microsoft 2013 users encounter the error message "Cannot find a supported template editor". This may be due to lack of the DocObject registry key... Show MoreSome Microsoft 2013 users encounter the error message "Cannot find a supported template editor". This may be due to lack of the DocObject registry key with a value of 16.The simplest way to correct these registry keys is to download the attached file Office2013_RegistryKeys.zip and decompress it in the folder of your choice. You will find three separate files:
Office2013_x86.reg: regedit commands for 32 bit operating systems
Office2013_x64.reg: regedit commands for 64 bit operating systems
Office2013Registry.xlsx: list of the registry keys.
Double click on the file for your operating system and answer yes to all warnings. Your registry should be OK so try opening NPrinting template editor again and check that everything works correctly.If you cannot download the zip, you can copy and paste the following text into the corresponding file:
Office2013_x86.reg
[HKEY_CLASSES_ROOT\CLSID\{00020820-0000-0000-C000-000000000046}\DocObject]
@="16"
[HKEY_CLASSES_ROOT\CLSID\{00020830-0000-0000-C000-000000000046}\DocObject]
@="16"
[HKEY_CLASSES_ROOT\CLSID\{00020832-0000-0000-C000-000000000046}\DocObject]
@="16"
[HKEY_CLASSES_ROOT\CLSID\{00020906-0000-0000-C000-000000000046}\DocObject]
@="16"
[HKEY_CLASSES_ROOT\CLSID\{F4754C9B-64F5-4B40-8AF4-679732AC0607}\DocObject]
@="16"
[HKEY_CLASSES_ROOT\CLSID\{18A06B6B-2F3F-4E2B-A611-52BE631B2D22}\DocObject]
@="16"
[HKEY_CLASSES_ROOT\CLSID\{64818D10-4F9B-11CF-86EA-00AA00B929E8}\DocObject]
@="16"
[HKEY_CLASSES_ROOT\CLSID\{CF4F55F4-8F87-4D47-80BB-5808164BB3F8}\DocObject]
@="16"
[HKEY_CLASSES_ROOT\CLSID\{DC020317-E6E2-4A62-B9FA-B3EFE16626F4}\DocObject]
@="16"
Office2013_x64.reg
[HKEY_CLASSES_ROOT\Wow6432Node\CLSID\{00020820-0000-0000-C000-000000000046}\DocObject]
@="16"
[HKEY_CLASSES_ROOT\Wow6432Node\CLSID\{00020830-0000-0000-C000-000000000046}\DocObject]
@="16"
[HKEY_CLASSES_ROOT\Wow6432Node\CLSID\{00020832-0000-0000-C000-000000000046}\DocObject]
@="16"
[HKEY_CLASSES_ROOT\Wow6432Node\CLSID\{00020906-0000-0000-C000-000000000046}\DocObject]
@="16"
[HKEY_CLASSES_ROOT\Wow6432Node\CLSID\{F4754C9B-64F5-4B40-8AF4-679732AC0607}\DocObject]
@="16"
[HKEY_CLASSES_ROOT\Wow6432Node\CLSID\{18A06B6B-2F3F-4E2B-A611-52BE631B2D22}\DocObject]
@="16"
[HKEY_CLASSES_ROOT\Wow6432Node\CLSID\{64818D10-4F9B-11CF-86EA-00AA00B929E8}\DocObject]
@="16"
[HKEY_CLASSES_ROOT\Wow6432Node\CLSID\{CF4F55F4-8F87-4D47-80BB-5808164BB3F8}\DocObject]
@="16"
[HKEY_CLASSES_ROOT\Wow6432Node\CLSID\{DC020317-E6E2-4A62-B9FA-B3EFE16626F4}\DocObject]
@="16"
-
How to Distribute User Specific QlikView Reports to User Folders
NPrinting allows you to create reports which are filtered according to parameters you set for your recipients. These reports can then be sent directly... Show MoreNPrinting allows you to create reports which are filtered according to parameters you set for your recipients. These reports can then be sent directly to a recipient folder that has been specified in the Recipient. Output to be sent can be in PDF or an image format such as JPEG or PNG, see How to Create Reports Based on QlikView Entities.
Create New Report Task
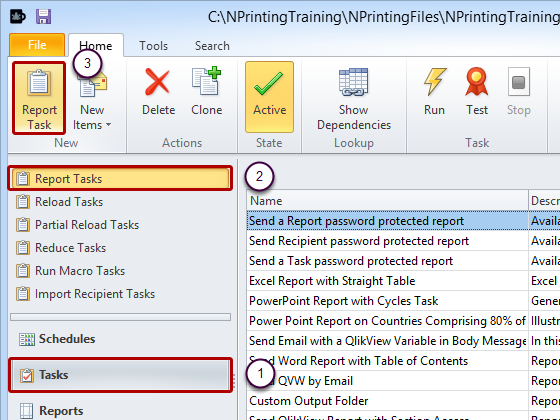
- Select Tasks
- Select Report Tasks
- Click on Report Task
Set up New Task
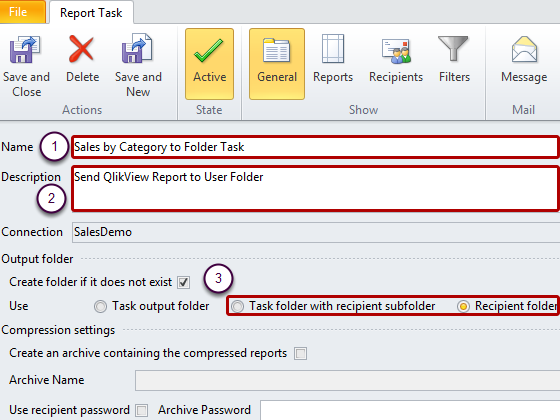
- Enter a Name for the task
- Enter a Description optionally
- Select a Recipient/User output folder for the task by selecting either the Task folder with recipient subfolder or the Recipient folder radio button. This is the folder specified in the Recipient where output for this task will be saved automatically (you can save output to different folders; details are in another tutorial). NPrinting will save a copy of all output also if you send the report as an e-mail attachment.
Select One or More QlikView Entity Reports
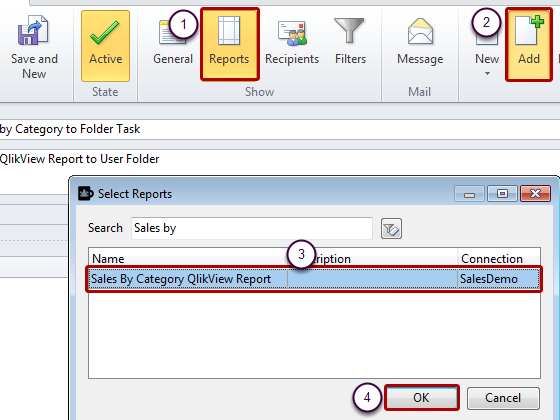
- Click on Reports. You can insert any kind of reports, but, for this tutorial, we'll select only a QlikView Entity Reports. They are integrated with all other kind of reports, with the same features.
- Click on Add
- Type "Sales by" in the Search form, then select the report "Sales by Category QlikView Report"
- Click on OK
Add Recipients
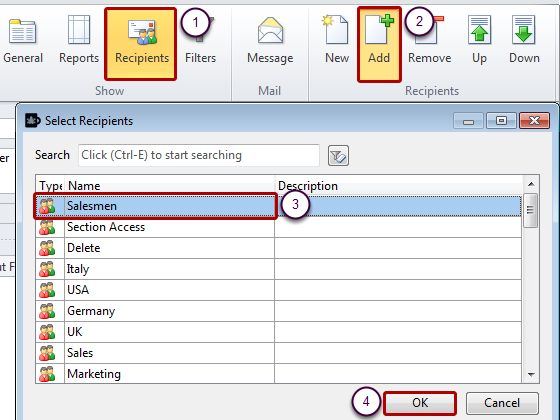
- Select the Recipients icon
- Click on the Add icon
- Select one or more recipients or groups from the list in the Select Recipients window
- Click on OK
You can add as many Recipients to a Task as you want. Separate output, filtered using each Recipient's filter(s), will be created for each recipient. You can see and modify Recipient details by double clicking on a Recipient (modifications are saved in the Recipient and will be reflected in all future output which that recipient receives).
Create New Recipient
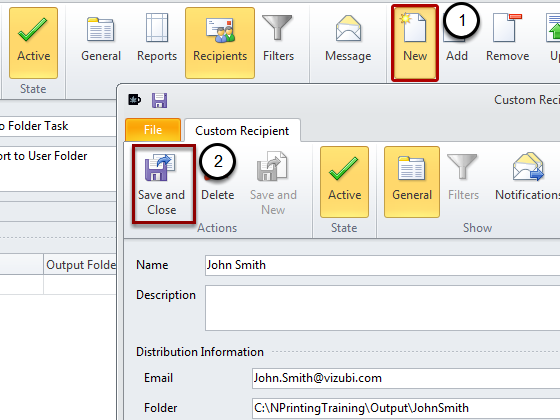
You can also create new recipients by clicking on the New button in the Recipients section of the tool ribbon. Than click on "Save and Close".
Preserving Newly Created Custom Recipient

- Recipients created from within a Task are not saved in the Recipient list and are visible only in the Task where they are created, unless you check the Add to recipient list check box at the bottom of the CustomRecipient form
- Click on the Save and Close icon to save the new Custom Recipient in the Task
Add Filters

Add as many filters to your Task as are necessary. All Task output will be filtered using the Task filters. This will be in addition to Report filters and Recipient filters which are applied to specific Reports and/or Recipients
- Add filters to the Task by clicking on the Filters button in the Show group of the tool ribbon.
- Click on the Add button in the Filters group in the ribbon. You can also create new filters by clicking on the New button.
- Select the filter you want to add.
- Click on OK to confirm your selection.
Run Task Manually
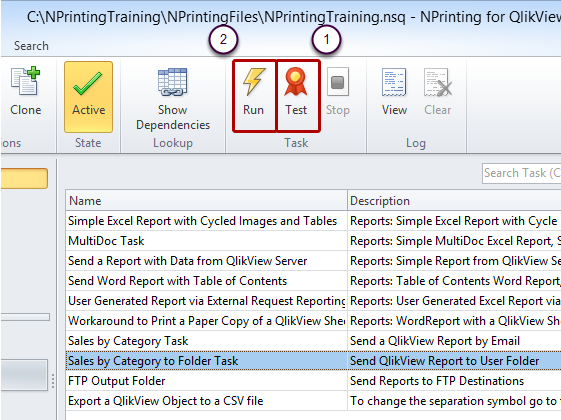
- Check to make sure the Task functions properly by clicking on the Test button in the Task group of the tool ribbon. Also see "How to Test a Task without Involving Recipients"
- Run the job manually by clicking on the Run button in the Task group in the tool ribbon
Check that Report was Distributed to User Folder

Each Salesman Folder did not exist before the task was run, but was created by the task.
-
How to Create Printed Hard Copies of Your Reports
There is no need to generate Office reports and then print them out by hand. NPrinting can send reports directly to printers to produce hard copies au... Show MoreThere is no need to generate Office reports and then print them out by hand. NPrinting can send reports directly to printers to produce hard copies automatically. This tutorial shows how to create a task to do this.
For the purposes of this tutorial, you have launched NPrinting and opened an NPrinting file.
Create Task
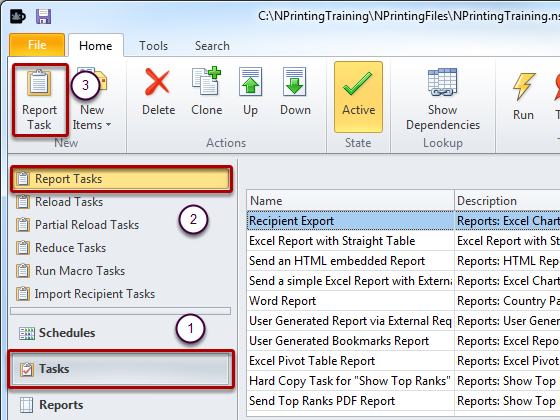
- Select Tasks on the Home tab
- Select Report Tasks
- Create a new task by clicking on Report Task
Give Task a Name
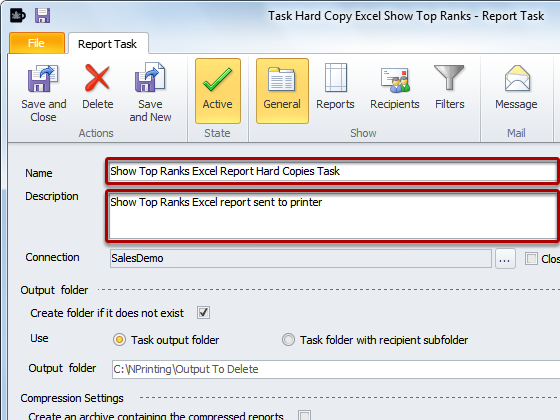
Give your new task a Name and enter a Description (optional)
Send to Printer
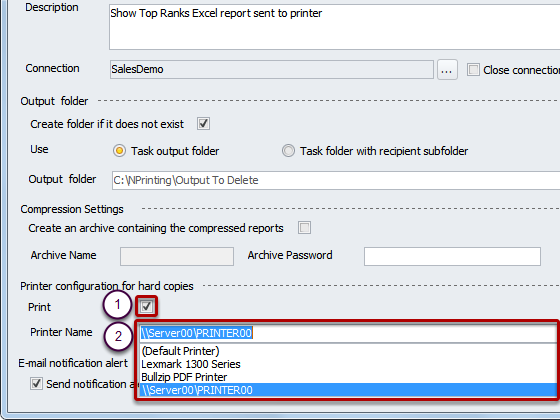
- Make sure the Print box is checked
- Enter a Printer Path and Name or select a printer from the drop-down menu
If you need to send the same report to various printers, clone the task to create a separate task for each printer. You cannot currently print more than one copy of a report per task without running the task repeatedly.
Add One or More Reports
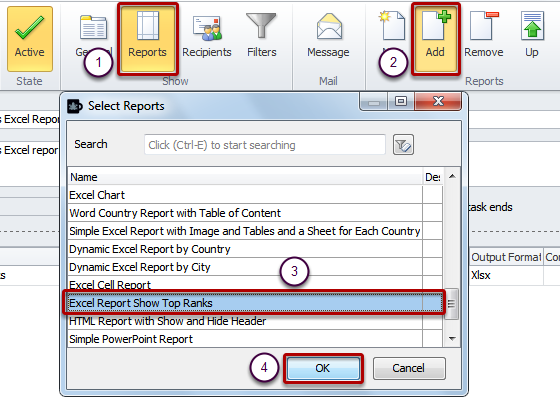
- Select the Reports icon
- Click on the Add icon in the Reports section
- Select one or more reports in the Select Reports dialog that opens
- Click on OK
Page size, orientation, margins, etc. must be set in the report template.
Prepare to Make Test Run
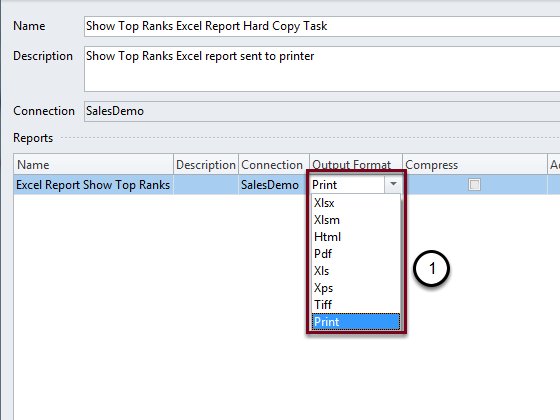
- Open the Output format drop-down menu and select Print
- Save and Close the task by clicking on the Save and Close icon in the Actions section of the menu bar.
The option Print is not available in the reports that export an Entire QlikView Sheet in QlikView Entity reports. If you want to export an Entire QlikView Sheet you can do these steps:
- Create a Word report
- Insert the QlikView sheet into the Word template
- Create a new task and insert the Word report into it
- Set the task options to print a paper copy of the QlikView Sheet
Run Trial
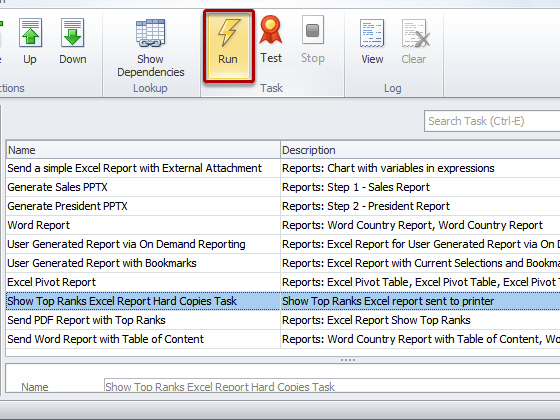
Before clicking on the Run icon in the Task section of the menu bar, it may be a good idea to reflect on the number of pages that will be printed.
-
How to Manage Dimensions Containing Cyclic Groups in Word, Excel, PowerPoint and...
The "Use This Group Field" property has been added to the Table column Properties menu in Word, Excel, PowerPoint and HTML report templates. It is dis... Show MoreThe "Use This Group Field" property has been added to the Table column Properties menu in Word, Excel, PowerPoint and HTML report templates. It is displayed only for dimensions and only if they contain a Cyclic Group. It has a predefined value, "(Active Field)" which will use the field which is active at run time. It is also possible to force NPrinting to display a specific dimension by selecting it from the list.
Formula and drill-down groups are not supported.
Set Basic Parameters and Open Template Editor
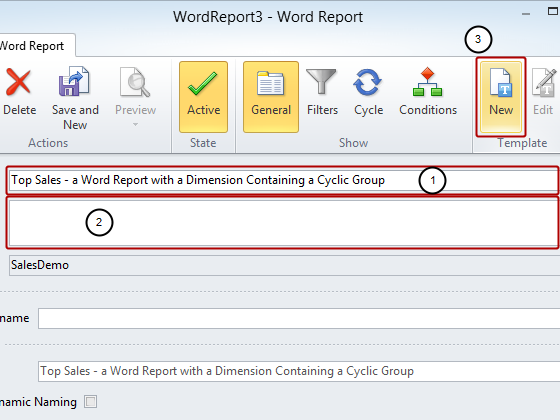
- Enter a Name for your report
- Enter a more detailed Description (optional)
- Click on the New icon in the Template group
Save Template

Click on the Save As icon
Save Template
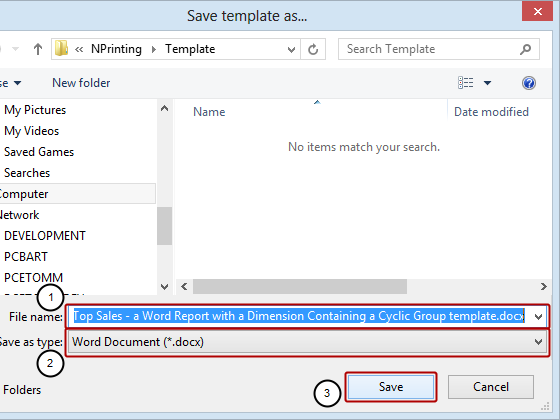
- Enter a File name for the template or accept the suggested one
- Save as type: can be set to Word Document (*.docx) or the default Word 97-2003 Document (*.doc) as they are both compatible with this feature
- Click on the Save button
Add Heading and QlikView Object to Template
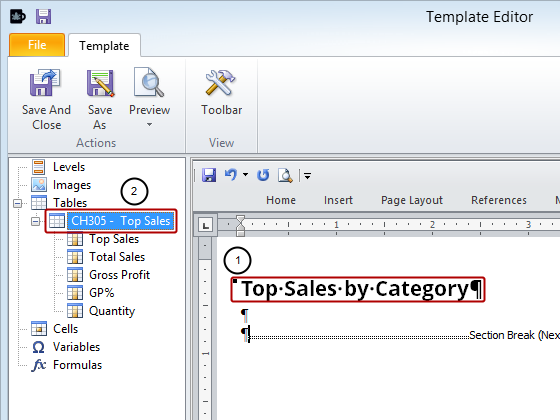
- Add Top Sales by Category as a heading to Word template
- Add QlikView object CH305 - Top Sales to template as a table
Set CategoryName as Field to Be Used
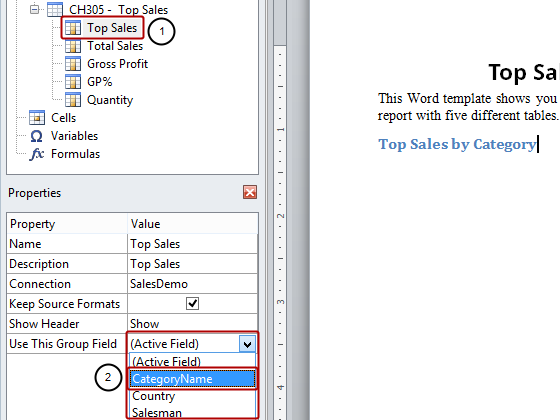
- Select the Top Sales column node under the CH305 - Top Sales table node
- Select CategoryName in the Value cell of the Use This Group Field property in the Properties pane
Embed CH305 - Top Sales in Template
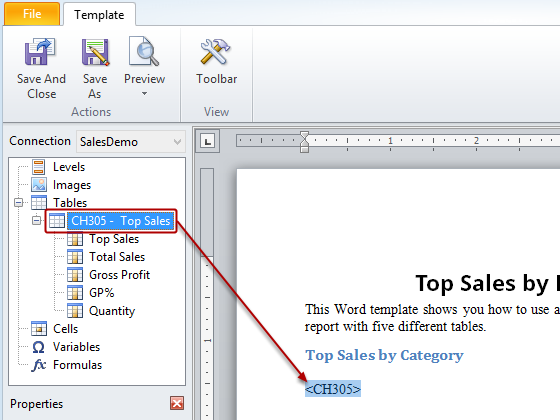
Drag and drop the CH305 - Top Sales table-node token into the template.
Add Second Heading and Same QlikView Object to Template
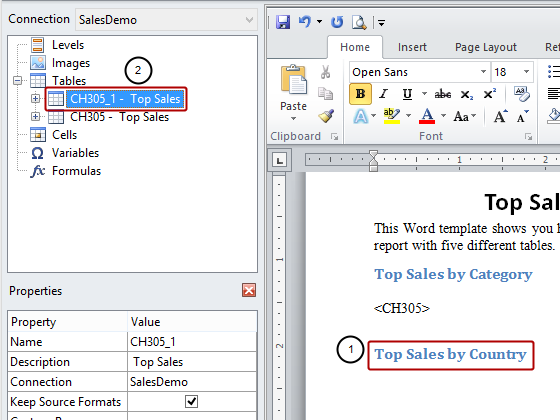
- Add Top Sales by Country as a new heading to the template
- Add QlikView object CH305 - Top Sales to template as a table again, resulting in the CH305_1 - Top Sales node
Set Country as Field to Be Used
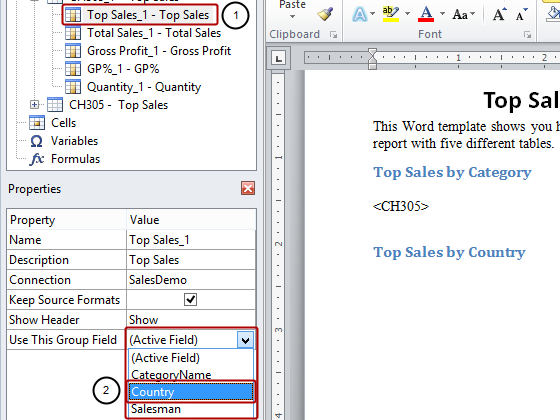
- Select the Top Sales_1 - Top Sales column node
- Select Country in the Value cell of the Use This Group Field property in the Properties pane
Embed CH305_1 - Top Sales in Template
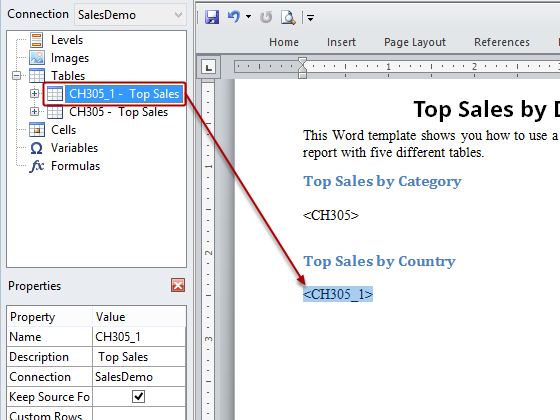
Drag and drop the CH305_1 - Top Sales table-node token into the template.
Add Third Heading and Same QlikView Object to Template
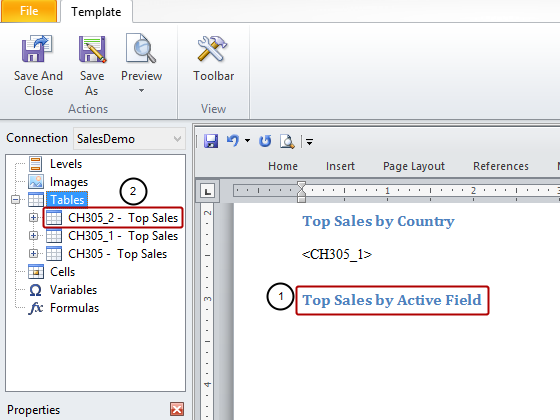
- Add a new heading to the template
- Add QlikView object CH305 - Top Sales to template as a table again, resulting in the CH305_2 - Top Sales node
Set Salesman as Field to Be Used
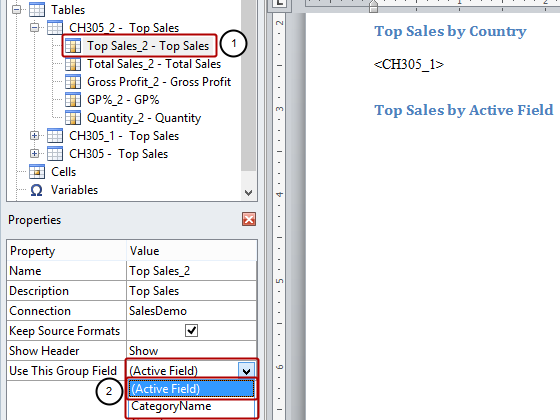
- Select the Top Sales_2 - Top Sales column node
- Select Active Field in the Value cell of the Use This Group Field property if it is not already selected
N.B. Active Field means the field of the group active at the moment of saving the QlikView document. In this case, though we haven't saved the QlikView document, the last active field is Country. If you use Active Field in an Excel report template and add the fields one by one, then you need to set Show Header to Show Above Tag Cell
Embed CH305_2 - Top Sales in Template
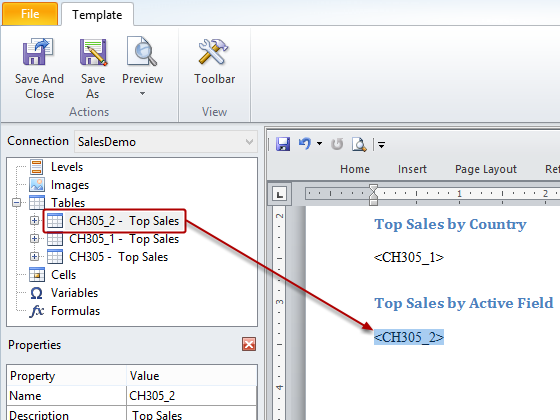
Drag and drop the CH305_2 - Top Sales node token into the template.
Run Preview
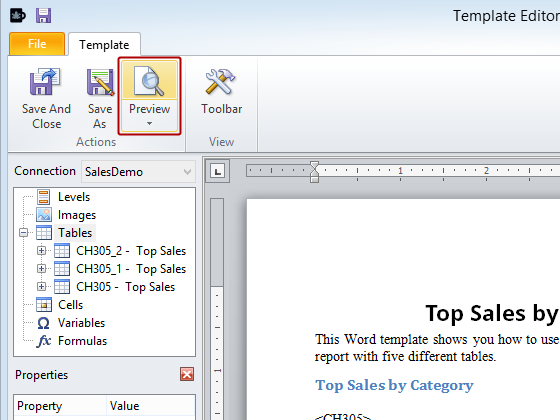
Click on Preview in the Actions group
Inspect Report Preview
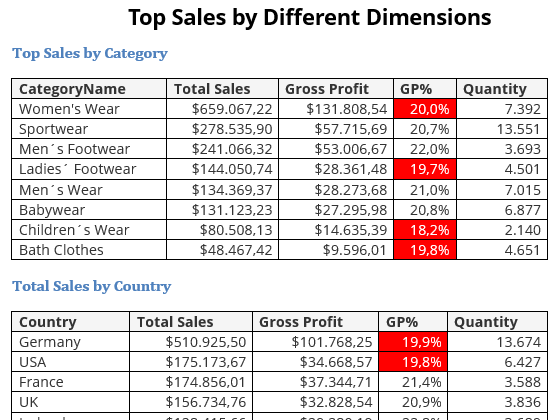
Notice that the table has been repeated but the first dimension displays a different field from the cyclic group and the other dimensions show the relevant data.
Be Sure to Save Your Work
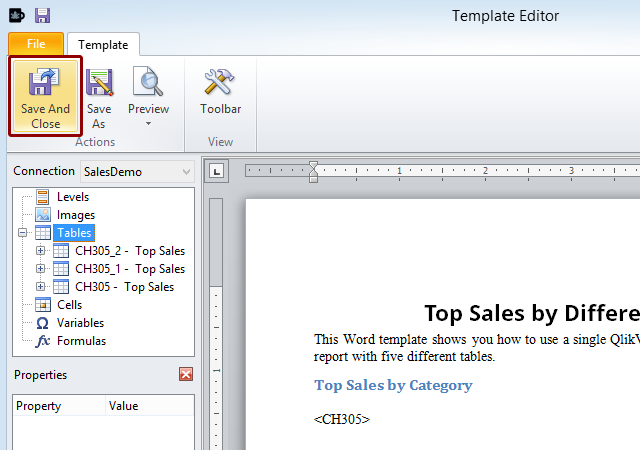
Click on the Save and Close icon.