Unlock a world of possibilities! Login now and discover the exclusive benefits awaiting you.
- Qlik Community
- :
- Forums
- :
- Analytics & AI
- :
- Products & Topics
- :
- Connectivity & Data Prep
- :
- Web Connectors 2.0.1 and users’ management
- Subscribe to RSS Feed
- Mark Topic as New
- Mark Topic as Read
- Float this Topic for Current User
- Bookmark
- Subscribe
- Mute
- Printer Friendly Page
- Mark as New
- Bookmark
- Subscribe
- Mute
- Subscribe to RSS Feed
- Permalink
- Report Inappropriate Content
Web Connectors 2.0.1 and users’ management
IT or server admins can use the Web Connectors 2.0.1 web interface to manage who can use this application. Hence selected users in Qlik Web Connectors 2.0.1 can log in after they are granted permissions to work with such Connectors and generate QlikView or Qlik Sense load scripts.
Description:
In some scenarios, the IT or server Admins want to manage or restrict the usage of Web Connectors by allowing only a number of users to access the Web Connectors, generate the load scripts and be able to use them in their Qlik Sense or Qlik View applications for pulling data from different data-sources.
Managing users in the Web Connectors enables us to manage the licenses designation per users. At the bottom of the Web Connectors interface, we can see how many users the current Web Connectors license permits and how many of these have been used so far (see image below).
If you did the Web Connectors configuration correctly, then you should be able to see “Manage Users” option under Settings next time you start it.
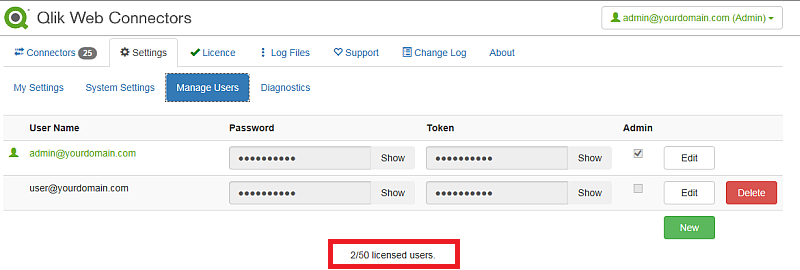
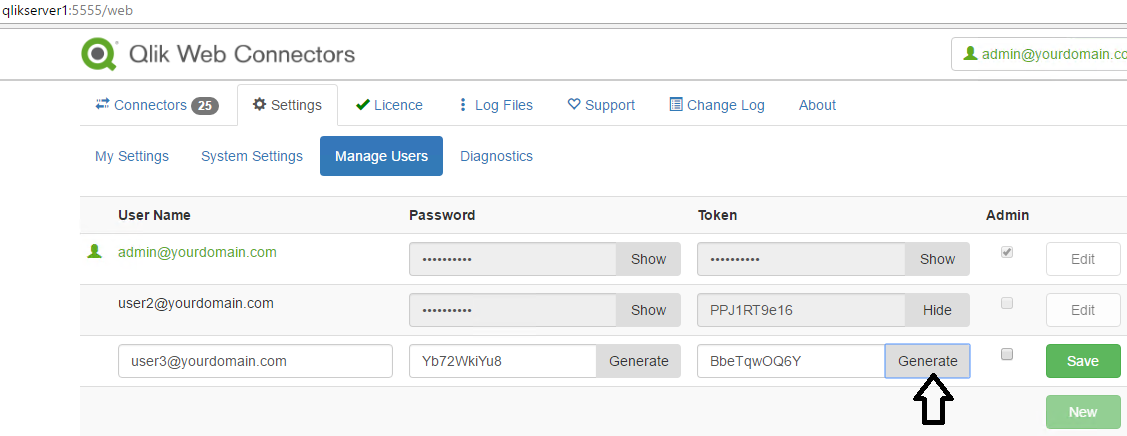
Note also in the above added users, those accounts have User name, Passwords and Tokens. The question that may also raise how all this fit together in the “Manage Users” section of the Web Connectors?
Resolution:
To enable the ”Manage Users” option under Settings in the Web Connectors, you need to follow these steps:
- You have the Web Connectors 2.0.1 zip file downloaded from qlik.com, extract it and test first with the exe file. You can start the web interface for using the Web Connectors – double click on QlikWebConnectors.exe.
- Close the Web Connectors interface and the associated running process (the web interface and the QlikWebConnectors.exe started from the previous step).
- Go to the folder where you extracted the zip file and allocate deploy.config.

- Open deploy.config in a text editor and allocate the following section:
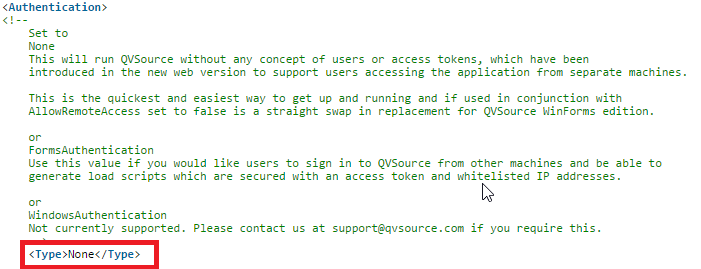
- Change
<Type>None</Type> to <Type>FormsAuthentication</Type> Note that according to the former QvSource documents “None” and “FormsAuthentication” are the only supported modes at the moment. While “WindowsAuthentication” is not supported.- By setting the value of “FormsAuthentication” the following sections become relevant:
 And
And

- You can also enable “Manage Users” by copying the deploy.config and logins.xml files from the “Sample Configs\Forms Auth and Remote Access” directory. This sets Web Connectors up with two users.
- Once you have copied these into the QVSource root directory you should be able to log-in with either:
- admin@yourdomain.com
- password01
- Or: user@yourdomain.com
- password01
- The first user has admin privileges. You can also edit the element in logins.xml first to be your own username or email address.
- Once logged in as Admin, you can go to the user management screen to add or edit users.
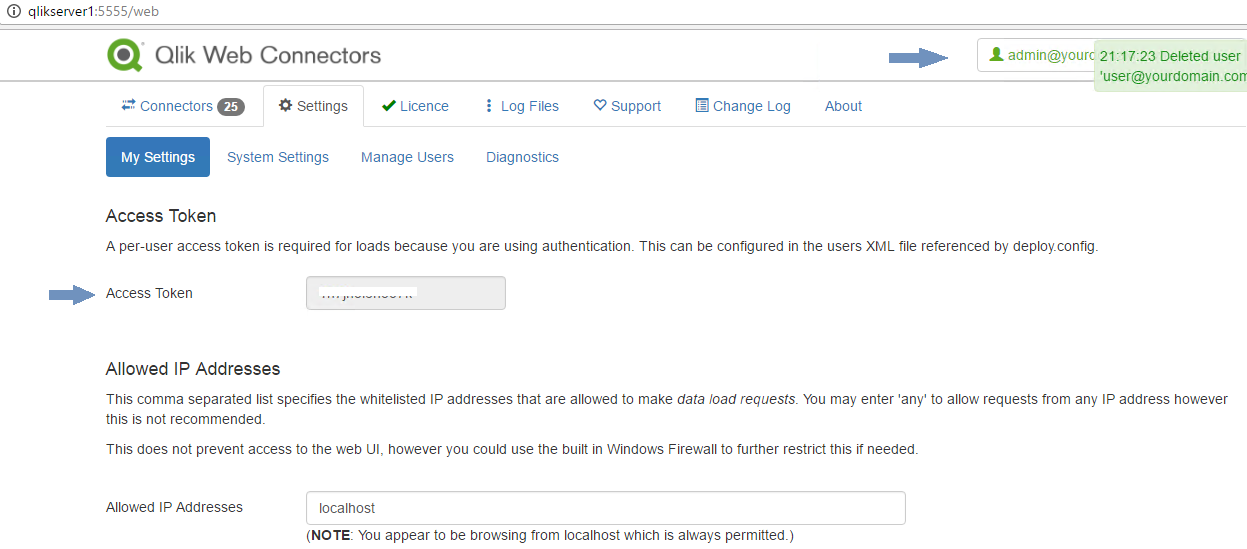
- For local network access (a user accessing the server locally for example), it is enough to start the QlikWebConnectors.exe on the server, then from the other machine the user type in the browser the full HTTP URL containing the host machine name, the port number, by default it is 5555, can be changed to something else if needed in the deploy.config.
Example of a working URL tested on my machine:
http://qlikserver1:5555/web
- Where qlikserver1 is the name of the host machine.
- For more information on this topic especially for people wanting to enable out of the local network access using SSL, then you are welcome to have a look on this page http://wiki.qvsource.com/Running-Over-SSL.ashx
- The Qlik online help documents with more details on the topic: https://help.qlik.com/en-US/connectors/Subsystems/Web_Connectors_help/Content/2.0/Configuration/Adva...
Web connectors and tokens
When “FormsAuthentication” is enabled in the deploy.config file, users will be able to sign-in to the Web Connectors from other machines and create load scripts which are secured with an access token. This token is generated automatically the first time for the Admin user.
Then it is manually generated by the Admin for any new added user. Most of the time users are in this case developers working with the load scripts within a given organization or company.
Each user added to the Web Connectors will have his/her own specific token, you may call it also a key which in turn will be embedded in the generated load script “specifically the URL of the HTTP request”, as in the following example where we tried to connect to JIRA REST API.
http://qlikserver1:5555/data?connectorID=WebConnector&table=JsonToXmlRaw&url=https%3a%2f%2fjira.qlik...loadAccessToken=0b8jh3i6h9o7x
If this token is removed from the HTTP request, then the load script will fail and throw the following error message if tested for example in Chrome and the expected result was a JSON response from the REST API.
Error Code 2. Please contact the Qlik Web Connectors deployment administrator with this message, your IP Address (172.17.17.101) and details of your request (including your request URL).
The load access tokens allow the Web Connectors to map the request to particular user and look up settings associated with that user (e.g. access tokens to a particular API) as well as associate API call logs and error logs to that user.
Since Tokens are embedded in the QlikView and Qlik Sense load script, thus it is important to guard and deliver them in a secure way. If others put their hands on the tokens, then they will be able to use them in their own API requests / load scripts and retrieve data using the Web Connectors installed on your machine.
Enabling access with Tokens
1. From the “Settings” tab you may add a new user by filling the input fields for username@domain.com and Password. You can key-in the password or click on the generate button to assign one.
2. Then you may key-in the token or click on “Generate” to have the application creates the Token automatically.
3. Passwords and tokens are at least 10 characters.
4. Click on “Save”, the Password and Token become hidden now. You may click on “Show” to view them again.
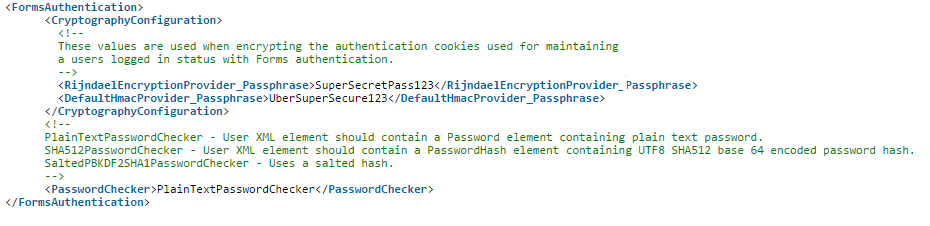
5. You will only be able to edit the passwords easily in the logins.xml file if the “PasswordChecker” element in deploy.config is set to:
<PasswordChecker>PlainTextPasswordChecker</PasswordChecker>
Otherwise the passwords will be hashed and not easy to set manually without going through the Web UI.
Web connectors licensing and how many users can be setup
After installing the Web Connectors the first time, you will need to insert your license information in case you want to use the “Premium connectors”. If you don’t need the premium connectors, then you may use the standard ones.
For licensing your Web Connectors, you need the following information, provided by Qlik:
- The serial number and control number.
- Otherwise the Lef.txt file (if the machine on which you are installing the license has no internet connection)
As it is the case with new users and Tokens allocation, the Web Connectors will always allow a maximum number of 50 users to be added, this is regardless if the license is provided or not. Once “FormsAuthentication” is enabled then by default you will get 50 users as a maximum number of users to be managed.
Steps for licensing the Web Connectors:
- Run the Web Connectors and then click on the “License” tab at the top of the page.
- Enter the Owner name and the Owner organization.
- Enter the Serial number and Control number.
- If you do not have internet access on the machine you are licensing, open the Lef.txt file in an appropriate application, like Notepad. Select all the text in the file and copy/paste it into the Enter LEF text box.
- Click on Apply new LEF.
Once this is done, the “License” tab is updated to reflect the installed license. Click on the Connectors tab to return to the list of connectors. The connectors included in your license will now show true in the Licensed column.
Note, the installed LEF license text can be found in the LicenceSettings.xml file, in the App_Data folder of the Web Connectors folder on the root drive, see the example below.
C:\Users\{some user}\Desktop\Qlik\QlikWebConnectors2.0.1\App_Data