Unlock a world of possibilities! Login now and discover the exclusive benefits awaiting you.
- Qlik Community
- :
- Support
- :
- Support
- :
- Knowledge
- :
- Member Articles
- :
- How to CC and BCC Report Distribution by E-mail
- Move Document
- Delete Document
- Subscribe to RSS Feed
- Mark as New
- Mark as Read
- Bookmark
- Subscribe
- Printer Friendly Page
- Report Inappropriate Content
How to CC and BCC Report Distribution by E-mail
- Move Document
- Delete Document
- Mark as New
- Bookmark
- Subscribe
- Mute
- Subscribe to RSS Feed
- Permalink
- Report Inappropriate Content
How to CC and BCC Report Distribution by E-mail
Description: Add CC and BCC e-mail addresses to Tasks, Groups and Recipients. CC and BCC e-mail addresses set on the E-mail settings page in the Options window of the File tab receive copies of all e-mail messages and attachments sent via Task. If your task has ten recipients, the CC and BCC recipients for that Task will receive ten e-mails every time the Task is executed. These addresses are specific to and saved in the NPrinting environment on the computer and can be replaced manually in each Task. CC and BCC e-mail addresses set for Groups will receive a copy of the message and attachment(s) sent to each and every group member. CC and BCC e-mail addresses set for individual Recipients will receive a copy of each and every message and attachment(s) sent to each respective recipient.
Set CC and BCC Addresses in Options Window
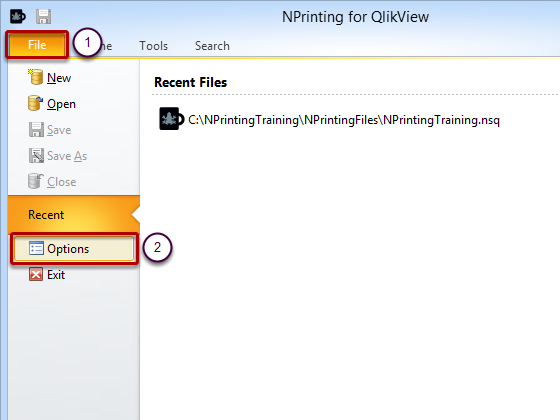
- Select the File tab
- Click on Options.
Go to E-mail Settings Page
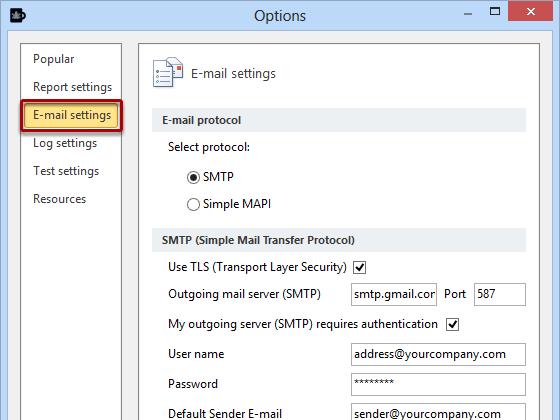
Select E-mail Settings in the left pane
Enter E-mail Addresses on E-mail Settings Page
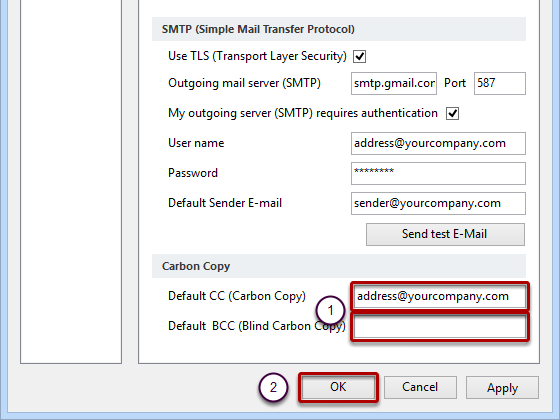
- Enter comma or semicolon separated lists of e-mail addresses in the appropriate text box in the Carbon Copysection of the window
- Conclude by clicking on OK
Task
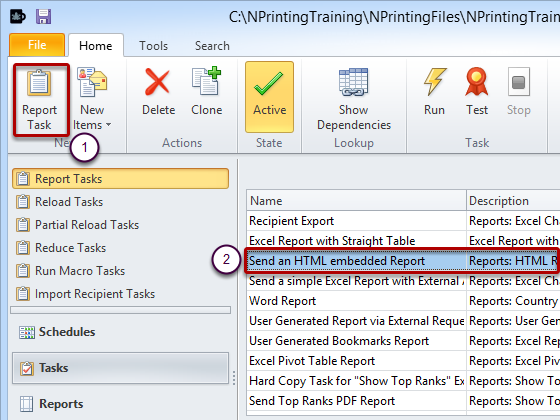
- Create a new task
- Or open an existing one by double clicking on it in the list
Set Up Task E-mail Message
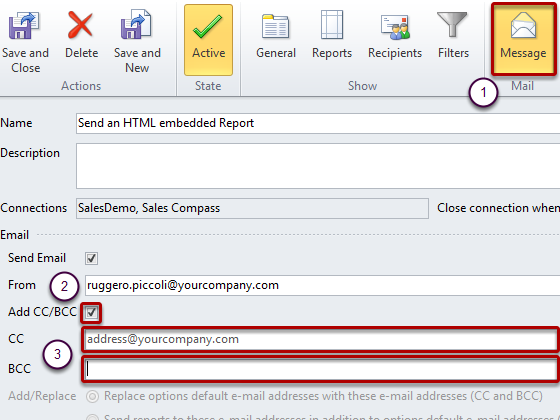
- Click on the Message button in the Mail section of the tool ribbon
- Make sure the Add CC/BCC box is checked
- Click in the CC or BCC text box and enter a comma or semicolon separated list of the e-mail addresses you want to use.
Alternative Method for Entering E-mail Addresses
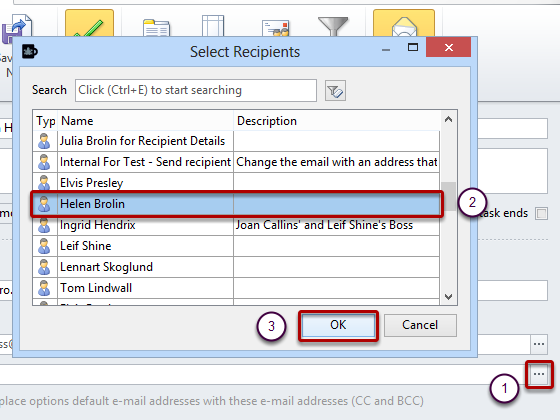 OR
OR- Click on the browse button to the right of the CC or BCC text box; this will open a window listing all of your recipients
- Select the one(s) you want (use CTRL-Click or Shift-Click to select multiple recipients)
- Add by clicking on OK
Manage CC and BCC E-mail Addresses
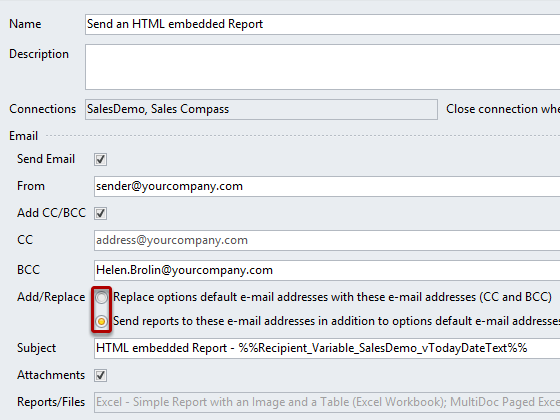
Use the radio buttons below the BCC text box to either replace the e-mail addresses entered on the E-mail Settingspage with the ones you entered manually or to add the ones you entered manually to the CC and BCC e-mail addresses entered on the E-mail Settings page.
Set CC and BCC Addresses for Groups of Recipients
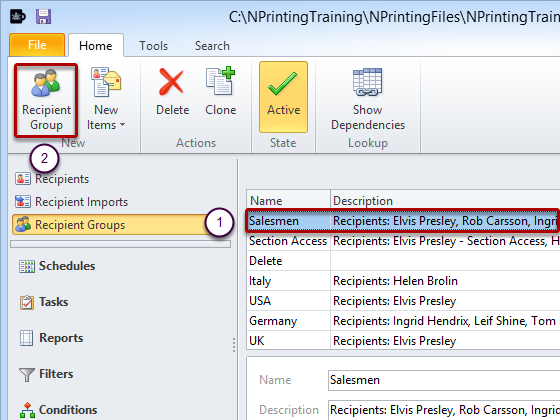
- Open an existing Group by double clicking on the Group name
- Or create a new one by clicking on the Recipient Group icon in the New section of the tool ribbon
Set Up Notifications for Group
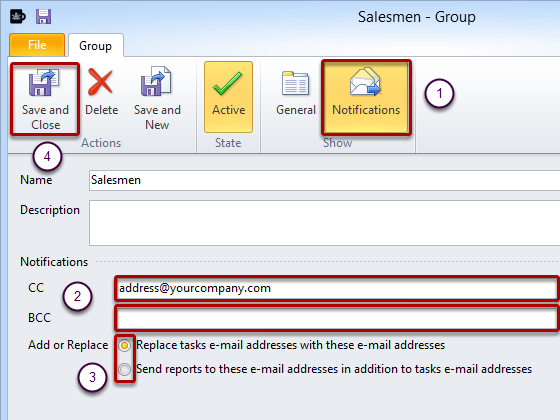
- Click on the Notifications button in the tool ribbon.
- Click in the text box to manually enter a comma or semicolon separated list of the e-mail addresses you want to use OR click on the browse button to the right of the CC or BCC text box; this will open a window with all of your recipients. Select the ones you want (use CTRL-Click or Shift-Click to select multiple recipients). Conclude the selection process and add them by clicking on OK.
- Select one of the radio buttons below the BCC text box to use the manually entered e-mail addresses in addition to or instead of Task CC and BCC e-mail addresses.
- Click on the Save and Close icon to conclude the procedure
Set CC and BCC Addresses for Individual Recipients
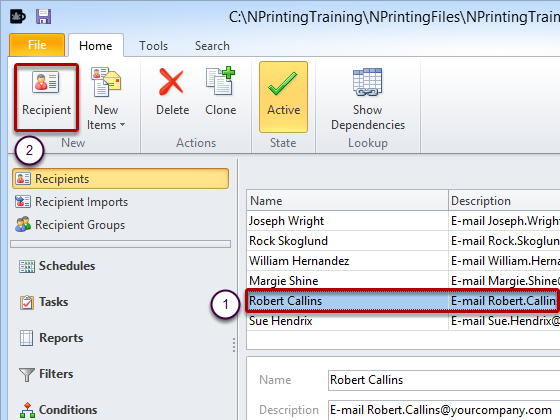
- Open an existing Recipient by double clicking on the Recipient's name
- Or create a new one by clicking on the Recipient icon in the New section of the tool ribbon
Set Up Notifications for Individual Recipients
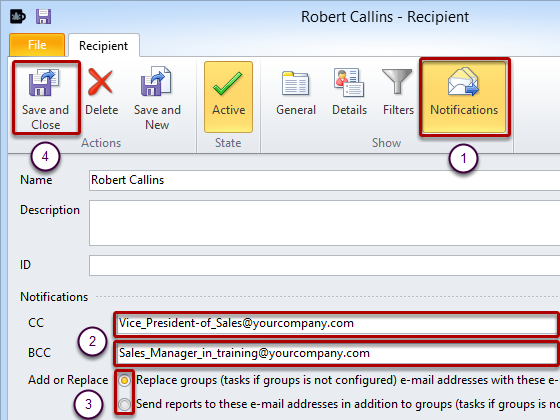
- Click on the Notifications button in the tool ribbon.
- Click in the text box to manually enter a comma or semicolon separated list of the e-mail addresses you want to use OR click on the browse button to the right of the CC or BCC text box; this will open a window listing all of your recipients. Select the ones you want (use CTRL-Click or Shift-Click to select multiple recipients). Conclude the selection process and add them by clicking on OK.
- Select one of the radio buttons below the BCC text box to use the manually entered e-mail addresses in addition to or instead of Group CC and BCC e-mail addresses.
- Click on the Save and Close icon to conclude the procedure