Unlock a world of possibilities! Login now and discover the exclusive benefits awaiting you.
- Qlik Community
- :
- Support
- :
- Support
- :
- Knowledge
- :
- Member Articles
- :
- How to Create Reports Based on QlikView Entities
- Move Document
- Delete Document
- Subscribe to RSS Feed
- Mark as New
- Mark as Read
- Bookmark
- Subscribe
- Printer Friendly Page
- Report Inappropriate Content
How to Create Reports Based on QlikView Entities
- Move Document
- Delete Document
- Mark as New
- Bookmark
- Subscribe
- Mute
- Subscribe to RSS Feed
- Permalink
- Report Inappropriate Content
How to Create Reports Based on QlikView Entities
Learn how to create and distribute output in PDF or as image from QlikView reports and object you have already created in QlikView. You cannot create or modify QlikView reports in NPrinting, but you can add filters and cycles to dynamically select the data which is published in the report. Recipient-specific versions of your reports in PDF can be filtered according to parameters set for each recipient and can be sent by e-mail or saved to recipient-specific directories.
If you want to export a QlikView object in a CSV (Comma Separated Value) file refer to "How to Export QlikView Objects to CSV Files". To customize the separator character refer to "How to Customize the Separator Character When Exporting QlikView Objects to CSV Files"
NB: New QlikView Entity Reports do not require the Bullzip PDF printer, but it must be install in order to create NPrinting QlikView Reports when they are based on QlikView Legacy Reports. We strongly recommend that you migrate any and all of your Legacy Reports to new Entity Reports as soon a possible.
Create New QlikView Entity Report
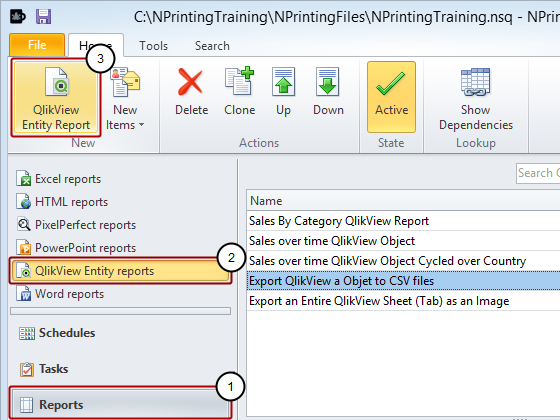
- Select the Reports icon in the lower left pane
- Select the QlikView Entity reports icon in the upper left pane
- Click on the QlikView Report icon in the New group of the toolbar
Configure Report
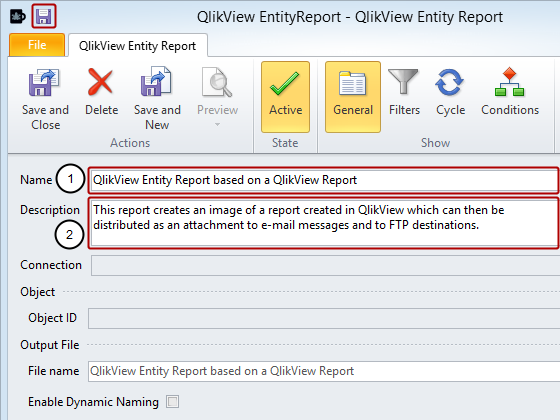
- Enter a Name for the report
- Enter a Description (optional)
Open Select Objects window
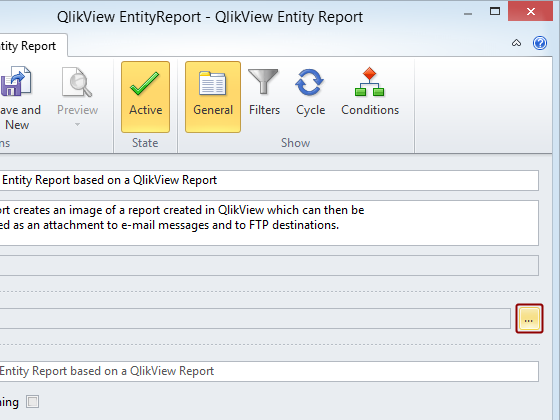
Click on the browse button at the extreme right of the Object ID field to open the Select Objects window.
Select QlikView Report

- Select the Connection to the QlikView document that contains the report that you want
- Enter 'rp' or 'RP' in the Search field, this will select for QlikView report IDs
- Select the report you want
- Click on the OK button
Add filters to your QlikView report
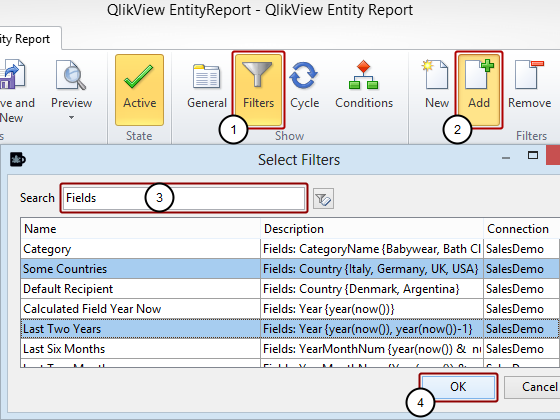
Add filters to your reports. Filters added to reports will filter all instances of that report in all tasks.
- Click on the Filters button in the Show group in the tool bar
- Click on the Add button in the Filters group of the tool bar to open the Select Filters window and select an existing filter. Alternatively, click on the New button to create a new filter (see: How to Create Static and Dynamic Filters Based on Fields). You can add as many filters as you like.
- Enter Fields in the Search field to reduce the selection. Keeping CTRL pressed, select two filters, for instance "Some Countries" and "Last Two Years"
- Click on the OK button
Open Select Field Window
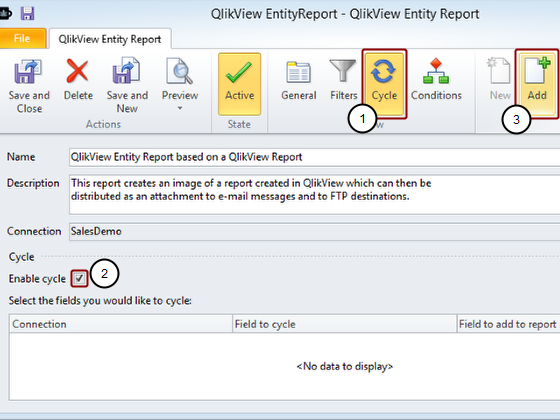
Cycle creates a separate report for each value of the cycled field.
If you add a cycle to a report, running the report will create a separate output for each value of the field you cycle and each output would only contain data associated with that value. For instance if you cycle on the field Year and your QlikView document contains data for 2007 - 2009, you would create a separate report for 2007, 2008, 2009. Each report would be named something like 2007_ReportName, 2008_ReportName 2009_ReportName and each report would only contain data for a single year. You can add as many fields as you want in a cycle. This will create a separate file for each combination of the fields values.
- Click on the Cycle button in the Show group of the tool bar.
- Put a check mark in the Enable cycle box
- Click on the Add icon in the Cycle group
Select Field to Cycle over
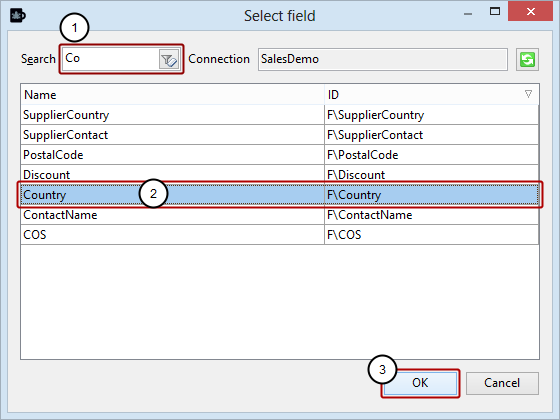
- Enter as many characters of a field name in the Search field as necessary to easily find the field name in the list
- Select the Field each of whose values you want to generate a separate report for. For instance "Country".
- Click on the OK button
Report names when cycling
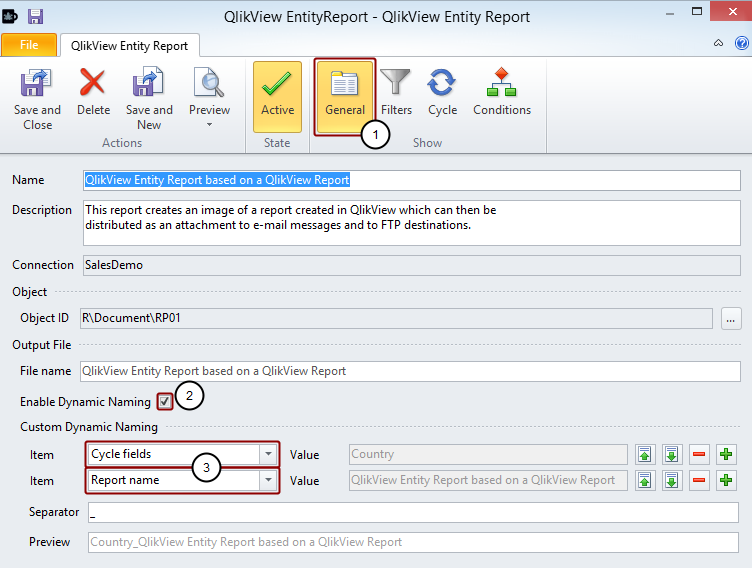
- Go back to the General page by clicking on the General icon in the Show group
Please note that when you enable cycling, NPrinting:
- Enables Dynamic Naming automatically and it's mandatory.
- Includes, not only the report name as an element of the names of the reports that will be generated, but also the values of the cycled fields. Refer to "Dynamic Report Naming"
- Click on the Preview button to check the result. To run the Cycle you need to run a Task with the report inside.