Unlock a world of possibilities! Login now and discover the exclusive benefits awaiting you.
- Qlik Community
- :
- Support
- :
- Support
- :
- Knowledge
- :
- Member Articles
- :
- How to Enable SSL in On-Demand
- Move Document
- Delete Document
- Subscribe to RSS Feed
- Mark as New
- Mark as Read
- Bookmark
- Subscribe
- Printer Friendly Page
- Report Inappropriate Content
How to Enable SSL in On-Demand
- Move Document
- Delete Document
- Mark as New
- Bookmark
- Subscribe
- Mute
- Subscribe to RSS Feed
- Permalink
- Report Inappropriate Content
How to Enable SSL in On-Demand
Nov 6, 2015 8:58:33 AM
Nov 6, 2015 8:58:33 AM
NOTE: NPrinting On Demand does NOT support reverse proxy server configurations nor software/hardware web load balancers at this time. It is currently designed to work with http or https in a non load-balanced front environment where ports 9000 and 9001 are left open for use with NPrinting On Demand Exclusively.
SSL can be enabled selectively per-endpoint.
For example, you can enable SSL for HTTP endpoint and disable SSL for WS endpoint. Also see "NPrinting On-Demand: Architecture and Configuration".
A valid SSL certificate signed by a valid CA (public or domain) must be bound to the https://yourhostdnsname:ajaxport/ address you plan to use for the endpoint.
Ports Reservation
Ports reservation are done automatically at service startup in NPrinting 14.0.0.12 or higher releases. In some installations, you must reserve TCP ports listening for the On-Demand service process.
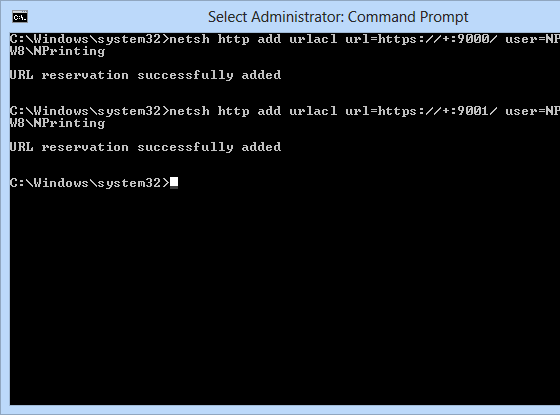
After opening a Command Prompt as Administrator, check if SSL is enabled:
- Enter netsh http add urlacl url=https://+:9000/ user=DOMAIN\user , replace DOMAIN\user with the domain and the name of your NPrinting Server account
- Enter netsh http add urlacl url=https://+:9001/ user=DOMAIN\user
If a port is reserved by another process and you are sure you can use it with On-Demand, remove the reservation before enabling it typing the following:
Enter netsh http delete urlacl url=https://+:9000/ (replace 9000 with target TCP port and http with https if SSL is enabled)
Install Makecert Tool

If you already have a SSL certificate, go directly to "Get the Certificate Thumbprint" step further below in this tutorial.
After logging in with your NPrinting Server account, download and install "Microsoft Windows SDK for Windows 7 and .NET Framework 4" if your system does not have "makecert" installed.
Select Tools during the installation and finish the installation
Create a Trusted Certificate only for Test
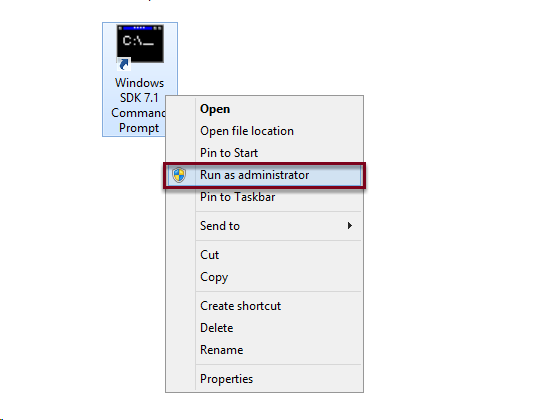
Right click on Windows SDK 7.1 Command Prompt and select Run as administrator
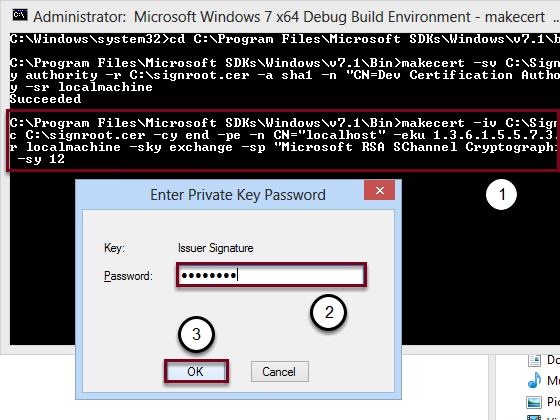
Generate the Trusted SSL Certificate
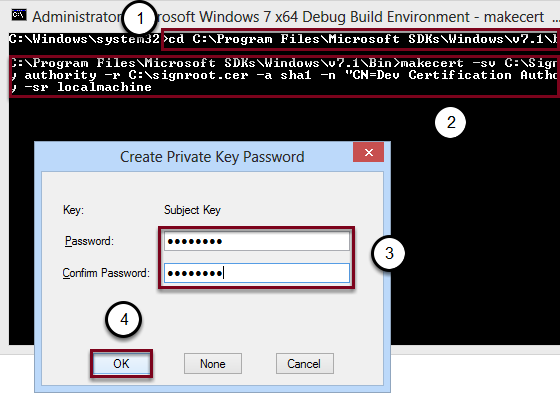
- Enter cd C:\Program Files\Microsoft SDKs\Windows\v7.1\bin
- Enter makecert -sv C:\SignRoot.pvk -cy authority -r C:\signroot.cer -a sha1 -n "CN=Dev Certification Authority" -ss my -sr localmachine to create a trusted certificate only for tests. Refer to "Makecert.exe (Certificate Creation Tool)"
- Enter a password
- Click OK. If necessary retype the password
This command create a certificate (.cer) and a Private Key (.pvk) in C:\ root folder.
Open the Microsoft Management Console
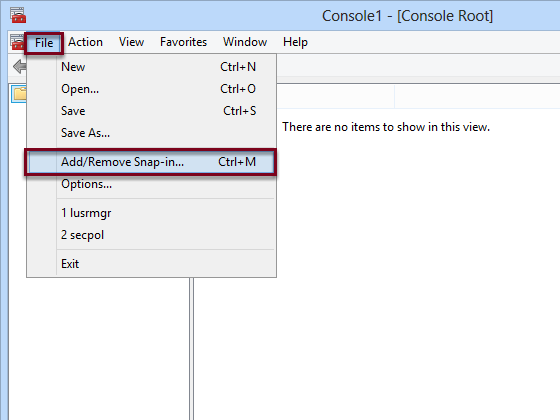
Execute the command mmc.exe then:
- Click on File
- Select Add/Remove Snap-in...
Add the Certificates to the Console
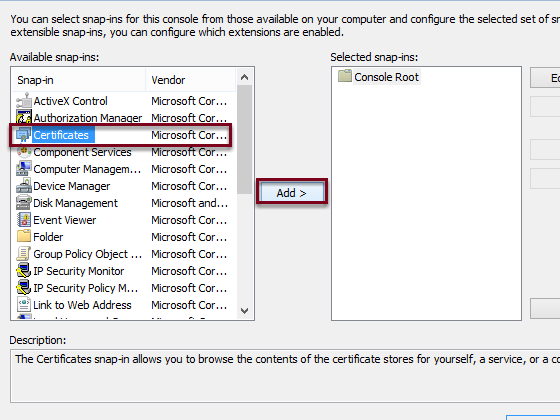
- Select Certificates from the list
- Click on Add > to import the selected element in the console and a new window will appears
Certificate snap-in
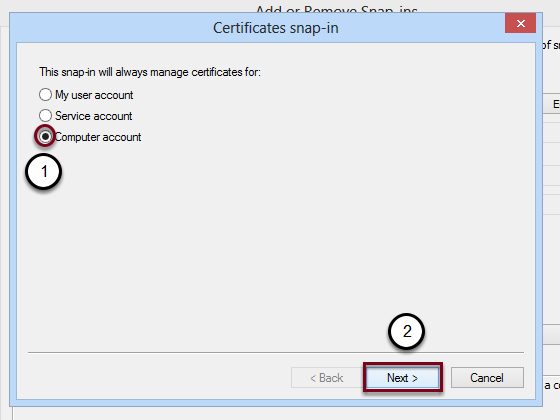
- Select Computer account
- Click on Next
After clicking on Finish, click on OK
Move the Certificate to Trusted Root Certification Authorities
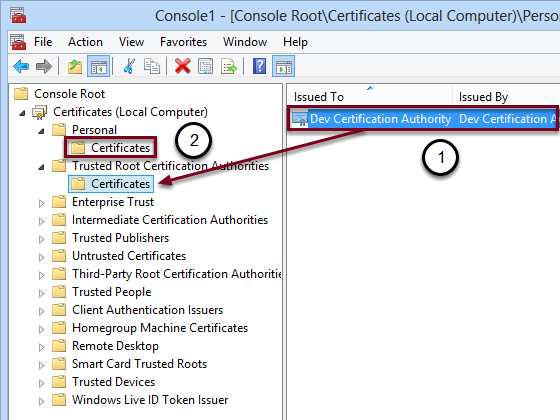
- Move into Certificates -> Personal -> Certificates
- Select Dev Certification Authority and drag and drop it into Trusted Root Certification Authorities
Create a localhost Certificate
After returning to the Command Prompt:
- Enter makecert -iv C:\SignRoot.pvk -ic C:\signroot.cer -cy end -pe -n CN="localhost" -eku 1.3.6.1.5.5.7.3.1 -ss my -sr localmachine -sky exchange -sp "Microsoft RSA SChannel Cryptographic Provider" -sy 12
- Enter the password created for the first certificate
- Click OK
Get the Certificate Thumbprint
If you already have a certificate you can import it:
- Go to Certificates -> Personal -> Certificates
- Right-click on the empty list and select All Tasks -> Import...
After reopening the Microsoft Management Console and clicking F5:
- Double click on localhost or on your certificate into Certificates -> Personal -> Certificates
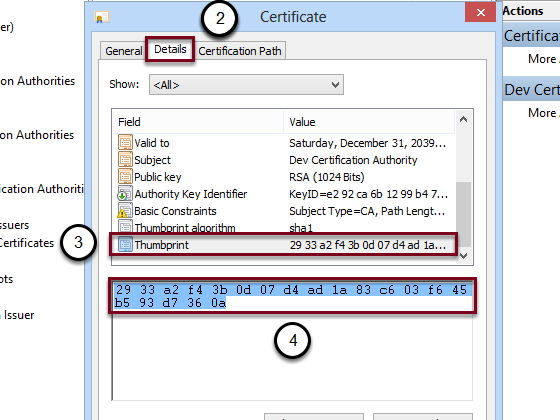
- Open the Details tab
- Select from the list Thumbprint
- Select the thumbprint and copy it into Notepad and remove the spaces, the number will be different from the screenshot
Remove old SSL Associations
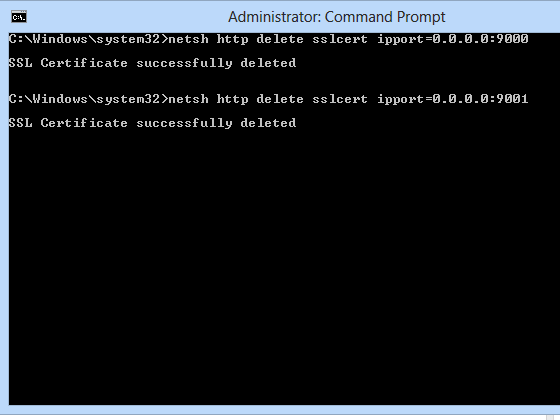
After opening a Command Prompt as Administrator:
- Enter netsh http delete sslcert ipport=0.0.0.0:9000
- Enter netsh http delete sslcert ipport=0.0.0.0:9001
If you get the error "SSL Certificate deletion failed, Error: 2 The system cannot find the file specified." means that there weren't certificates bound to these ports.
Netsh command works only starting from Windows Vista and Windows Server 2008, if you use an older version refer to "How to: Configure a Port with an SSL Certificate"
Generate GUIDs
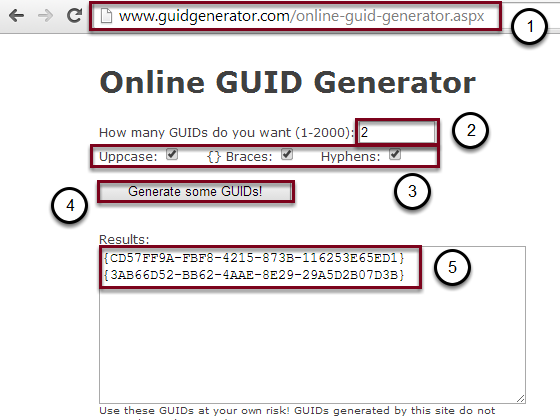
- Go to "Online GUID Generator"
- Enter 2
- Check all three boxes
- Click on Generate some GUIDs!
- Select and copy these two GUIDs into your Notepad, the GUIDs will be different from the screenshot.
Binding an SSL Certificate to a URL
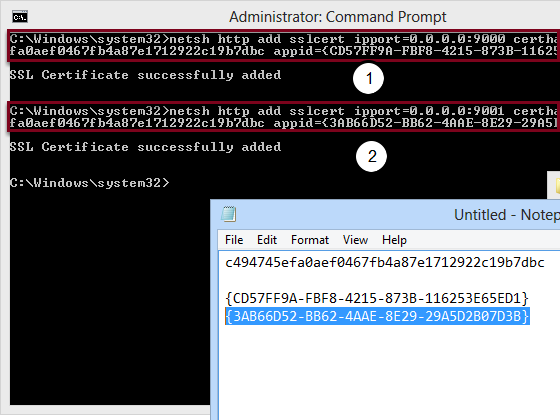
After reopening the Command Promt:
- Enter netsh http add sslcert ipport=0.0.0.0:9000 certhash="thumbprint" appid={GUID} , replace "thumbprint" with your thumbprint and "GUID" with one of your GUIDs previously copied into the notepad without quotes (e.g. netsh http add sslcert ipport=0.0.0.0:9000 certhash=c494745efa0aef0467fb4a87e1712922c19b7dbc appid={CD57FF9A-FBF8-4215-873B-116253E65ED1})
- Enter netsh http add sslcert ipport=0.0.0.0:9001 certhash="thumbprint" appid={GUID} , replace "thumbprint" with your thumbprint and "GUID" with your second GUID (e.g. netsh http add sslcert ipport=0.0.0.0:9001 certhash=c494745efa0aef0467fb4a87e1712922c19b7dbc appid={3AB66D52-BB62-4AAE-8E29-29A5D2B07D3B})
Check the Ports
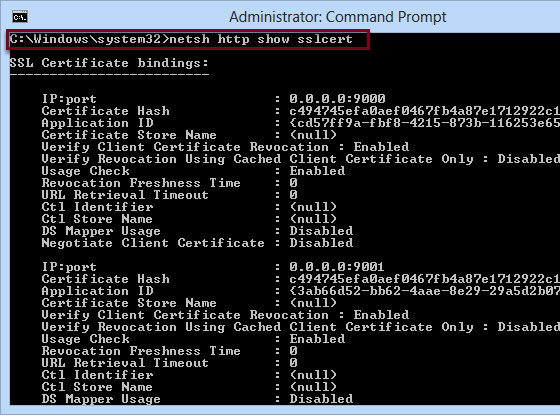
Enter netsh http show sslcert
Using this command is possible to see all the SSL certificate added. If all step have been performed correctly, you will see the certificates which you added in previous steps.
Configure ods.config

- Go to C:\Users\{UserName}\AppData\Roaming\NPrinting\ODS (e.g. C:\Users\NPrinting\AppData\Roaming\NPrinting\ODS)
- Open ods.config with a text editor
Configure On-Demand Service Endpoints
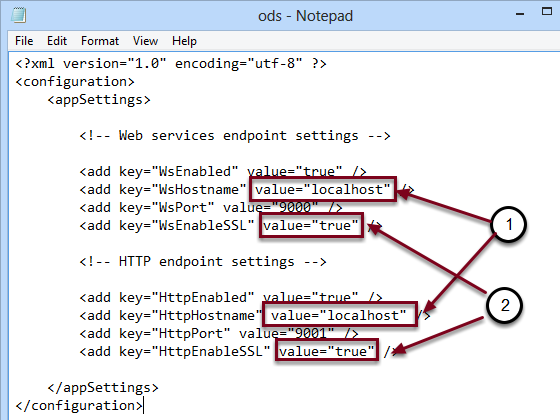
- WsEnabled and HttpEnabled enable or disable the WS and HTTP endpoints respectively.
- WsHostname and HttpHostname are the DNS hostnames of the WS and HTTP interfaces respectively as they appear to clients. If you enable SSL, these names must be the same as indicated in the SSL certificate. (e.g. localhost)
- WsPort and HttpPort are the TCP ports used for the WS and HTTP interfaces respectively. If both endpoints are enabled these ports must be different.
- WsEnableSSL and HttpEnableSSL enable or disable the SSL protocol in the respective interface.
- Enter localhost in the WsHostname and HttpHostname value field
- Type true in the WsEnableSSL and HttpEnableSSL value field
- Save and Close
Edit the On-Demand Components
If you want to use SSL you must enable SSL on ON-Demand Components
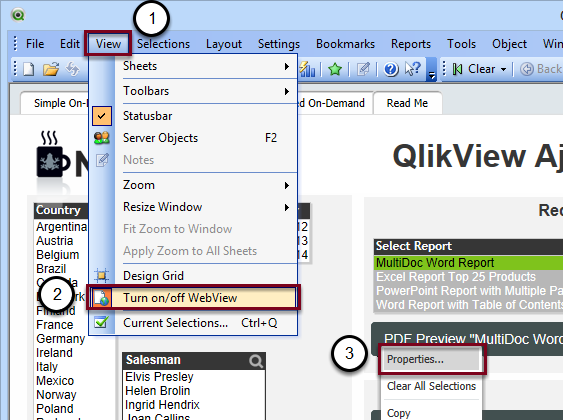
- Click on View
- Select Turn on/off WebView
- Right-click on each button and click on Properties
Enable SSL on On-Demand Components
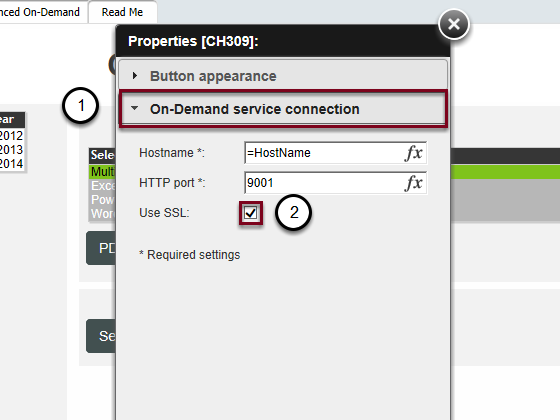
- Select On-Demand service connection
- Check Use SSL
Restart the NPrinting Server Service
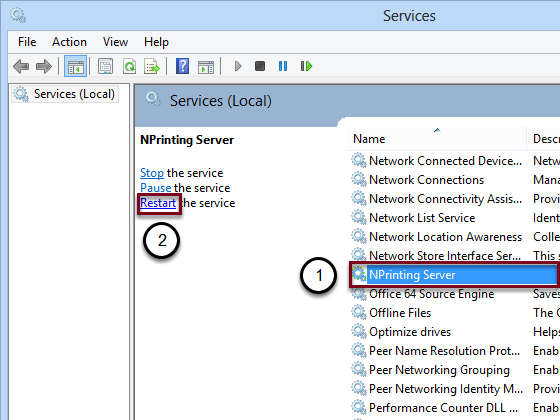
After opening the Services manager:
- Select NPrinting Server service from the list
- Click on Restart
Result
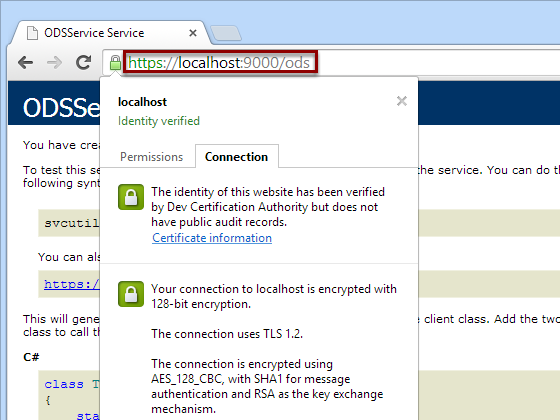
If you go to https://localhost:9000/ods, you can see the a green padlock and that the certificate has been accepted.
NOTE: NPrinting On Demand does NOT support reverse proxy server configurations nor software/hardware web load balancers at this time. It is currently designed to work with http or https in a non load-balanced front environment where ports 9000 and 9001 are left open for use with NPrinting On Demand Exclusively.