Unlock a world of possibilities! Login now and discover the exclusive benefits awaiting you.
- Qlik Community
- :
- Support
- :
- Support
- :
- Knowledge
- :
- Member Articles
- :
- How to Schedule Jobs
- Move Document
- Delete Document
- Subscribe to RSS Feed
- Mark as New
- Mark as Read
- Bookmark
- Subscribe
- Printer Friendly Page
- Report Inappropriate Content
How to Schedule Jobs
- Move Document
- Delete Document
- Mark as New
- Bookmark
- Subscribe
- Mute
- Subscribe to RSS Feed
- Permalink
- Report Inappropriate Content
How to Schedule Jobs
Nov 10, 2015 6:10:23 AM
Nov 10, 2015 6:10:23 AM
Once you have created one or more Jobs, you can check and run them manually by clicking on the Check and Run icons. You may, however, want to schedule Job execution so that you don't have to worry about forgetting or someone being present to run them. One drawback to the Scheduler is that if NPrinting is shut down for any reason, such as a reboot or someone tripping over the power cord, the Scheduler must be restarted manually. A solution to this drawback is running NPrinting as a Windows Service and not using the scheduler (see: How to Configure NPrinting as a Service).
Learn how to set up a schedule for one or more jobs in this tutorial.
Create a New Schedule for Jobs
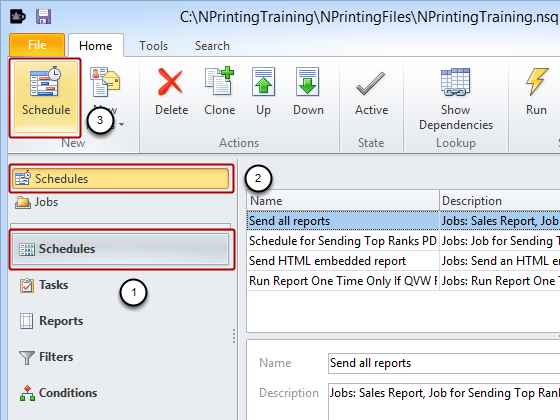
- Select the Schedules icon in the lower left pane
- Select the Schedules icon in the upper left pane
- Click on the Schedule icon in the New group
Configure Schedule Parameters
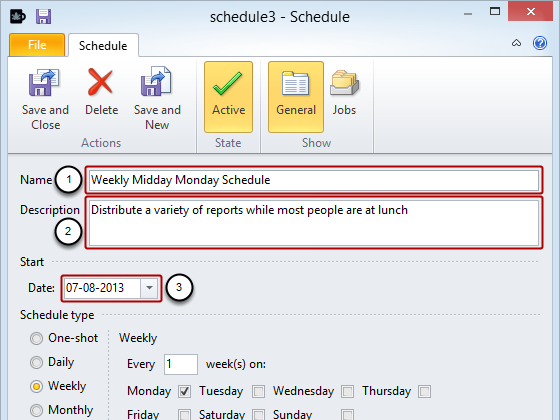
- Enter a meaningful Name for your Schedule
- You may want to enter a more explanatory Description (optional)
- Select a Start date. The Scheduler will begin checking for scheduled jobs at 00:00:01 on the start date.
Configure More Schedule Parameters
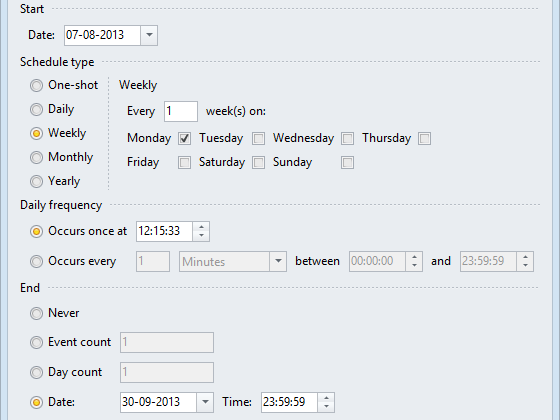
- Select a Schedule type: One-shot will execute once at the selected Shot time on the start date, the other selections are self-explanatory (Weekly has been selected and job execution has been set for Monday of Every week in the example)
- Set Daily frequency: the scheduler will run jobs once at 12:15:33 in the example
- Set the Date and Time for this Schedule to become defunct
Configure State and Add Jobs
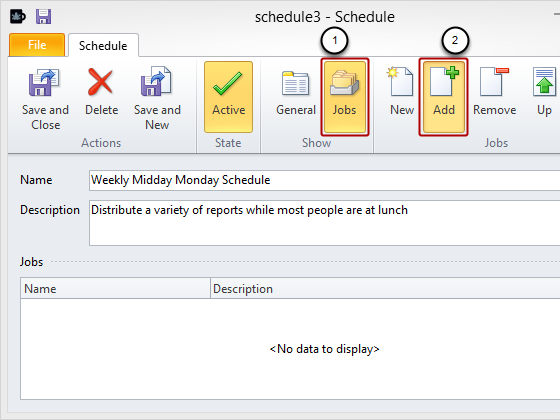
- Select the Jobs icon in the Show group
- Click on the Add icon
Choose Jobs to be Triggered by This Schedule
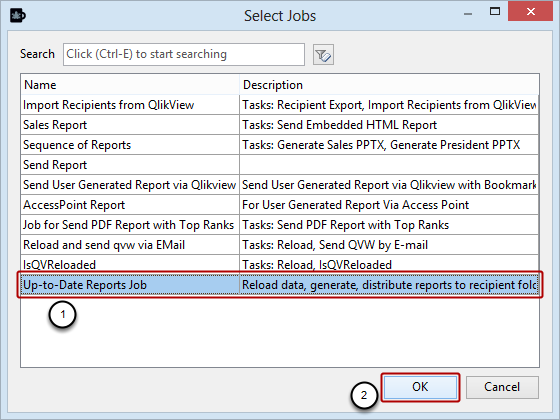
- Select one or more jobs for this Schedule
- Click on the OK button
Save Schedule
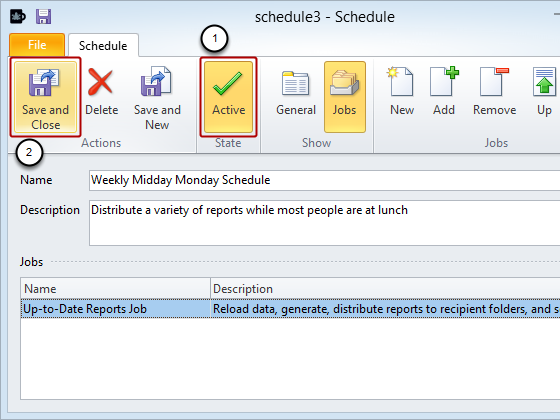
- You can toggle between active and inactive states for individual Schedules by clicking on the Active icon in the tool bar State group of the window for the specific Schedule
- Click on Save and Close to conclude schedule creation by saving the schedule in the NPrinting file
Start Scheduler
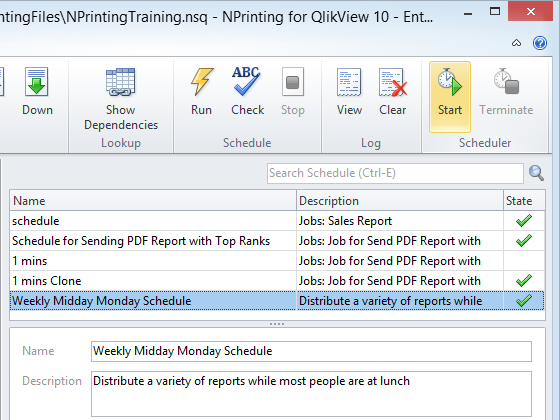
Be sure to put the Scheduler in an active state by clicking on the Start button in the Scheduler group of the tool bar.
This sets NPrinting to check periodically for jobs scheduled for execution and to execute them as scheduled. You cannot use other NPrinting features, such as development tools, when the Scheduler is active. You can put the Scheduler in stand-by, suspending all scheduled job execution but re-enabling the other NPrinting features by clicking on the Terminate icon.