Unlock a world of possibilities! Login now and discover the exclusive benefits awaiting you.
- Qlik Community
- :
- Support
- :
- Support
- :
- Knowledge
- :
- Member Articles
- :
- How to Use Specific Filters with NPrinting On-Dema...
- Move Document
- Delete Document
- Subscribe to RSS Feed
- Mark as New
- Mark as Read
- Bookmark
- Subscribe
- Printer Friendly Page
- Report Inappropriate Content
How to Use Specific Filters with NPrinting On-Demand Reporting
- Move Document
- Delete Document
- Mark as New
- Bookmark
- Subscribe
- Mute
- Subscribe to RSS Feed
- Permalink
- Report Inappropriate Content
How to Use Specific Filters with NPrinting On-Demand Reporting
Nov 10, 2015 4:36:52 AM
Nov 10, 2015 4:36:52 AM
We suggest that you do How to Use Current Selections with On-Demand Reporting before doing this tutorial.
You will explore the interaction between Reports with filters applied in the NPrinting Project file and Current Selections you set on the QlikView On-Demand sheet.
Attention: remember to save QlikView documents used as NPrinting connections with WebView mode deactivated. NPrinting cannot open QlikView documents with WebView mode activated because it doesn't have full control of QlikView functionalities.
Prepare NPrinting Filter
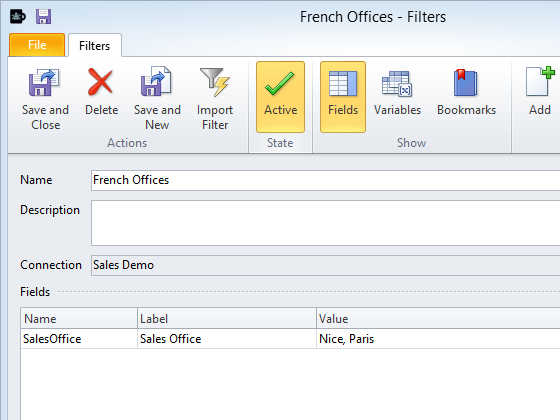
- Open NPrinting Project document C:\NPrintingTraining\NPrintingFiles\OnDemand.nsq
- Create a new filter or use the one that is already present in the training environment. Read this tutorial: How to Create Static and Dynamic Filters Based on Fields to learn how to create a filter based on fields.
- Call it French Offices
- Select the field Sales Office
- Add the value Paris and Nice
- OK
- Save and Close
Create New NPrinting Report Extension
Create a new NPrinting Report Extension in the QlikView document (see: How to Use NPrinting Extensions in QlikView Documents). We’ll use an NPrinting report that doesn’t have any NPrinting filters connected in this example. We’ll add an NPrinting filter but using the NPrinting Report Extension Object. Finally, we’ll generate the report with different combinations of filters to see how they work together.
- Turn on WebView if it is not already on
- Right click on the sheet
- Select New Sheet Object
- Click on the Extension Objects bar
- Drag and drop the NPrinting Report object onto the sheet
Configure NPrinting Report Extension Object
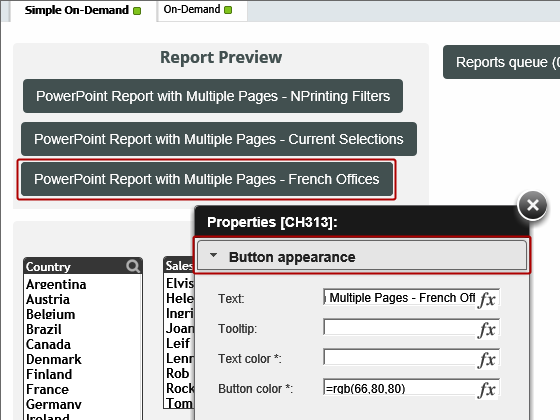
- Right click on the object
- Select Properties
- Click on Button appearance if it is not already selected
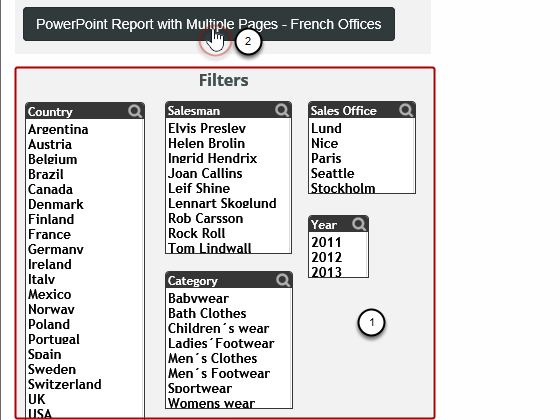
- Text: PowerPoint Report with Multiple Pages - French Offices
- Bottom Color: =rgb(66,80,80)
Configure On-Demand Service Connection
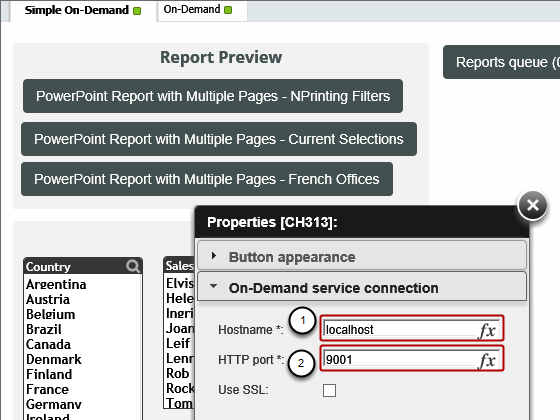
Click on On-Demand Service Connection
- Hostname: localhost
- HTTP Port: 9001
Configure Report settings
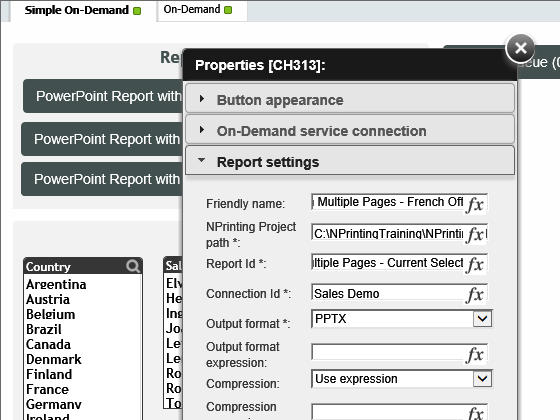
Click on Report settings
- Friendly name: PowerPoint Report with Multiple Pages - French Offices
- NPrinting Project path: C:\NPrintingTraining\NPrintingFiles\OnDemand.nsq
- Report ID: PowerPoint Report with Multiple Pages - Current Selections
- Connection ID: Sales Demo
- Output format: PPTX
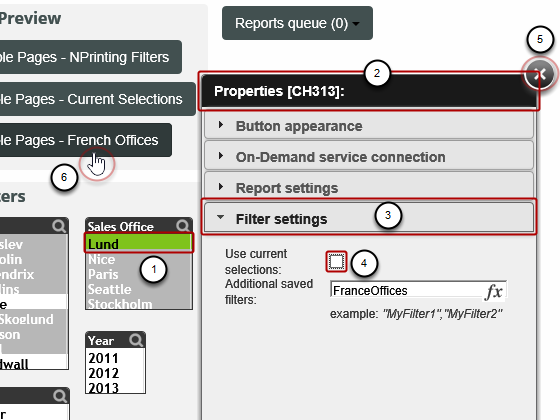
Configure Filter settings

Click on Filter settings
- Use current selections: check marked
- Additional saved filters: insert here the name of the NPrinting filter you want to apply to the report. For this tutorial insert FranceOffices, the name precisely as it is in the NPrinting Project file
- Close the configuration editor
Clear and Demand
- Clear all Filters/Selections
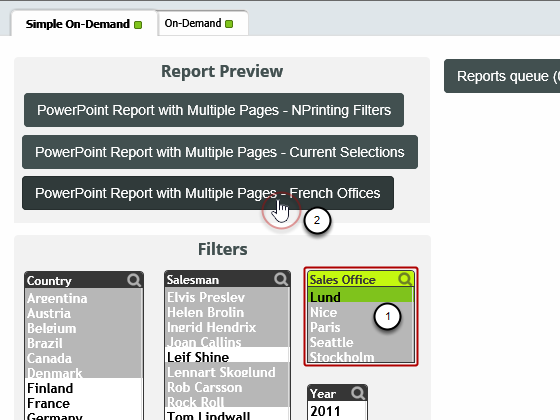
- Click on the PowerPoint Report with Multiple Pages - French Offices button to generate the report
Select and Open Report
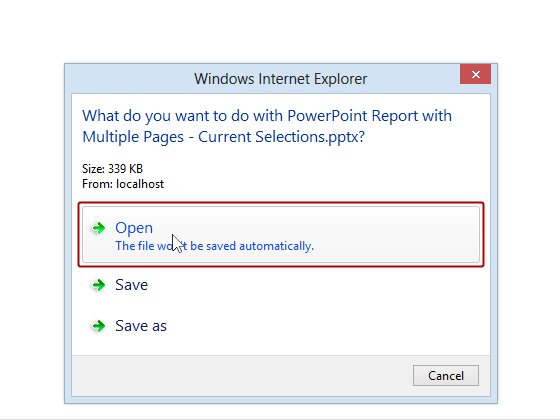
- Click on the Report queue button
- Click on the topmost report
- Click on Open
Inspect Report
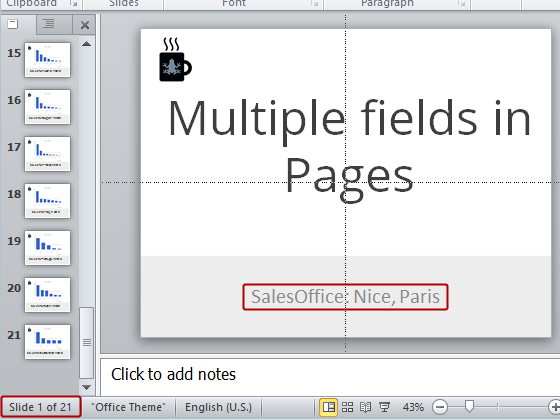
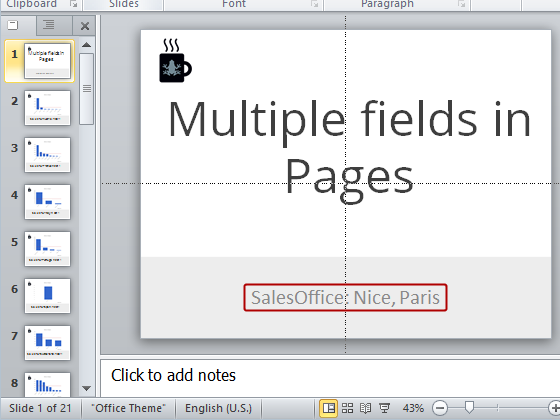
The report has 21 slides for sales managed by the Paris and Nice sales offices as set in the saved NPrinting filter.
Set Current Selection
- Set a current selection, Sales Office=Lund, in the QlikView document. It’s a filter on the same field filtered inside NPrinting.
- Request report generation
Inspect Report Again

The report has 17 slides for the sales managed by the Lund office. The saved NPrinting report filter was ignored.
Reconfigure Filter Settings and Demand Report Generation Again
- Keep the current selection, Sales Office = Lund and right click on the NPrinting Report button
- Open the properties windows by right clicking and selecting Properties
- Go to Filter settings
- Uncheck the option Use current selections
- Close the window by clicking on the 'X'
- Demand report generation another time
Inspect This Last Report
The current selection has been ignored and the resulting report contains only sales from the Paris and Nice offices.
We suggest that you do How to Use NPrinting On-Demand to Set Recipients in Tasks now that you have completed this tutorial.