Unlock a world of possibilities! Login now and discover the exclusive benefits awaiting you.

Featured Content
-
How to contact Qlik Support
Qlik offers a wide range of channels to assist you in troubleshooting, answering frequently asked questions, and getting in touch with our technical e... Show MoreQlik offers a wide range of channels to assist you in troubleshooting, answering frequently asked questions, and getting in touch with our technical experts. In this article, we guide you through all available avenues to secure your best possible experience.
For details on our terms and conditions, review the Qlik Support Policy.
Index:
- Support and Professional Services; who to contact when.
- Qlik Support: How to access the support you need
- 1. Qlik Community, Forums & Knowledge Base
- The Knowledge Base
- Blogs
- Our Support programs:
- The Qlik Forums
- Ideation
- How to create a Qlik ID
- 2. Chat
- 3. Qlik Support Case Portal
- Escalate a Support Case
- Phone Numbers
- Resources
Support and Professional Services; who to contact when.
We're happy to help! Here's a breakdown of resources for each type of need.
Support Professional Services (*) Reactively fixes technical issues as well as answers narrowly defined specific questions. Handles administrative issues to keep the product up-to-date and functioning. Proactively accelerates projects, reduces risk, and achieves optimal configurations. Delivers expert help for training, planning, implementation, and performance improvement. - Error messages
- Task crashes
- Latency issues (due to errors or 1-1 mode)
- Performance degradation without config changes
- Specific questions
- Licensing requests
- Bug Report / Hotfixes
- Not functioning as designed or documented
- Software regression
- Deployment Implementation
- Setting up new endpoints
- Performance Tuning
- Architecture design or optimization
- Automation
- Customization
- Environment Migration
- Health Check
- New functionality walkthrough
- Realtime upgrade assistance
(*) reach out to your Account Manager or Customer Success Manager
Qlik Support: How to access the support you need
1. Qlik Community, Forums & Knowledge Base
Your first line of support: https://community.qlik.com/
Looking for content? Type your question into our global search bar:
The Knowledge Base
Leverage the enhanced and continuously updated Knowledge Base to find solutions to your questions and best practice guides. Bookmark this page for quick access!
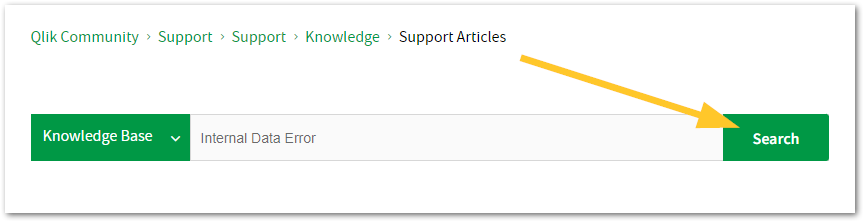
- Go to the Official Support Articles Knowledge base
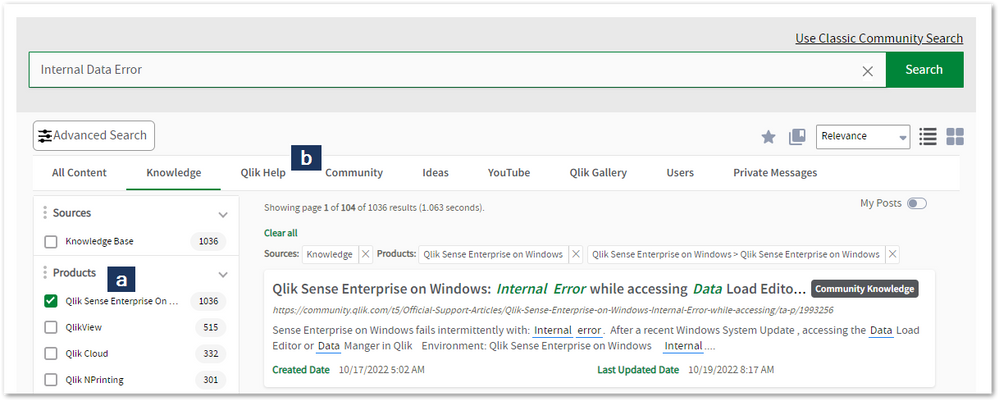
- Type your question into our Search Engine
- Need more filters?
- Filter by Product
- Or switch tabs to browse content in the global community, on our Help Site, or even on our Youtube channel
Blogs
Subscribe to maximize your Qlik experience!
The Support Updates Blog
The Support Updates blog delivers important and useful Qlik Support information about end-of-product support, new service releases, and general support topics. (click)The Qlik Design Blog
The Design blog is all about product and Qlik solutions, such as scripting, data modelling, visual design, extensions, best practices, and more! (click)The Product Innovation Blog
By reading the Product Innovation blog, you will learn about what's new across all of the products in our growing Qlik product portfolio. (click)Our Support programs:
Q&A with Qlik
Live sessions with Qlik Experts in which we focus on your questions.Techspert Talks
Techspert Talks is a free webinar to facilitate knowledge sharing held on a monthly basis.Technical Adoption Workshops
Our in depth, hands-on workshops allow new Qlik Cloud Admins to build alongside Qlik Experts.Qlik Fix
Qlik Fix is a series of short video with helpful solutions for Qlik customers and partners.The Qlik Forums
- Quick, convenient, 24/7 availability
- Monitored by Qlik Experts
- New releases publicly announced within Qlik Community forums (click)
- Local language groups available (click)
Ideation
Suggest an idea, and influence the next generation of Qlik features!
Search & Submit Ideas
Ideation GuidelinesHow to create a Qlik ID
Get the full value of the community.
Register a Qlik ID:
- Go to register.myqlik.qlik.com
If you already have an account, please see How To Reset The Password of a Qlik Account for help using your existing account. - You must enter your company name exactly as it appears on your license or there will be significant delays in getting access.
- You will receive a system-generated email with an activation link for your new account. NOTE, this link will expire after 24 hours.
If you need additional details, see: Additional guidance on registering for a Qlik account
If you encounter problems with your Qlik ID, contact us through Live Chat!
2. Chat
Incidents are supported through our Chat, by clicking Chat Now on any Support Page across Qlik Community.
To raise a new issue, all you need to do is chat with us. With this, we can:
- Answer common questions instantly through our chatbot
- Have a live agent troubleshoot in real time
- With items that will take further investigating, we will create a case on your behalf with step-by-step intake questions.
3. Qlik Support Case Portal
Log in to manage and track your active cases in the Case Portal. (click)
Before you can access the Support Portal, please complete your Community account setup. See First time access to the Qlik Customer Support Portal fails with: Unauthorized Access Please try signing out and sign in again.
Please note: to create a new case, it is easiest to do so via our chat (see above). Our chat will log your case through a series of guided intake questions.
Your advantages:
- Self-service access to all incidents so that you can track progress
- Option to upload documentation and troubleshooting files
- Option to include additional stakeholders and watchers to view active cases
- Follow-up conversations
When creating a case, you will be prompted to enter problem type and issue level. Definitions shared below:
Problem Type
Select Account Related for issues with your account, licenses, downloads, or payment.
Select Product Related for technical issues with Qlik products and platforms.
Priority
If your issue is account related, you will be asked to select a Priority level:
Select Medium/Low if the system is accessible, but there are some functional limitations that are not critical in the daily operation.
Select High if there are significant impacts on normal work or performance.
Select Urgent if there are major impacts on business-critical work or performance.
Severity
If your issue is product related, you will be asked to select a Severity level:
Severity 1: Qlik production software is down or not available, but not because of scheduled maintenance and/or upgrades.
Severity 2: Major functionality is not working in accordance with the technical specifications in documentation or significant performance degradation is experienced so that critical business operations cannot be performed.
Severity 3: Any error that is not Severity 1 Error or Severity 2 Issue. For more information, visit our Qlik Support Policy.
Escalate a Support Case
If you require a support case escalation, you have two options:
- Request to escalate within the case, mentioning the business reasons.
To escalate a support incident successfully, mention your intention to escalate in the open support case. This will begin the escalation process. - Contact your Regional Support Manager
If more attention is required, contact your regional support manager. You can find a full list of regional support managers in the How to escalate a support case article.
Phone Numbers
When other Support Channels are down for maintenance, please contact us via phone for high severity production-down concerns.
- Qlik Data Analytics: 1-877-754-5843
- Qlik Data Integration: 1-781-730-4060
- Talend AMER Region: 1-800-810-3065
- Talend UK Region: 44-800-098-8473
- Talend APAC Region: 65-800-492-2269
Resources
A collection of useful links.
Qlik Cloud Status Page
Keep up to date with Qlik Cloud's status.
Support Policy
Review our Service Level Agreements and License Agreements.
Live Chat and Case Portal
Your one stop to contact us.




Recent Documents
-
How to download and use the Qlik Data Gateway Monitoring and Logging Tool
Deploying the Qlik Data Gateway Monitoring Tool The Data Gateway Monitoring tool provides an additional layer of logging that Qlik's R&D team can use ... Show MoreDeploying the Qlik Data Gateway Monitoring Tool
The Data Gateway Monitoring tool provides an additional layer of logging that Qlik's R&D team can use to troubleshoot Data Gateway issues for a Data Gateway that was successfully installed and running previously.
This troubleshooting tool is not necessary for the day-by-day operation of the Data Gateway Direct Access deployment and can be disabled after troubleshooting has been completed.- Download the Qlik.ConnectorAgent.Monitor.Installer-x.x.x.exe installer available at
Installing Data Gateway Monitor Instructions and Download link - Install the Qlik Data Gateway Monitoring tool where you have the Qlik Data Gateway Direct Access deployed.
The installation requirements are the same as for Qlik Data Gateway Direct Access. See Best practices.
A Windows Server service will be installed that can be set to manual when troubleshooting is completed. - Reproduce the issue and monitor logging will automatically collect/log data.
- Zip and upload the logs from C:\ProgramData\Qlik\Gateway\Monitor\Logs to the Qlik Support case.
If the zip is too large for the support site, ask your Qlik support engineer to provide you with the dedicated upload space for your specific case.
More details about this tool can be found here.
General Health Check and Monitoring of Qlik Data Gateway
- To check overall Data Gateway health, access the following URL in a supported browser: http://localhost:5050/health
A simple 'OK' will appear if Gateway is connected to the cloud instance and running normally. - To check Data Gateway connections status, access the following URL in a supported browser: http://localhost:5050/status
Scroll to the bottom of the status page. Healthy Data Gateway status will be indicated by a Pass result.
The information in this article is provided as-is and to be used at own discretion. Depending on tool(s) used, customization(s), and/or other factors ongoing support on the solution below may not be provided by Qlik Support.
- Download the Qlik.ConnectorAgent.Monitor.Installer-x.x.x.exe installer available at
-
About the deprecation of Qlik Analytics charts
Qlik constantly refines its Analytics, over time replacing old charts with new, modernized alternatives. These deprecations are announced well in adva... Show MoreQlik constantly refines its Analytics, over time replacing old charts with new, modernized alternatives. These deprecations are announced well in advance and include instructions on how best to replace these old charts, whether that is to use a new one, several new ones, or to make use of new settings.
As an example, seven visualization bundle charts are scheduled for deprecation in May 2027, most of which have already been removed from the asset panel and are no longer in use in recent applications. See Upcoming deprecation of Qlik Analytics charts in May 2027.
What do I use instead?
Charts that are up for deprecation are often no longer in use. However, if you happen to still have a very old application and need to replace it, see Visualization bundle > Deprecated charts for more information on what to use instead. The list will be updated whenever a new set of charts is deprecated.
How do I find out if my apps are using the deprecated charts?
Qlik recommends reviewing your apps for old charts. Depending on your platform (Qlik Cloud or Client-managed), there are different methods you can deploy.
Qlik Cloud
Qlik Cloud administrators should use the Qlik Cloud Monitoring Apps to track the usage. The App Analyzer has a sheet dedicated to where deprecated charts are being used on a tenant in Qlik Cloud. The App Analyzer is based on usage events rather than scanning every app. Use the App Analyzer to find which apps and sheets have charts that need to be updated to newer and more modern alternatives. The easiest way to install and update the Qlik Cloud Monitoring Apps is to use the automation template. If you already have the App Analyzer, just remove the automation and install a new one to get the latest version of the App Analyzer.
Client-managed
For client-managed installations, use the Monitoring apps. The Content Monitor app has a sheet for tracking deprecated charts. At reload, the Content Monitor app scans every app in the installation in order to list all applications and sheets that are using charts that are being deprecated. It also lists the installed extensions and their deprecation status. The Monitoring apps are bundled with the Qlik Analytics installation. The first version with the new sheet will be included in the May 2026 release. If you want to track usage in prior versions, the deprecated chart usage scanner will also be available on the product download page.
Environment
- Qlik Cloud Analytics
- Qlik Sense Enterprise on Windows
-
Deprecation of basic authentication for Exchange Online and Gmail
Google and Microsoft deprecated basic authentication for their email services in 2022. Both companies consider Basic authentication as an outdated in... Show More -
Qlik Talend Remote Engine configure wrapper JVM port
To change the Talend Remote Engine wrapper port defaults, edit the Remote Engine's wrapper configuration file named RE_HOME/etc/talend-remote-engine-w... Show MoreTo change the Talend Remote Engine wrapper port defaults, edit the Remote Engine's wrapper configuration file named RE_HOME/etc/talend-remote-engine-wrapper.conf.
- Stop the Remote Engine service on the target machine before editing configuration files.
- If the engine was installed with the wrapper service, edit the following:
RemoteEngineInstallationDirectory/etc/talend-remote-engine-wrapper.conf - Adjust or add the JVM arguments and any wrapper-specific port settings.
Example:
=====================
wrapper.jvm.port.min=61000
wrapper.jvm.port.max=61999
wrapper.port=62000
=================== - Save the change.
- Start the engine service.
- Verify pairing and connection in Talend Management Console, and verify that the correct ports are used.
Linux (use ps -ef | grep java):
Windows (resource monitor):
For more information, see wrapper.jvm.port.
Environment
- Qlik Talend Cloud
- Remote Engine; Linux & Windows
-
How to configure a proxy for Talend Data Catalog on Linux
To configure a proxy for a Talend Data Catalog server on Linux: Stop the Talend Data Catalog application server Locate the Talend Data Catalog Tomcat... Show MoreTo configure a proxy for a Talend Data Catalog server on Linux:
- Stop the Talend Data Catalog application server
- Locate the Talend Data Catalog Tomcat configuration:
On Linux, the Talend Data Catalog server typically runs in a Tomcat‑style container under the installation directory (for example, /opt/talend/talend-data-catalog).
The key paths are $TDC_HOME/bin/setenv.sh or equivalent startup script, often in /bin/ or /bin/linux_x86_64. - Configure the JVM proxy properties:
- Edit the $TDC_HOME/bin/setenv.sh of the Talend Data Catalog server on Linux.
- Add the JVM arguments for the proxy: -Dhttps.proxyHost= <IP or HostName> -Dhttps.proxyPort=3128
Example:
JAVA_OPTS="-D\"catalina.data=${CATALINA_DATA}\" -D\"connector.port=${M_CONNECTOR_PORT}\" -D\"shutdown.port=${M_SHUTDOWN_PORT}\" -D\"server.fqdn=${M_SERVER_FQDN}\" -Dlog4j2.disableJmx=true -Djava.awt.headless=true -Dhttp.proxyHost=<IP or HostName> -Dhttp.proxyPort=3128 -Dhttps.proxyHost= <IP or HostName> -Dhttps.proxyPort=3128"
- Restart
- To verify if the Talend Data Catalog application server uses the proxy, run the following command:
$ps -ef | grep java
This will output the following:
[root@RHEL8-QCDI01 ~]# ps -ef | grep java
root 23155 1 6 May11 ? 12:28:04 /home/TDC-8-20250107/TalendDataCatalog/tomcat/bin/../../jre/bin/java -Dnop -Djava.util.logging.manager=org.apache.juli.ClassLoaderLogManager -Xms256M -Xmx4096M -Dcatalina.data=/home/TDC-8-20250107/TalendDataCatalog/tomcat/bin/../../data -Dconnector.port=11480 -Dshutdown.port=11481 -Dserver.fqdn=localhost -Dlog4j.configurationFile=/home/TDC-8-20250107/TalendDataCatalog/tomcat/bin/../../tomcat/conf/log4j2.xml -Dlog4j2.disableJmx=true -Djava.awt.headless=true -Dhttp.proxyHost=10.76.203.106 -Dhttp.proxyPort=3128 -Dhttps.proxyHost=10.76.203.106 -Dhttps.proxyPort=3128 -Djdk.tls.ephemeralDHKeySize=2048 - [...]
Note the effect using a proxy will have if you have SAML/SSO enabled. See Configuring the SAML server for details.
Environment
- Talend Data Catalog Server
- Squid Proxy Server
-
Qlik Talend Cloud: REST Microservice fails on Remote engine with: Log4jLoggerFac...
You may encounter the following error when using Qlik Talend Cloud and a Remote Engine: REST Microservice fails on Remote engine with: Log4jLoggerFact... Show MoreYou may encounter the following error when using Qlik Talend Cloud and a Remote Engine:
REST Microservice fails on Remote engine with: Log4jLoggerFactory: method 'void <init>()' not found
Resolution
Use Hive 3 to resolve this dependency issue. Choose the appropriate version in the Hive connection configuration. See tHiveConnection.
Cause
This is due to the Hive version 2 (hive-exec2 dependency) using log4j-slf4j-impl, which causes a conflict on the Remote Engine deployment.
Environment
- Qlik Talend Cloud
-
Talend Studio and Starburst
This article describes how to connect Talend Studio to Starburst (Galaxy or Enterprise) using the Trino JDBC driver. It covers driver download, JDBC c... Show MoreThis article describes how to connect Talend Studio to Starburst (Galaxy or Enterprise) using the Trino JDBC driver. It covers driver download, JDBC connection configuration inside Talend Studio, and load script patterns for querying Starburst catalogs. It is intended for use alongside Qlik Sense Enterprise on Windows (client-managed) environments where Talend Studio is used as the ETL layer to stage or transform data before it is consumed by Qlik.
Content
- Prerequisites
- Download the Trino JDBC Driver
- Configure the JDBC Connection in Talend Studio
- Connection Settings: Galaxy vs. Enterprise
- Schema and Catalog Usage
- Trino SQL Compatibility Notes
- Talend Component Patterns
- Troubleshooting
- References
Prerequisites
Before configuring the connection, ensure the following requirements are met:
- Talend Studio (Data Integration or Big Data edition), version 7.x or later.
- Java Runtime Environment (JRE) 11 or later, as required by the Trino JDBC driver.
- Network connectivity from the Talend Studio workstation or server to the Starburst cluster endpoint.
- A Starburst user account (Galaxy service account or Enterprise user) with SELECT privileges on the target catalog and schema.
- Internet access to download the Trino JDBC driver from Maven Central, or an internal Maven proxy that mirrors it.
Download the Trino JDBC Driver
Talend Studio connects to Starburst using the Trino JDBC driver. Unlike the ODBC driver used for Qlik Sense direct connections, no platform installer is required. The driver is a single JAR file.
- Download the Trino JDBC driver JAR from Maven Central:
https://repo1.maven.org/maven2/io/trino/trino-jdbc/479/trino-jdbc-479.jar
- Save the JAR to a stable local path, for example:
C:\Drivers\Starburst\trino-jdbc-479.jar
- Do not rename the JAR file. Talend Studio uses the filename to identify the driver.
Check the Starburst documentation for the recommended JDBC driver version that matches your Starburst Galaxy or Enterprise deployment. The version referenced above (479) is the version used in the Data Nova Conference demo environment.
Configure the JDBC Connection in Talend Studio
Talend Studio uses a generic JDBC database connection type to connect to Starburst. The steps below apply to both Starburst Galaxy and Starburst Enterprise. The only difference is the JDBC URL and credentials.
Add a New Database Connection
- Open your Talend Studio project.
- In the Repository panel, expand Metadata and right-click Db Connections.
- Select Create connection.
- Enter a connection name (for example: Starburst Galaxy or Starburst Enterprise) and click Next.
Select the JDBC Connection Type
- In the DB Type dropdown, search for and select JDBC.
- Click Next to proceed to the driver and URL configuration.
Configure Driver and Connection Parameters
Complete the connection form with the following parameters:
Parameter
Value
JDBC URL (Galaxy)
jdbc:trino://<cluster>.galaxy.starburst.io:443/<catalog>
JDBC URL (Enterprise)
jdbc:trino://<coordinator-host>:8443/<catalog>
Driver JAR
trino-jdbc-479.jar (full local path to the JAR downloaded in Download the Trino JDBC Driver)
Driver Class
io.trino.jdbc.TrinoDriver
User ID
Service account username (e.g. starburst_service)
Password
Service account password or personal access token
Schema
Target schema within the catalog (e.g. transactional_data)
Example JDBC URL for the Data Nova Conference demo environment (Starburst Galaxy):
jdbc:trino://stardock-qlik.starport.starburst.io:443/transactional_data
- Click the [...] button next to the Driver JAR field and browse to the trino-jdbc-479.jar file saved in Download the Trino JDBC Driver.
- In the Driver Class field, enter or select: io.trino.jdbc.TrinoDriver
- Enter the User ID and Password for the Starburst service account.
- Click Check to test the connection. A successful test displays the Starburst version.
- Click Finish to save the connection.
If the connection test fails with an SSL error when connecting to Starburst Galaxy, ensure that Java's certificate store trusts the public CA that signed the Galaxy endpoint certificate. For Starburst Enterprise with a self-signed certificate, import the certificate into the JRE keystore using keytool.
Connection Settings: Galaxy vs. Enterprise
The table below summarises the JDBC parameters that differ between Starburst Galaxy and Starburst Enterprise:
Parameter
Starburst Galaxy
Starburst Enterprise
Host
<cluster>.galaxy.starburst.io
<coordinator-hostname-or-ip>
Port
443 (HTTPS)
8443 (HTTPS) or 8080 (HTTP)
SSL
Always enabled
Enabled for HTTPS deployments
Authentication
Username / password (LDAP) or OAuth2
LDAP, Kerberos, or password
JDBC URL pattern
jdbc:trino://<cluster>.galaxy.starburst.io:443/<catalog>
jdbc:trino://<host>:8443/<catalog>
The Trino JDBC driver is the same JAR for both Galaxy and Enterprise. Only the JDBC URL, port, and authentication settings differ.
Schema and Catalog Usage
Starburst organises data in a three-level hierarchy: catalog > schema > table. The JDBC URL specifies the default catalog. The schema is set in the Talend connection configuration and can be overridden at the component level.
Specifying the Default Catalog in the JDBC URL
Include the catalog name as the path component of the JDBC URL:
jdbc:trino://stardock-qlik.starport.starburst.io:443/transactional_data
In this example, transactional_data is the catalog. All queries run through this connection will default to that catalog unless a three-part table name is used.
Using Three-Part Table Names in Talend Components
When querying tables across multiple catalogs within the same Talend job, use three-part table names in tDBInput or tDBRow SQL queries:
SELECT
    customer_id,
    customer_name,
    region,
    created_date
FROM transactional_data.retail.customers
WHERE created_date >= DATE '2024-01-01'
Always use three-part table names (catalog.schema.table) in SQL queries inside Talend components to avoid ambiguity, even when a default catalog is set in the JDBC URL.
Trino SQL Compatibility Notes
Starburst uses the Trino query engine. The following SQL conventions differ from standard ANSI SQL and must be observed when writing SQL inside Talend components (tDBInput, tDBRow, tDBOutput):
Feature
Trino Syntax
Avoid
Date literal
DATE '2024-01-01'
TO_DATE(), CONVERT()
String concat
CONCAT(a, b) or a || b
a + b
Top N rows
LIMIT n
TOP n, ROWNUM
Table names
catalog.schema.table
schema.table (ambiguous)
Case sensitivity
Double-quote identifiers if mixed case
Unquoted mixed-case names
Write operations
INSERT INTO and CREATE TABLE AS SELECT supported; UPDATE and DELETE require Delta or Iceberg connector
Direct UPDATE/DELETE on Hive connector
Talend Component Patterns
The following patterns cover common scenarios for reading from and writing to Starburst within a Talend Studio job.
Reading Data with tDBInput
- Use the Starburst JDBC connection configured in Configure the JDBC Connection in Talend Studio.
- In the tDBInput component, set the Query field to a valid Trino SQL SELECT statement using three-part table names.
- Map the output schema columns to match the SELECT column list.
Writing Data with tDBOutput
- Starburst supports INSERT INTO for Iceberg and Delta Lake tables. Hive connector tables may be read-only depending on the catalog configuration.
- Set the Action on the table to Insert and ensure the target table exists in Starburst before running the job.
- Use three-part table names in the Table field: catalog.schema.table.
Incremental Loads with Context Variables
Use Talend context variables to pass date parameters into SQL predicates for incremental data loads:
Define a context variable:
context.lastLoadDate = 2024-01-01
Reference it in the tDBInput query:
SELECT *
FROM transactional_data.retail.transactions
WHERE transaction_date >= DATE '" + context.lastLoadDate + "'
For production incremental loads, persist the last successful load date to a Talend context file or a control table in Starburst so that the value survives job restarts.
Troubleshooting
Connection test fails: ClassNotFoundException
- Verify the full path to the trino-jdbc-479.jar is correct in the Driver JAR field.
- Confirm the Driver Class is exactly io.trino.jdbc.TrinoDriver (case-sensitive).
- Ensure the JAR has not been renamed or moved since the connection was saved.
Connection test fails: SSL handshake error
- For Starburst Galaxy, confirm that the Talend Studio JRE trusts the public CA certificate chain for *.galaxy.starburst.io.
- For Starburst Enterprise with a self-signed certificate, import the certificate into the JRE keystore: keytool -import -alias starburst -keystore $JAVA_HOME/lib/security/cacerts -file starburst.crt
- Verify that the JDBC URL uses the correct port (443 for Galaxy, 8443 for Enterprise HTTPS).
Authentication failure: Access Denied
- Confirm the User ID and Password match the Starburst Galaxy service account credentials or the Starburst Enterprise user account.
- For Galaxy, verify that the service account has not been deactivated or had its password rotated.
- Test the same credentials in the Starburst Galaxy Query Editor or Enterprise query interface before diagnosing the Talend connection.
Query error: [Trino] Error executing query
- Verify the three-part table name is correct: catalog, schema, and table names are case-sensitive.
- Confirm the Starburst user account has SELECT privileges on the target table.
- Test the SQL directly in the Starburst query interface before embedding it in the Talend component.
Slow job performance
- Push filtering predicates into the SQL WHERE clause in the tDBInput query rather than relying on Talend tFilterRow components downstream.
- Select only required columns rather than using SELECT *.
- Review the Starburst query history to identify slow-running queries and optimise at the catalog or connector level.
References
Environment
- Talend Studio
-
Qlik Sense Enterprise on Windows and Starburst Galaxy
This article describes how to connect Qlik Sense Enterprise on Windows (client-managed) to Starburst Galaxy using the Starburst ODBC driver. It covers... Show MoreThis article describes how to connect Qlik Sense Enterprise on Windows (client-managed) to Starburst Galaxy using the Starburst ODBC driver. It covers driver installation, data connection configuration, and load script patterns for querying Starburst Galaxy catalogs via Trino SQL.
Content
- Prerequisites
- Install the Starburst ODBC Driver
- Configure an ODBC Data Source (DSN)
- Create a Data Connection in Qlik Sense
- Load Script Patterns
- Trino SQL Compatibility Notes
- Troubleshooting
- Related Content and References
Prerequisites
Before configuring the connection, ensure the following requirements are met on the Qlik Sense server or any node that will execute data load tasks:
- Qlik Sense Enterprise on Windows (client-managed), version February 2022 or later.
- Network connectivity from the Qlik Sense server to the Starburst Galaxy cluster endpoint (default port 443 over HTTPS/TLS).
- A Starburst Galaxy account with a running cluster and at least one catalog configured.
- A Starburst Galaxy service account username and password (or personal access token) with SELECT privileges on the target catalog and schema.
- Administrator access on the Windows server to install the ODBC driver and configure the DSN.
Install the Starburst ODBC Driver
Starburst provides a dedicated ODBC driver for Galaxy that is based on the Simba/Magnitude Trino ODBC driver. Use only the Galaxy-specific build to ensure compatibility with Galaxy authentication and TLS settings.
- Download the Driver
- Log in to your Starburst Galaxy account at https://galaxy.starburst.io.
- Navigate to Settings > Clients & Tools > Drivers.
- Download the Windows 64-bit ODBC driver package (.msi or .zip).
- Copy the installer to the Qlik Sense server.
- Install the Driver
- Run the installer as a local administrator.
- Accept the licence agreement and choose the default installation directory.
- When prompted, select "System DSN" scope so that the Qlik Sense service account can access the driver.
- Complete the installation. No restart is required.
Install the 64-bit driver even if the Qlik Sense process appears as 32-bit. Qlik Sense on Windows runs as a 64-bit process.
Configure an ODBC Data Source (DSN)
A System DSN makes the driver available to all Windows services, including the Qlik Sense Engine and Scheduler services.
- Open ODBC Data Source Administrator (64-bit) from Windows Administrative Tools.
- Click the System DSN tab, then click Add.
- Select the Starburst ODBC Driver from the list and click Finish.
- Configure the DSN with the following settings:
Setting
Value
DSN Name
StarburstGalaxy (used in the Qlik connection string)
Host
<your-cluster>.galaxy.starburst.io
Port
443
Catalog
Leave blank (set per query or in the Qlik load script)
Authentication
LDAP (username/password) or OAuth2 (token)
SSL
Enabled (required for Galaxy)
SSL Certificate
Use the system certificate store
- Click Test Connection to verify connectivity. A successful test returns the Starburst Galaxy version.
- Click OK to save.
If the test connection fails with a TLS error, ensure that the Starburst Galaxy root certificate is trusted by the Windows certificate store on the Qlik Sense Enterprise on Windows server.
Create a Data Connection in Qlik Sense
- In the Qlik Sense Management Console (QMC), navigate to Data Connections.
- Click Create new and select ODBC.
- Select the StarburstGalaxy DSN created in Configure an ODBC Data Source (DSN).
- Enter the service account credentials.
- Set the connection name to: Data Nova Conference:Starburst Galaxy
This name is required by the standard load script connection string used in Qlik apps that target this tenant. - Click Apply and test the connection.
The connection name Data Nova Conference:Starburst Galaxy is the canonical name used in all Qlik load scripts for this integration. Changing it requires updating all dependent scripts.
Load Script Patterns
The following patterns cover common scenarios for loading data from Starburst Galaxy into Qlik Sense Enterprise on Windows.
-
Establish the Connection
Always use the following statement at the top of the load script tab that accesses Starburst Galaxy:LIB CONNECT TO 'Data Nova Conference:Starburst Galaxy';
-
Basic SQL SELECT
Use three-part table names (catalog.schema.table) in all Trino SQL statements:
Customers:
SQL SELECT
   customer_id,
   customer_name,
   region,
   created_date
FROM burstbank.retail.customers
WHERE created_date >= DATE '2024-01-01'; -
Joining Tables
Perform joins in SQL rather than in the Qlik data model to reduce data transfer volume:
Orders:
SQL SELECT
   o.order_id,
   o.customer_id,
   o.order_date,
   o.total_amount,
   c.customer_name,
   c.region
FROM burstbank.retail.orders o
JOIN burstbank.retail.customers c ON o.customer_id = c.customer_id; -
Incremental Load
Use Qlik variables to pass date parameters into the SQL predicate for incremental data loads:
LET vLastLoadDate = Date(Today()-1, 'YYYY-MM-DD');
Transactions:
SQL SELECT *
FROM burstbank.retail.transactions
WHERE transaction_date >= DATE '$(vLastLoadDate)';
Trino SQL Compatibility Notes
Starburst Galaxy uses the Trino query engine. The following SQL conventions differ from standard ANSI SQL and must be observed:
Feature
Trino Syntax
Avoid
Date literal
DATE '2024-01-01'
TO_DATE(), CONVERT()
String concat
CONCAT(a, b) or a || b
a + b
Top N rows
LIMIT n
TOP n, ROWNUM
Table names
catalog.schema.table
schema.table (ambiguous)
Case sensitivity
Double-quote identifiers if mixed case
Unquoted mixed-case names
Troubleshooting
Connection fails in QMC
- Verify the DSN name matches exactly (case-sensitive) in the data connection configuration.
- Confirm the Qlik Sense service account has Read permission on the Windows registry key for the System DSN.
- Check that TCP port 443 is open outbound from the Qlik Sense server to the Galaxy cluster host.
Load script error: [Starburst][Trino] Error executing query
- Verify the three-part table name is correct: catalog, schema, and table names are case-sensitive in some catalogs.
- Confirm the Galaxy service account has SELECT privileges on the target table.
- Test the same SQL in the Starburst Galaxy Query Editor before embedding it in the Qlik load script.
Slow load performance
- Push filtering predicates into the SQL WHERE clause rather than relying on Qlik WHERE clauses.
- Select only required columns rather than using SELECT *.
- Consider using Starburst Galaxy materialized views for frequently queried aggregations.
Related Content and References
Environment
- Qlik Sense Enterprise on Windows
-
Qlik Sense Enterprise on Windows and Starburst Enterprise
This article describes how to connect Qlik Sense Enterprise on Windows (client-managed) to Starburst Enterprise (self-managed, on-premises or private ... Show MoreThis article describes how to connect Qlik Sense Enterprise on Windows (client-managed) to Starburst Enterprise (self-managed, on-premises or private cloud) using the Starburst ODBC driver. It covers driver installation, data connection configuration, and load script patterns for querying Starburst Enterprise catalogs via Trino SQL.
Content
- Prerequisites
- Install the Starburst ODBC Driver
- Configure an ODBC Data Source (DSN)
- Create a Data Connection in Qlik Sense
- Load Script Patterns
- Trino SQL Compatibility Notes
- Differences vs. Starburst Galaxy
- Troubleshooting
- Related Content and References
Prerequisites
Before configuring the connection, ensure the following requirements are met on the Qlik Sense server or any node that will execute data load tasks:
- Qlik Sense Enterprise on Windows (client-managed), version February 2022 or later.
- Network connectivity from the Qlik Sense server to the Starburst Enterprise coordinator node (default port 8443 for HTTPS/TLS, or 8080 for HTTP).
- A Starburst Enterprise deployment with at least one catalog configured and the coordinator accessible from the Qlik network segment.
- A Starburst Enterprise user account with SELECT privileges on the target catalog and schema.
- Administrator access on the Windows server to install the ODBC driver and configure the DSN.
- The Starburst Enterprise TLS certificate (or the CA certificate chain) if using HTTPS, to be trusted by the Windows server.
Install the Starburst ODBC Driver
Starburst provides a dedicated ODBC driver for Starburst Enterprise based on the Simba/Magnitude Trino ODBC driver. Download the Enterprise-specific build from your Starburst Enterprise distribution. Do not use the Galaxy driver.
- Download the Driver
- Log in to the Starburst Enterprise software portal or obtain the driver package from your Starburst account representative.
- Download the Windows 64-bit ODBC driver package (.msi) that matches your Starburst Enterprise version.
- Copy the installer to the Qlik Sense server.
- Install the Driver
- Run the installer as a local administrator.
- Accept the licence agreement and choose the default installation directory.
- When prompted, select "System DSN" scope so that the Qlik Sense service account can access the driver.
- Complete the installation. No restart is required.
Install the 64-bit driver. Qlik Sense on Windows runs as a 64-bit process regardless of the label shown in Windows Task Manager.
Configure an ODBC Data Source (DSN)
A System DSN makes the driver available to all Windows services, including the Qlik Sense Engine and Scheduler services.
- Open ODBC Data Source Administrator (64-bit) from Windows Administrative Tools.
- Click the System DSN tab, then click Add.
- Select the Starburst ODBC Driver from the list and click Finish.
- Configure the DSN with the following settings:
Setting
Value
DSN Name
StarburstEnterprise (used in the Qlik connection string)
Host
<coordinator-hostname-or-ip>
Port
8443 (HTTPS) or 8080 (HTTP — not recommended for production)
Catalog
Leave blank (set per query or in the Qlik load script)
Authentication
LDAP, Kerberos, or Password (depends on Starburst Enterprise configuration)
SSL
Enabled for HTTPS deployments; disabled for HTTP-only test environments
SSL Certificate
Path to the PEM or PFX certificate file, or use the system certificate store if the CA is trusted
- Click Test Connection to verify connectivity. A successful test returns the Starburst Enterprise version.
- Click OK to save.
If Kerberos authentication is required, ensure the Qlik Sense service account has a valid Kerberos ticket and that the Kerberos configuration file (krb5.ini) is present at C:\Windows\krb5.ini on the Qlik Sense server.
Create a Data Connection in Qlik Sense
- In the Qlik Sense Management Console (QMC), navigate to Data Connections.
- Click Create new and select ODBC.
- Select the StarburstEnterprise DSN created in Configure an ODBC Data Source (DSN)
- Enter the service account credentials appropriate to your authentication method (LDAP username/password, or leave blank for Kerberos SSO).
- Set the connection name to reflect your deployment (for example: Starburst Enterprise:Production).
Update the LIB CONNECT TO statement in your load scripts to match the connection name you choose. - Click Apply and test the connection.
Unlike Starburst Galaxy, the connection name for Starburst Enterprise deployments can be customised to match your environment. Ensure the name is consistent across all load scripts that use this connection.
Load Script Patterns
The following patterns cover common scenarios for loading data from Starburst Enterprise into Qlik Sense. The patterns are identical to those used with Starburst Galaxy; the only difference is the connection name in the LIB CONNECT TO statement.
-
Establish the Connection
Replace the connection name with the one configured in Create a Data Connection in Qlik Sense:LIB CONNECT TO 'Starburst Enterprise:Production';
-
Basic SQL SELECT
Use three-part table names (catalog.schema.table) in all Trino SQL statements:
Customers:
SQL SELECT
    customer_id,
    customer_name,
    region,
    created_date
FROM hive.sales.customers
WHERE created_date >= DATE '2024-01-01'; -
Joining Tables
Perform joins in SQL rather than in the Qlik data model to reduce data transfer volume:
Orders:
SQL SELECT
    o.order_id,
    o.customer_id,
    o.order_date,
    o.total_amount,
    c.customer_name,
    c.region
FROM hive.sales.orders o
JOIN hive.sales.customers c ON o.customer_id = c.customer_id; -
Use Qlik variables to pass date parameters into the SQL predicate for incremental data loads:
LET vLastLoadDate = Date(Today()-1, 'YYYY-MM-DD');
Transactions:
SQL SELECT *
FROM hive.sales.transactions
WHERE transaction_date >= DATE '$(vLastLoadDate)';
Trino SQL Compatibility Notes
Starburst Enterprise uses the Trino query engine. The same Trino SQL conventions apply as for Starburst Galaxy:
Feature
Trino Syntax
Avoid
Date literal
DATE '2024-01-01'
TO_DATE(), CONVERT()
String concat
CONCAT(a, b) or a || b
a + b
Top N rows
LIMIT n
TOP n, ROWNUM
Table names
catalog.schema.table
schema.table (ambiguous)
Case sensitivity
Double-quote identifiers if mixed case
Unquoted mixed-case names
Differences vs. Starburst Galaxy
The table below summarises the key differences between the two deployment models relevant to a Qlik Sense integration:
Area
Starburst Galaxy
Starburst Enterprise
Hosting
Fully managed SaaS (Starburst-hosted)
Self-managed (on-premises or private cloud)
Default port
443 (HTTPS)
8443 (HTTPS) or 8080 (HTTP)
Authentication
LDAP or OAuth2
LDAP, Kerberos, password, or custom
ODBC driver
Galaxy-specific build
Enterprise-specific build
Connection name
Data Nova Conference:Starburst Galaxy (canonical)
Defined by the administrator per deployment
TLS certificate
Signed by a public CA — trusted automatically
May require manual certificate import
Catalog examples
burstbank.retail.customers
hive.sales.customers
Troubleshooting
Connection fails in QMC
- Verify the DSN name matches exactly (case-sensitive) in the data connection configuration.
- Confirm the Qlik Sense service account has Read permission on the Windows registry key for the System DSN.
- Check that the configured TCP port (8443 or 8080) is open outbound from the Qlik Sense server to the Starburst Enterprise coordinator.
- If using HTTPS, verify that the Starburst Enterprise TLS certificate or its CA is trusted by the Windows server certificate store.
Kerberos authentication failures
- Confirm that the krb5.ini file exists at C:\Windows\krb5.ini and contains the correct KDC settings for your domain.
- Verify that the Qlik Sense Windows service is running as a domain account (not Local System) with a valid Kerberos principal.
- Test Kerberos connectivity separately using the kinit utility before diagnosing ODBC issues.
Load script error: [Starburst][Trino] Error executing query
- Verify the three-part table name is correct: catalog, schema, and table names are case-sensitive in some catalogs.
- Confirm the Starburst user account has SELECT privileges on the target table.
- Test the same SQL in the Starburst Enterprise query interface before embedding it in the Qlik load script.
Slow load performance
- Push filtering predicates into the SQL WHERE clause rather than relying on Qlik WHERE clauses.
- Select only required columns rather than using SELECT *.
- Review the Starburst Enterprise query history to identify slow-running queries and optimise at the catalog/connector level.
Related Content and References
Environment
- Qlik Sense Enterprise on Windows
-
Qlik Cloud Analytics and Starburst Enterprise
This article describes how to connect Qlik Cloud Analytics to Starburst Enterprise (self-managed, on-premises, or private cloud) using a Qlik Data Gat... Show MoreThis article describes how to connect Qlik Cloud Analytics to Starburst Enterprise (self-managed, on-premises, or private cloud) using a Qlik Data Gateway - Direct Access and the Starburst ODBC driver. It covers gateway installation and registration, ODBC driver and DSN configuration on the gateway host, TLS certificate handling for self-managed deployments, and data connection setup in Qlik Cloud. It is intended for Qlik Cloud tenants that need to query Starburst Enterprise catalogs directly from Qlik Cloud apps and scripts.
Content
- Architecture Overview
- Prerequisites
- Qlik Data Gateway - Direct Access Requirement
- Install the Starburst ODBC Driver on the Gateway Host
- Configure TLS Certificate Trust on the Gateway Host
- Configure an ODBC DSN on the Gateway Host
- Install and Register the Qlik Data Gateway - Direct Access
- Create a Data Connection in Qlik Cloud
- Load Script Patterns
- Trino SQL Compatibility Notes
- Comparison: Starburst Enterprise vs. Starburst Galaxy
- Troubleshooting
- Related Content and References
Architecture Overview
Qlik Cloud Analytics is a fully managed SaaS platform. Because Starburst Enterprise runs within a customer-managed network, a Qlik Data Gateway - Direct Access must be deployed within the same network as, or with routable access to, the Starburst Enterprise coordinator node. The gateway acts as a secure proxy, relaying data load requests from Qlik Cloud to Starburst Enterprise over the ODBC connection configured on the gateway host.
The connection flow will look as follows:
Qlik Cloud tenant → Qlik Data Gateway (Direct Access) → Starburst ODBC DSN → Starburst Enterprise coordinator
The gateway host is a Windows or Linux server that you manage. It must have outbound HTTPS access to both the Qlik Cloud tenant (port 443) and the Starburst Enterprise coordinator (port 8443 for HTTPS, or 8080 for HTTP). The gateway is typically deployed inside the same private network as the Starburst Enterprise cluster.
Prerequisites
Before beginning, ensure the following requirements are met:
- A Qlik Cloud tenant with a Qlik Cloud Analytics subscription.
- Tenant Admin or Space Admin rights in Qlik Cloud to create data connections.
- A dedicated Windows or Linux server to host the Qlik Data Gateway - Direct Access (minimum: 4 vCPU, 8 GB RAM, Windows Server 2016+ or RHEL/Ubuntu 20.04+), deployed inside or with routable access to the Starburst Enterprise network.
- Network connectivity from the gateway host to the Starburst Enterprise coordinator node (port 8443 for HTTPS, or 8080 for HTTP).
- Outbound HTTPS access (port 443) from the gateway host to your Qlik Cloud tenant URL (e.g. https://<tenant>.us.qlikcloud.com).
- The Starburst Enterprise TLS certificate or CA certificate chain (if using HTTPS with a self-signed or private CA certificate), to be imported into the Windows certificate store on the gateway host.
- A Starburst Enterprise user account with SELECT privileges on the target catalog and schema.
- Administrator access on the gateway host to install software, configure ODBC System DSNs, and manage the Windows certificate store.
Qlik Data Gateway - Direct Access Requirement
A Qlik Data Gateway - Direct Access is required to connect Qlik Cloud Analytics to Starburst Enterprise. Unlike Qlik Sense on Windows (client-managed), Qlik Cloud does not execute data load scripts directly. All connections to on-premises or privately hosted data sources are routed through the gateway.
A Qlik Data Gateway - Direct Access must be installed and registered to your Qlik Cloud tenant before a Starburst ODBC data connection can be created or used. Attempting to create the connection without a registered gateway will result in an error.
Because Starburst Enterprise runs inside a customer-managed network, the gateway host is typically deployed within that same network. This ensures the gateway can reach the Starburst Enterprise coordinator without requiring firewall rules that expose the coordinator to the public internet.
The gateway must be installed on a host that:
- Has network access to the Starburst Enterprise coordinator on the configured port (8443 for HTTPS or 8080 for HTTP).
- Has the Starburst Enterprise ODBC driver been installed and a System DSN configured (see Install the Starburst ODBC Driver on the Gateway Host, and Configure an ODBC DSN on the Gateway Host).
- Has outbound HTTPS access to the Qlik Cloud tenant on port 443.
- Has the Starburst Enterprise TLS certificate or CA chain been trusted in its certificate store (see Configure TLS Certificate Trust on the Gateway Host).
- Runs continuously. The gateway must be active whenever a Qlik Cloud app or script loads data from Starburst.
blockquote For high availability, install the gateway on two or more hosts within the Starburst Enterprise network and register all of them to the same Qlik Cloud tenant. Qlik Cloud will distribute data load requests across available gateway instances.
Install the Starburst ODBC Driver on the Gateway Host
The Starburst ODBC driver must be installed on the gateway host, not on the Qlik Cloud infrastructure. Qlik Cloud reads data through the gateway, so the driver must be present and configured where the gateway is running.
Download the Driver
Use the Starburst Enterprise-specific ODBC driver build, not the Starburst Galaxy driver.
- Log in to the Starburst Enterprise software portal or obtain the driver package from your Starburst account representative.
- Download the Windows 64-bit ODBC driver package (.msi) that matches your Starburst Enterprise version.
- Copy the installer to the gateway host.
Install the Driver
- Run the installer as a local administrator on the gateway host.
- Accept the licence agreement and choose the default installation directory.
- When prompted, select System DSN scope so that the Qlik Data Gateway service account can access the driver.
- Complete the installation. No restart is required.
Install the 64-bit driver on the gateway host. The Qlik Data Gateway - Direct Access runs as a 64-bit process and requires the 64-bit ODBC driver. Use ODBC Data Source Administrator (64-bit) for all DSN configuration.
Configure TLS Certificate Trust on the Gateway Host
Starburst Enterprise deployments commonly use HTTPS with a certificate signed by a private or internal CA. Unlike Starburst Galaxy, whose certificate is signed by a publicly trusted CA, the Starburst Enterprise certificate chain may not be automatically trusted by Windows. The certificate must be imported into the Windows certificate store on the gateway host before the ODBC DSN can establish a TLS connection.
Obtain the Certificate
- Obtain the Starburst Enterprise TLS certificate or the root CA certificate that signed it from your Starburst Enterprise administrator.
- The certificate file is typically in PEM (.pem, .crt) or DER (.cer) format.
- Copy the certificate file to the gateway host.
Import the Certificate into the Windows Certificate Store
- Open the Microsoft Management Console (MMC) on the gateway host: press Win + R, type mmc, and press Enter.
- In MMC, select File > Add/Remove Snap-in.
- Add the Certificates snap-in and select Computer account when prompted.
- Navigate to Trusted Root Certification Authorities > Certificates.
- Right-click and select All Tasks > Import.
- Follow the Certificate Import Wizard to import the Starburst Enterprise CA certificate.
- Confirm the certificate appears in the Trusted Root Certification Authorities store.
If the Starburst Enterprise deployment uses a certificate signed by an intermediate CA, import the full chain: the root CA certificate and any intermediate CA certificates. Importing only the leaf (server) certificate is not sufficient for TLS validation.
Verify Certificate Trust
After importing the certificate, verify that the gateway host trusts the Starburst Enterprise endpoint by opening a browser on the gateway host and navigating to the coordinator URL (such as https://<coordinator-host>:8443). If the page loads without a certificate warning, the certificate chain is trusted correctly.
This step is only required for HTTPS deployments with private or self-signed certificates. It is not applicable for Starburst Enterprise using a certificate signed by a publicly trusted CA (such as Let's Encrypt, DigiCert).
Configure an ODBC DSN on the Gateway Host
A System DSN must be created on the gateway host. This is the DSN that Qlik Cloud will reference when the data connection is used in a load script or app.
- Open ODBC Data Source Administrator (64-bit) on the gateway host.
- Click the System DSN tab, then click Add.
- Select the Starburst ODBC Driver from the driver list and click Finish.
-
Configure the DSN with the following settings:
Setting
Value
DSN Name
StarburstEnterprise (must match the name used when creating the Qlik Cloud data connection)
Host
<coordinator-hostname-or-ip>
Port
8443 (HTTPS) or 8080 (HTTP — not recommended for production)
Catalog
Leave blank (set per query or in the Qlik load script)
Authentication
LDAP, Kerberos, or password (depends on Starburst Enterprise configuration)
SSL
Enabled for HTTPS deployments; disabled for HTTP-only test environments
SSL Certificate
Use the system certificate store (after completing Configure TLS Certificate Trust on the Gateway Host)
- Click Test Connection to verify connectivity from the gateway host to the Starburst Enterprise coordinator. A successful test returns the Starburst Enterprise version.
- Click OK to save the DSN.
Test the DSN connection while logged in as the same Windows service account that will run the Qlik Data Gateway service. DSN access permissions are per-user for User DSNs and per-machine for System DSNs. Always use System DSN for service accounts.
If Kerberos authentication is required, ensure the Qlik Data Gateway service account has a valid Kerberos principal and that the Kerberos configuration file (krb5.ini) is present at C:\Windows\krb5.ini on the gateway host before configuring the DSN.
Install and Register the Qlik Data Gateway - Direct Access
The Qlik Data Gateway - Direct Access installer is downloaded from the Qlik Cloud Administration Center and registers the gateway to your tenant during installation. The gateway itself is product-agnostic, meaning the installation steps are identical for Starburst Galaxy and Starburst Enterprise connections.
Download the Installer
- In Qlik Cloud, open the Qlik Cloud Administration activity center
- Navigate to Data Gateways.
- Click Add and select Direct Access Gateway.
- Follow the on-screen instructions to download the installer for the gateway host operating system.
Install the Gateway
- Copy the installer to the gateway host.
- Run the installer as a local administrator.
- When prompted, enter the Qlik Cloud tenant URL and an API key.
See Generating and managing API keys for instructions on how to generate an API key. - Complete the installation. The gateway service will start automatically and register with the Qlik Cloud tenant.
Verify the Gateway is Registered
- Return to the Qlik Cloud Administration activity center > Data Gateways.
- Confirm the gateway appears in the list with a Connected status.
- If the gateway shows a Disconnected status, check outbound HTTPS connectivity from the gateway host to the tenant URL on port 443.
The gateway service runs under a Windows service account (or as a systemd service on Linux). Ensure this account has Read access to the System DSN registry keys and is granted Log on as a service rights on Windows. For Kerberos authentication, the service account must also have a valid Kerberos ticket.
Create a Data Connection in Qlik Cloud
Once the gateway is registered and the ODBC DSN is configured on the gateway host, create the ODBC data connection in Qlik Cloud.
- In Qlik Cloud, go to Create
- Choose Data connection from the available actions and choose your Space
- In the connector list, search for and select ODBC.
- In the connection configuration panel, set the following:
Field
Value
Data gateway
Select the Direct Access Gateway registered in Install and Register the Qlik Data Gateway - Direct Access
DSN
StarburstEnterprise (the System DSN configured on the gateway host in Configure an ODBC DSN on the Gateway Host)
Username
Starburst Enterprise user account username (leave blank for Kerberos SSO)
Password
Starburst Enterprise user account password (leave blank for Kerberos SSO)
Connection name
Administrator-defined (e.g. Starburst Enterprise:Production)
- Click Create.
- Test the connection. The test runs through the gateway, confirming end-to-end connectivity from Qlik Cloud through the gateway to Starburst Enterprise.
Unlike Starburst Galaxy, the connection name for Starburst Enterprise is administrator-defined and can reflect the deployment environment (e.g. Starburst Enterprise:Production, Starburst Enterprise:Staging). Ensure the name is used consistently in all load scripts that reference this connection.
Load Script Patterns
Load scripts in Qlik Cloud apps use the same patterns as Qlik Sense on Windows. The LIB CONNECT TO connection name must match the data connection created in Create a Data Connection in Qlik Cloud.
Establish the Connection
Replace the connection name with the one configured in Create a Data Connection in Qlik Cloud:
LIB CONNECT TO 'Starburst Enterprise:Production';
Basic SQL SELECT
Use three-part table names (catalog.schema.table) in all Trino SQL statements:
Customers:
SQL SELECT
    customer_id,
    customer_name,
    region,
    created_date
FROM hive.sales.customers
WHERE created_date >= DATE '2024-01-01';
Joining Tables
Perform joins in SQL rather than in the Qlik data model to reduce data transfer volume through the gateway:
Orders:
SQL SELECT
    o.order_id,
    o.customer_id,
    o.order_date,
    o.total_amount,
    c.customer_name,
    c.region
FROM hive.sales.orders o
JOIN hive.sales.customers c ON o.customer_id = c.customer_id;
Incremental Load
Use Qlik variables to pass date parameters into the SQL predicate for incremental data loads:
LET vLastLoadDate = Date(Today()-1, 'YYYY-MM-DD');
Transactions:
SQL SELECT *
FROM hive.sales.transactions
WHERE transaction_date >= DATE '$(vLastLoadDate)';
Avoiding Synthetic Keys
Rename non-key fields that share names across tables by prefixing the table name. Island tables should be commented out:
Orders:
SQL SELECT
    order_id,
    customer_id, // Key — keep as-is
    order_date AS Order_order_date, // Renamed to avoid synthetic key
    total_amount AS Order_total_amount
FROM hive.sales.orders;
In Qlik Cloud, scheduled reloads run through the gateway. Ensure the gateway service is running and the gateway host has network access to the Starburst Enterprise coordinator at the time scheduled reloads are triggered.
Trino SQL Compatibility Notes
Starburst Enterprise uses the Trino query engine. The following SQL conventions differ from standard ANSI SQL and must be observed in all Qlik load script SQL statements:
Feature
Trino Syntax
Avoid
Date literal
DATE '2024-01-01'
TO_DATE(), CONVERT()
String concat
CONCAT(a, b) or a || b
a + b
Top N rows
LIMIT n
TOP n, ROWNUM
Table names
catalog.schema.table
schema.table (ambiguous)
Case sensitivity
Double-quote identifiers if mixed case
Unquoted mixed-case names
Comparison: Starburst Enterprise vs. Starburst Galaxy
The table below summarises the key differences in the Qlik Cloud connection setup between Starburst Enterprise and Starburst Galaxy:
Area
Starburst Enterprise
Starburst Galaxy
Coordinator host
Customer-managed (on-premises or private cloud)
Starburst-managed SaaS
Default port
8443 (HTTPS) or 8080 (HTTP)
443 (HTTPS)
ODBC driver build
Enterprise-specific build from Starburst portal
Galaxy-specific build from galaxy.starburst.io
TLS certificate
May require manual import into Windows certificate store
Signed by public CA — trusted automatically
Authentication
LDAP, Kerberos, or password
LDAP or OAuth2
Gateway network placement
Deploy inside the Starburst Enterprise private network
Deploy with outbound access to port 443
Connection name
Administrator-defined (e.g. Starburst Enterprise:Production)
Data Nova Conference:Starburst Galaxy (canonical)
Catalog examples
hive.sales.customers
burstbank.retail.customers
Load script syntax
Identical — LIB CONNECT TO + Trino SQL SELECT
Identical — LIB CONNECT TO + Trino SQL SELECT
Troubleshooting
Gateway shows Disconnected in Qlik Cloud
- Verify outbound HTTPS connectivity from the gateway host to the Qlik Cloud tenant URL on port 443.
- Check that the gateway service is running: in Windows Services, look for Qlik Data Gateway - Direct Access.
- Review the gateway log files at %ProgramData%\Qlik\DataGateway\logs for connection errors.
- Confirm the API key used during registration has not been revoked in Qlik Cloud.
Data connection test fails: DSN not found
- Confirm the DSN name in the Qlik Cloud data connection matches exactly (case-sensitive) the System DSN name on the gateway host.
- Open ODBC Data Source Administrator (64-bit) on the gateway host and verify the DSN exists under the System DSN tab.
- Ensure the Qlik Data Gateway service account has access to the System DSN. Restart the gateway service after creating or modifying the DSN.
Data connection test fails: SSL/TLS error
- Confirm that the CA certificate chain for the Starburst Enterprise deployment has been imported into the Trusted Root Certification Authorities store on the gateway host.
- The test connection runs on the gateway host, not in Qlik Cloud. All certificate issues must be resolved on the gateway host.
- Verify that the SSL Certificate setting in the DSN is set to use the system certificate store, not a specific file path that may no longer be valid.
Kerberos authentication failures
- Confirm that the krb5.ini file exists at C:\Windows\krb5.ini and contains the correct KDC and realm settings for your domain.
- Verify that the Qlik Data Gateway Windows service is running as a domain account (not Local System) with a valid Kerberos principal.
- Test Kerberos connectivity separately using the kinit utility before diagnosing ODBC issues.
- After any changes to krb5.ini or the service account configuration, restart the Qlik Data Gateway service.
Load script error: [Starburst][Trino] Error executing query
- Verify the three-part table name is correct. Catalog, schema, and table names are case-sensitive.
- Confirm the Starburst Enterprise user account has SELECT privileges on the target table.
- Test the SQL directly in the Starburst Enterprise query interface before embedding it in the Qlik load script.
Scheduled reload fails, but manual reload succeeds
- Scheduled reloads run through the gateway under the service account context. Ensure the gateway service account has the same DSN access and Kerberos credentials as the interactive user.
- Verify the gateway is in a Connected state at the time the reload is scheduled.
- Check the Qlik Cloud reload log for gateway timeout errors and increase the gateway connection timeout if necessary.
Slow reload performance
- Push filtering predicates into the SQL WHERE clause rather than relying on Qlik WHERE clauses. All data passes through the gateway, so minimising row count reduces transfer time.
- Select only required columns rather than using SELECT *.
- Consider co-locating the gateway host in the same network segment as the Starburst Enterprise coordinator to minimise latency.
- Review the Starburst Enterprise query history to identify slow-running queries and optimise at the catalog or connector level.
Related Content and References
- Qlik Data Gateway - Direct Access documentation
- Starburst Enterprise documentation
- Qlik Cloud Data Sources
Environment
- Qlik Cloud
-
Qlik Cloud Analytics and Starburst Galaxy
This article describes how to connect Qlik Cloud Analytics to Starburst Galaxy using a Qlik Data Gateway - Direct Access and the Starburst ODBC driver... Show MoreThis article describes how to connect Qlik Cloud Analytics to Starburst Galaxy using a Qlik Data Gateway - Direct Access and the Starburst ODBC driver. It covers gateway installation and registration, ODBC driver and DSN configuration on the gateway host, and data connection setup in Qlik Cloud. It is intended for Qlik Cloud tenants that need to query Starburst Galaxy catalogs directly from Qlik Cloud apps and scripts.
Content
- Architecture Overview
- Prerequisites
- Qlik Data Gateway - Direct Access Requirement
- Install the Starburst ODBC Driver on the Gateway Host
- Configure an ODBC DSN on the Gateway Host
- Install and Register the Qlik Data Gateway - Direct Access
- Create a Data Connection in Qlik Cloud
- Load Script Patterns
- Trino SQL Compatibility Notes
- Comparison: Qlik Cloud vs. Qlik Sense on Windows
- Troubleshooting
- Related Content and References
Architecture Overview
Qlik Cloud Analytics is a fully managed SaaS platform. Because Starburst Galaxy is not directly accessible from the Qlik Cloud infrastructure without network configuration, a Qlik Data Gateway - Direct Access must be deployed within the same network as, or with routable access to, the Starburst Galaxy cluster endpoint. The gateway acts as a secure proxy, relaying data load requests from Qlik Cloud to Starburst Galaxy over the ODBC connection configured on the gateway host.
The connection flow will look as follows:
Qlik Cloud tenant → Qlik Data Gateway (Direct Access) → Starburst ODBC DSN → Starburst Galaxy cluster
The gateway host is a Windows or Linux server that you manage. It must have outbound HTTPS access to both the Qlik Cloud tenant (port 443) and the Starburst Galaxy cluster endpoint (port 443).
Prerequisites
Before beginning, ensure the following requirements are met:
- A Qlik Cloud tenant with a Qlik Cloud Analytics subscription.
- Tenant Admin or Space Admin rights in Qlik Cloud to create data connections.
- A dedicated Windows or Linux server to host the Qlik Data Gateway - Direct Access (minimum: 4 vCPU, 8 GB RAM, Windows Server 2016+ or RHEL/Ubuntu 20.04+).
A Qlik Data Gateway - Direct Access must be installed and registered to your Qlik Cloud tenant before a Starburst ODBC data connection can be created or used. Attempting to create the connection without a registered gateway will result in an error.
- Network connectivity from the gateway host to the Starburst Galaxy cluster endpoint (port 443, HTTPS/TLS).
- Outbound HTTPS access (port 443) from the gateway host to your Qlik Cloud tenant URL (such as https://<tenant>.us.qlikcloud.com).
- A Starburst Galaxy service account with SELECT privileges on the target catalog and schema.
- Administrator access on the gateway host to install software and configure ODBC System DSNs.
Qlik Data Gateway - Direct Access Requirement
A Qlik Data Gateway - Direct Access is required to connect Qlik Cloud Analytics to Starburst Galaxy. All connections to on-premises or privately hosted data sources are routed through the gateway.
The gateway must be installed on a host that:
- Has network access to the Starburst Galaxy cluster on port 443.
- Has the Starburst ODBC driver installed and a System DSN configured (see Install the Starburst ODBC Driver on the Gateway Host, and Configure an ODBC DSN on the Gateway Host).
- Has outbound HTTPS access to the Qlik Cloud tenant on port 443.
- Runs continuously. The gateway must be active whenever a Qlik Cloud app or script loads data from Starburst.
For high availability, install the gateway on two or more hosts and register all of them to the same Qlik Cloud tenant. Qlik Cloud will distribute data load requests across available gateway instances.
Install the Starburst ODBC Driver on the Gateway Host
The Starburst ODBC driver must be installed on the gateway host. Qlik Cloud reads data through the gateway, so the driver must be present and configured where the gateway is running.
- Download the Driver
- Log in to your Starburst Galaxy account at https://galaxy.starburst.io.
- Navigate to Settings > Clients & Tools > Drivers.
- Download the Windows 64-bit ODBC driver package (.msi or .zip) appropriate for the gateway host operating system.
- Copy the installer to the gateway host.
- Install the Driver
- Run the installer as a local administrator on the gateway host.
- Accept the licence agreement and choose the default installation directory.
- When prompted, select System DSN scope so that the Qlik Data Gateway service account can access the driver.
- Complete the installation. No restart is required.
Install the 64-bit driver on the gateway host. The Qlik Data Gateway - Direct Access runs as a 64-bit process and requires the 64-bit ODBC driver. Use ODBC Data Source Administrator (64-bit) for all DSN configuration.
Configure an ODBC DSN on the Gateway Host
A System DSN must be created on the gateway host. This is the DSN that Qlik Cloud will reference when the data connection is used in a load script or app.
- Open ODBC Data Source Administrator (64-bit) on the gateway host.
- Click the System DSN tab, then click Add.
- Select the Starburst ODBC Driver from the driver list and click Finish.
- Configure the DSN with the following settings:
Setting
Value
DSN Name
StarburstGalaxy (must match the name used when creating the Qlik Cloud data connection)
Host
<your-cluster>.galaxy.starburst.io
Port
443
Catalog
Leave blank (set per query or in the Qlik load script)
Authentication
LDAP (username/password) or OAuth2 (token)
SSL
Enabled (required for Galaxy)
SSL Certificate
Use system certificate store
- Click Test Connection to verify connectivity from the gateway host to Starburst Galaxy. A successful test returns the Starburst Galaxy version.
- Click OK to save the DSN.
Test the DSN connection while logged in as the same Windows service account that will run the Qlik Data Gateway service. DSN access permissions are per-user for User DSNs and per-machine for System DSNs. Always use System DSN for service accounts.
Install and Register the Qlik Data Gateway - Direct Access
The Qlik Data Gateway - Direct Access installer is downloaded from the Qlik Cloud Administration activity center and registers the gateway to your tenant during installation.
- Download the Installer
- In Qlik Cloud, open the Qlik Cloud Administration activity center.
- Navigate to Data Gateways.
- Click Add and select Direct Access Gateway.
- Follow the on-screen instructions to download the installer for the gateway host operating system.
- Install the Gateway
- Copy the installer to the gateway host.
- Run the installer as a local administrator.
- When prompted, enter the Qlik Cloud tenant URL and your API key.
See Generating and managing API keys for instructions on how to generate an API key. - Complete the installation. The gateway service will start automatically and register with the Qlik Cloud tenant.
- Verify the Gateway is registered
- Return to the Qlik Cloud Administration activity center > Data Gateways.
- Confirm the gateway appears in the list with a Connected status.
If the gateway shows a Disconnected status, check outbound HTTPS connectivity from the gateway host to the tenant URL on port 443.
The gateway service runs under a Windows service account (or as a systemd service on Linux). Ensure this account has Read access to the System DSN registry keys and is granted Log on as a service rights on Windows.
Create a Data Connection in Qlik Cloud
Once the gateway is registered and the ODBC DSN is configured on the gateway host, create the ODBC data connection in Qlik Cloud.
- In Qlik Cloud, go to Create
- Choose Data connection from the available actions and choose your Space
- In the connector list, search for and select ODBC.
- In the connection configuration panel, set the following:
Field
Value
Data gateway
Select the Direct Access Gateway registered in Install and Register the Qlik Data Gateway - Direct Access
DSN
StarburstGalaxy (the System DSN configured on the gateway host in Configure an ODBC DSN on the Gateway Host)
Username
Starburst Galaxy service account username
Password
Starburst Galaxy service account password or personal access token
Connection name
Data Nova Conference:Starburst Galaxy
- Click Create.
- Use the Test button to verify the connection. The test runs through the gateway, confirming end-to-end connectivity.
The connection name Data Nova Conference:Starburst Galaxy is the canonical name used in all Qlik load scripts for this integration. Changing it requires updating all dependent scripts. This name is consistent across Qlik Sense Enterprise on Windows and Qlik Cloud (this article).
Load Script Patterns
Load scripts in Qlik Cloud apps use the same patterns as Qlik Sense on Windows. The LIB CONNECT TO connection name must match the data connection created in Create a Data Connection in Qlik Cloud.
Establish the Connection
Always use the following statement at the top of the load script tab that accesses Starburst Galaxy:
LIB CONNECT TO 'Data Nova Conference:Starburst Galaxy';
Basic SQL SELECT
Use three-part table names (catalog.schema.table) in all Trino SQL statements:
Customers:
SQL SELECT
    customer_id,
    customer_name,
    region,
    created_date
FROM hive.sales.customers
WHERE created_date >= DATE '2024-01-01';
Joining Tables
Perform joins in SQL rather than in the Qlik data model to reduce data transfer volume through the gateway:
Orders:
SQL SELECT
    o.order_id,
    o.customer_id,
    o.order_date,
    o.total_amount,
    c.customer_name,
    c.region
FROM hive.sales.orders o
JOIN hive.sales.customers c ON o.customer_id = c.customer_id;
Incremental Load
Use Qlik variables to pass date parameters into the SQL predicate for incremental data loads:
LET vLastLoadDate = Date(Today()-1, 'YYYY-MM-DD');
Transactions:
SQL SELECT *
FROM hive.sales.transactions
WHERE transaction_date >= DATE '$(vLastLoadDate)';
Avoiding Synthetic Keys
Rename non-key fields that share names across tables by prefixing the table name. Island tables should be commented out:
Orders:
SQL SELECT
    order_id,
    customer_id, // Key — keep as-is
    order_date AS Order_order_date, // Renamed to avoid synthetic key
    total_amount AS Order_total_amount
FROM hive.sales.orders;
In Qlik Cloud, scheduled reloads run through the gateway. Ensure the gateway service is running and the gateway host has network access to Starburst Galaxy at the time scheduled reloads are triggered.
Trino SQL Compatibility Notes
Starburst Galaxy uses the Trino query engine. The following SQL conventions differ from standard ANSI SQL and must be observed in all Qlik load script SQL statements:
Feature
Trino Syntax
Avoid
Date literal
DATE '2024-01-01'
TO_DATE(), CONVERT()
String concat
CONCAT(a, b) or a || b
a + b
Top N rows
LIMIT n
TOP n, ROWNUM
Table names
catalog.schema.table
schema.table (ambiguous)
Case sensitivity
Double-quote identifiers if mixed case
Unquoted mixed-case names
Comparison: Qlik Cloud vs. Qlik Sense on Windows
The table below summarises the key differences in the Starburst connection setup between Qlik Cloud Analytics and Qlik Sense Enterprise on Windows (client-managed):
Area
Qlik Cloud Analytics
Qlik Sense on Windows
Deployment
SaaS (Qlik-managed)
Client-managed
ODBC driver location
Gateway host (not Qlik Cloud servers)
Qlik Sense server
Gateway required
Yes — Direct Access Gateway mandatory
No — connects directly via QMC
DSN configuration
On the gateway host, must be System DSN
On the Qlik Sense server, must be System DSN
Connection creation
Qlik Cloud hub or Management Console
Qlik Management Console (QMC)
Connection name
Data Nova Conference:Starburst Galaxy (canonical)
Data Nova Conference:Starburst Galaxy (canonical)
Load script syntax
Identical — LIB CONNECT TO + SQL SELECT
Identical — LIB CONNECT TO + SQL SELECT
Scheduled reloads
Via Qlik Cloud scheduler, executed through gateway
Via QMC task scheduler, executed on Qlik Sense server
Troubleshooting
Gateway shows Disconnected in Qlik Cloud
- Verify outbound HTTPS connectivity from the gateway host to the Qlik Cloud tenant URL on port 443.
- Check that the gateway service is running: in Windows Services, look for Qlik Data Gateway - Direct Access.
- Review the gateway log files at %ProgramData%\Qlik\DataGateway\logs for connection errors.
- Confirm the API key used during registration has not been revoked in Qlik Cloud.
Data connection test fails: DSN not found
- Confirm the DSN name in the Qlik Cloud data connection matches exactly (case-sensitive) the System DSN name on the gateway host.
- Open ODBC Data Source Administrator (64-bit) on the gateway host and verify the DSN exists under the System DSN tab.
- Ensure the Qlik Data Gateway service account has access to the System DSN. Restart the gateway service after creating or modifying the DSN.
Data connection test fails: SSL/TLS error
- Confirm that the Windows certificate store on the gateway host trusts the CA certificate chain for *.galaxy.starburst.io.
- The test connection runs on the gateway host, not in Qlik Cloud. All certificate issues must be resolved on the gateway host.
Load script error: [Starburst][Trino] Error executing query
- Verify the three-part table name is correct. Catalog, schema, and table names are case-sensitive.
- Confirm the Starburst Galaxy service account has SELECT privileges on the target table.
- Test the SQL directly in the Starburst Galaxy Query Editor before embedding it in the Qlik load script.
Scheduled reload fails, but manual reload succeeds
- Scheduled reloads run through the gateway under the service account context. Ensure the gateway service account has the same DSN access as the interactive user.
- Verify the gateway is in a Connected state at the time the reload is scheduled.
- Check the Qlik Cloud reload log for gateway timeout errors and increase the gateway connection timeout if necessary.
Slow reload performance
- Push filtering predicates into the SQL WHERE clause rather than relying on Qlik WHERE clauses. All data passes through the gateway, so minimising row count reduces transfer time.
- Select only required columns rather than using SELECT *.
- Consider co-locating the gateway host in the same network region as the Starburst Galaxy cluster to minimise latency.
Related Content and References
- Qlik Data Gateway - Direct Access documentation
- Starburst Galaxy documentation
- Qlik Cloud Data Sources
Environment
- Qlik Cloud
-
Qlik Sense Enterprise on Windows and Security Vulnerability CVE-2023-26136 (toug...
Is Qlik Sense Enterprise on Windows affected by the security vulnerability CVE-2023-26136 (nvd.nist.gov)? CVE-2023-26136 is a vulnerability detected i... Show MoreIs Qlik Sense Enterprise on Windows affected by the security vulnerability CVE-2023-26136 (nvd.nist.gov)?
CVE-2023-26136 is a vulnerability detected in Node.js, a third-party component used by Qlik Sense Enterprise on Windows. Security scans may flag the vulnerability in a Qlik Sense Enterprise on Windows environment.
While Qlik was not directly impacted, the affected third-party component has been updated across supported versions.
Qlik Sense versions up to the following would be flagged by security scans:
- Qlik Sense Enterprise on Windows May 2024 patch 23
- Qlik Sense Enterprise on Windows November 2024 patch 17
- Qlik Sense Enterprise on Windows May 2025 patch 5
Resolution
Upgrade to any of the following (or later) versions:
- Qlik Sense Enterprise on Windows May 2024 patch 24
- Qlik Sense Enterprise on Windows November 2024 patch 18
- Qlik Sense Enterprise on Windows May 2025 patch 6
- Qlik Sense Enterprise on Windows November 2025 IR, and all subsequent versions, such as May 2026 IR and upward
In some instances, the Qlik Sense patch installer updates service binaries but does not remove leftover node_modules folders from previous installations. The old request/node_modules/tough-cookie directories may still exist on disk even though the running service no longer uses them.
If you notice stale folders post-upgrade:
- Run the following PowerShell script as Administrator to clean up stale folders:
# Qlik Sense - tough-cookie stale folder cleanup # Run as Administrator after upgrading to v14.231.26 or later # Take a backup or snapshot before running Write-Host "Starting tough-cookie cleanup..." -ForegroundColor Cyan # Step 1 - Stop Service Dispatcher (this will stop all dependent Qlik Sense services) Stop-Service -Name "QlikSenseServiceDispatcher" -Force -ErrorAction SilentlyContinue Write-Host "Stopped: QlikSenseServiceDispatcher" -ForegroundColor Yellow Start-Sleep -Seconds 5 # Step 2 - Remove tough-cookie directories $paths = @( "C:\Program Files\Qlik\Sense\ConverterService\node_modules\tough-cookie", "C:\Program Files\Qlik\Sense\DownloadPrepService\node_modules\request\node_modules\tough cookie", "C:\Program Files\Qlik\Sense\MobilityRegistrarService\node_modules\request\node_modules\tough cookie", "C:\Program Files\Qlik\Sense\NotifierService\node_modules\request\node_modules\tough-cookie" ) foreach ($path in $paths) { if (Test-Path $path) { Remove-Item -Path $path -Recurse -Force Write-Host "Removed: $path" -ForegroundColor Green } else { Write-Host "Not found (already clean): $path" -ForegroundColor Gray } } Write-Host "`nCleanup complete. Restart Service Dispatcher manually to bring all services back online." -ForegroundColor CyanThis script may need to be re-run after any future Qlik Sense Enterprise on Windows patch or reinstallation, as the installer may restore these directories.
The script is provided as is and to be used at your own risk.
- Restart the Qlik Sense Service Dispatcher service
Internal Investigation ID(s)
- SUPPORT-2237
-
Qlik Cloud Monitoring Apps Workflow Guide
This template was updated on December 4th, 2025 to replace the original installer and API key rotator with a new, unified deployer automation. Please... Show MoreThis template was updated on December 4th, 2025 to replace the original installer and API key rotator with a new, unified deployer automation. Please disable or delete any existing installers, and create a new automation, picking the Qlik Cloud monitoring app deployer template from the App installers category.
Installing, upgrading, and managing the Qlik Cloud Monitoring Apps has just gotten a whole lot easier! With a single Qlik Automate template, you can now install and update the apps on a schedule with a set-and-forget installer using an out-of-the-box Qlik Automate template. It can also handle API key rotation required for the data connection, ensuring the data connection is always operational.
Some monitoring apps are designed for specific Qlik Cloud subscription types. Refer to the compatibility matrix within the Qlik Cloud Monitoring Apps repository.
'Qlik Cloud Monitoring Apps deployer' template overview
This automation template is a set-and-forget template for managing the Qlik Cloud Monitoring Applications, including but not limited to the App Analyzer, Entitlement Analyzer, Reload Analyzer, and Access Evaluator applications. Leverage this automation template to quickly and easily install and update these or a subset of these applications with all their dependencies. The applications themselves are community-supported; and, they are provided through Qlik's Open-Source Software (OSS) GitHub and thus are subject to Qlik's open-source guidelines and policies.
For more information, refer to the GitHub repository.
Features
- Can install/upgrade all or select apps.
- Can create or leverage existing spaces.
- Programmatically verified prerequisite settings, roles, and entitlements, notifying the user during the process if changes in configuration are required, and why.
- Installs latest versions of specified applications from Qlik’s OSS GitHub.
- Creates required API key.
- Creates required analytics data connection.
- Creates a daily reload schedule.
- Reload applications post-install.
- Tags apps appropriately to track which are installed and their respective versions.
- Supports both user and capacity-based subscriptions.
Configuration:
Update just the configuration area to define how the automation runs, then test run, and set it on a weekly or monthly schedule as desired.
Configure the run mode of the template using 7 variable blocks
Users should review the following variables:
- configuredMonitoringApps: contains the list of the monitoring applications which will be installed and maintained. Delete any applications not required before running (default: all apps listed).
- refreshConnectorCredentials: determines whether the monitoring application REST connection and associated API key will be regenerated every run (default: true).
- reloadNow: determines whether apps are reloaded immediately following updates (default: true).
- reloadScheduleHour: determines at which hour of the day the apps reload at for the daily schedule in UTC timezone (default: 06)
- sharedSpaceName: defines the name of the shared space used to import the apps into prior to publishing. If the space doesn't exist, it'll be created. If the space exists, the user will be added to it with the required permissions (default: Monitoring - staging).
- managedSpaceName: defines the name of the managed space the apps are published into for consumption/ alerts/ subscription use.If the space doesn't exist, it'll be created. If the space exists, the user will be added to it with the required permissions (default: Monitoring).
- versionsToKeep: determines how many versions of each staged app is kept in the shared space. If set to 0, apps are deleted after publishing. If a positive integer value other than 0, that many apps will be kept for each monitoring app deployed (default: 0).
App management:
If the monitoring applications have been installed manually (i.e., not through this automation), then they will not be detected as existing. The automation will install new copies side-by-side. Any subsequent executions of the automation will detect the newly installed monitoring applications and check their versions, etc. This is due to the fact that the applications are tagged with "QCMA - {appName}" and "QCMA - {version}" during the installation process through the automation. Manually installed applications will not have these tags and therefore will not be detected.
FAQ
Q: Can I re-run the installer to check if any of the monitoring applications are able to be upgraded to a later version?
A: Yes. The automation will update any managed apps that don't match the repository's manifest version.
Q: What if multiple people install monitoring applications in different spaces?
A: The template scopes the application's installation process to a managed space. It will scope the API key name to `QCMA – {spaceId}` of that managed space. This allows the template to install/update the monitoring applications across spaces and across users. If one user installs an application to “Space A” and then another user installs a different monitoring application to “Space A”, the template will see that a data connection and associated API key (in this case from another user) exists for that space already. It will install the application leveraging those pre-existing assets.
Q: What if a new monitoring application is released? Will the template provide the ability to install that application as well?
A: Yes, but an update of the template from the template picker will be required, since the applications are hard coded into the template. The automation will begin to fail with a notification an update is needed once a new version is available.
Q:I have updated my application, but I noticed that it did not preserve the history. Why is that?
A: Each upgrade may generate a new set of QVDs if the data models for the applications have changed due to bug fixes, updates, new features, etc. The history is preserved in the prior versions of the application’s QVDs, so the data is never deleted and can be loaded into the older version.
-
The Content Monitor App for Qlik Sense Enterprise on Windows
The Qlik Sense on Windows Content Monitor is intended for Qlik Administrators. Its purpose is to monitor and analyze your Qlik Sense content, includin... Show MoreThe Qlik Sense on Windows Content Monitor is intended for Qlik Administrators. Its purpose is to monitor and analyze your Qlik Sense content, including app usage, resource consumption, and data sources. This helps with governance, optimization, and identifying unused content.
Requirements
- Platform: Qlik Sense Enterprise on Windows
- Version: November 2025 onwards
- Availability: Bundled with installation from version November 2025 onwards
- If you are running previous versions of Qlik Sense Enterprise on Windows, the Content Monitor is also available on Qlik's Downloads page here: Content Monitor (download page)
- This must be manually installed, and a weekly reload is recommended.
- The downloaded version is supported from Qlik Sense version Feb 2020.
Core Documentation
All technical details can be found in the two attached documents. These are your primary resources.
Qlik Sense Content Monitor User Guide
-
-
What it covers: A detailed, sheet-by-sheet explanation of the entire app. It describes what every KPI, chart, and table means for sections like "Weekly Summary," "Snapshot," "Applications," "Sessions," "Task Executions," "File Inventory," and "Infrastructure."
-
Use Case:
-
Guiding a customer on how to read and interpret the data.
-
Answering customer questions like, "What does the 'Session Concurrency' sheet show?" or "How do I read the 'File Inventory' sheet?"
-
- See the attached Qlik Sense Content Monitor User Guide
-
Configuration Guide
-
-
What it covers: This is the primary guide for setup and reload issues. It contains:
-
Detailed definitions for all script parameters (e.g.,
vCentralNodeHostName,vVirtualProxyPrefix,vServerLogFolder). -
Performance tuning options (e.g.,
vFileScanMaxDuration,vAppRetrievalLoop, exclusion lists). -
A "Trial Mode" section is used for troubleshooting initial reload failures.
-
A "Troubleshooting" section.
-
-
Use Case:
-
New installations.
-
Troubleshootings.
-
Tuning performance for long reloads.
-
-
See the attached Qlik Sense Content Monitor Configuration Guide
-
Environment
- Qlik Sense Enterprise on Windows
-
Qlik NPrinting and the CVE-2025-32433 Erlang/OTP vulnerability
Erlang/Open Telecom Platform (OTP) has disclosed a critical security vulnerability: CVE-2025-32433. Is Qlik NPrinting affected by CVE-2025-32433? Reso... Show MoreErlang/Open Telecom Platform (OTP) has disclosed a critical security vulnerability: CVE-2025-32433.
Is Qlik NPrinting affected by CVE-2025-32433?
Resolution
Qlik NPrinting installs Erlang OTP as part of the RabbitMQ installation, which is essential to the correct functioning of the Qlik NPrinting services.
RabbitMQ does not use SSH, meaning the workaround documented in Unauthenticated Remote Code Execution in Erlang/OTP SSH is already applied. Consequently, Qlik NPrinting remains unaffected by CVE-2025-32433.
All future Qlik NPrinting versions from the 20th of May 2025 and onwards will include patched versions of OTP and fully address this vulnerability.
Environment
- Qlik NPrinting

-
How to extract changes from the change store (Write table) and store them in a Q...
This article is currently under review. This article explains how to extract changes from a Change Store and store them in a QVD by using a load scrip... Show MoreThis article is currently under review.
This article explains how to extract changes from a Change Store and store them in a QVD by using a load script in Qlik Analytics.
The article also includes
- An app example with an incremental load script that will store new changes in a QVD
- Configuration instructions for the examples
Scenario
This example will create an analytics app for Vendor Reviews. The idea is that you, as a company, are working with multiple vendors. Once a quarter, you want to review these vendors.
The example is simplified, but it can be extended with additional data for real-world examples or for other “review” use cases like employee reviews, budget reviews, and so on.
The data model
The app’s data model is a single table “Vendors” that contains a Vendor ID, Vendor Name, and City:
Vendors:
Load * inline [
"Vendor ID","Vendor Name","City"
1,Dunder Mifflin,Ghent
2,Nuka Cola,Leuven
3,Octan, Brussels
4,Kitchen Table International,Antwerp
];
The Write Table
The Write Table contains two data model fields: Vendor ID and Vendor Name. They are both configured as primary keys to demonstrate how this can work for composite keys.
The Write Table is then extended with three editable columns:
- Quarter (Single select)
- Action required? (Single select)
- Comment (Manual user input)
Prerequisites
- A shared space
- A managed space (optional but advised for the tutorial)
- A connection to the Change-stores API to the Analytics REST connector in the shared space. A step-by-step guide on creating this connection is available in Extracting write table changes with the REST connector in Qlik Cloud.
Steps
- Upload the attached .QVF file to a shared space
- Open the private sheet Vendor Reviews
- Click the Reload App (A) button and make sure data appears (B) in the top table
- Go to Edit sheet (A) mode
- Drag a Write Table Chart (B) on the top table, and choose the option Convert to: Write Table (C).
This transforms the table into a Write Table with two data model columns Vendor ID and Vendor Name.
- Go to the Data section in the Write Table’s Properties menu and add an editable column
- This prompts you to define a primary key inside the table. Click Define (A) in the table and use both Vendor ID and Vendor Name as primary keys (B).
You can also just use Vendor ID, but we want to show that this also supports composite primary keys. - Configure the editable column:
- Title: Quarter
- Show content: Single selection
- Add options for Q1Y26 through Q4Y26.
Tip! Also add an empty option by clicking the Add button without specifying a value.
- Add another Editable column with the below configuration
- Title: Action required
- Type: Single select
- Options: Yes and No
- Add another Editable column with the below configuration
- Title: Review
- Type: Single select
- Options: Yes and No
- The Write Table is now set up.
Go to the Write Table’s properties and locate the Change store (A) section. Copy the Change store ID (B).
- Leave the Edit sheet mode. Then add changes for at least two records. Save those changes.
- Go to the app’s load script editor and uncomment the second script section by first selecting all lines in the script section (CTRL+A or CMD+A) (A) and then clicking the comment button (B) in the toolbar.
- Configure the settings in the CONFIGURATION part at the end of the load script
- Update the load script with the IDs of the editable columns.
The easiest solution to get these IDs is to test your connection. Make sure the connection URL is configured to use the /changes/tabular-views endpoint and uses the correct change store ID.
- Copy and paste the example load script (for the editable columns only) and paste it in the app’s load script SQL Select statement that starts on line 159:
- Replace the corresponding * symbols in the LOAD statement that starts on line 176:
- Choose which records you want to track in your table by configuring the Exists Key on line 216.
This key will be used to filter the “granularity” on which we want to store changes in the QVD and data model, as the load script will only load unique existing keys (line 235).
- $(vExistsKeyFormula) is a pipe-separated list of the primary keys.
- In this example, Quarter is added as an additional part of the exists key to keep track of changes by Quarter.
- Optionally, this can be extended with createdBy and updatedAt to extend the granularity to every change made:
- Reload the app and verify that the correct change store table is created in your data model. The second table in the sheet should also successfully show vendors and their reviews.
Environment
- Qlik Cloud Analytics
-
How to create NPrinting GET and POST REST connections
NPrinting has a library of APIs that can be used to customize many native NPrinting functions outside the NPrinting Web Console. Environment: Qlik N... Show MoreNPrinting has a library of APIs that can be used to customize many native NPrinting functions outside the NPrinting Web Console.
Environment:
An example of two of the more common capabilities available via NPrinting APIs are as follows
- Connection reloads
- Publish Task executions
These and many other public NPrinting APIs can be found here: Qlik NPrinting API
In the Qlik Sense data load editor of your Qlik Sense app, two REST connections are required (These two REST Connectors must also be configured in the QlikView Desktop application>load where the API's are used. See Nprinting Rest API Connection through QlikView desktop)
- GET
- POST
Requirements of REST user account:
- Windows Authentication is required in both these connectors. The required user account is the NPrinting service account (which is also ROOTADMIN on the Qlik Sense server)
- This user account must also be a member of the NPrinting 'Administrators' Security Role on the NPrinting Server.
Creating REST "GET" connections
Note: Replace QlikServer3.domain.local with the name and port of your NPrinting Server
NOTE: replace domain\administrator with the domain and user name of your NPrinting service user account
Creating REST "POST" connections
Note: Replace QlikServer3.domain.local with the name and port of your NPrinting Server
NOTE: replace domain\administrator with the domain and user name of your NPrinting service user account
Ensure to enter the 'Name' Origin and 'Value' of the Qlik Sense (or QlikView) server address in your POST REST connection only.
Replace https://qlikserver1.domain.local with your Qlik sense (or QlikView) server address.
Ensure that the 'Origin' Qlik Sense or QlikView server is added as a 'Trusted Origin' on the NPrinting Server computer
Related Content
- Distribute NPrinting reports after reloading a Qlik App
- Extending Qlik NPrinting
- Run a Qlik NPrinting API POST command via QlikView reload script
- Troubleshooting Common NPrinting API Errors
NOTE: The information in this article is provided as-is and to be used at own discretion. NPrinting API usage requires developer expertise and usage therein is significant customization outside the turnkey NPrinting Web Console functionality. Depending on tool(s) used, customization(s), and/or other factors ongoing, support on the solution below may not be provided by Qlik Support.
-
Top 10 Viz tips - part IX - Qlik Connect 2025
At Qlik Connect 2025 I hosted a session called "Top 10 Visualization tips". Here's the app I used with all tips including test data. Tip titles, ... Show MoreAt Qlik Connect 2025 I hosted a session called "Top 10 Visualization tips". Here's the app I used with all tips including test data.
Tip titles, more details in app:
- Open ended buckets
- Cyclic reset
- "Hidden" columns
- Labels in different sizes
- Others by Ack%
- Highlight over threshold
- Tooltip to other things
- Bar codes revisited
- Table tooltips
- More Pivot tooltips
- Max min
- Gradients and opacity with SVG
- Cluster map layer
- Standard deviation band
- Band chart in table
- Table with scaling text
- Font size for highlight
- Labels on bars
- Renaming map labels
- "Extra" columns in Pivot
- Vertical waterfall revisited
- Trellis respond to selection
- Radar with more than one measure
- Button with two lines of text
- Currencies
- Date range sliders
- Dotted line on forecast
- Nav menu tooltips
- Blinking KPI
- Color table headers
I want to emphasize that many of the tips were discovered by others than me, I tried to credit the original author at all places when possible.
If you liked it, here's more in the same style:
- 24 days of visualization Season III, II, I
- Top 10 Tips Part X, IX, VIII, VII, VI, V, IV, III, II , I
- Let's make new charts with Qlik Sense
- FT Visual Vocabulary Qlik Sense version
- Similar but for Qlik GeoAnalytics : Part III, II, I
Thanks,
Patric -
Qlik Replicate target Oracle database experienced a transient CPU spike per quer...
During Change Data Capture (CDC) replication, the target Oracle database experienced a transient CPU spike. Database performance monitoring identified... Show MoreDuring Change Data Capture (CDC) replication, the target Oracle database experienced a transient CPU spike.
Database performance monitoring identified that the high CPU consumption was driven by the following automated bulk query generated by Qlik Replicate:
UPDATE /*+ PARALLEL(tempview) */ ( SELECT /*+ PARALLEL("CDC"."CATB_ENTRIES_DECOUPLING") PARALLEL("QLIK_TARGET"."attrep_changes69C66930_0000001") */ ...
The underlying cause of the resource spike was the execution of this query using aggressive Oracle PARALLEL hints, which exhausted available target DB CPU/memory resources.
Resolution
To prevent future resource contention and CPU/memory alerts in the target database, parallelism hints must be disabled or tuned within Qlik Replicate. This involves modifying two internal parameters across the Full Load and CDC stages: bulkUseParallel and directPathParallelLoad.
bulkUseParallel is for CDC / Change Processing and is enabled by default (true). It instructs Qlik Replicate to inject the Oracle PARALLEL hint into bulk DML statements for better target performance.
Setting it to false stops queries such as UPDATE /*+ PARALLEL(tempview) */ ... from executing in parallel, preventing CPU spikes.
This may cause a slight performance degradation during high-volume CDC processing.
directPathParallelLoad is for Full Load and enabled by default (true). It enables Direct Path loading using parallel processing only during the initial Full Load phase. It has no impact on the daily CDC.
Setting it to false proactively protects the DB during table reloads.
Will likely increase the time required to complete Full Load operations.
How to set the Internal Parameters in Qlik Replicate:
- Navigate to Manage Endpoint Connection → Targets and select your Endpoint
- Open the Advanced tab and select Internal Parameters
- Add bulkUseParallel and directPathParallelLoad
- Untick the Value checkbox to disable them
- Click OK
Environment
- Qlik Replicate
-
How to Replace the Operations Monitor App
Take a backup of the app and data associated with the app: Export the existing Operations Monitor app via the QMC (Apps > More actions > Export). Ba... Show More- Take a backup of the app and data associated with the app:
- Export the existing Operations Monitor app via the QMC (Apps > More actions > Export). Backup to a safe location.
- Backup the QVD files in the Central Node Log directory (C:\ProgramData\Qlik\Sense\Log by default)
- Verify you have an Operations Monitor QVF file in the DefaultApps section of the Qlik installation directory (C:\ProgramData\Qlik\Sense\Repository\DefaultApps by default). Ask support for a copy for your version of Qlik Sense if you cannot locate the file.
- Write down any reload tasks associated with the app so that you can restore them later
- Write down the original owner of the app (should be the internal repository user, INTERNAL\sa_repository)
- Remove the Operations Monitor App and associated data files:
- Delete the Operations Monitor app via the QMC (Apps > Delete). This removes both the app and associated reload tasks.
- Delete the QVD files associated with the Operations Monitor App (governance*.qvd) in the Central Node Log directory (C:\ProgramData\Qlik\Sense\Log by default)
- Restart all Qlik Sense services.
- Re-import the Operations Monitor App from the installation directory:
- Locate the default Operations Monitor app in the DefaultApps section of the Qlik installation directory (C:\ProgramData\Qlik\Sense\Repository\DefaultApps by default)
- Import the app via the QMC (Apps > Import)
- Change ownership of the app to the same user as before (should have been the internal repository user, INTERNAL\sa_repository)
- Recreate any reload tasks noted from step 1
- Reload the app, and verify the app works as expected.
- Take a backup of the app and data associated with the app: