Unlock a world of possibilities! Login now and discover the exclusive benefits awaiting you.
- Qlik Community
- :
- Blogs
- :
- Technical
- :
- Design
- :
- Exploring Qlik AutoML Real-time Predictions API
- Subscribe to RSS Feed
- Mark as New
- Mark as Read
- Bookmark
- Subscribe
- Printer Friendly Page
- Report Inappropriate Content
The ability to make data-driven decisions in real-time is a cornerstone for many businesses. Using Qlik AutoML's real-time prediction API let's you seamlessly integrate predictions on the fly in your web applications.
In this guide, we will walk through the process of leveraging Qlik AutoML's real-time prediction capabilities using Node.js.
Before using the API, we first need to create an ML experiment in Qlik cloud and deploy it.
Creating the AutoML Experiment and deploying it
There are lots of help articles around this topic, but for our simple case, we will be using a Customer Churn dataset to train our model (You will find the file attached at the end of this post).
- Start by creating a new ML experiment from your Qlik cloud hub
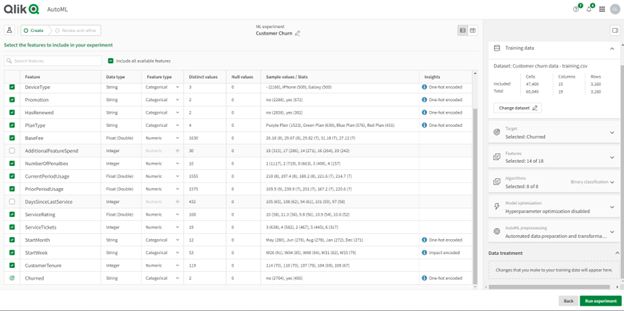
- After uploading the Training file, select the “churned” column as the target to make our predictions. Make sure to de-select the “AdditionalFeatureSpend” and “DaysSinceLastService” columns if you want to follow along with this example.
The features (columns) selected in this step should later on match the schema of the input dataset we want to get real-time prediction on.
- Once we run the experiment to train the model, the best performing algorithm is automatically selected, you can now reconfigure a different version or simply press Deploy to create a new ML deployment, let’s do the latter.
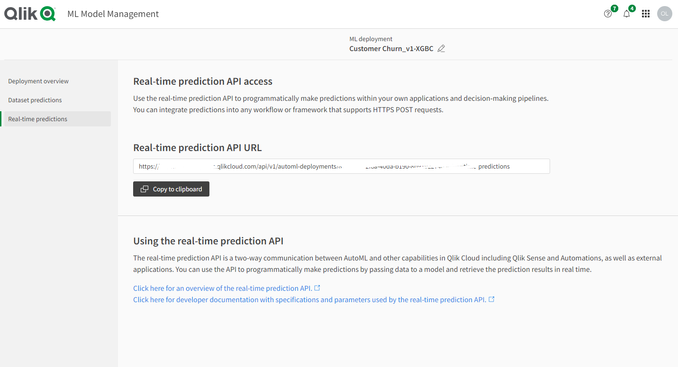
- In the Deployment screen, you can run predictions on new apply datasets right in the hub, or in our case, we will use the Real-time prediction API to programmatically make predictions from our node.js app.
Creating the node.js app to make real-time predictions
Head to the Real-time predictions pane as shown above, this is where we will be able to grab the API URL.
To interact with the real-time prediction API, you'll require an API key from Qlik Cloud. Users with the 'Developer' role have the necessary privileges to generate this key. You can learn more about generating one here.
Setting up the Environment
Begin by initializing a Node.js environment and installing the necessary packages, run:
npm init -y
then
npm install axios dotenv fs
API Configuration
In the .env file, define the Real-time prediction API URL and the API Key:
API_KEY=eyJhb....
API_URL=https://....
Next, create an index.js file and include the following:
Data prep:
We read from the csv file using fs and format the data to align with the real-time prediction API's requirements
const axios = require('axios');
const fs = require('fs');

require('dotenv').config();

const api_url = process.env.API_URL;
const api_key = process.env.API_KEY;

const rawData = fs.readFileSync('./customer-churn-apply-subset.csv', 'utf8');
const rows = rawData.split('\n').slice(1).filter(line => line.trim() !== '').map(row => {
    const [
        AccountID, Territory, Country, DeviceType, Promotion, HasRenewed, PlanType,
        BaseFee, NumberOfPenalties, CurrentPeriodUsage, PriorPeriodUsage, ServiceRating,
        ServiceTickets, StartMonth, StartWeek, CustomerTenure, Churned
    ] = row.split(',');

    return {
        "AccountID": AccountID,
        "Territory": Territory,
        "Country": Country,
        "DeviceType": DeviceType,
        "Promotion": Promotion,
        "HasRenewed": HasRenewed,
        "PlanType": PlanType,
        "BaseFee": parseFloat(BaseFee),
        "NumberOfPenalties": parseInt(NumberOfPenalties, 10),
        "CurrentPeriodUsage": parseFloat(CurrentPeriodUsage),
        "PriorPeriodUsage": parseFloat(PriorPeriodUsage),
        "ServiceRating": parseFloat(ServiceRating),
        "ServiceTickets": parseInt(ServiceTickets, 10),
        "StartMonth": StartMonth,
        "StartWeek": StartWeek,
        "CustomerTenure": parseFloat(CustomerTenure),
    };
});

const formattedRows = rows.map(record => [
    record.AccountID,
    record.Territory,
    record.Country,
    record.DeviceType,
    record.Promotion,
    record.HasRenewed,
    record.PlanType,
    record.BaseFee,
    record.NumberOfPenalties,
    record.CurrentPeriodUsage,
    record.PriorPeriodUsage,
    record.ServiceRating,
    record.ServiceTickets,
    record.StartMonth,
    record.StartWeek,
    record.CustomerTenure
]);
Crafting the API Request:
here, we define the headers and body content for the POST request to the API.
Notice that the schema matches the features we used to train our model.
const json_data = {
    "rows": formattedRows,
    "schema": [
        {"name": "AccountID"},
        {"name": "Territory"},
        {"name": "Country"},
        {"name": "DeviceType"},
        {"name": "Promotion"},
        {"name": "HasRenewed"},
        {"name": "PlanType"},
        {"name": "BaseFee"},
        {"name": "NumberOfPenalties"},
        {"name": "CurrentPeriodUsage"},
        {"name": "PriorPeriodUsage"},
        {"name": "ServiceRating"},
        {"name": "ServiceTickets"},
        {"name": "StartMonth"},
        {"name": "StartWeek"},
        {"name": "CustomerTenure"},
    ]
};

const headers = {
    'Authorization': `Bearer ${api_key}`,
    'Content-type': 'application/json',
    'Accept': 'text/json',
};
Sending the Request & Handling Response
We utilize axios to transmit the data and receive real-time prediction results (you can use any http client for this)
axios.post(
    api_url,
    json_data,
    {
        headers: headers,
    })
    .then(response => {
        console.log(response.data);
    })
    .catch(error => {
        console.error("Error:", error);
    });
Now you can run the node app:
node index.js
The result we get are the predictions of the Customer Churn for our apply dataset with the second column representing whether the customer is predicted to Churn or not, 3rd column is the probability of Churned_no, and the 4th column is the probability of Churned_yes.
We can compare these results to the ones we get on the hub if we were to create predictions there:
With Qlik AutoML's real-time prediction API at your fingertips, you’re now ready to integrate real-time predictions into your web apps whether it’s to enrich your visualizations or build interactive what-if scenarios, you can easily make impactful real-time decisions.
API docs: https://qlik.dev/apis/rest/automl-real-time-predictions
You can find the full code and dataset files used below.
You must be a registered user to add a comment. If you've already registered, sign in. Otherwise, register and sign in.


