Unlock a world of possibilities! Login now and discover the exclusive benefits awaiting you.
- Qlik Community
- :
- Support
- :
- Support
- :
- Knowledge
- :
- Support Articles
- :
- How to change the share path in Qlik Sense (Servic...
- Subscribe to RSS Feed
- Mark as New
- Mark as Read
- Bookmark
- Subscribe
- Printer Friendly Page
- Report Inappropriate Content
How to change the share path in Qlik Sense (Service Cluster)
- Mark as New
- Bookmark
- Subscribe
- Mute
- Subscribe to RSS Feed
- Permalink
- Report Inappropriate Content
How to change the share path in Qlik Sense (Service Cluster)
Feb 5, 2024 7:45:51 AM
Apr 4, 2018 11:02:02 AM
The purpose of this guide is to walk through how to change the path in which Apps, ArchivedLogs, Custom Data, and Repository content is stored.
Older releases (e.g. June 2017) of Qlik Sense Enterprise did not include the QlikSenseUtil.exe tool. A copy for older releases is attached to this article for use at the end customer's own risk since it is no longer supported.
Change the Service Cluster path:
- Navigate to the Service Cluster section of the Qlik Sense Management Console to determine the current share path
- Create a new folder for share on the intended destination.
Fig 1
- Share this path through Windows file sharing as shown in Fig 1
- Right-Click, select Properties
- Open the Sharing tab
- Press Share...
- In the available menu add the service account to have Read/Write permissions as visualized in Fig 2
Fig 2
- Copy the Network path to a text editor for reference later
- Stop all Qlik Sense services except for the Qlik Sense Repository Database / PostgreSQL on all nodes
- Move the Apps, ArchivedLogs, CustomData, and StaticContent folders from the previous share location to the new share
- Browse to C:\Program Files\Qlik\Sense\Repository\Util\QlikSenseUtil\ and open QlikSenseUtil.exe
If the installation path of Qlik Sense was customized at install, the location will have changed to: Drive:\Path\Where\Installed\Repository\Util\QlikSenseUtil\ - Click Connect to database and fill out the required connection details
- Host Name: the hostname of your database; use localhost if local
- Port: the Qlik Sense Repository port; use 4432 if default
- Database user: the user; use qliksenserepository
- Password: the password you have chosen at install
- Use SSL: Check if SSL has been set up
- Next, click on the Service Cluster section and click OK to retrieve the current share path values
- Replace the existing values with the new share path
Ensure that there are no double slashes in the paths (e.g. \\QlikSense\\Apps) as this is not a logical Windows path
Example before values:
Example after values: - Click on Save to save the values in the underlying Qlik Sense Repository Database
- Click on Clear to clear the values and then OK to retrieve the values which exist in the underlying database to ensure that the previously entered values were saved in an expected manner
It is ideal here to copy one of the paths and ensure that they work as expected in Windows - Start all previously stopped Qlik Sense Services
Adjust the default Data connections:
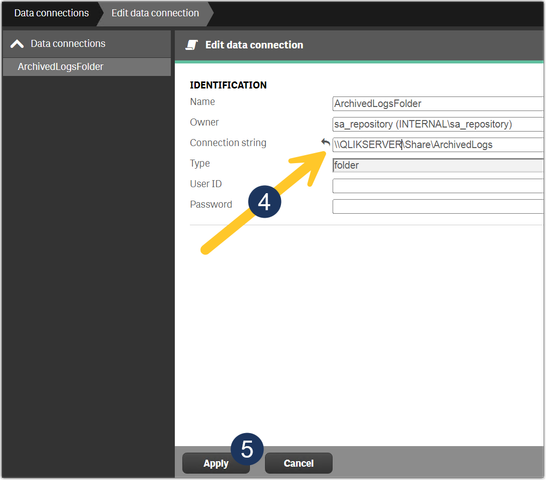
After changing the Service Cluster path, some default Data connections need to be adjusted to match the new path.
- Open the Qlik Sense Enterprise Management Console (QMC)
- Go to Data Connections
- Locate:
- ArchivedLogFolders
- AttachedFiles
- DataPrebAppCache
- Modify each and chance the Connection String to match the new path.
Example:
(old) \\DC1\Share\ArchivedLogs
(new) \\QLIKSERVER1\Share\ArchivedLogs - Click Apply after changing each connection string
- Mark as Read
- Mark as New
- Bookmark
- Permalink
- Report Inappropriate Content
Hi, I did all the steps to change the Share folder, but now I'm having issues with the Monitoring apps. After changing the share folder all the apps wors perfect, but the reload of the Monitoring apps throws this error
The following error occurred:
Connector reply error: Unable to connect to database:
Connection failed:
Please check the values for Username‚ Password‚ Host‚ and other properties.
The error occurred here:
db_check:
SELECT "id"
FROM "public"."log_entries"
WHERE "entry_timestamp" >= '2020-10-30 08:52:07'
The following error occurred:
Exists for \ failed: ExistsException \ failed: boost::filesystem::status: No se encuentra el nombre de red especificado: "\\JRG-SRV-QLIK\QlikShare\ArchivedLogs": unknown error
The error occurred here:
FOR each folder in DirList(archivedLogsFolder & '*')
The following error occurred:
Exists for \ failed: ExistsException \ failed: boost::filesystem::status: No se encuentra el nombre de red especificado: "\\JRG-SRV-QLIK\QlikShare\ArchivedLogs": unknown error
The error occurred here:
?
Any idea what should I do in order to solve this issue?
Thanks,
- Mark as Read
- Mark as New
- Bookmark
- Permalink
- Report Inappropriate Content
Thanks for this. Please add to the steps the need to update connection strings of the default Data Connections.
- Mark as Read
- Mark as New
- Bookmark
- Permalink
- Report Inappropriate Content
Hello @Jason_Michaelides
Thank you for reaching out! The article has been updated. I appreciate your feedback immensely.
All the best,
Sonja
- Mark as Read
- Mark as New
- Bookmark
- Permalink
- Report Inappropriate Content
Nice one Sonja - thank you!


