Unlock a world of possibilities! Login now and discover the exclusive benefits awaiting you.
- Qlik Community
- :
- Support
- :
- Support
- :
- Knowledge
- :
- Support Articles
- :
- Qlik Sense: How to request an OIDC token manually ...
- Subscribe to RSS Feed
- Mark as New
- Mark as Read
- Bookmark
- Subscribe
- Printer Friendly Page
- Report Inappropriate Content
Qlik Sense: How to request an OIDC token manually and check if correct attributes are included (PowerShell)
- Mark as New
- Bookmark
- Subscribe
- Mute
- Subscribe to RSS Feed
- Permalink
- Report Inappropriate Content
Qlik Sense: How to request an OIDC token manually and check if correct attributes are included (PowerShell)
This article explains how to request a token manually from your Identity provider token endpoint and verify if the required attributes are included in the id_token.
Qlik Sense Enterprise for Windows reads the attributes from the id_token and is not using the /userinfo endpoint to fetch them.
Environments:
Qlik Sense Enterprise on Windows May 2021 and higher
Qlik Cloud (For "ADFS" and "Azure" Identity provider types only)
First of all, for testing purposes, add the URL "https://test/login/callback" used in this script in your Identity Provider (IdP) allowed redirect URIs. The reason we are doing this is because we want to request the token manually to check its content and not have it getting automatically processed by Qlik Sense.
- Run the below PowerShell script to get your authorization URL. Variables authorization_endpoint, client_id, and scope need to be updated to match your IdP, those information can be found from the /.well-known/openid-configuration endpoint.
$authorization_endpoint = 'https://dc1.domain.local/adfs/oauth2/authorize' $client_id = '592a5672-a360-49da-93a4-20654f42d3c2' $redirect_uri = [System.Web.HTTPUtility]::UrlEncode("https://test/login/callback") #For ADFS, use 'openid%20allatclaims%20profile%20email' for the scope $scope = 'openid%20profile%20email' $code_challenge="7TsROgPKuP0hHoWWwEGqMsIOgzokT3xAz8kWoo7Ivp8" #Paste this URL in your browser to get back the authorization code $authorization_endpoint+'?response_type=code&client_id='+$client_id+'&redirect_uri='+$redirect_uri+'&state=xyzABC123&nonce=3O2bsVV99-kjikCWCxqzxOx007aXbKMUd0YXBwA3sUk&scope='+$scope+'&code_challenge_method=S256&code_challenge='+$code_challenge - Paste the URL output from the script in your browser and log in to your Identity provider, the URL should look like this:
https://dc1.domain.local/adfs/oauth2/authorize?response_type=code&client_id=592a5672-a360-49da-93a4-20654f42d3c2&redirect_uri=https%3a% 2f%2ftest%2flogin%2fcallback&state=xyzABC123 &scope=openid%20allatclaims%20profile%20email
After the authentication is completed, you will be redirected to https://test/login/callback with an authorization code in the URL, copy the authorization code that we will use in the next step.
Copy the value between code= and the next & sign. (The length of the authorization code may vary depending on the IdP) - Request the token from the token_endpoint URL (also found from the /.well-known/openid-configuration endpoint)
$client_id = '592a5672-a360-49da-93a4-20654f42d3c2' $redirect_uri = [System.Web.HTTPUtility]::UrlEncode("https://test/login/callback") $client_secret = 'Ssxx92jvm6RE_Plf1NnKgduZujE99nd0vWuujE_L' $token_endpoint = 'https://dc1.domain.local/adfs/oauth2/token' $code_verifier="_fqY.Xg5srawq24h9_A57tjY-ycqX0PzzIcM7VcwLZRou_Mvqn-_tCTz4ICWcXoCTO8NXlm3b9RfGOjSZEH68a_gWgaLByddN5y52M06~Z8XlO3XMgOJRWK0DefsxcmC" #Put your authorization code here $auth_code = 'mSzqI71WMUGuYcxSTciAcw.kZdiCG6J2QgNAPRcEZ9A51OMW6g.TMrNMhHPBiG3aNbh_4lbUakFzWoU_MFcDQZcL6_wBIaDd_1_DMWz9OZUSvRcE_zR115HwNXdZYUTjHB6mcnK3u5R2EDxsVKthwQwbP184ujVK1c8LmI-QOMb4jEGRTAm49nbtM8MfO4pTO1fICMSU7CLuhVb8KcCefjPOQ5W0JMKLl7XElvhJDLg5n6v1V2m8L2ZaCQVDy6oTiZygIr20j3TpQnpu2Zwk1KzbttOTGqeJgzCoyPJJJcRjnOrD1zPmBEENrz8fuZwdihRIPZufzhj0gEJ18-stWBz7polztBH7y_jKn-mK6WgIqlLSG2AlmcQa9kBANLmfbal7OUFtA' $pair = "$($client_id):$($client_secret)" $encodedCreds = [System.Convert]::ToBase64String([System.Text.Encoding]::ASCII.GetBytes($pair)) $basicAuthValue = "Basic $encodedCreds" $hdrs = @{} $hdrs.Add("Authorization",$basicAuthValue) $body = 'code='+$auth_code+'&grant_type=authorization_code&redirect_uri='+$redirect_uri+'&code_verifier='+$code_verifier $response = Invoke-WebRequest -Uri $token_endpoint -Method Post -Body $body -Headers $hdrs -ContentType 'application/x-www-form-urlencoded' echo $response.Content - Copy the value in "id_token" from the request response, and decode the JWT token to see what it contains.
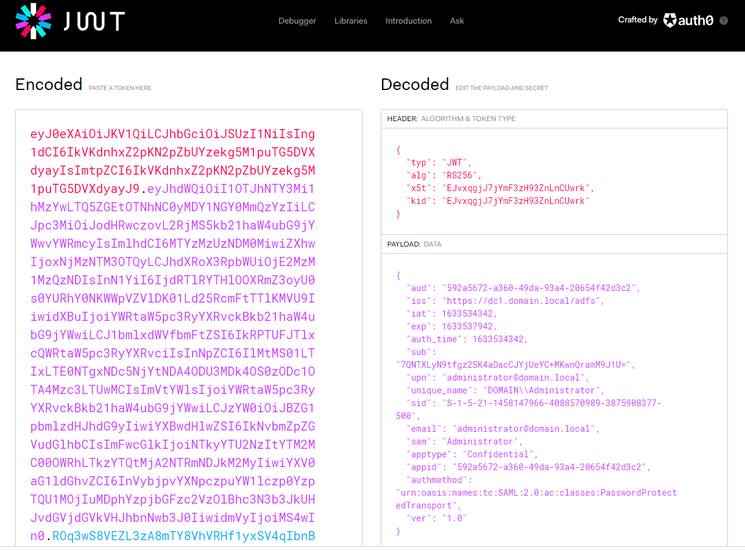
For simplicity, you can use the debugger on https://jwt.io :
You can confirm if the expected claims are included in the token payload or not.
- Mark as Read
- Mark as New
- Bookmark
- Permalink
- Report Inappropriate Content
Hey @willtech93 , How i got this guy working was i did this
First i called keycloak to get all the clients. You can do this with
https://${serverHost}:${serverPort}/auth/${user}/realms/${RealmName}/clients.
then from there i iterated through and found the right client. Then you can call
https://${serverHost}:${serverPort}/auth/${user}/realms/${RealmName}/clients/${clientId}/client-secr...
That way you can make sure you are looking at the right client and such.
.
- « Previous
- Next »

