Unlock a world of possibilities! Login now and discover the exclusive benefits awaiting you.
- Qlik Community
- :
- Support
- :
- Support
- :
- Knowledge
- :
- Member Articles
- :
- How to Use NPrinting On-Demand with Section Access
- Move Document
- Delete Document
- Subscribe to RSS Feed
- Mark as New
- Mark as Read
- Bookmark
- Subscribe
- Printer Friendly Page
- Report Inappropriate Content
How to Use NPrinting On-Demand with Section Access
- Move Document
- Delete Document
- Mark as New
- Bookmark
- Subscribe
- Mute
- Subscribe to RSS Feed
- Permalink
- Report Inappropriate Content
How to Use NPrinting On-Demand with Section Access
Nov 10, 2015 4:33:37 AM
Nov 10, 2015 4:33:37 AM
We suggest that you do the How to Make Reports Selectable with NPrinting On-Demand tutorial before doing this tutorial.
This tutorial explains how to use Section Access combined with NPrinting On-Demand in order to get or send reports on demand that are filtered according to the Section Access connected user.
NPrinting does not support NT Security to authenticate Section Access users. You cannot specify NTNAME, NTDOMAINSID or NTSID in the loading script. If your QlikView document uses NT Security, you need to create a QlikView user with administrative rights that can access all data. You then need to create a recipient for each user and apply related filters. Please note that you can import recipients with filter definitions from external files, databases or QlikView charts. In the following example we use the Load * INLINE method to obtain a clear explanation, however, you can load the section access users with the method you prefer.
The first part of the tutorial explains how to preview a report filtered for a Section Access user. The second part will explain how to send a report to the connected Section Access user.
Attention: remember to save QlikView documents used as NPrinting connections with WebView mode deactivated. NPrinting cannot open QlikView documents with WebView mode activated because it doesn't have full control of QlikView functionalities.
Part I: Preview a Report Filtered for a Section Access User
Make & Rename Copy

Make a copy of SalesDemo for Ajax.qvw in C:\NPrintingTraining\QlikViewDocuments\ and call it SalesDemo for Ajax - Section Access.qvw
Change Script for QlikView
- Open C:\NPrintingTraining\QlikViewDocuments\SalesDemo for Ajax - Section Access.qvw in QlikView
- Open the script editor (press ctrl+e)
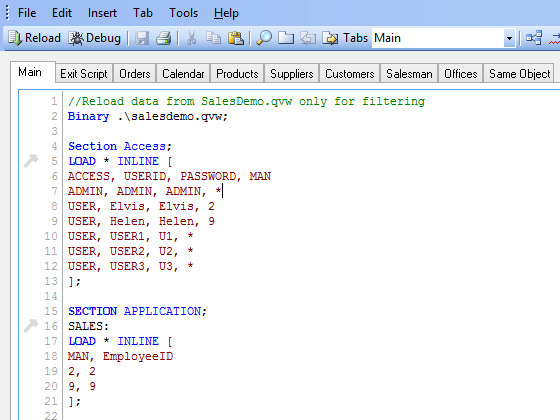
- Add the following piece of script after the Binary .\salesdemo.qvw; instruction at the beginning of the script
- Section Access;
- LOAD * INLINE [
- ACCESS, USERID, PASSWORD, MAN
- ADMIN, ADMIN, ADMIN, *
- USER, Elvis, Elvis, 2
- USER, Helen, Helen, 9
- USER, USER1, U1, *
- USER, USER2, U2, *
- USER, USER3, U3, *
- ];
- SECTION APPLICATION;
- SALES:
- LOAD * INLINE [
- MAN, EmployeeID
- 2, 2
- 9, 9
- ];
4. Save the script and reload (ctrl+r).
This will create the new Section Access users and connect Elvis and Helen to respective salesman in the .qvw so when Elvis will connect into the QlikView doc he will see only his data
5. Exit QlikView
SalesDemo for Ajax.qvw - Section Access in C:\NPrintingTraining\QlikViewDocuments\ contains the NPrinting Report Extension button called PowerPoint Report with Multiple Pages - Current Selections and the others. Do the tutorial, How to Use NPrinting Extensions in Qlikview Documents, to learn more on how to create it. Let's embed a new text box to display the user who is currently logged in.
- Open SalesDemo for Ajax - Section Access.qvw and connect using User ID: Admin and Password: Admin
Turn on WebView
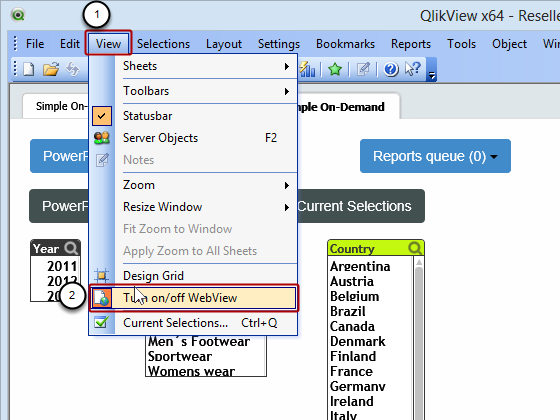
- Click on View in the menu bar
- Make sure WebView is turned on: the icon at the left has an orange background
Embed Text Object in Sheet
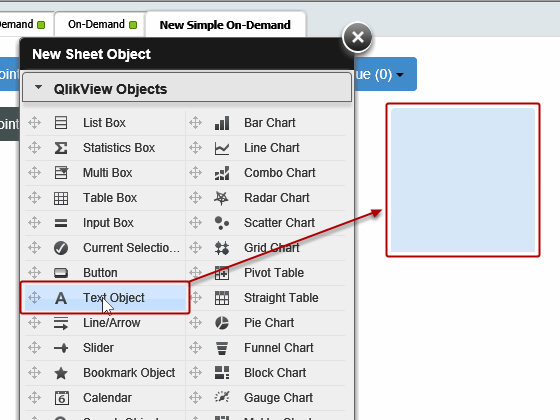
Right click on an empty part of the sheet, select New sheet object from the menu that appears, then drag and drop a new Text Object onto the sheet.
Configure Button Label
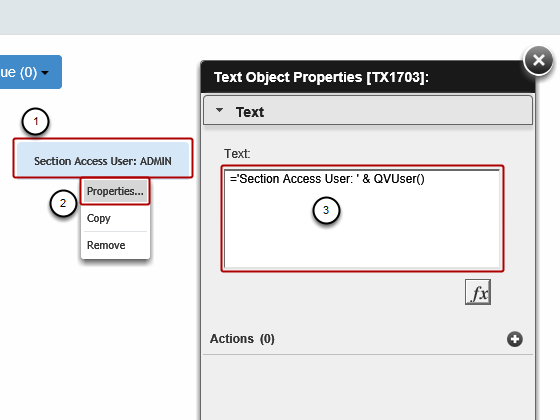
- Right click on the new object
- Select Properties
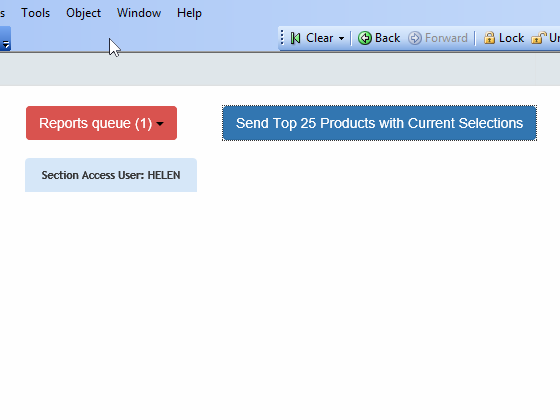
- Enter the QlikView formula, ='Section Access User: ' & QVUser(), into the Text: box. This will display the user who is currently logged in with section access.
Now Save the QlikView document and exit QlikView. Reopen SalesDemo for Ajax - Section Access.qvw in C:\NPrintingTraining\QlikViewDocuments\
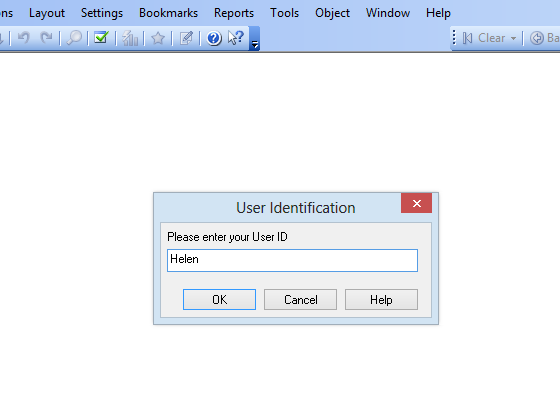
Log in as Elvis
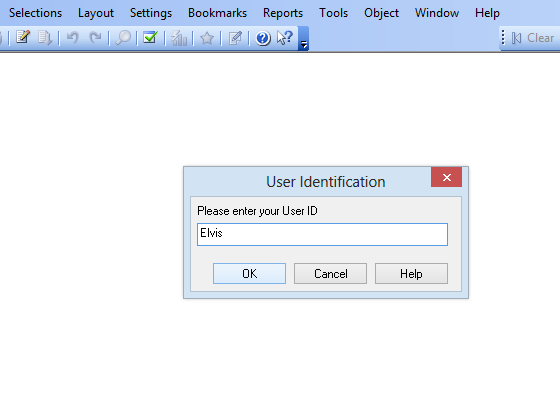
Enter Elvis in both the User ID and the Password fields clicking on the OK button each time.
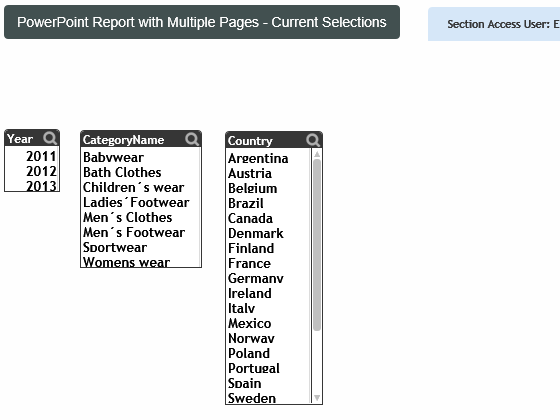
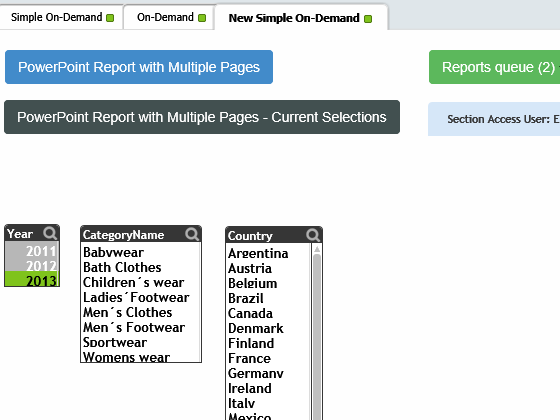
Set QlikView Selections
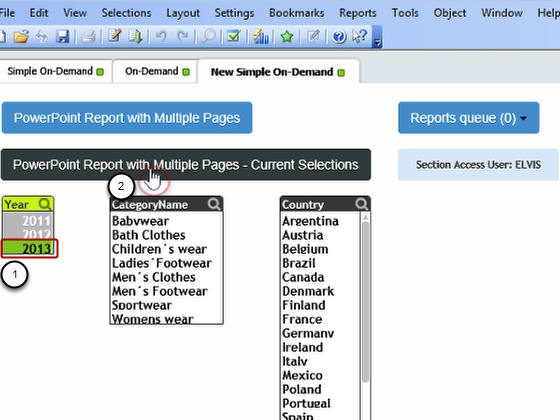
- Select 2013 in Year list box
- Demand to generation of the PowerPoint Report with Multiple Pages - Current Selections report
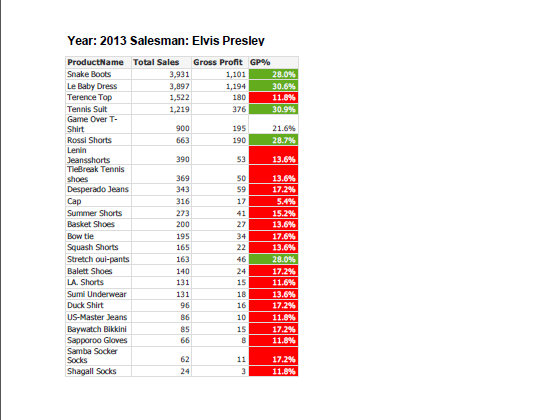
Inspect Report
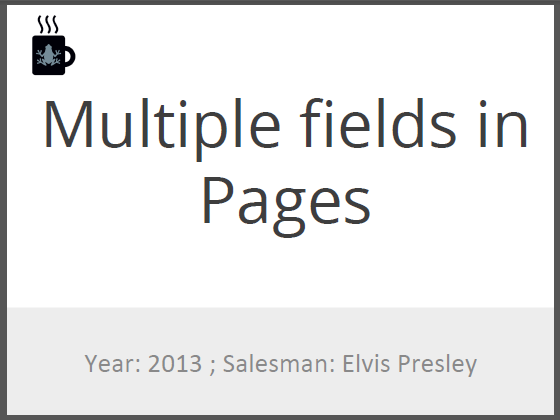
When the report is ready, open it. The first slide displays the selections applied at the moment of creation. Year: 2013 from your current selection and Salesman: Elvis Presley from Section Access, as expected. Both filters were applied.
Part II: Send Filtered Report to User logged in with Section Access
Create or Clone New Recipient
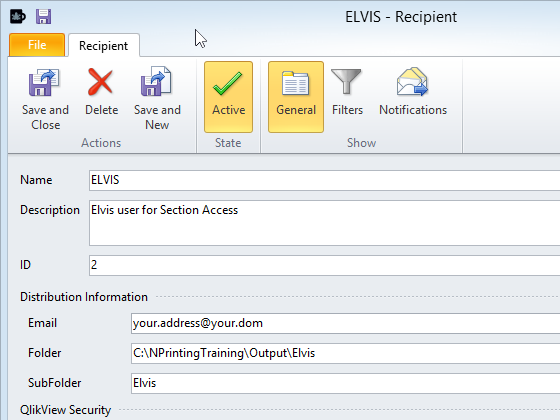
Create an NPrinting recipient named ELVIS (all caps). It is easiest just to clone recipient Elvis Presley and change the Name to obtain the new Section Access user.
See this tutorial about recipients: How to Create and Import Recipients with Filters and Distribution Groups
Remember to customize the email address if you are using the NPrinting training environment.
Create New Task
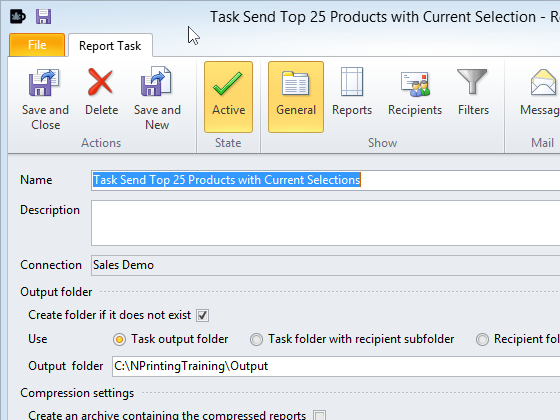
Create Task Send Top 25 Products with Current Selection in the NPrinting project
(see: link tutorial task on demand)
Add Report to Task
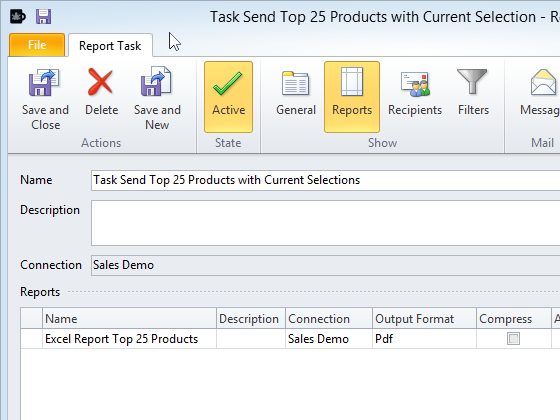
Add Excel Report Top 25 Products to the task. This is a very simple Excel report, easy to create. See: How to Create Excel Reports
Add Recipient to Task
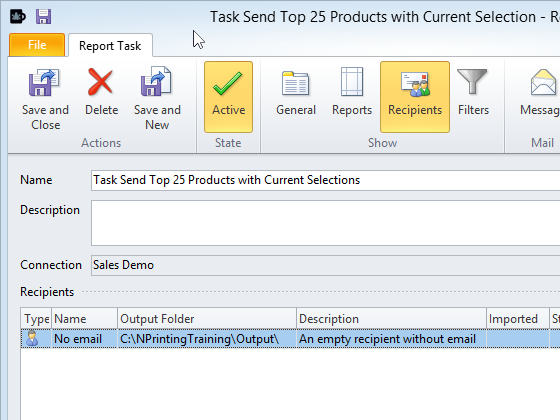
It is mandatory to insert a recipient, No email, here with an email address, otherwise NPrinting won’t let you activate email report. You can insert an email address that nobody will read or an address like a@b.c.
Create E-mail Message
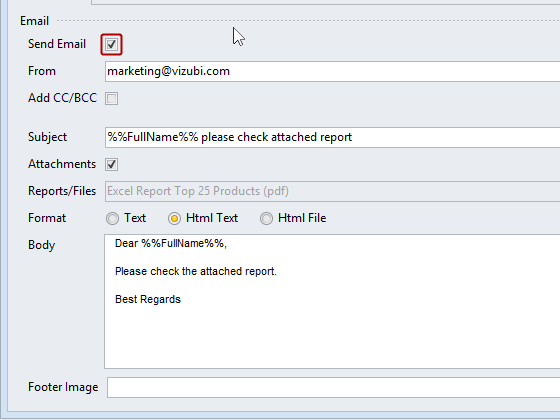
- Put a check in the Send Email box to activate the email message, you can customize the text. See How do I set up e-mail in NPrinting? on how to setup the email server. See Can I include dynamic elements in NPrinting e-mail? and What elements can I add to NPrinting e-mail? on how to include dynamic email content. Check out this tutorial, How to Distribute User Specific QlikView Reports by E-mail on how to create an email message.
- Please feel free to use the text above or your own version
- Save and Close
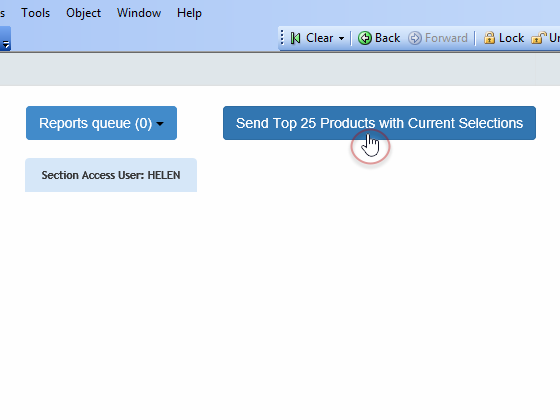
Embed Run Task Button in Sheet
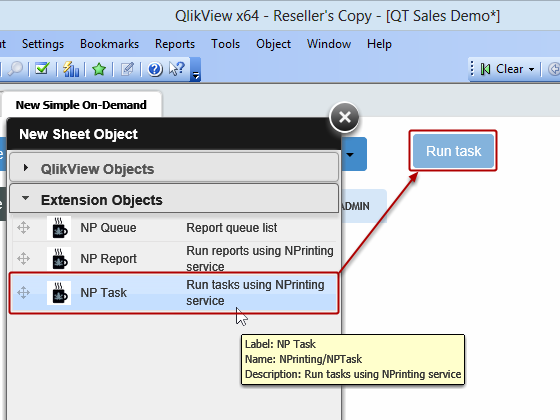
Add an NPrinting task extension that runs Task Send Top 25 Products with Current Selections.
- Reopen SalesDemo for Ajax - Section Access.qvw using User ID: Admin and Password: Admin
- Right click on the sheet, select New sheet object, click on Extension object, and then drag and drop NPrinting Task object onto the sheet.
Configure Button Appearance
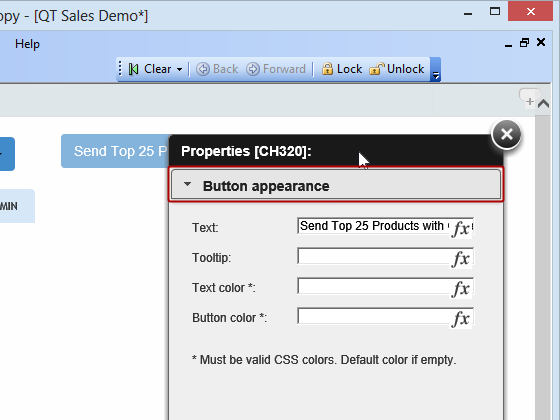
Right click on the new button and select Properties. Select Button appearance and configure the following fields as indicated:
- Text: Task Send Top 25 Products with Current Selections
- Button color: =rgb(66,80,80)
Configure On-Demand Service Connection
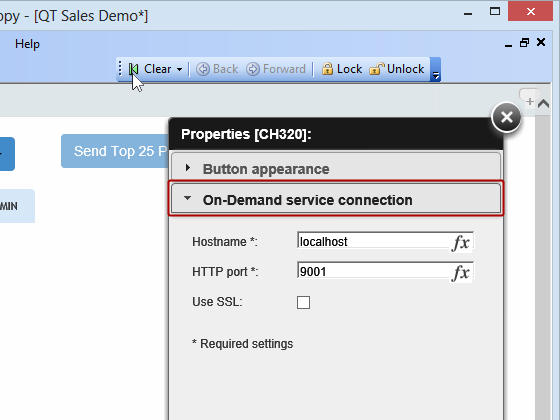
Click on On-Demand service connection and configure the following fields as indicated:
- Hostname: localhost
- HTTP Port: 9001
Configure Task Settings
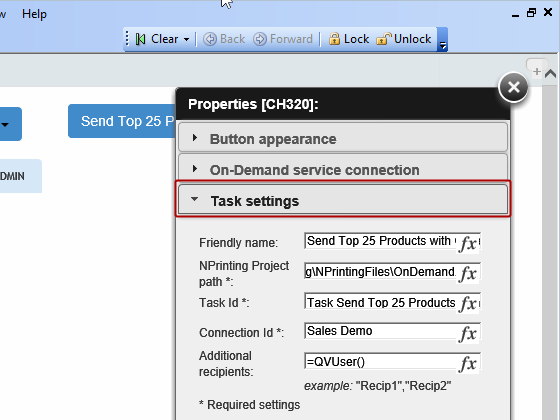
Click on Task settings and configure the following fields as indicated:
- Friendly name: Task Send Top 25 Products with Current Selections
- NPrinting Project path: C:\NPrintingTraining\NPrintingFiles\OnDemand.nsq
- Report ID: Task Send Top 25 Products with Current Selection
- Connection ID: Sales Demo
- Additional recipients: enter the QlikView formula =QVUser(). This formula returns the active recipient and sends them to NPrinting service so it will send them the reports. Dynamic selection is obtained using this QlikView formula.
Configure Filter Settings

Click on Filter settings and configure as indicated:
- Use current selections: check marked
Close the object Properties editor, then save the QVW and close it.
Clear All Selections
- Reopen SalesDemo for Ajax - Section Access.qvw in C:\NPrintingTraining\QlikViewDocuments\ and log in as the user Elvis.
- Clear all selections if any are set.
Demand Report Generation and Distribution
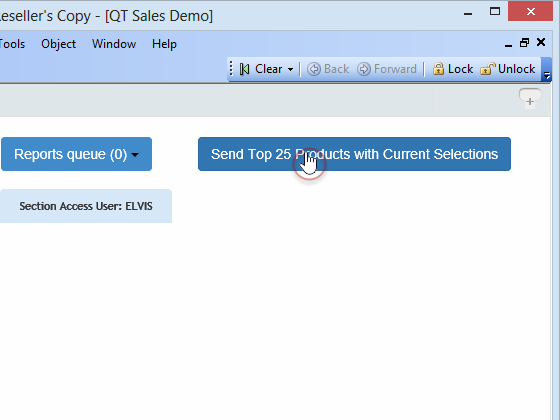
Click on the run task button entitled: Task Send Top 25 Products with Current Selections.
Check E-mail
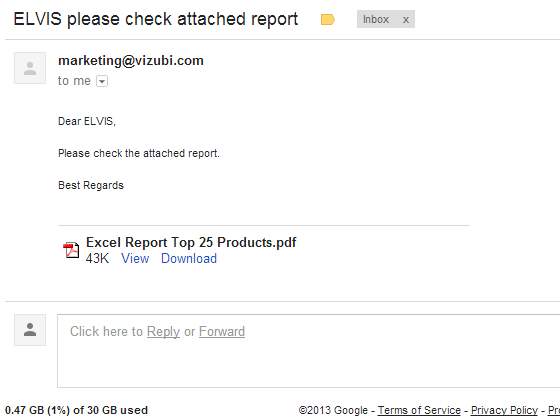
Go to the e-mail account you put in the ELVIS recipient and look for a message for ELVIS.
Inspect New Report
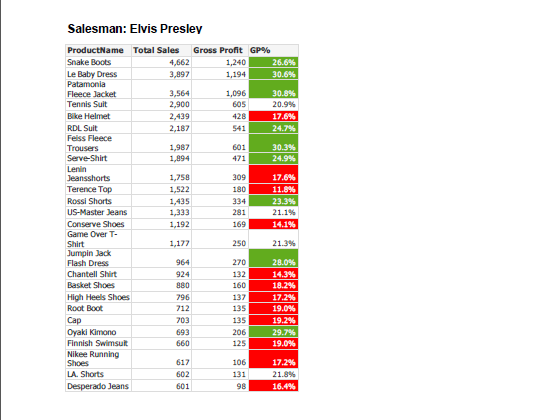
Download and open the report for ELVIS. Note the heading.
Add Selection
Now add a a selection, Year=2013 for instance and run the task again. You’ll find a report in the associated e-mail account box containing data filtered by Salesman=Elvis Presley (as before) and by Year=2013.
Inspect This Third Report
Close the report and the QlikView document in QlikView.
Reopen SalesDemo for Ajax - Section Access.qvw as Helen
Open the document with User ID: Helen and Password: Helen
Demand Report Generation and Distribution Again
Click on the run task button entitled: Task Send Top 25 Products with Current Selections.
No E-mail Sent!
There is no NPrinting recipient associated with Helen.