Unlock a world of possibilities! Login now and discover the exclusive benefits awaiting you.
- Qlik Community
- :
- Support
- :
- Support
- :
- Knowledge
- :
- Support Articles
- :
- Qlik Cloud: How to set up Keycloak as a SAML Ident...
- Subscribe to RSS Feed
- Mark as New
- Mark as Read
- Bookmark
- Subscribe
- Printer Friendly Page
- Report Inappropriate Content
Qlik Cloud: How to set up Keycloak as a SAML Identity Provider
- Mark as New
- Bookmark
- Subscribe
- Mute
- Subscribe to RSS Feed
- Permalink
- Report Inappropriate Content
Qlik Cloud: How to set up Keycloak as a SAML Identity Provider
This is a quick guide on how to set up SAML authentication in Qlik Cloud using Keycloak as the Identity Provider.
Environment:
KeyCloak Configuration
- In Keycloak, navigate to General and Realm Settings and download the IdP metadata
- In Keycloak, set up a test user:
- Click Save and go to Credentials to set the password
- In Keycloak, add a new Client and set the Qlik Cloud tenant original URL as the Client ID. For example: https://kxvfihtburc1m5j.ap.qlikcloud.com
-
Add https://<tenant URL>/login/saml in Valid redirect URIs and in Master SAML Processing URL
-
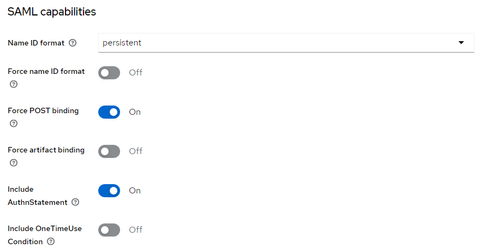
In Settings, under SAML capabilities, set the Name ID format to persistent and make sure that Force POST binding is checked.
- In Settings locate Signature and encryption and make sure that either Sign Assertions or Sign Documents is enabled (Having both enabled is also fine).
- Switch to the Keys tab and disable Client Signature Required.
- The last step is to add the needed attributes (username, email, display name) that we will use in Qlik Cloud. Before that, please make sure to set the role_list to "optional" so that Keycloak doesn't send the role list attribute several times which Qlik Cloud won't be able to understand.
Then, under "Client Scopes", click on the name of client scope that has the description "Dedicated scope and mappers for this client", in the below screenshot the name is https://kxvfihtburc1m5j.ap.qlikcloud.com-dedicated. - Choose Configure new mapper and choose User Attribute then click Add. For simplicity, we will use firstname as the display name for this example in order to not have to create a custom attribute.
- Repeat the same for email and username by choosing Add mapper > By configuration > User Attribute
- If you also want to fetch groups for the user, choose Add Mapper > By Configuration > Group List and configure the mapper as below.
Qlik Cloud Settings
- In Qlik Cloud, go to Identity Provider and create a new interactive Identity provider configuration
- Select SAML as the type and generic for the Provider
- Check Use IdP metadata and upload or paste the content of the IdP metadata file downloaded from Keycloak in the first step of the Keycloak configuration section.
- If needed, check Enable IdP-initiated login
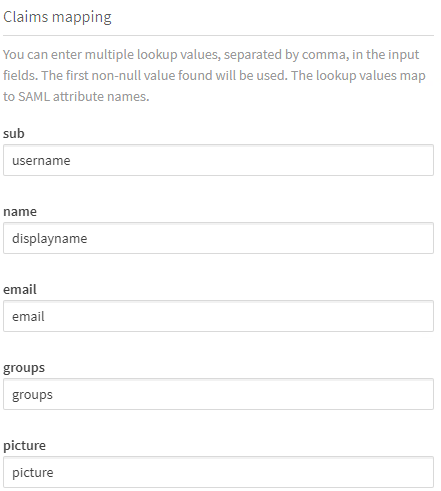
- Under Claim mapping, fill in the SAML claims name created previously. In this case username for sub, displayname for name and email for email.
- You can now click on Create but do not Validate yet.
- Once created, Edit the Identity Provider again and make sure to set the Name ID format to urn:oasis:names:tc:SAML:2.0:nameid-format:persistent
- Once done, save and validate the configuration and make sure everything is working fine.
- Mark as Read
- Mark as New
- Bookmark
- Permalink
- Report Inappropriate Content
Hi, I followed this method but when I validate, I'm correctly redirected to keycloak but I get this error:
{
  "status": "callbackError",
  "protocol": "SAML",
  "error": "SAML Response validation failed, unable to query 'Attributes'",
  "traceId": "e5df8289a6302b5cfd7a6f365fa83eef"
}
(picture below)
Any advice for the resolution? We also tried connecting with OIDC but got a similar error.
Thank you very much,
Gianluca
- Mark as Read
- Mark as New
- Bookmark
- Permalink
- Report Inappropriate Content
Since we got a few reports of that error recently, we would like to investigate if that is due to a defect or a configuration problem.
Could you please open a support case and provide us with all information listed in the below article so that we can investigate?
- Mark as Read
- Mark as New
- Bookmark
- Permalink
- Report Inappropriate Content
Hi damien,
I indeed did it, it seems deleting role_list scope in client_scopes made it work.
Now I don't get groups mapped from keycloak to qlik and I'd like to map to the full name instead of firstName, I asked this into the issue also, but maybe these are more related to this page.
Thank you!
Gianluca
- Mark as Read
- Mark as New
- Bookmark
- Permalink
- Report Inappropriate Content
For groups it's straightforward, in Keycloak scopes, choose "Add mapper" "By configuration" "Group list", choose "Single group attribute" and input a name for the attribute.
In the Qlik Console Identity Providers configuration, make sure that you have the same attribute name in the "groups" fields.
Also in the Qlik Console settings section, make sure that "Creation of groups" is enabled.
For the full name it's a bit more complicated in recent versions of Keycloak since it seems they removed the Javascript mapper. The easiest would be to sync the full name from a directory service.


