Unlock a world of possibilities! Login now and discover the exclusive benefits awaiting you.
- Qlik Community
- :
- Support
- :
- Support
- :
- Knowledge
- :
- Support Articles
- :
- Qlik Sense for Windows: How to configure OIDC with...
- Subscribe to RSS Feed
- Mark as New
- Mark as Read
- Bookmark
- Subscribe
- Printer Friendly Page
- Report Inappropriate Content
Qlik Sense for Windows: How to configure OIDC with Azure AD
- Mark as New
- Bookmark
- Subscribe
- Mute
- Subscribe to RSS Feed
- Permalink
- Report Inappropriate Content
Qlik Sense for Windows: How to configure OIDC with Azure AD
Mar 22, 2024 3:59:27 AM
Jun 2, 2021 8:39:29 AM
This is a basic guide on how to configure a Qlik Sense virtual proxy with OIDC authentication.
This customization is provided as is. Qlik Support cannot provide continued support of the solution. For assistance, reach out to our Professional Services or engage in our active Integrations forum.
On Azure
- Follow the instructions in How To: Configure Qlik Sense Enterprise SaaS to use Azure AD as an IdP. Now with Groups!, but note the main difference:
"Access tokens (used for implicit flows)" and "ID tokens (used for implicit and hybrid flows)" need to be checked in the "Authentication" tab of the app registration. - Set the redirect URI to: https://<name-of-qliksense-server>/<virtual-proxy-prefix>/oidcauthn
Setting up Qlik Sense for OIDC with Azure ID
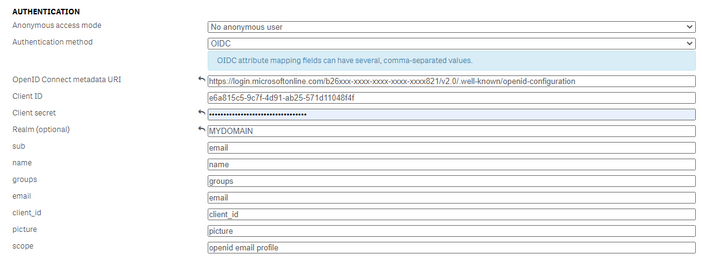
Create a new virtual proxy in the QMC, configure the virtual proxy as usual (Engine load balancing, host white list, associate to Proxy service) and for the authentication part choose OIDC and configure like below:
The fields to pay attention to are the following:
- OpenID Connect metadata URI: (can be found from Azure app registration > Overview > Endpoints)
- Client ID: (can be found from Azure app registration > Overview)
- Client secret: (can be found from Azure app registration, only visible once when the secret is created)
- scope: openid email profile
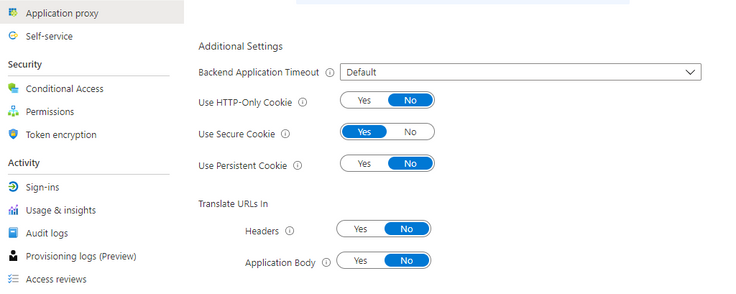
Azure Application Proxy
This only applies if Azure Application Proxy is used.
In the Enterprise Application, make sure that "Translate URLs in headers" in set to NO, otherwise the redirect_uri value will be wrong and the authentication will fail.
- Mark as Read
- Mark as New
- Bookmark
- Permalink
- Report Inappropriate Content
Have you ever done this integration with AD B2C? Do you have an example?


