Unlock a world of possibilities! Login now and discover the exclusive benefits awaiting you.
- Qlik Community
- :
- Forums
- :
- Forums by Product
- :
- Products (A-Z)
- :
- Qlik Sense
- :
- Documents
- :
- Gauge fill to value with conditional colors
- Edit Document
- Move Document
- Delete Document
- Subscribe to RSS Feed
- Mark as New
- Mark as Read
- Bookmark
- Subscribe
- Printer Friendly Page
- Report Inappropriate Content
Gauge fill to value with conditional colors
- Move Document
- Delete Document and Replies
- Mark as New
- Bookmark
- Subscribe
- Mute
- Subscribe to RSS Feed
- Permalink
- Report Inappropriate Content
Gauge fill to value with conditional colors
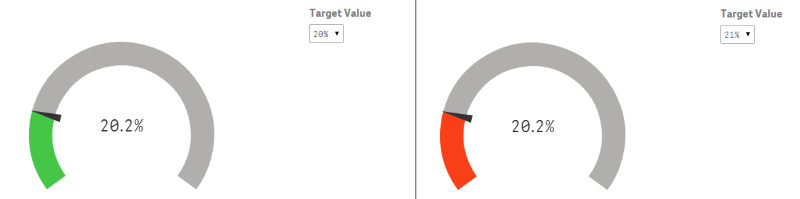
One use case I have been asked about is fill to value gauges being conditional on a target value (in this example I have used a variable to set the target to be able to test things).
To do this follow the steps below:
| Step 1 – Create your gauge with your measure as normal. | |
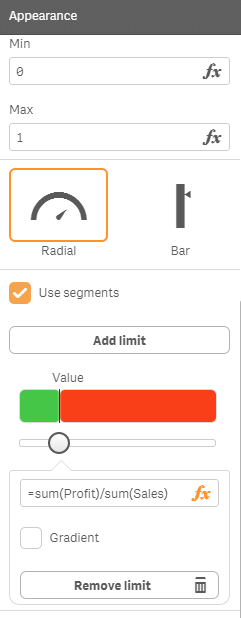
Step 2 – Set up two segments for the gauge
|  |
Step 3 – create a third segment
=if([Measure formula]>=[Target Value], [Measure formula],0) Explanation of behavior: If the measure is >= the target then we will make this segment not show as it will be the same value as the segment boundary we created in step 1. If the measure is < the target then we will set the boundary to 0 which makes this segment overwrite the green segment from step 1. Once this has been done you will notice that only two segments will show at one point in time which is how we have programmed it to work. However, this does make the gauge hard to change once setup which is why these steps are important. | 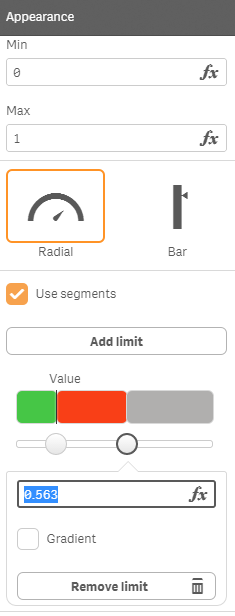 |
example app attached... Please not that the variable uses an extension so I have attached this also.
- Move Comment
- Delete Comment
- Mark as Read
- Mark as New
- Bookmark
- Permalink
- Report Inappropriate Content
Thanks , useful information
- Move Comment
- Delete Comment
- Mark as Read
- Mark as New
- Bookmark
- Permalink
- Report Inappropriate Content
It looks really nice 
How did you inset the drop down for target value?
- Move Comment
- Delete Comment
- Mark as Read
- Mark as New
- Bookmark
- Permalink
- Report Inappropriate Content
Hi Peter,
I used the QS Variable extension which I have attached (although this was some time ago) and provided the link to branch for in the post. It's a great extension for managing variables and can be button, dropdown, input field or list...
Cheers
Richard
- Move Comment
- Delete Comment
- Mark as Read
- Mark as New
- Bookmark
- Permalink
- Report Inappropriate Content
This is really useful.
Can I ask how this would work if you needed three colours as opposed to two (e.g. Red, Amber, Green)?
- Move Comment
- Delete Comment
- Mark as Read
- Mark as New
- Bookmark
- Permalink
- Report Inappropriate Content
Hi
In line chart how to increase line size with out any extension and in Gauge chart how to hide the speedometer line