Unlock a world of possibilities! Login now and discover the exclusive benefits awaiting you.
- Qlik Community
- :
- Support
- :
- Support
- :
- Knowledge
- :
- Support Articles
- :
- How to use Qlik Application Automation to generate...
- Subscribe to RSS Feed
- Mark as New
- Mark as Read
- Bookmark
- Subscribe
- Printer Friendly Page
- Report Inappropriate Content
How to use Qlik Application Automation to generate sharing links of Qlik Sense App report stored in cloud storage
- Mark as New
- Bookmark
- Subscribe
- Mute
- Subscribe to RSS Feed
- Permalink
- Report Inappropriate Content
How to use Qlik Application Automation to generate sharing links of Qlik Sense App report stored in cloud storage
Environment
- Qlik Sense Enterprise SaaS
- Qlik Application Automation
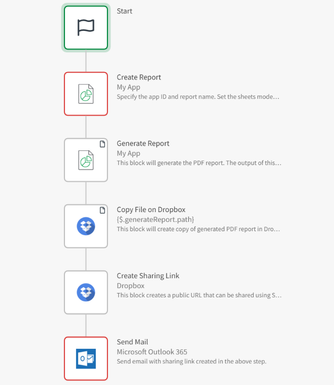
This article shows how to generate a report from a Qlik Sense app, upload the report to any cloud storage platform, create a sharing link, and send out an email with the link in the body.
We can send the report as an attachment using the Send Mail block in the Mail connector, but this block only supports attachments of size 40MB. An alternative solution is to store reports in any of the cloud storage platforms that support the creation of sharing links and send emails with the links.
I will go through a few examples to show how this can be achieved using the following cloud storage connectors:
- Dropbox
- Microsoft OneDrive
- Microsoft SharePoint
- Amazon S3
I will not go through the steps on how to generate the report using Qlik Reporting blocks as it's already explained in this article.
The four automation files used in the examples are attached to this article. More information on importing automations can be found here.
Dropbox
The following steps explain how to create a public URL using the Dropbox connector.
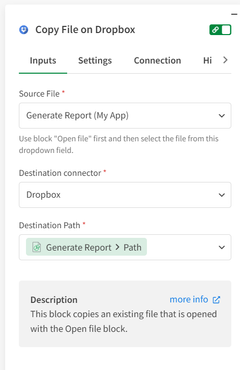
- Store the generated report on Dropbox using the "Copy File on Dropbox" block. Configure it to use the output from the "Generate Report" block as the Source File and set the Destination connector to Dropbox. Include the Path from the output of the "Generate Report" block in the Destination Path parameter to use the generated filename.
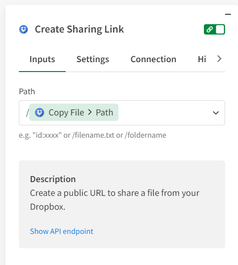
- Add the "Create Sharing Link" block from the Dropbox connector to the automation and configure it to use the path of the file from the output of the "Copy File on Dropbox" block in the Path parameter.
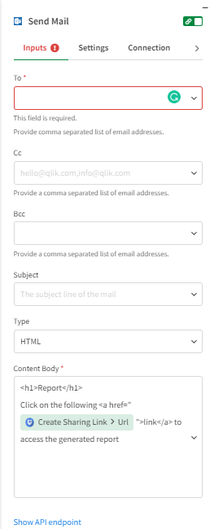
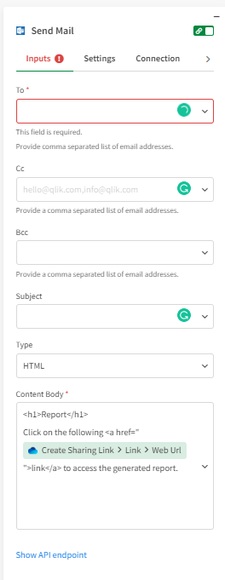
- Add the "Send Mail" block from Microsoft Outlook 365 connector to the automation. Configure the Content Body parameter to use the public URL generated in the step above.
Microsoft OneDrive
The following steps explain how to create a public URL using the Microsoft OneDrive connector.
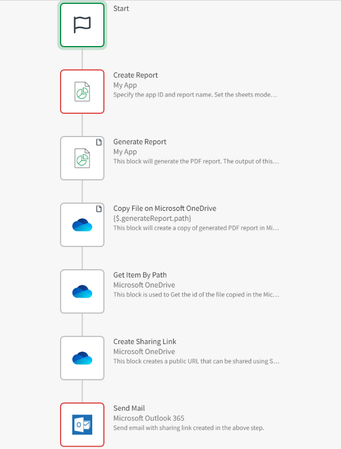
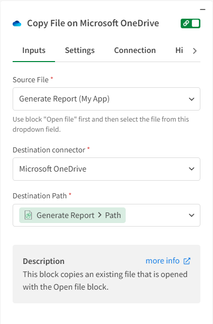
- Store the generated report on Microsoft OneDrive using the "Copy File on Microsoft OneDrive" block. Configure it to use the output from the "Generate Report" block as the Source File and set the Destination connector to Microsoft OneDrive. Include the Path from the output of the "Generate Report" block in the Destination Path parameter to use the generated filename.
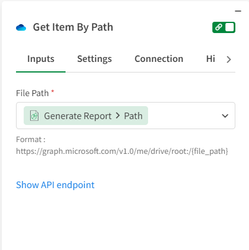
- Add the "Get Item By Path" block from the Microsoft OneDrive connector to the automation. Configure it to use the file path from the output of the "Generate Report" block in the File Path parameter to use the generated filename.
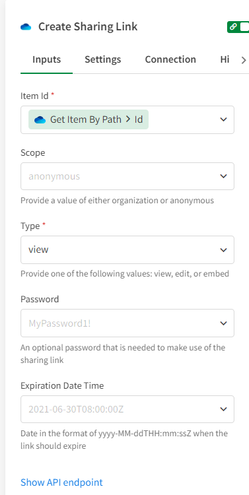
- Add the "Create Sharing Link" block from the Microsoft OneDrive connector to the automation. Configure it to use the ID of the file from the output of the "Get Item By Path" block in the Item Id parameter.
- Add the "Send Mail" block from Microsoft Outlook 365 connector to the automation. Configure the Content Body parameter to use the public URL generated in the step above.
Microsoft SharePoint
The following steps explain how to create a public URL using the Microsoft SharePoint connector.
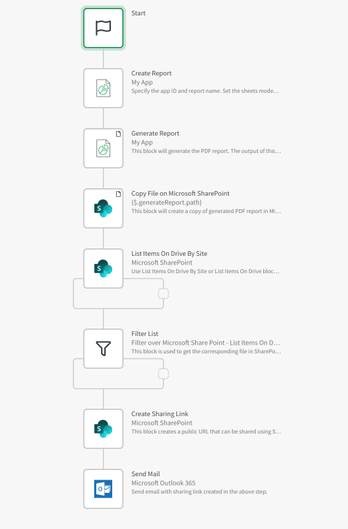
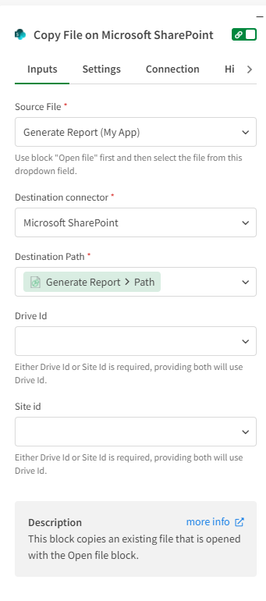
- Store the generated report on Microsoft SharePoint using the "Copy File on Microsoft SharePoint" block. Configure it to use the output from the "Generate Report" block as the Source File and set the Destination connector to Microsoft SharePoint. Include the Path from the output of the "Generate Report" block in the Destination Path parameter to use the generated filename. Use the do lookup functionality to find a Drive Id or a Site Id, but do not specify both.
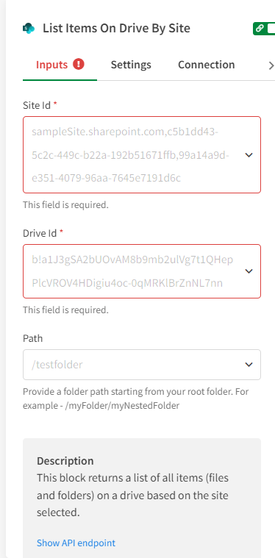
- Add the "List Items On Drive By Site" or "List Items On Drive" block from the Microsoft SharePoint connector to the automation to get all the items on a drive/site. Use the do lookup functionality to find a Drive Id or a Site Id.
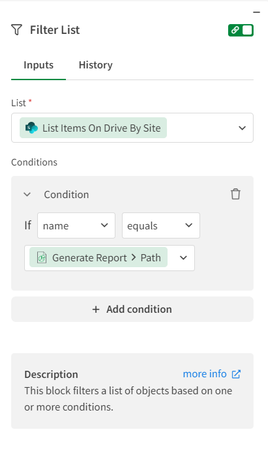
- Add a "Filter List" block to retrieve the generated report stored in SharePoint based on the report name. Note that the report name is equivalent to the Path obtained from the output of the "Generate Report" block. Set the condition as shown in the screenshot below.
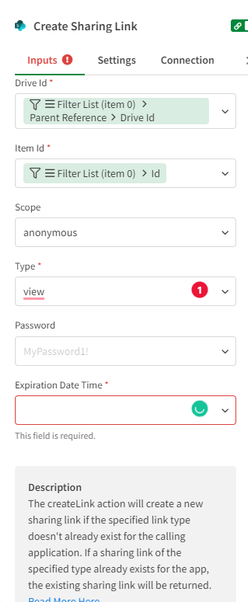
- Add the "Create Sharing Link" block from the Microsoft SharePoint connector to the automation. Configure it to use Drive Id and Id from the output of the "Filter List" block in the Drive Id and Item Id parameter. Set the Scope parameter value to anonymous to provide access to the sharing link to anyone (including individuals outside your organization) without needing to sign in. Keep in mind that this won't work if the anonymous support is disabled by the SharePoint admin. More info about enabling the external sharing option can be found here. Also, configure the Expiration Date Time Parameter which indicates the expiration time of permission.
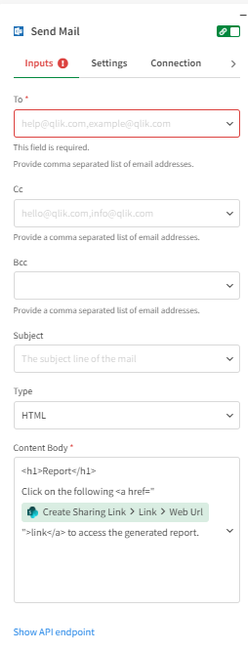
- Add the "Send Mail" block from Microsoft Outlook 365 connector to the automation. Configure the Content Body parameter to use the public URL generated in the step above.
Amazon S3
The following steps explain how to create a public URL using the Amazon S3 connector.
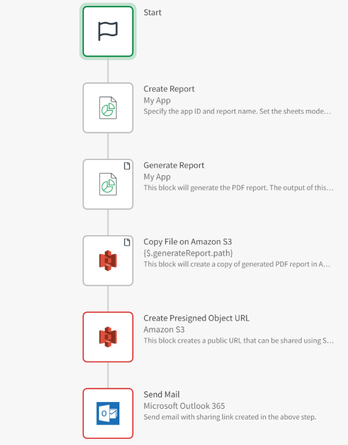
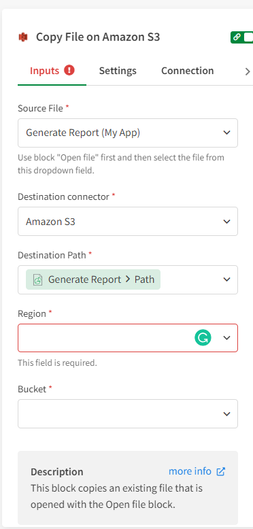
- Store the generated report on Amazon S3 using the "Copy File on Amazon S3" block. Configure it to use the output from the "Generate Report" block as the Source File and set the Destination connector to Amazon S3. Include the Path from the output of the "Generate Report" block in the Destination Path parameter to use the generated filename. Also, configure Region and Bucket parameters.
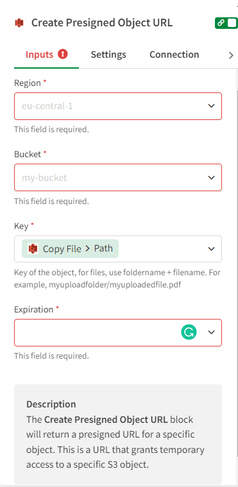
- Add the "Create Presigned Object URL" block from the Amazon S3 connector to the automation and configure it to use the path of the file from the output of the "Copy File on Amazon S3" block in the Key parameter. Also, configure Region, Bucket, and Expiration parameters.
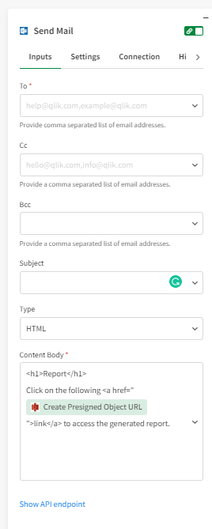
- Add the "Send Mail" block from Microsoft Outlook 365 connector to the automation. Configure the Content Body parameter to use the public URL generated in the step above.
Related Content
- Mark as Read
- Mark as New
- Bookmark
- Permalink
- Report Inappropriate Content
Nice, I'm still waiting for Automations to support Google Drive
Please upvote the idea if you are also waiting for a Google Drive connector see https://community.qlik.com/t5/Suggest-an-Idea/Add-Google-Drive-connector-to-Qlik-Application-Automat...
- Mark as Read
- Mark as New
- Bookmark
- Permalink
- Report Inappropriate Content
we absolutely need a solution to put these report in the mail body....
- Mark as Read
- Mark as New
- Bookmark
- Permalink
- Report Inappropriate Content
Hi @OlivierS
You can use Send Mail block in the Mail connector to send the report as an attachment. But it has a few limitations as mentioned in this article. This article describes workaround that can be used to overcome this limit.
Thanks
- Mark as Read
- Mark as New
- Bookmark
- Permalink
- Report Inappropriate Content
Hello has anyone tried to use the google storage block? I tried but I got some error about it not copying the file and that I should go to an url to resume the file uploading
- Mark as Read
- Mark as New
- Bookmark
- Permalink
- Report Inappropriate Content
- Mark as Read
- Mark as New
- Bookmark
- Permalink
- Report Inappropriate Content
To bad there is still no Google Drive storage block.
There is an idea, please like it
