Unlock a world of possibilities! Login now and discover the exclusive benefits awaiting you.
- Qlik Community
- :
- Support
- :
- Support
- :
- Knowledge
- :
- Support Articles
- :
- How to get started with the Amazon Bedrock connect...
- Subscribe to RSS Feed
- Mark as New
- Mark as Read
- Bookmark
- Subscribe
- Printer Friendly Page
- Report Inappropriate Content
How to get started with the Amazon Bedrock connector in Qlik Application Automation
- Mark as New
- Bookmark
- Subscribe
- Mute
- Subscribe to RSS Feed
- Permalink
- Report Inappropriate Content
How to get started with the Amazon Bedrock connector in Qlik Application Automation
Amazon Bedrock is a fully managed service that makes base models from Amazon and third-party model providers accessible through an API.
This article explains how the Amazon Bedrock connector in Qlik Application Automation can be used within Qlik Cloud.
Content:
- Authentication
- AWS Setup
- Qlik Cloud
- Available blocks
- Examples for the Invoke Model Endpoint
- Example 1: Using amazon.titan-text-express-v1
- Example 2: Using amazon.titan-tg1-large
- Example 3: Using stability.stable-diffusion-xl (Text to Image)
Authentication
AWS Setup
By default, users and roles don't have permission to create or modify Bedrock resources. They cannot perform tasks using the AWS Management Console, AWS Command Line Interface (AWS CLI), or AWS API. To grant users permission to perform actions on the resources that they need, an IAM administrator can create IAM policies. The administrator can then add the IAM policies to roles, and users can assume the roles.
To learn how to create an IAM identity-based policy by using these sample JSON policy documents, see Creating IAM policies in the IAM User Guide.
- Open the AWS console
- Navigate to Identity and Access Management (IAM)
- Click Create User and enter the new username.
Optionally, you can also give separate console access to the user.
- In the Create User editor, you can select one of the three options.
For our example, let’s select the highlighted option Attach policies directly. - Scroll down. In the Permissions Policies text box, type and search for Bedrock Full Access.
- (Optional) Expand Set permissions boundary - optional and set Use permissions boundary to control the maximum permissions
Review the on-screen text for details.
- Review and create user.
- Navigate to the Security Credentials tab.
- Click Create Access Key.
- For Use Case, click Third-party service and follow the recommendations. A description tag is optional.
- Click Create Access Key
- Copy the Access Key and Secret Access Key values.
Store them safely. The Secret Access Key will only be shown once. See Access key best practices onscreen.
Qlik Cloud
- Open Qlik Cloud
- Navigate to My Automations
- Switch to the Connections tab
- Click Add new connection.
- Search for Amazon Bedrock and click Add.
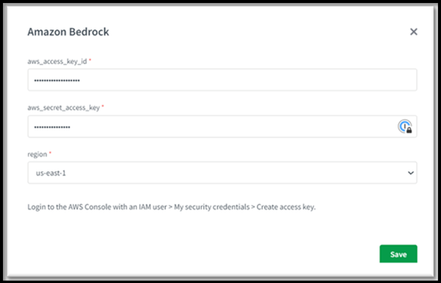
- Provide the access key and secret access key and specify where your AWS region is located.
Available blocks
The Amazon Bedrock connector consists of the following blocks:
- Invoke Model
- List Foundation Models
- List Custom Models
Examples for the Invoke Model Endpoint
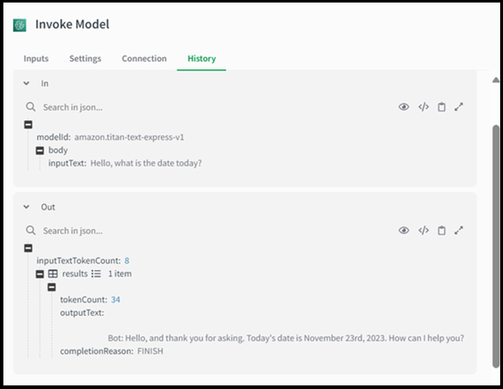
Example 1: Using amazon.titan-text-express-v1
- Drag and drop the Invoke Model block from the left-hand side menu.
- In Model ID, enter amazon.titan-text-express-v1 or choose it from the lookup dropdown.
- In Body, enter:
Key: inputText
Value: a prompt of your choice for testing. In our example, we use Hello, what is the date today?
- Run the block and review its output in the History tab
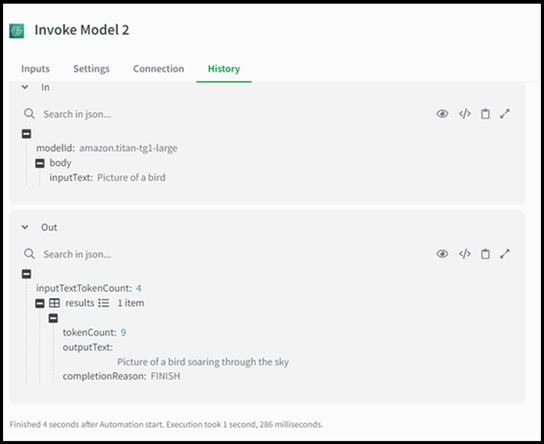
Example 2: Using amazon.titan-tg1-large
- Drag and drop the Invoke Model block from the left-hand side menu.
- In Model ID, enter amazon.titan-tg1-large or choose Amazon Titan Text Large from the lookup dropdown.
- In Body, enter:
Key: inputText
Value: a prompt of your choice for testing. In our example, we use Hello, what is the date today?
or
Switch to Raw input and design a JSON based on the same:
{
"inputText":"Picture of a bird"
} - Run the block and review its output in the History tab
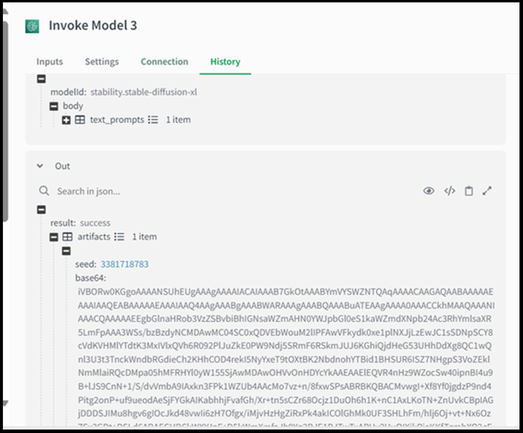
Example 3: Using stability.stable-diffusion-xl (Text to Image)
- Drag and drop the Invoke Model block from the left-hand side menu.
- In Model ID, enter stability.stable-diffusion-xl or choose Stability AI Stable Diffusion XL from the lookup dropdown.
- In Body, switch to Raw Input and design the following JSON based on a prompt of your choice:
{
"text_prompts":[{"text":"A lighthouse on a cliff","weight":0.5}]
} - Run the block and review its output in the History tab
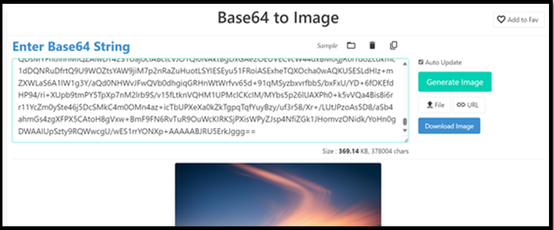
- To test this use case, copy the base64 output and paste it into a Base64 to Image converter
- Mark as Read
- Mark as New
- Bookmark
- Permalink
- Report Inappropriate Content
The Amazon Bedrock connector is currently not functioning. I assume this issue arises because the API endpoint for Amazon has changed. The correct endpoint should be bedrock-runtime.<region>.amazonaws.com, instead of the previously used bedrock.<region>.amazonaws.com. (https://docs.aws.amazon.com/general/latest/gr/bedrock.html)
- Mark as Read
- Mark as New
- Bookmark
- Permalink
- Report Inappropriate Content


