Unlock a world of possibilities! Login now and discover the exclusive benefits awaiting you.
Qlik Sense documentation and resources.
Recent Documents
-
Qlik Explorer for Developers
Qlik Explorer for Developers is a light weight tool designed to provide a simple way for developers to examine the contents of a Qlik Sense server. T... Show More
-
Backing up your Qlik Apps into Stream Folders using Qlik-Cli
Today, I'd like to share with you our current App backup solution using Powershell and Qlik-Cli.As you know, a production environment needs backups an... Show MoreToday, I'd like to share with you our current App backup solution using Powershell and Qlik-Cli.
As you know, a production environment needs backups and Qlik Sense Enterprise does not offer such a thing by default so I decided to build a solution.
Using Qlik-Cli for Windows, I put in place a solution that will not only backup my published and unpublished apps but will also create a folder structure to match your streams.
The unpublished apps are backed up inside the "My Work" folder using the app owner's name as a directory name. This allows to easily find the app owner when performing a search in the folders.
Square brackets in the App's name will be removed because you cannot create a file with these characters in Windows.
The script is scheduled using the Windows Task Scheduler with the following command:
Here's the code:
$ErrorActionPreference = "Stop"

Try
{
# set export drive and directory
D:
cd D:\QlikBackups

# connect to the Qlik Server. Replace <ServerName> with your Qlik Sense hostname
Connect-Qlik -ComputerName <ServerName> -UseDefaultCredentials -TrustAllCerts

# Export each apps from the previously defined streams to qvf
Get-QlikStream | % {New-Item -Name ".\$($_.name)" -Force -ItemType 'Directory'} | foreach {Get-QlikApp -filter "stream.name eq '$($_.name)'"} | foreach {Export-QlikApp -skipdata -id $_.id -filename "$($_.stream.name)\$($_.name -replace '[[\]]','').qvf"}

# set the export folder to the My Work area for unpublished apps
cd "D:\QlikBackups\My Work"

# Create a folder structure for all the app owners
Get-QlikApp -full -filter "published eq False" | % {New-Item -Name ".\$($_.owner.userId)" -Force -ItemType 'Directory'}

# Export each app into their folder
Get-QlikApp -full -filter "published eq False" | foreach {Export-QlikApp -skipdata -id $_.id -filename "$($_.owner.userId)\$($_.name -replace '[[\]]','').qvf"}
}
Catch # In case of error, send an email to the Qlik administrators
{
    $ErrorMessage = $_.Exception.Message
    $FailedItem = $_.Exception.ItemName
    $Time=Get-Date
    "Error: $FailedItem Message: $ErrorMessage Time: $Time" | out-file d:\log\QlikBackup.log -append

    $FailMailParams = @{
To = 'qlikadmin@MyCompany.com'
        From = 'MyQlikServer@MyCompany.com'
        Port = '25'
        SmtpServer = 'smtprelay.MyCompany.com'
        Subject = 'MyQlikServer Backup Failure'
        Body = "The backup failed. The error message was: $ErrorMessage"
        }

         Send-MailMessage @FailMailParams
}
My next steps are:
- Add timestamps to the filename
- Keep the most recent copy and Archive the rest.
- Add qvf file retention
-
Multiple lines in Pivot and Straight table cells in QlikSense
[Paragraph format. Descriptive text here. See Content Guidelines for details. You can remove sections that are not needed for your article. If subhead... Show More[Paragraph format. Descriptive text here. See Content Guidelines for details. You can remove sections that are not needed for your article. If subheaders are needed, use heading 3 or heading 4 formats.]
Description:
- By default Straight tables only allows maximum of 3 lines in a cell to be visible and Pivot tables are limited to one line only
Resolution
By using a Multi-KPI object we can inject custom CSS onto the sheet to override the default limitations on pivot & straight tables
Step1:
Drag a Multi-KPI object onto the sheet and add a dummy measure example = 1;
Next, on the Properties panel of the Multi-Kpi object navigate to Appearance >> Styles
Add CSS here
Step2:
Paste the custom below
For Straight Tables add the below CSS snippet in the Styles(CSS) box
.qv-st .qv-st-value .qv-st-value-overflow {
max-height: none;
}For Pivot Tables add the below CSS snippet in the Styles(CSS) box
.qv-pt .cell .value {
max-height: none;
white-space:pre
}As shown below now each cell will fit to content of the cell based on line breaks in the content
Output
Cheers
Vineeth P

-
Qlik Sense SaaS - Automating Apps Export
Developing apps in the Qlik Sense SaaS environment may require us to make a full local copy of apps from a given Development Space , either for ba... Show More -
Introducing the Sense Field Formatter
Introducing Sense Field Formatter Version 1.7 - A new feature for the front end! With the latest version, you can now quickly copy the output in expre... Show MoreIntroducing Sense Field Formatter
Version 1.7 - A new feature for the front end!
With the latest version, you can now quickly copy the output in expression editor windows using a button.
Check it out on YouTube : https://www.youtube.com/watch?v=CXPMbQSD9mQ
It is very likely that many of you build your data models so that you can easily reuse certain parts, such as dimensions.
Although some development methods such as the Qlik Deployment Framework (QDF) help speed things up, the task of renaming fields when reusing a QVD is still time-consuming.
Let's imagine that a fact table contains 3 customer dimensions and 2 warehouse dimensions and that for each of these dimensions you add a prefix, or that your fields are written in a multilingual way ([Customer/Customer/Cliente]) and you want to get the middle value. You could also use it to rename fields from an SQL database and format everything for a nice front-end result in Qlik.
It's now easier than ever with Sense Field Formatter.
What it does
(https://youtu.be/k3HQpJivyZM)
Allows a user to format a list of fields, delimited by commas, into an alias and standardized format.
The user has multiple configuration options to choose from.
When the extension icon is clicked, a popup menu is displayed where the formatting takes place and is pasted into the clipboard.
User Settings
Use Alias as the field's source name
Will use the alias name (at the right of "AS") from your source fields as your new source fields.
e.g. [SourceField] AS [SourceAlias] -> [SourceAlias] AS [OutputAlias]
Key Prefix
The character(s) used to identify the key fields in Qlik. Formatting will be handled differently here as the Prefixing will be done AFTER (the right) the key prefix to avoid breaking the key formatting.
e.g. Prefixing a key field with "Customer." will generate this: [%MyKeyField] AS [%Customer.MyKeyField]
Ignore formatting on Key Fields?
Fields starting with the identified key will NOT be formatted.
Comma Position
Places the comma either at the start or end of the line.
Field Delimiter
Should the field delimiters be double quotes or square brackets.
Replace characters
Find what: The character(s) you are looking to replace. Multiple characters can be replaced at once.
Replace with: Replace all occurrences of the character(s) in the fields.
Insert a space before capitals
Will insert a space before each capital letter in the fields, except for the first character.
e.g. [MyNewField] -> [My New Field]
Change Case
Applies a case change to all the fields.
Uppercase: Replaces each lowercase letter with a corresponding uppercase char.
Lowercase: Replaces each uppercase letter with a corresponding lowercase char.
Capitalize: The first letter of each word will be in uppercase.
Subfield the field names?
Extract substring components from a parent string field, where the original record fields consist of two or more parts separated by a delimiter.
The function can be used, for example, to extract the column name in a specific language if the field is multilingual.
*e.g. Applying a subfield of 3 with a delimiter of '/' [Client/Cliente/Customer] -> [Customer]
Delimiter: A character within the input text that divides the string into component parts.
Field no: Specifies which of the substrings of the parent string text is to be returned. Use the value 1 to return the first substring, 2 to return the second substring, and so on.
Add Suffix/Prefix?
Adds an affix, either placed before the field (prefix) or at the end (suffix). Useful when reusing the same dimension over and over for multiple scenarios.
e.g. Using the customer dimension where a customer may be a Ship To or Bill To customer.
Prefix : [Customer Name] -> [ShipTo.Customer Name]
Suffix : [Customer Name] -> [Customer Name.ShipTo]
Affix: The text that will be used as an affix. Make sure to add a space to your affix if you'd like the new string to remain spaced out.
Installing the plugin
Visit the Store:
Visit my GitHub: https://github.com/MichelLalancette/SenseFieldFormatter
-
Distribute NPrinting reports after reloading a Qlik App
***UPDATED 06/30/2021To resolve rest connector related issues visit:https://community.qlik.com/t5/Knowledge-Base/Qlik-Sense-June-2020-connecting-to-NP... Show More***UPDATED 06/30/2021
To resolve rest connector related issues visit:
**UPDATED 10/16/2020
Revised Sense Sample to include updated cookie parsing and proper error handling
Added sample to trigger an NPrinting User Import Task from Qlik Sense
****
One of the most common questions is how can i distribute my NPrinting reports to occur automatically as soon as my Qlik app is done reloading ?
THis is possible in both Qlik Sense and with QlikView using the NPrinting API. Moreover, you can invoke the API through the the Qlik load script Qlik REST Connector v1.3+. What this means is that you can schedule and/or chain your NPrinting report distributions using the Qlik Sense scheduler or the QlikView publisher to better integrate the operations across the platform
.The sample included herein draws on the great document published by gianluca perrin on Qlik Community here: https://community.qlik.com/thread/292037
Benefits
- Common Scheduler
Currently NPrinting and QLik (Sense or View) have separate schedulers.
If you reload a Qlik application daily at 1:00AM and want to send the NPrinting reports directly after a successful reload, you must schedule them separately for times that you believe will not intefere with each other. Its better to have a100% chained solution however whereby reports are only distribute upon successful reload of the Qlik app. - Error handling
Should the NPrinting task, publisher has a built in solution to notify administrators. Qlik Sense also has 3rd party solutions to do the same.
Restrictions
You need to have v1.3 of the Qlik REST Connector. Its available as of Feb 2018.
Sample
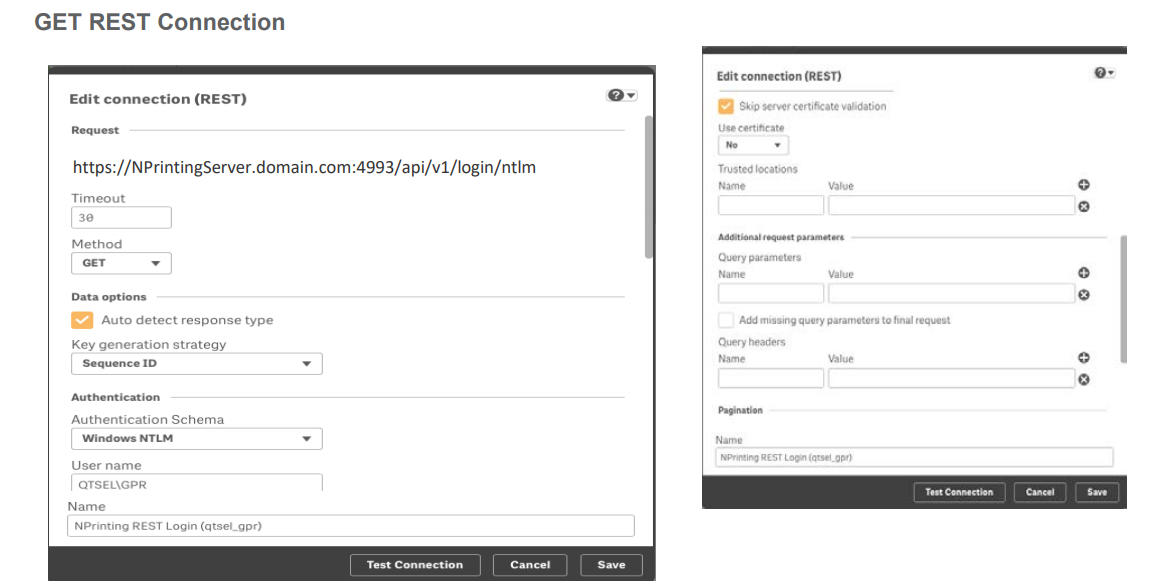
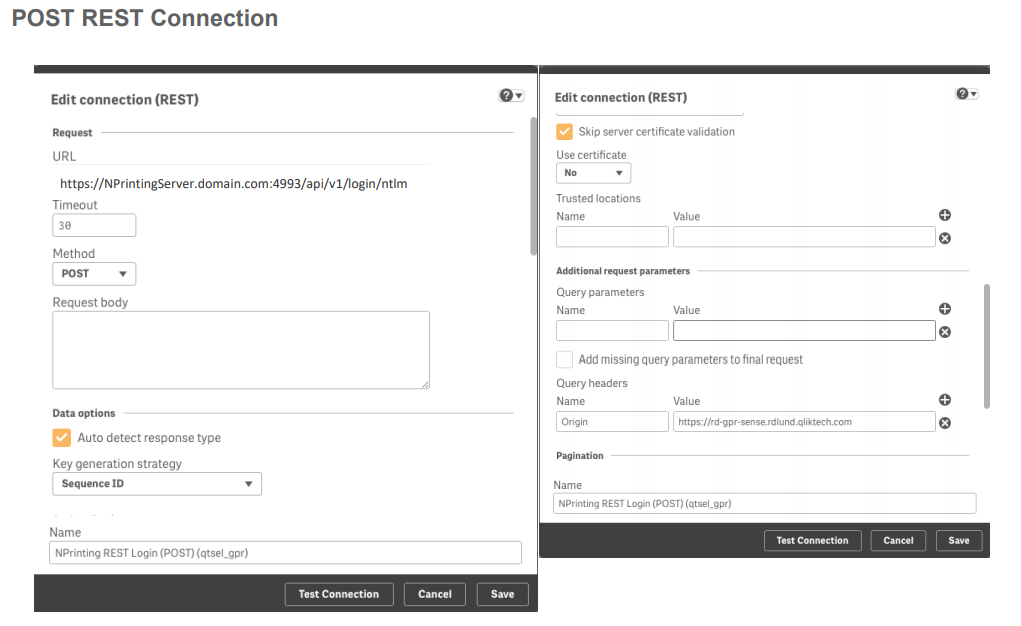
Connection setup
You will need to create two REST Connector connections to the NPrinting API. One that uses a default HTTP method of "GET" , the other will use "POST" as the default method.Please reference pages 8-9 of the document https://community.qlik.com/thread/292037 to create the two connections.
App Setup
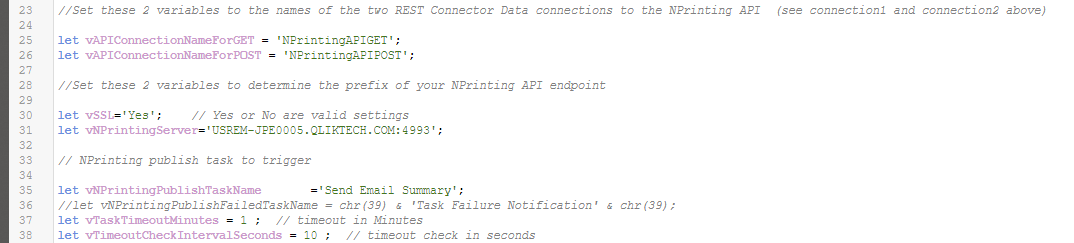
1. Import the attached application and open the script in the Data Load Editor
2. Modify the SETUP tab to reflect your
i. on lines 25/26 update the names of the two REST Connections that you create using the steps in 'Connection Setup' above.
ii. on line 30 , if NPrinting is configured to use https (it is by default) leave this setting to 'Yes' . If you reconfigured it to use http , set to 'No'
iii. On line 31 , set the NPrinting server and endpoint (host + port)
iv: Line 35 is the name of the NPrinting Publish Task that you want to execute
v: Line 37 and 38 is an enhancement to have Qlik check the NPrinting task executions for errors, or , if it runs too long, to abort it and report a failure .
3. (optional) You can also Import the following application into Qlik Sense to send an administrative alert. THis is not necessary with QV Publisher as it has an in-built feature to notify administrators when a publish task fails.
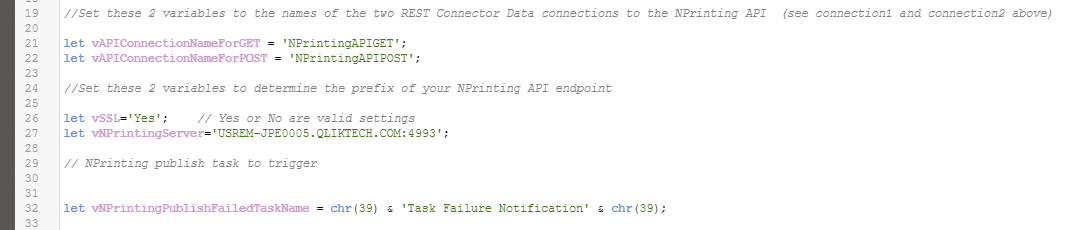
4. Open the imported app in the data load editor and update the 'setup' section
i. on lines 21/22 update the names of the two REST Connections that you create using the steps in 'Connection Setup' above.
ii. on line 26 , if NPrinting is configured to use https (it is by default) leave this setting to 'Yes' . If you reconfigured it to use http , set to 'No'
iii. On line 37 , set the NPrinting server and endpoint (host + port)
iv: Line 32 is the name of the NPrinting Publish Task that will alert an administrator about a report failure
(note that i've toyed with using the Notification Web Connector to send an administrative email alert in the event of a full blown NPrinting outage. This sample is a little simpler)
Task setup
In Qlik Sense QMC under tasks i've setup 3 tasks .
Task #1 - reloads a Qlik App
Task #2 - Distributes reports in an NPrinting Publish task (this is chained to execute 'on success' of Task #1)
Task #3 - Send an Administrator alert (this is chained to execute 'on failure' of Task #2)

QLIKVIEW
The QLikVIew solution has all the same benefits as the Qlik Sense solution with a couple more benefits.
Additional benefits:
- you can pass the vTask name from the publisher task to make for greater re-usability of the load script for chaining multiple tasks
- Publisher has a built in admin notification feature. SHould the NP task fail, the publisher task will also fail and an admin notification will be sent (you can do that with qlik sense but need to use a 3rd party qlik sense task notification solution, or use the load script to call an administrative task to send a notification. The latter can be done with NPrinting or with the Qlik Web Notification Connector.
Load script
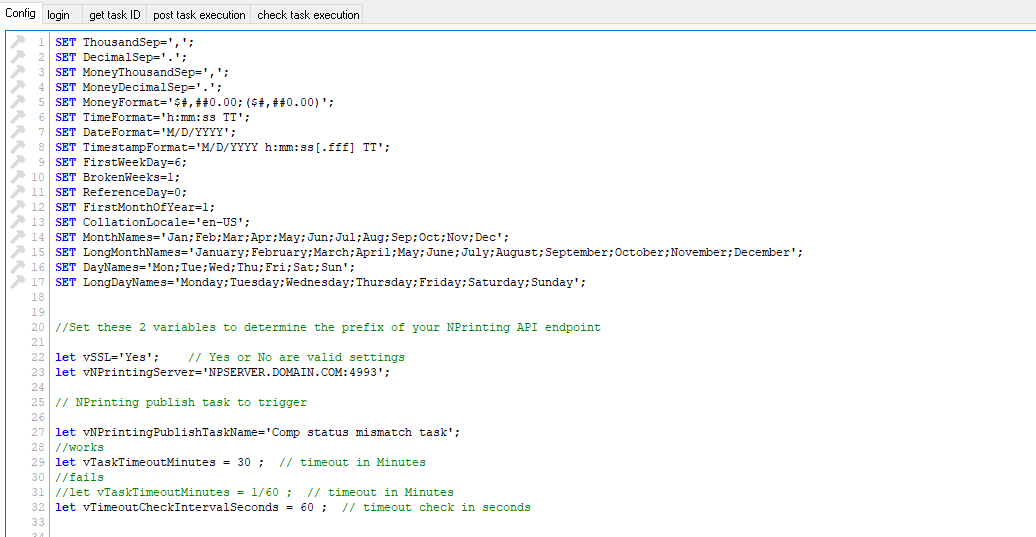
The QlikView load script has a login , get task ID (lookup using task name), post task execution, and a task execution check tab. The task execution check tab will monitor the NP task execution on an interval with a configurable timeout. Should the NP task throw a warning or error, it errors out the publisher task. Should the NP task exceed the timeout, it kills the NP task and errors out the publisher task.You will need to update the NPServer, Task and timeout settings in the CONFIG tab. Again use the REST Connector 1.3 and i suggest testing with QV desktop first . The REST Connector must be manually installed on QV desktop and on the publisher machine to work.
New cookie parsing:
//Set Cookie header
let vCookieRaw = peek( 'Set-Cookie',0,'_response_header');
if vSSL='False' then
let vCookie= subfield(subfield('$(vCookieRaw)','Path=/,',3),';',1);
else
// let vCookie = TextBetween('$(vCookieRaw)','Secure,','Path=/',2);
Let vCookie = TextBetween('$(vCookieRaw)','SameSite=None,','; Path=/',3);
end if
- Common Scheduler
-
Qlik SaaS Utils to automate management tasks
Hi all,I've been using Qlik SaaS since the first release, Qlik Cloud and whenever I needed to upload new apps, extensions and themes for new or existi... Show MoreHi all,
I've been using Qlik SaaS since the first release, Qlik Cloud and whenever I needed to upload new apps, extensions and themes for new or existing deployments, I thought it was a waste of time. With Qlik SaaS's unlimited storage, files have grown tremendously, and with great viewing capabilities, users and apps have followed this trend. My tasks too!
Well, I started studying Qlik SaaS APIs last year (thanks to @Clever_Anjos) and created some scripts to help me do my work on new or existing deployments. These tools were written in Powershell version 7 and can be used on Windows, Mac and Linux. They are:
- qlik_saas_upload.ps1 - This line command was designed to help create new tenants and automatically upload Apps, Extensions and Themes, and Files too. All of them based on the local directories. If you want to upload multiple apps to multiple Spaces, just create local directories with the desired Space names and put the QVFs there. When you call this script, it will create the Spaces, Upload the QVFs, publish their sheets and then publish (or move) to desired Spaces, managed or shared.
- qlik_saas_upload_files.ps1 - Special thanks to @Levi_Turner that helps me to create a simple script to upload local files directly to any SaaS space. The API has size limitation (600Mb), but it works fine and I don't need to install a service like QDT and I can use it any time that i want.
- qlik_saas_delete_files.ps1 - Last year I needed to delete about 7 thousand files at my tenant, thanks again to @Levi_Turner that shows me how i can find a file at a SaaS space. This command line gave me the power to delete many files at a DataFiles SaaS Space using wildcards.
- qlik_saas_delete_users.ps1 - Recently I created dozens of users in a tenant without Idp, and after they did their work I needed to delete them, but I didn't wanna do it manually, one per one. This command line tool aids me to delete that users using the same list that i used to invite them.
The scripts are not error-proof, because i'm not a powershell master, and I hope the community can contribute and make this a better tool.
These scripts are avaible at my Git Repository (https://github.com/pbergo/qlik-saas-utils). Enjoy them and write me if you have any trouble.
[]
Pedro Bergo
-
Qlik Sense Mashup Development Tutorial
Hi All,You intrested in Qlik API OR want to start using APIThis cource can help you in thatQlik Sense API Essentials Firstly i'll like to thank my ... Show MoreHi All,
You intrested in Qlik API OR want to start using API
This cource can help you in that
Qlik Sense API Essentials
Firstly i'll like to thank my indirect Contributors for this document, from where i started my journey into qlik sense.
This document will help to kick start your skill with basic Mashup & Extension development.
What is Mashup?
1.A mashup is a web page or web application that uses Graphs from Qlik Sense application
2.It content can come from one or more than one source to create a web page
3.The Capability APIs enable to easily integrate with your Qlik Sense objects to get desired result.
4.Custom extensions and widgets can also be used
5.Note :
1.You open a Web Socket to Qlik Associative Engine using the qlik.openApp method.
2.Objects use the same Web Socket, that is the same session, which means they are connected.
3.Qlik Sense objects work just as they do in the Qlik Sense client.
About Mashup
1.You can integrate single Qlik Sense visualizations, sheets or snapshots into an iframe.
2.The Single configurator is a Qlik Sense tool that provides an easy way of creating simple mashup pages without having to write any code at all. It returns a Qlik Sense object, which is identified in an URL. The Qlik Sense object is typically a visualization from an app, for example a Line chart
Important Links
5.bootstrap 4 classes references
YOU CAN GO THROUGH THIS ATTACHED DOUCUMENT FIRST TO GET BASIC UNDERSTANDING ABOUT THE DEVELOPMENT, THEN JUMP TO THESE VIDEO.
IT WILL DEFENETLY HELP IN DEVELOPING A GOOD, PRESENTABLE & UNIQUE MASHUP FOR YOUR ORGANIZATION.
Youtube Video to get started
-
SaaS Enablement (Part 3 - APIs)
When I was a young whipper snapper I constantly asked vendors "what's inside your box?" The problem when people ask "What is inside the box" about Qli... Show More -
How to delete a sheet via Qlik repository API using Postman Desktop
Hi techies,The Qlik Sense Repository Service (QRS) contains all data and configuration information for a Qlik Sense site. The data is normally added a... Show MoreHi techies,
The Qlik Sense Repository Service (QRS) contains all data and configuration information for a Qlik Sense site. The data is normally added and updated using the Qlik Management Console (QMC) or a Qlik Sense client, but it is also possible to communicate directly with the QRS using its API. This enables the automation of a range of tasks, for example:
- Start tasks from an external scheduling tool
- Change license configurations
- Extract data about the system
We will learn how to connect with Qlik Sense via repository API using POSTMAN Desktop tool. For practice we will delete a sample sheet by repository API request.
Sheet deletion is one of the operations we can perform via API request. We have different endpoints which we can use in API request to perform operation.
We can know what are available end points in Qlik API at https://help.qlik.com/en-US/sense-developer/April2020/Subsystems/RepositoryServiceAPI/Content/Sense_RepositoryServiceAPI/RepositoryServiceAPI-QRS-API-Endpoints.htm
Prerequisites:
- Qlik Sense Enterprise
- Postman Desktop tool
- Administrator user for installation of Postman.
- Service user account to send API request.
Installation and configuration of Postman:
- Download Postman desktop version and install with administrator user.
- Download Qlik Sense Enterprise certificates from QMC > Certificate section and export a copy of the certificates used in the site.
- Arbitrary machine name (best practice is to use the machine you are making the API calls from)
- No password on the files
- Include secrets key
- PEM Format
- Go to Process with PEM Certificates (Simplest, Doesn't Require OpenSSL), Install Qlik certificates by referring https://support.qlik.com/articles/Basic/How-to-configure-Postman-desktop-app-to-connect-to-Qlik-Sense?articleId=How-to-configure-Postman-desktop-app-to-connect-to-Qlik-Sense
- Open Postman Desktop=> Go to SSL certificate verification and disable SSL certificate verification
4. Certificates verification: Add host name, certificates as per below snapshot.:
5. Test connectivity of Postman with QSE. A valid test of postman connectivity with service account would be the following.
- Request: https://hostname:4242/qrs/about?xrfkey=1234567890123456
- X-Qlik-Xrfkey = 1234567890123456(Xrfkey string is a random string. The only characters that are allowed for use in the Xrfkey parameter are 0 - 9, a - z, and A - Z.)
- X-Qlik-User= UserDirectory=Domain;UserId=qliksense(qliksense is service user in this article)
If everything is fine then you will see Status 200 OK and build version etc. information of QSE.
How to delete a sheet using repository API
- Go to hub and create a sample sheet in any app i.e. DeleteMe
- Create a request https://hostname:4242/qrs/app/object?xrfkey=1234567890123456
- End point in above request is object.
- Go to headers=>set X-Qlik-Xrfkey to any string i.e. 1234567890123456
- X-Qlik-User= UserDirectory=internal;UserId=sa_api
- Note we are using sa_api user to delete a sheet. Here, service user is ineffective to delete any sheet.
Section 2:
- Go to Params:
- set xrfkey = 1234567890123456
- Filter = name eq 'DeleteMe'
- This will make request as https://hostname:4242/qrs/app/object?xrfkey=1234567890123456&filter=name eq 'DeleteMe'
- press GET button.
- This will bring us sheet details whose name is DeleteMe.
- GET /qrs/app/object?xrfkey=somerandomstring&filter=app.name eq 'SomeApp' and objectType eq 'sheet' and name eq 'deleteMe'. Is case insensitive
- Response:
{
"id": "92366630-3c23-467c-848d-a8733d253289",
"engineObjectType": "",
"description": "",
"objectType": "sheet",
"publishTime": "1753-01-01T00:00:00.000Z",
"published": false,
"name": "DeleteMe",
"engineObjectId": "77dfef2a-6fa4-4edf-bfce-12d07e14c735",
"contentHash": "AP=B$+WA3.Z[_H`@E'[;@C!Y9(95?D\/7S92!>TBLKP",
"privileges": null
}
7. Here we need Id detail from response received by GET Request: "id": "92366630-3c23-467c-848d-a8733d253289".
- This id 92366630-3c23-467c-848d-a8733d253289 we can find in QMC by going to App objects, filter the records by ID column
Check last column
8. Delete a sheet by https://hostname:4242/qrs/app/object/92366630-3c23-467c-848d-a8733d253289?xrfkey=1234567890123456 with keeping X-Qlik-User= UserDirectory=internal;UserId=sa_api
9. Check QMC or HUB, you will find that DeleteMe sheet is vanished.
Note: This solution uses repository service or API which removes entry of sheet from QSR database not the actually file from binary file present in disk. If you need to cleanse the sheet from disk, please refer this beautiful document created by Levi.
https://adminplaybook.qlik-poc.com/docs/asset_management/apps/remove_unused_private_sheets.html
You can do many operations as we used delete of sheet. Please check what are the endpoints available in Qlik. End points means what operation you are trying to do with Qlik using API request.
Reach out to me at kumar.rohit1609@gmail.com if there is need of any clarification or assistance
Connect with me on LinkedIn https://www.linkedin.com/in/rohit-kumar-67ba152b/
To get latest updates and articles, join Qlik community at https://www.facebook.com/QlikIntellectuals
When applicable please mark the appropriate replies as ACCEPT AS SOLUTION and LIKE it. This will help community members and Qlik Employees know which discussions have already been addressed and have a possible known solution. Please mark threads as LIKE if the provided solution is helpful to the problem, but does not necessarily solve the indicated problem. You can mark multiple threads as LIKE if you feel additional info is useful to others.


