Unlock a world of possibilities! Login now and discover the exclusive benefits awaiting you.

Analytics & AI
Forums for Qlik Analytic solutions. Ask questions, join discussions, find solutions, and access documentation and resources.
Data Integration & Quality
Forums for Qlik Data Integration solutions. Ask questions, join discussions, find solutions, and access documentation and resources
Explore Qlik Gallery
Qlik Gallery is meant to encourage Qlikkies everywhere to share their progress – from a first Qlik app – to a favorite Qlik app – and everything in-between.
Qlik Community
Get started on Qlik Community, find How-To documents, and join general non-product related discussions.
Qlik Resources
Direct links to other resources within the Qlik ecosystem. We suggest you bookmark this page.
Qlik Academic Program
Qlik gives qualified university students, educators, and researchers free Qlik software and resources to prepare students for the data-driven workplace.
Recent Blog Posts
-
Final week to apply to become a Qlik Academic Program Professor Ambassador
This week is your last chance to apply to become a Qlik Academic Program Professor Ambassador for 2021. In case you haven’t heard, this is a brand-new... Show MoreThis week is your last chance to apply to become a Qlik Academic Program Professor Ambassador for 2021. In case you haven’t heard, this is a brand-new initiative where we will be celebrating our most active educator members! Our ambassadors will champion our vision to make more students data literate and to prepare them for the data-driven workplace.
If one or more of the below points describes you, then we encourage you to apply:
- Passionate about the Qlik Academic Program and the resources provided to students and educators
- Passionate about educating students to be prepared for the data-driven workforce and to secure jobs.
- An active promoter of the Qlik Academic Program to academic peers as well as students
- Willing to share your experience of the Qlik Academic Program at (virtual) events, in forums, on social media and in the press
- A contributor to blogs, forums, university publications, professional journals, papers, or other materials that promote the Qlik Academic Program
Please note, to be eligible for this program you must be a university educator and an existing member of the Qlik Academic Program.
As a Professor Ambassador you will receive a host of benefits including:
- Insight: Exclusive webinars with Qlik leaders, covering the latest trends in analytics and other industry topics
- Credibility: A digital badge to certify ambassador status and a featured online profile
- Exposure: Outreach opportunities to showcase your experience with the Qlik Academic Program via Qlik marketing channels or speaking engagements
- Perks: Discounts on Qlik events and other exclusive rewards
- Community: Connect with other professors across various fields and geographies
- Opportunity: Potential to advance your career including meeting university requirements for scholarly contribution beyond the classroom
We have received some great applications so far, and we are looking forward to selecting our inaugural class of 2021 very soon.
Click here for full program details and to apply.
Applications close 30 November 2020. Apply now!
-
Sharing Qlik Love for the Holidays (Part I)
How is it possible that we are entering the official "holiday season" in 2020? In so many ways, the year has seemed to drag on, hour-by-hour, as we mu... Show MoreHow is it possible that we are entering the official "holiday season" in 2020? In so many ways, the year has seemed to drag on, hour-by-hour, as we muddle through an often dark and stressful time. But in other ways, the year flew by in a sea of virtual meetings and an even further blurred lines of work and home life. We blinked and it was Thanksgiving in the US. We blinked again and it was December, and the beginning of Hanukkah and the shopping season. We exhaled and we were celebrating Kwanzaa.
So now, we invite you - our cherished Qlik community of users and technologists - to pause with us. Pause to celebrate the season of joy, giving, peace and all the other qualities of life we aspire to in ourselves and each other.
Please share in the season by downloading any or all of the Zoom backgrounds for Holiday 2020 and enjoying them on your own desktops. There are 5 to choose from: 3 here and 2 additional uploaded on Part II here.
And the warmest greetings of the season to you and your families from Team Qlik.
-
QlikView AccessPoint and QMC with HTTPS and a custom SSL certificate
Here is what we'll need: A signed certificate A brief (5 minute) downtime of the QlikView WebServer (optional) Another brief (5 minute) downtime... Show MoreHere is what we'll need:
- A signed certificate
- A brief (5 minute) downtime of the QlikView WebServer
- (optional) Another brief (5 minute) downtime of the QlikView Management Console
- This blog post 🙂
Note: This blog post does not cover the configuration of Certificate Trust between the QlikView services. For more information about Certificate Trust, check out the QlikView Online Help.
Are the AccessPoint and the Management Console hosted by the same web server?
No. While the AccessPoint is hosted by the QlikView WebServer (QVWS) service, the Management Console is directly served by the QlikView Management Service (QMS).
That means if you wish to swap both from HTTP to HTTPS, both services will need to be individually configured.
But you only need one certificate.
! In this blog post, I will assume that the AccessPoint web server currently in use is the QlikView WebServer (QVWS). The QlikView AccessPoint can be hosted by Microsoft IIS as well, but Microsoft IIS has its own instructions on how to import an SSL certificate for one of its sites.
Certificate options, or: What type of certificate is right for me?
There are three possible types of certificates for us to use:
- A certificate purchased from and signed by a trusted CA (Certificate Authority) such as VeriSign, Thawte, Geotrust, etc.
- A corporate certificate provided and signed by your own Enterprise CA (Certificate Authority).
- And a self-signed one. Those can be created by any number of applications, such as Microsoft IIS, but is generally only recommended for test environments. Since they are not generally trusted or verified, browsers will prompt with warnings if a site was secured using a self-signed certificate. More so, it has the potential side effect of teaching users to ignore browser warnings, which we do not want.
Requirements, or: What to look out for when getting your cert?
- The certificate itself must contain a private key
- Must have an up to date valid from / valid to date range
- Be signed by a valid and OS or browser configured Certificate Authority
As far as formats and algorithms are concerned, the following are confirmed to work with QlikView:
- Certificates that are x509 version 3
- Use signature algorithm sha256RSA
- Use signature hash algorithm sha256
Where to get a certificate and how to do a CSR?
The Certificate Authority you chose will have instructions for this, and if you are looking to get a self-signed one or one from your corporation's CA, then a local administrator can provide the certificate to you.
Either way, you are going to need to generate a Certificate Signing Request (CSR) to pass on to your CA. There are tools out there to get that done with, such as certreq from Microsoft (found here), and SSLhopper has a great article on that, which I often send to customers when they ask us about CSRs and how to do them.
Once you obtain the certificate, we'll move on to installing it and binding it to the desired ports.
This will be done in three steps:
- Import/Install
- Bind the certificate using PowerShell or the Windows command prompt
- Configure the QVWS and, optionally, the QMS
Importing the Certificate
We only need to import/install it once (unless you have your services across multiple machines).
Step 1:
On the QlikView node running the QlikView WebServer, log on with the user running the QlikView services. This is important since the certificate needs to be accessible for this account.
(Optional:) If you want to switch the Management Console to HTTPS as well, and the services are not on the same machine, repeat the step on the node running the QlikView Management Service.
Step 2:
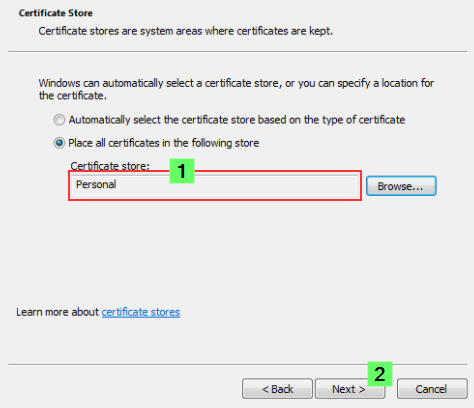
If the certificate was saved in the .pfx format, then all you need to do is double-click the file. Follow the prompt to import the certificate into the Personal store.
Longer Step 2:
If you want to import it manually or verify if it was correctly installed, then we'll need to do a little more work.
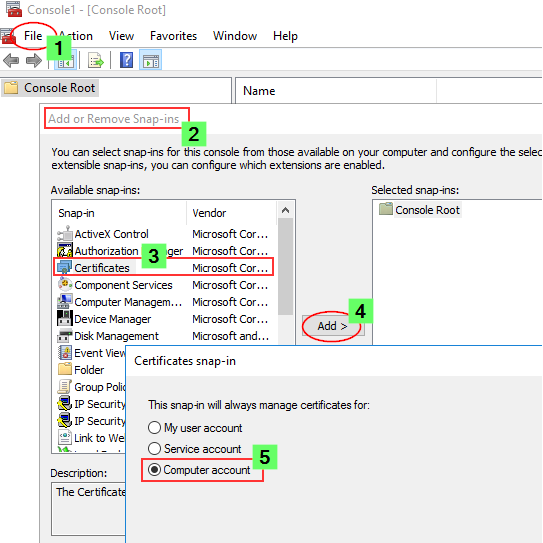
- Launch the Microsoft Management Console (mmc.exe) on the QVWS (and QMS) node
- In the MMC, go to File > Add / Remove Snap-in...
- Select Certificates and click Add
- Select Computer account, click Next, select Local computer and click Finish.
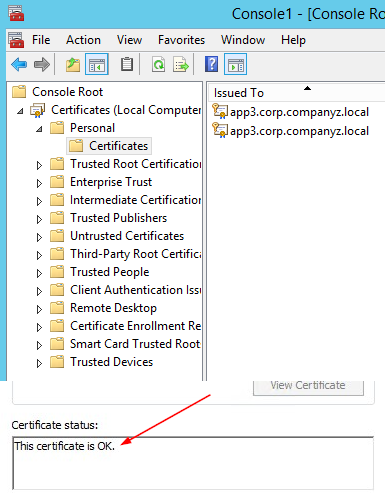
- In the MMC, go to Certificates (Local Computer)/Personal
- In the MMC, go to Actions > All Tasks > Import...
- Browse to the certificate file provided to you from your CA
- Follow the instructions on the screen to import the certificate, including the private key
- Verify the new certificate has been imported into Certificates (Local Computer) > Personal > Certificates and that it contains a private key
- Double-click the Certificate > Certification Path and confirm it shows "This certificate is OK"
- Don't close any of this yet, we'll need it in a moment.
Binding the certificate to the correct port and address.
Next, we need to manually bind the certificate to the correct port and IP address. This is done using either PowerShell or the Windows command prompt and the netsh command. For details on netsh, see the official Microsoft documentation.
For this we will need:
- The certificate Thumbprint
- An Application ID (random GUID)
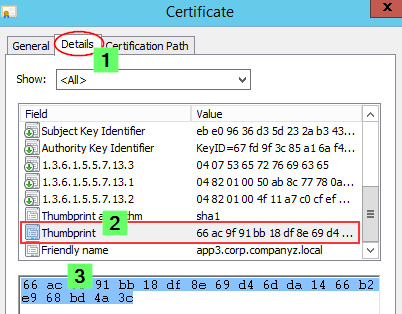
Step 1: Get the Thumbprint
Since we are already in the MMC, let's open the freshly installed certificate again and:
- Switch to the Details tab and scroll down until you find Thumbprint
- Mark the entire thing and copy it into, for example, Notepad.
Step 2: Get an AppID (Application ID, GUID)
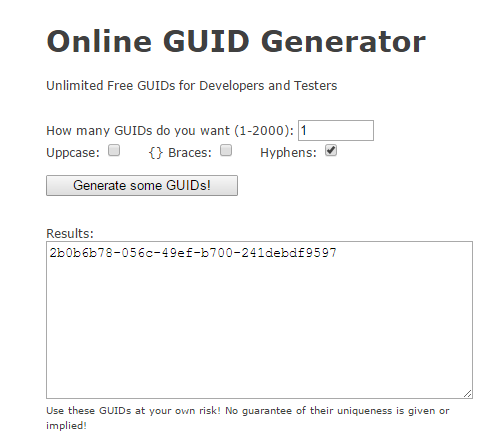
There is a wide range of different tools available to generate GUIDs. My favorite is https://www.guidgenerator.com/
Click Generate some GUIDs! Copy that into Notepad as well.(Optional:) Generate and save two if you want to use one for the Management Console as well.
Step 3: Bind the certificate
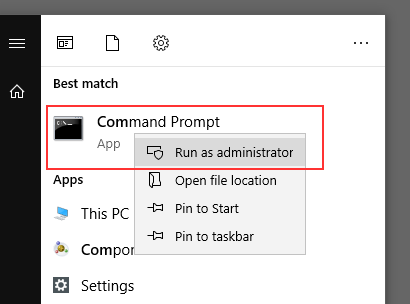
Open either PowerShell or a Windows command prompt with elevated permissions.
Let's assume the thumbprint is 55ab3131fbd585ad3ad817f25aee025a51a2ffb5 and the GUID is e23183e3-c874-467a-bd39-d110cd066f1f. Based on this, we will build the following command:For the AccessPoint:
netsh http add sslcert ipport=0.0.0.0:443 certhash=55ab3131fbd585ad3ad817f25aee025a51a2ffb5 appid={e23183e3-c874-467a-bd39-d110cd066f1f}For the Management Console:
netsh http add sslcert ipport=0.0.0.0:4780 certhash=55ab3131fbd585ad3ad817f25aee025a51a2ffb5 appid={UseTheSecondGUID}We are using ipport=0.0.0.0 in our examples. If you wish to restrict the target IP address, meaning only a specific IP address can be used in combination with this certificate, then specify that here.
Also, note how we are using port 4780 for the Management Console. You can choose a different port. Instructions for that are a little further down.
If you wish to verify the port bindings, use the netsh http show sslcert command line.
It should look like this:
  IP:port        : 0.0.0.0:443
  Certificate Hash    : 55ab3131fbd585ad3ad817f25aee025a51a2ffb5
  Application ID     : {e23183e3-c874-467a-bd39-d110cd066f1f}
  Certificate Store Name : (null)
  Verify Client Certificate Revocation  : Enabled
  Verify Revocation Using Cached Client Certificate Only  : Disabled
  Usage Check  : Enabled
  Revocation Freshness Time : 0
  URL Retrieval Timeout : 0
  Ctl Identifier     : (null)
  Ctl Store Name     : (null)
  DS Mapper Usage  : Disabled
  Negotiate Client Certificate  : Disabled
Configuring the QlikView service
Almost done!
The QlikView Webserver
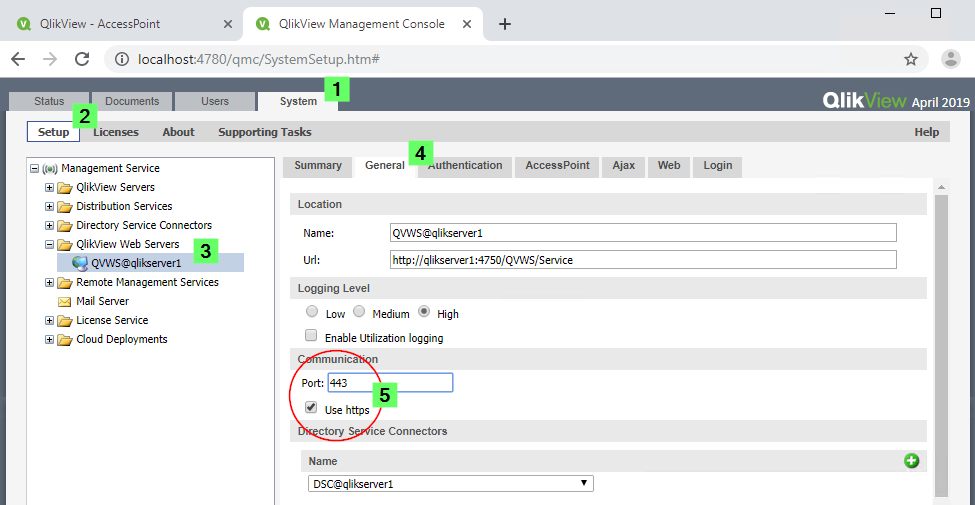
- Open the QlikView Management Console
- Navigate to System > Setup > QVWS@YourQlikServer > General
- Configure Communication to port 443 and tick the Use https checkbox.
- Restart the QlikView WebServer
- You can verify by opening the latest log file in C:\ProgramData\QlikTech\WebServer\Log and checking what port and protocol is now used:
Information     register prefix: "https://+:443/scripts/"
Information     register prefix: "https://+:443/qvajaxzfc/"
Information     register prefix: "https://+:443/scripts/"
Information     register prefix: "https://+:443/qlikview/"
Information     register prefix: "https://+:443/qvdesktop/"
Information     register prefix: https://+:443/qvplugin/
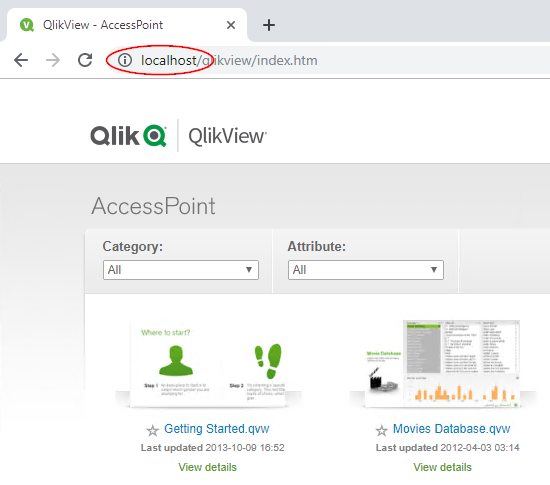
The QlikView AccessPoint can now be opened using https://YourWebServer/qlikview.
If you're looking to implement HSTS (HTTP Strict-Transport-Security) as well, see QlikView HSTS (HTTP Strict-Transport-Security response header).
The Management Service
- Stop the QlikView Management Service
- Open the file C:\Program Files\QlikView\Management Service\QVManagementService.exe.config
- Modify the following tag (set to True😞
<add key="UseHTTPS" value="True"/> - Optional: Find the section:
<!-- ****** QlikView Management Service - FRONTEND ****** -->- Set the value to the port the certificate was bound to in the following tag:
<add key="QMSFrontendWebServicePort" value="YOURPORT"/>
- Set the value to the port the certificate was bound to in the following tag:
- Start QlikView Management Service
- Test the QMC by accessing it through https://YourQMSServer:YOURPORT/qmc
If you're looking to implement HSTS (HTTP Strict-Transport-Security) as well, see QlikView HSTS (HTTP Strict-Transport-Security response header).
Troubleshooting
The parameter is incorrect
If, during the binding process, you are getting an error of The parameter is incorrect, then this is likely caused by a hidden character copied along with the certificate thumbprint. Use your arrow keys to the left and right of the copied key to see if there is a blank space that needs to be removed.
Internet Explorer Plugin complains that "This page contains both secure and non-secure items"
And that’s it 😊
Don’t forget to subscribe to our Qlik Support Update Blogs so you don’t miss out on any new content delivered by #QlikSupport. As always, we’ll be watching for comments and questions and your feedback is always appreciated!
-
Qlik and the University of Wisconsin Nasa GeneLab
Richard Barker, an Academic Program participant and member of the Gilroy Lab at the University of Wisconsin, Madison uses Qlik for the universities c... Show MoreRichard Barker, an Academic Program participant and member of the Gilroy Lab at the University of Wisconsin, Madison uses Qlik for the universities collaboration with the Nasa GeneLab.
The collaboration between NASA GeneLab and the universities Gilroy Lab has led to a multi-omics, cross-species analysis of GeneLab omics data, creating a new NASA Space Biology sponsored investigation into the effects of spaceflight and microgravity simulations on plant-microbe interactions.
For the full article, visit https://genelab.nasa.gov/plants-nasa_award
If you are a professor or student interested in using Qlik for your academic analysis, visit the Qlik Academic Program and apply today!

-
Qlik Sense Business- Changes to sharing
Attention Academic Program members, the newest updates to Qlik Sense Business (cloud editions) were released this month. For information on all the ... Show MoreAttention Academic Program members, the newest updates to Qlik Sense Business (cloud editions) were released this month. For information on all the changes, visit the post from the Product Innovation Team on Community, Qlik-Sense-Product-Release-March-2020
The main change you will see is how to share apps with others. Rather than sharing apps from your personal space, apps will need to designated to one of your shared spaces in order to be shared to others.
Here is the help.com page to explain the change, https://help.qlik.com/en-US/cloud-services/Subsystems/Hub/Content/Sense_Hub/Apps/sharing-apps-cloud-hub.htm?_ga=2.258339146.1172472256.1583757925-342631916.1576506423
Here is the help.com to explain how to add members to the shared space, https://help.qlik.com/en-US/cloud-services/Subsystems/Hub/Content/Sense_Hub/Spaces/working-in-shared-spaces.htm
Professors and students with questions may email academicprogram@qlik.com
To learn more about the Qlik Academic Program and apply today visit us at qlik.com/academicprogram
-
Qlik November 2020 Data Integration Platform Improvements
My friend and colleague Adam Mayer gives us an update on the recent workflow improvements we have made in the November 2020 release of our Data Integr... Show MoreMy friend and colleague Adam Mayer gives us an update on the recent workflow improvements we have made in the November 2020 release of our Data Integration Platform.
November 2020 - Data Integration Platform - Qlik Replicate and Qlik Catalog
We’ve now added the ability to automate the cataloging of Qlik Replicate CDC Streaming tasks, helping you streamline your workflows and save time. From this release of Qlik Replicate and Enterprise Manager, you can now automatically register target datasets in Qlik Catalog which will always be kept up-to-date in real time via CDC allow you to leverage Qlik Catalog's powerful capabilities and ensure your business can gain insights from the latest data and take appropriate action. Take a few mins to watch my video to see it in action.
Qlik Replicate to Qlik CatalogAbout Adam Mayer:
Adam joined Qlik in 2016 and is a Senior Manager of Technical Product Marketing, responsible for many marketing activities involving our Data Integration platform. With a strong technical background in computing, spanning over 20 years, underpinned by an incisive engineering perspective, Adam is an avid follower of new technology and holds a deep fascination with IoT, particularly on the data streaming and analytics side, and loves finding new ways to make it as translatable, visual and understandable to as many people as possible.

-
Let's Dissect the Qlik Engine API - Part 3: Generic Objects
My friend, Øystein Kolsrud - Software Architect at Qlik, is back with part 3 of the Qlik Engine API fundamentals: Generic ObjectsIntroductionThis post... Show MoreMy friend, Øystein Kolsrud - Software Architect at Qlik, is back with part 3 of the Qlik Engine API fundamentals: Generic Objects
Introduction
This post will focus on the concept of generic objects and how they are used to organize information in Qlik Sense.
"Evaluate" revisited
Part 2 of this series focused on the concept of handles and gave an example of how to evaluate expressions in Qlik Sense using the app method "Evaluate" along with selections in a field. That method is quite handy for doing simple calculations, but it is very common that you want to evaluate multiple expressions at the same time. Imagine that we want to build a visualization representing a KPI. We would like the visualization to display the sum of sales, be we would also like to display the average sum of sales per month. We could do this by performing two calls to the engine using the "Evaluate" method like this:
{
  "jsonrpc": "2.0",
  "id": 6,
  "method": "Evaluate",
  "handle": 1,
  "params": [
    "Sum(Sales)"
  ]
}
{
  "jsonrpc": "2.0",
  "id": 7,
  "method": "Evaluate",
  "handle": 1,
  "params": [
    "Sum(Sales)/Count(Month)"
  ]
}
For which the engine would reply:
{
  "jsonrpc": "2.0",
  "id": 6,
  "result": {
    "qReturn": "513503"
  }
}
{
  "jsonrpc": "2.0",
  "id": 7,
  "result": {
    "qReturn": "5135.03"
  }
}
Conceptually this works fine, but it is not very efficient as it requires a lot of communication with the engine. Ideally we would like these two expression to be evaluated together. And this is exactly the purpose of the concept of "Generic object". Generic objects provide an interface for grouping information and expressions that constitute different parts of the same entity. This can for instance include two expressions that should always be evaluated together like in the case of our KPI.
Grouping evaluations with generic objects
We will now use a generic object to group the two evaluations used for our KPI. In this first example I will utilize what is called a "session object" which is an object that is not persisted as part of the app, but created on the fly and discarded when the app is closed. The endpoint to create such an object is called "CreateSessionObject" and is defined here:
The argument required for this call is a structure of the type "GenericObjectProperties" which contains the definition of the different evaluations we would like to be associated with our object. The only property that must be defined when creating a generic object is the property "qInfo.qType" which is just a simple string. Since this is our own custom object, I'll just choose the value 'myKpi' for the object:
{
  "jsonrpc": "2.0",
  "id": 9,
  "method": "CreateSessionObject",
  "handle": 1,
  "params": [ {"qInfo": {"qType": "myKpi"}} ]
}
The engine replies with an object interface for the newly created session object:
{
  "jsonrpc": "2.0",
  "id": 9,
  "result": {
    "qReturn": {
      "qType": "GenericObject",
      "qHandle": 3,
      "qGenericType": "myKpi",
      "qGenericId": "81bac84a-cb6a-48ac-8139-298b6e4913c5"
    }
  },
  "change": [ 3 ]
}
Now that we have our object, we want to add the KPI values to this object, and to do that, we'll dig further into the concept of "properties".
Generic object properties
The properties of an object is where we define what evaluations to associate with that object. The properties can be defined when you create the object, but you can also modify the properties of an existing object. To retrieve the properties of an object you use the method "GetProperties":
The method takes no arguments and the call simply looks like this:
{
  "jsonrpc": "2.0",
  "id": 10,
  "method": "GetProperties",
  "handle": 3,
  "params": []
}
Notice that we use the handle corresponding to our newly created generic object to define the method context. This handle was returned to us when we called "CreateSessionObject", and must be used for all interactions with this particular object. The engine returns the following response:
{
  "jsonrpc": "2.0",
  "id": 10,
  "result": {
    "qProp": {
      "qInfo": {
        "qId": "81bac84a-cb6a-48ac-8139-298b6e4913c5",
        "qType": "myKpi"
      },
      "qMetaDef": {}
    }
  }
}
The value if "qId" has been randomly assigned by the engine, and is a unique identifier within the app. Now that we have the property definition, we will add our custom expression to this structure and call "SetProperties" on the object to update it:
{
  "jsonrpc": "2.0",
  "id": 12,
  "method": "SetProperties",
  "handle": 3,
  "params": [
    {
      "qInfo": {
        "qId": "81bac84a-cb6a-48ac-8139-298b6e4913c5",
        "qType": "myKpi"
      },
      "qMetaDef": {},
      "myProp0": { "qStringExpression": "=Sum(Sales)" },
      "myProp1": { "qStringExpression": "=Sum(Sales)/Count(Month)" }
    }
  ]
}
The names of the two properties "myProp0" and "myProp1" were picked by me, and could be anything. But the name of the inner expression, "qStringExpression" is NOT random. This is a predefined property name that the engine will recognized and act upon, and the definition of its contents can be found in the engine API reference documentation:
The response to the "SetProperties" call is pretty sparse, but states that the object has now changed:
{
  "jsonrpc": "2.0",
  "id": 12,
  "result": {},
  "change": [ 3 ]
}
We are now at the point where we want to tell the engine to compute our expressions, and this is where the concept of "Layout" comes into play.
Generic object layout
The term "layout" in the engine API does not have much to do with the term "layout" as we would think of it in the context of a graphical layout. (I remember I was confused by this when I first learned about the concept.) To the engine, a layout is a structure that is created based on the properties of an object and the state of the app in which that object resides. So the properties is where we define what the engine should compute, and the layout contains the computed values. So to compute the two expressions we added to our generic object, we simply call "GetLayout" on that object:
{
  "jsonrpc": "2.0",
  "id": 13,
  "method": "GetLayout",
  "handle": 3,
  "params": []
}
The result of which is (and I will from now on exclude some of the information to reduce verbosity):
{
  "jsonrpc": "2.0",
  "id": 13,
  "result": {
    "qLayout": {
      ...
      "myProp0": "513503"
      "myProp1": "5135.03",
    }
  }
}
In the layout, the properties "myProp0" and "myProp1" get the evaluated value of the expressions we defined in the corresponding properties structure. When the layout is produced, the engine will traverse the properties and look for certain predefined names of which "qStringExpression" is one. When the engine encounters this value in the properties it will interpret it as an expression that should be evaluated, and when the layout for the object is produced it will add to the layout the computed counterpart for the symbols found in the properties structure.
When reading about the engine API you will sometimes come across the concept of a "properties/layout duality". This duality refers to how a certain value is expressed in the properties and what its counterpart is in the layout. The layout duality of a "qStringExpression" is simply a string, but we will see later that other properties have more complex layout duals.
Summary
Generic objects provide a means of grouping evaluations, but also enable other important features such as change notifications which will be covered in later posts in this series. The concept of generic objects is fundamental to how Qlik Sense organizes data and is how the visualizations in a Qlik Sense app are defined and persisted from an engine perspective.
-
Register for our new course - Data Analytics: Turning Data into Wisdom
Kevin Hanegan, our Chief Learning Officer and author of Turning Data into Wisdom, is teaching this is 4-week, blended learning course designed to help... Show MoreKevin Hanegan, our Chief Learning Officer and author of Turning Data into Wisdom, is teaching this is 4-week, blended learning course designed to help students turn their data into insights and wisdom. Each week consists of a 60-minute self-paced learning module and a live 60 minute webinar.
Duration/Time Commitment:
4 Hours Self-paced learning and 4 Hours Live Webinar.
Also includes copy of Kevin Hanegan’s latest book Turning Data into Wisdom.Dates and time for the Live Webinars:
1st Live Webinar - 29 January: 10-11 am US Eastern Standard Time
2nd Live Webinar - 5 February: 10-11 am US Eastern Standard Time
3rd Live Webinar - 12 February: 10-11 am US Eastern Standard Time
4th Live Webinar - 19 February: 10-11 am US Eastern Standard TimeRegistration Cut-off date:
Wednesday, 28 January, 2020.
For pricing and registration visit Qlik training registration page.
This course is eligible for our 50% off promo.
-
Featured Content Friday – Creating novel shapes for Qlik Sense GeoAnalytics (usi...
Hello Qlik Users!Happy Featured Content Friday! This week we are featuring a partner from Vancouver, Canada!Martin of GINQO Consulting Ltd!Martin has ... Show MoreHello Qlik Users!
Happy Featured Content Friday!
This week we are featuring a partner from Vancouver, Canada!
Martin of GINQO Consulting Ltd!
Martin has been using Qlik products for 7 years. His current role is Senior Qlik Solutions Consultant and he specializes in Public Safety.
When asked what his favorite thing about Qlik is, Martin said:
"The current pace of development, innovation and expansion is blowing my mind! Amazing set of tools now and more to come." - Martin
Martin shared a video showing how he created a keyboard using QlikView and Qlik GeoAnalytics within a Qlik Sense app. QlikView was used to create the shapes of the keyboard and a macro was used to find the coordinates of the buttons. The coordinates were brought into Qlik Sense as an inline table and then the Qlik GeoAnalytics polygon layer was used to "map" the keyboard. Check out Martin's video*:
Creating novel shapes for Qlik Sense GeoAnalytics (using QlikView)
Martin’s mind might be blown away by Qlik’s innovation but we are blown away by his ingenuity and application of our products!
*The information in this post is provided as-is and to be used at own discretion. Depending on tool(s) used, customization(s), and/or other factors ongoing support may not be provided by Qlik Support.
Do you want to be spotlighted in a future post? See our previous post, Introducing Featured Content Friday!, for more information on submitting your dashboards, workarounds, how-to’s or anything else you would like to share!
Thank you for being a part of the Qlik Community and for choosing Qlik!
Kind regards,
Qlik Digital Support
-
Showing context in a KPI
All those questions can be answered with a number, and that single number has a lot of meaning for the right people. For example, a fictitious company... Show MoreAll those questions can be answered with a number, and that single number has a lot of meaning for the right people. For example, a fictitious company usually gets 1000 users visiting their site but this morning when the web analyst checked their Website dashboard, she sees they got 25K visitors yesterday. Something happened and she immediately starts to do some analysis to understand why.
Our pretended analyst knew that something was out of the normal parameters because she knows her data inside out, but to assume that everyone reading a KPI will know what is going on, that is a heck of a risky business. In order to offer a better, more complete view of a KPI our object should always (when possible) include some context.
Let us review some of the options available as of now to include more information in our KPI
Applying Color
Color is very simple and straightforward; we will want at least two colors, one that indicates positive and another one that delivers the bad news. In my example anything above the daily average Users should go in a positive color.
Color will give us the most basic context; we would know now how the KPI is doing, but we would not know how well or poorly it is performing.
Including a second KPI
The most intuitive way to add context to a KPI in Qlik would be to add a second measure. Depending on the main KPI type then we can use different supportive measure, for our example we could compare today’s unique users against yesterday or maybe against the series average or median value.
With color and a second KPI, we not only would see the KPI state but also we will have an element of comparison.
Adding visual indicators
As previously discussed in this blog, a nice way to make information more visible and useful is to add visual elements to the KPI. This technique could help to reduce the time needed to process and understand the displayed information.
Visuals indicators can be added in different places in Qlik:
- In the expression that return the displayed measure =sum(Users) & ' ' & if( sum(Users) > avg(Users), '▲', '▼')
- Defined in the number formatting (for positive and negative numbers only) #,##0 ▲;-#,##0 ▼
- Even simpler, as a part of the conditional color picker tool
Highlighting the comparison
It is a good idea to reserve color only for the elements that need our attention, in our Users KPI example the absolute number of Users is important but is when we compare it against other value when it really shines, to make that clear to everyone we should keep color out of the main element and apply it to the comparison.

-
Top 5 Things You Should Know about SaaS Deployments for Qlik Sense Enterprise
Hopefully you’ve had a chance to learn about the latest exciting innovations we’ve made with our multi-cloud strategy in our April release. It include... Show MoreHopefully you’ve had a chance to learn about the latest exciting innovations we’ve made with our multi-cloud strategy in our April release. It included all of the capabilities needed to deploy Qlik Sense Enterprise entirely on Qlik Cloud Services (enterprise SaaS), as well as in a private cloud with Kubernetes, and/or in a hybrid scenario that combines both on-premise and cloud environments. Today, we offer you unparalleled choice in how you deploy analytics and migrate to the cloud. Most importantly, we are committed to supporting you on your cloud journey with you, whatever form it may take.
At Qonnections we really enjoyed hearing your questions and feedback. Based on what we heard, here’s a recap of the top five things you need to know about Qlik Sense Enterprise on Qlik Cloud Services:
- It’s Qlik Sense Enterprise: Qlik Cloud Services is simply a deployment option for Qlik Sense Enterprise - not a separate product, not a separate license. By deploying on Qlik Cloud Services, you’re getting all the features and value of Qlik Sense Enterprise – associative difference, augmented intelligence, collaboration, etc. – without the infrastructure costs; managed by us. If you are already running Qlik Sense Enterprise on Windows you can add this SaaS option to your deployment today.
- Containers are key – the foundation of Qlik’s multi-cloud strategy is a cloud-native, Kubernetes-based architecture. This architecture facilitates not only general scalability, but also more efficient, elastic scale that utilizes resources only when you need them and helps lower your total cost of ownership. It also allows portability across multiple environments, enabling the ability to run multiple environments in one deployment. And, it provides a great, long-awaited deployment option for Linux users, since Kubernetes can be installed on Linux operating systems.
- A reinvented user experience – cloud analytics use cases demand broader self-service, collaboration, and consumption. With that in mind, we made some design updates to give the right users simplified management and control. Content management features are available right in the cloud hub, enabling individuals more control over how they organize content. In addition, the new cloud management console eases site management for administrators. And shared spaces, a new workspace paradigm, allow developers to easily co-create content together.
- It’s already part of your subscription – if you have a Qlik Sense Enterprise subscription, you have access to all three deployment options for Qlik Sense Enterprise – Qlik Cloud Services, Kubernetes, and Windows. The cost to deploy on our cloud and leverage our resources is included in your subscription.
- It’s not Qlik Sense Cloud Business: our April release includes all of the features you need to deploy Qlik Sense Enterprise on our cloud or yours. But, we know many of our Qlik Sense Cloud Business customers are eager to use the new cloud hub and benefit from the performance of our new architecture. Stay tuned for updates coming soon about how we’ll help you transition to a new Qlik Sense Business SaaS offering.
The most important thing we want you to know is that Qlik Sense Enterprise on Qlik Cloud Services is available for you now.
Check out the video below by our own Mike Tarallo who takes you on a tour of some of the latest features and content management capabilities available in Qlik Sense Enterprise on Qlik Cloud Services.
- It’s Qlik Sense Enterprise: Qlik Cloud Services is simply a deployment option for Qlik Sense Enterprise - not a separate product, not a separate license. By deploying on Qlik Cloud Services, you’re getting all the features and value of Qlik Sense Enterprise – associative difference, augmented intelligence, collaboration, etc. – without the infrastructure costs; managed by us. If you are already running Qlik Sense Enterprise on Windows you can add this SaaS option to your deployment today.
-
October Monthly Release to Cloud - a new look and more functionality!
Customize your hub and Access Critical Insights, Faster Chart Monitoring Enhancements Users have even more options to monitor their most important cha... Show MoreCustomize your hub and Access Critical Insights, Faster
Chart Monitoring Enhancements
Users have even more options to monitor their most important charts directly from the cloud hub. In addition to user-created charts, users can now select charts generated by Insight Advisor to monitor in the hub. This new enhancement to chart monitoring functionality gives users even more options and flexibility to have quick, easy access to critical insights.
Easier Access to Collections for Content Management
Collections are now easier to create, view and manage. Users can now access Collections directly from a newly added menu option at the top of the hub and create Collections or add content to Collections using a newly added collection icon on all chart and app thumbnails/cards in the hub. Users will also find a revision to their landing home page to showcase more customized collections, such as your charts, recent favorites, and your apps. With these changes, all historical “Favorites” will continue to be grouped under the default collection now titled “Favorites”.
Create Better Looking Apps by Default with a New Modern Theme
Introducing a modern look and feel with a new default theme and font. Create visually beautiful apps using modern and clean styling options specific to color and font selections to ensure apps have a modern appeal by default.
Connect to More Data and Manage Reloads
ODBC DSN Connectivity for Qlik DataTransfer
New functionality for Qlik DataTransfer now allows users to create ODBC DSN connections to securely move data from on-premises environment to their cloud environment. Users will now be able to utilize their ODBC DSN connections to use in the “Data Connections” panel in Qlik DataTransfer.
Data Reload Status and Error Messages
We have improved data reload management capabilities to include status and error messages for reloads. This feature introduces a "Reload Log" dialog, which will display all the detailed status and error information for a particular reload in the reload history.
New identity management configuration option with JWT authorization
JWT Authorization is a new identity management configuration option in Qlik Sense Enterprise SaaS. Customers will now be able to create their JSON web tokens to authenticate users in their systems and then send the tokens to Qlik Sense for validation and user provisioning. The intent is to support customers with portals who handle their own authentication.
Other User Experience Enhancements
Connect and Learn panel – Users now have direct access and easy navigation to the wide range of key resources from directly inside the hub. Access information on recent product updates, events, demos and the learning portal.
-
Community Enhancements (2020 - 5)
Qlik Community, Pleased to share with you that we have launched the following updates: 1. Solutions count added on home pageThis metric is taking int... Show MoreQlik Community,
Pleased to share with you that we have launched the following updates:
1. Solutions count added on home page
This metric is taking into account all questions that are marked as solved.We do encourage members to "accept as solution" if in fact a reply did solve your problem. You can mark up to 3 answers as sometimes more than one reply helped you. When inside a post you will see a purple button that will allow you to mark a response as a solution. From there a purple check icon is attached to the thread
2. MVPs empowered to move articles
On occasion, questions publish to the wrong location which could cause a delay in members receiving a timely response. Our community MVPs have been granted advanced permissions that will allow them to help us move articles If you are an MVP head on over to our (private) MVP group for instructions.3. Updates made for Tech Previews.
--Fixed problem with the NDA not popping up properly
--Tech Preview content will remain in tact and will not be removed at the end of the preview.
Tech Previews is a gated space on community. If you are registered on community with an anonymous email you will not be able to access this area.4. New Group added to community: Qlik Chile
Qlik Chile is the newest addition to Qlik Community groups. @QFabian is our group administrator. Thank you!As we wind up the calendar year we are also focused on:
- Content cleanup site-wide. You may have noticed:
- Increased usage of Labels
To improve search results and to keep all our content organized we are now requiring labels in many of our forums. Remember you can subscribe to a label! - Document Boards Archived: Qlik Server Side Extensions and Qlik Insight Bot
- Discussion Board Archived: Qlik Data Market
- New Support Knowledge Base - new content added all the time! Be sure to subscribe.
- More Talk to Expert Tuesday events! (TTET) please consider to join a future event and/or listen to a recording from a prior event. Tell us what you think!
- Increased usage of Labels
Our next release is scheduled for Tuesday, December 1. Lots more goodies coming to Qlik Community!
All the best,
Melissa
- Content cleanup site-wide. You may have noticed:
-
Qlik Academic Program supports blended learning with virtual lectures
Many universities all over the world have had no choice but to start the new academic year with at least some, if not full distance learning due to th... Show MoreMany universities all over the world have had no choice but to start the new academic year with at least some, if not full distance learning due to the ongoing pandemic. Of course, this presents both students and educators with new challenges on how to achieve the same quality of learning experience in the move to online. A number of our existing university partners on the Qlik Academic Program have requested that we provide our usual guest lectures and hands-on workshops virtually, and of course we have risen to the challenge.
We started with a presentation to all master's students within the Faculty of Economics at Valencia University in Spain. This formed part of the opening ceremony across all 16 master’s courses within the Economics department. We hope that many of the students will be able to leverage our free resources to support their studies this year.
For several Marketing courses at the University of Sheffield in the UK, we have provided a fully pre-recorded guest lecture and hands on workshop for students to work through at their own pace. With Master’s students in the University of Liverpool Management school (also in the UK) we ran a live guest lecture covering the importance of analytics across all industries and organisations, an introduction to Qlik, Qlik Sense and the Academic Program, as well as customer stories and demos. For the second half of the session, students accessed the pre-recorded hands-on workshop, but we remained available live to answer any questions. The beauty of this, is that students were able to pause and re-wind the recording in case they fell behind, whilst also having Qlik experts on hand to answer any immediate questions that arose.
This week we ran a virtual session as part of Graduate Plus Week at Birmingham City University in the UK. This session was open to students from any subject area at the university and focused on how students can prepare for the data-driven workplace. And today we have presented to both bachelor and master’s Business Intelligence students at the University of Lund in Sweden. These sessions served as an introduction to Qlik before student’s get hands on and develop their own Qlik Sense applications and analysis throughout the duration of their course.
The success of many of these sessions is thanks to the help that the Academic Program gets has from many other Qlik team members, who kindly give their time to share their expertise with our students directly. This term is also a learning experience for us here on the program, as we run the various sessions and get feedback on what worked well, which aspects most engaged the students and where we can make improvements. But we are very glad to have still had the opportunity to interact with our students and lecturers, despite the current restrictions. And we hope that this can continue until that point in the future where we can get back onto campuses in person.
-
Last 3 Sessions this year for the Do More with Qlik Series
Hey Guys - 2020 is coming to a close - and we have 3 more sessions planned in our Do More with Qlik Webinar Series. I want you to join me and my spec... Show MoreHey Guys - 2020 is coming to a close - and we have 3 more sessions planned in our Do More with Qlik Webinar Series. I want you to join me and my special guests as we close out this year with some exciting and innovative content.
To date we have had 10 awesome sessions, with special guests and a variety of Qlik content:
- Comparative Analysis
- Set Analysis
- The Associative Difference
- Augmented Intelligence
- Insight Advisor
- Extending Qlik Sense
- Qlik Sense SaaS
- QlikView Modernization
- Qlik Data Transfer
- qlik-cli
The list keeps growing and the topics presented are fast-paced, easily digestible, and entertaining. Join me on the next one Nov 5th at 2PM ET - where I will give you an in-depth look at some new features added to our new Business Logic feature.
Register here for one or all of our last 3 sessions of 2020:
https://go.qlik.com/Do-More-with-Qlik-Webinar-Series.html- Nov 5th: Business Logic in depth
- Nov 19th: Data Alerting
- Dec 3rd: Qlik Data Catalog
If you missed a session you can view the archive here:
https://go.qlik.com/Do_More_with_Qlik_Webinar_Series_Target_Registration-LP.htmlI hope to see you at one of these sessions! Stay healthy and well!
Mike Tarallo
https://twitter.com/mtarallo
-
David Bolton - Honoring a legendary Qlikkie
Many of you knew and loved David Bolton, a dear friend and Qlik colleague gone too soon We wanted to make you all aware of his funeral service this Fr... Show MoreMany of you knew and loved David Bolton, a dear friend and Qlik colleague gone too soonWe wanted to make you all aware of his funeral service this Friday, November 6, at 5:30am EST, which will be available for all to view via live stream hereAdditionally, for those wanting to help support David's family, please consider contributing to the David Bolton Memorial Fund hereDavid leaves behind his beloved wife Ali, and their children Josh and Amy. He also leaves behind thousands of joyful memories with us - a life short, but so well lived,We honor our dear friend with lots of love on Friday November 6. Join us. -
Save 25% on Qlik Continuous Classroom
Register now with coupon code LEARN2020 to save 25% on your new, one-year subscription to Qlik Continuous Classroom. Offer expires December 31, 2020, ... Show MoreRegister now with coupon code LEARN2020 to save 25% on your new, one-year subscription to Qlik Continuous Classroom. Offer expires December 31, 2020, so register soon and save 25%.
-
Get 50% off Instructor-Led Training
Are you getting the most from your Qlik solutions? Check out Qlik Training and save 50% on public, instructor-led classes. Use code: 2020TRAIN50. Publ... Show MoreAre you getting the most from your Qlik solutions? Check out Qlik Training and save 50% on public, instructor-led classes. Use code: 2020TRAIN50.
Public, virtual instructor-led classes must be registered by December 31, 2020 and attended by January 31, 2021.
-
Your First Enigma.js Mixins
IntroductionWe've discussed Engima.js on this blog before (Enigma.js posts) but it is usually within the context of building a mashup (Enigma is also ... Show MoreIntroduction
We've discussed Engima.js on this blog before (Enigma.js posts) but it is usually within the context of building a mashup (Enigma is also the library that the Qlik Demo Team uses for Qdt-Components). Enigma.js is a library that helps you communicate with the Qlik QIX Engine. One cool feature about Enigma.js is that it allows you to write your own mixins to extend or override the methods on the Qlik objects that you use all the time. This post will teach you the basics of mixins and show you how to implement your own.Your First Mixin
Here is the finished repo if you want to see the final product: https://github.com/coolinmc6/enigma-mixins-tutorial. If you want to follow along, clone the repo and checkout the "start" branch `git checkout -b start` to follow along from the beginning.Hopefully you are familiar with the typical Enigma configuration (https://community.qlik.com/t5/Qlik-Design-Blog/Qlik-Engine-and-Picasso-js/ba-p/1706241) because that's where mixins must be included. For this first mixin and the others that we'll write, we'll create a separate mixin file just to keep the code clean. We'll be mostly working in that mixin file and `index.js`.First, create a separate file in your `/config` directory called `mixins.js`. Copy the code below and we'll get started:// mixins.js const docMixin = { types: ['Doc'], init(args) {}, extend: { myMixin() { console.log('myMixin was called - this is all it does'); }, } } export { docMixin, };Add your mixin to the config file `app.js`:// app.js import { docMixin } from './mixins'; // CODE export default enigma.create({ schema, url, mixins: [docMixin] // add docMixin }).open().then(global => global.openDoc(config.appId));Now, in your index.js file, simply call your mixin by doing: `app.myMixin()`. If you check your console, you'll see the console.log message we entered; you've just completed your first mixin!I want to quickly summarize the mixin object before we move on (here are the docs to learn more). Mixin objects should have a types property to indicate which Qlik Objects (e.g. Doc, GenericObject, GenericBookmark, etc.) you are modifying. For this first mixin, we'll be modifying the Doc class. Next is the `init(args)` method which runs some code when you initialize your mixin. Lastly there are two properties: "extend" and "override". As their names suggest, "extend" will add methods to the Qlik Object while "override" will overwrite the existing Qlik Object methods. This tutorial will mainly focus on extending the functionality of Qlik Objects.Using Qlik Objects in Mixins
Now that we've created our first mixin with a single method that extends our Doc object, let's step it up and write a method to get hypercube data. The point of this method is to do all that Qlik QIX Engine stuff for us.We know that we want this method to be on the Doc class so in our code, we can just write the method below our `myMixin()` code like so:// mixins.js const docMixin = { types: ['Doc'], init(args) {}, extend: { myMixin() { console.log('myMixin was called - this is all it does'); }, mGetData({ object }) { return new Promise((res) => { this.createSessionObject(object).then((obj) => { console.log(obj) obj.getLayout().then((layout) => { const data = layout.qHyperCube.qDataPages; res(data); }) }) }) }, } } export { docMixin, };In our index.js file, we'll call the method and provide a hypercube. We've used this hypercube before on this blog (it simply shows the sales margin by product category from our Consumer Sales app). Copy the hypercube and code below to call the method:// index.js const hypercube = { qInfo: { qId: 'Sales by Year', qType: 'data'}, qHyperCubeDef: { qDimensions: [ // { qDef: { qFieldDefs: ['[Country]']} }, { qDef: { qFieldDefs: ['[Product Group Desc]']} } ], qMeasures: [ { qDef: { qDef: 'SUM([Sales Margin Amount])'}, }, ], qInitialDataFetch: [{ qTop: 0, qLeft: 0, qWidth: 10, qHeight: 1000, }], qInterColumnSortOrder: [], qSuppressZero: true, qSuppressMissing: true, } } // CODE (async () => { const app = await appPromise; app.myMixin() const data = await app.mGetData({ object: hypercube }) console.log(data) })()In the console, you'll notice two more logs there. The first is the session object that we just created (and that you're probably all too familiar with). The second is the data that we've requested in a JavaScript array. It's still in the Qlik formatting and may require more clean-up if you wanted to look at just the data but notice how easy it now is to request data for any hypercubes that you may write. We can now avoid having to write all that code over and over and just use our new `mGetData()` method.Using Other Mixin Methods
Another cool feature of these methods is that we can use other methods that we've written. For this method, we're going to use our `mGetData()` method to just log a table of the data in the console.Let's add the code to our mixins file right below `mGetData()`:// CODE mPrintTable({ object }) { return new Promise((res) => { this.mGetData({ object }).then((qObj) => { const table = [] qObj[0].qMatrix.map((o) => { const row = {} o.map((c,i) => { let val = c.qNum === "NaN" ? c.qText : c.qNum row[`c${i}`] = val; }) table.push(row); }) console.table(table); res(table); }) }) },And call it in our index.js file:// CODE const table = await app.mPrintTable({ object: hypercube }) console.log(table); // CODENow take a look at your console. You'll see that we have printed a table!To quickly summarize what's going on here, we now have three methods on the doc class: `myMixin()`, `mGetData()`, and `mPrintTable()`. We can call ALL of them within each other using the "this" object because it is the "doc" object; they are the same. All of these methods have extended the functionality of the Doc class so ALL of them are available whenever you use `app` or, within these methods, the `this` object. In the next section, we are going to create a separate mixin for just Generic Objects so you can see this concept in action.Generic Object Mixin
First, add the code below to our mixins file:// mixins.js // docMixin CODE const objectMixin = { types: ['GenericObject'], init(args) {}, extend: { objectMixin(msg) { console.log('layout mixin', msg) this.getLayout().then((layout) => { console.log("Layout: ", layout) }) } }, } export { docMixin, objectMixin };Notice that the the "types" property says "GenericObject" and NOT "Doc". This method will ONLY be available for Generic Objects. (Don't forget to export our objectMixin at the bottom of the mixins.js file).// app.js import { docMixin, objectMixin } from './mixins'; // import the objectMixin // CODE export default enigma.create({ schema, url, mixins: [docMixin, objectMixin] // add it to our mixins array }).open().then(global => global.openDoc(config.appId));Now in our index.js file, do the following:app.createSessionObject(hypercube).then((obj) => { console.log(obj) obj.objectMixin('hey there') obj.myMixin() })As you can see here, we used our Doc object to call `createSessionObject()` to manually create an instance of the Generic Object class. You'll see in the console that there are a few more logs. First, you'll see the Generic Object that you've probably seen many times. Next, you'll see the message "layout mixin hey there" from our `objectMixin()` method as well as the layout object. Last, and this was just to illustrate the point, when we called `myMixin()` on our Generic Object, it didn't work - we got an error. This happens because the `myMixin()` method is ONLY on the Doc class. Just like `objectMixin()` is ONLY on the Generic Object class. Keep this in mind when you are writing your own methods as you'll most likely need different behaviors for the different Qlik Objects.Additional Mixins for Same Type
Now let's create a second Generic Object mixin.const objectMixin2 = { types: ['GenericObject'], init(args) {}, extend: { objectMixin2() { console.log('layout mixin #2') this.getLayout().then((layout) => { console.log("Layout #2: ", layout) }) } }, } export { docMixin, objectMixin, objectMixin2 };Update your config:import { docMixin, objectMixin, objectMixin2 } from './mixins'; export default enigma.create({ schema, url, mixins: [docMixin, objectMixin, objectMixin2] }).open().then(global => global.openDoc(config.appId));And then call it in index.js:app.createSessionObject(hypercube).then((obj) => { console.log(obj) obj.objectMixin2('hey there') })And there we go. We've just created a second mixin for our Generic Object class. Now why is this important? It allows you to organize your code into blocks that make sense to YOU and not feel constrained by keeping the "types" together. You may have methods that you want available across ALL types and then methods for only one class. In that case, you'd need separate mixins. One important caveat to remember is that you cannot have name clashes within the same type. So if we called our method "objectMixin()` inside our second object mixin, we'd get an error because the method name clashes with the method name from our first object mixin.Bring it All Together
The last little bit of code we'll write reinforces what we did above with with the `mPrintTable()` method. But instead of doing two Doc class methods, we'll call our new `objectMixin()` method within our `mGetData()` method. Here we go:// mixins.js mGetData({ object }) { return new Promise((res) => { this.createSessionObject(object).then((obj) => { console.log(obj) obj.objectMixin('from inside mGetData') // NEW CODE obj.getLayout().then((layout) => { const data = layout.qHyperCube.qDataPages; res(data); }) }) }) },Now take a look in your console (clean-up or comment out some of our older code if you have trouble seeing the log). You'll see the "from inside mGetData" message. This is the power of mixins. You simply pick the Qlik Object type you'd like to modify or extend (Doc, Generic Object, etc.) and write your code. Now you can call your custom method directly on those objects as if they were native to that object. It gives developers a great deal of flexibility and the ability to write code that can be used in multiple projects.Conclusion
Let's wrap things up by reviewing what we did here in this blog:- Overview of mixins and their purpose
- Method #1: `myMixin()` - how to call a method from your mixin
- Method #2: `mGetData()` - using Enigma.js methods from your mixin
- Method #3: `mPrintTable()` - calling your own custom methods
- Method #4: `objectMixin()` - creating and calling a method from your Generic Object mixin
- Method #5: `objectMixin2()` - creating a second Generic Object method
- Using code from your other mixins
For more information on mixins, please take a look at these links below: