Unlock a world of possibilities! Login now and discover the exclusive benefits awaiting you.

Recent Documents
-
How to extract changes from the change store (Write table) and store them in a Q...
This article is currently under review. This article explains how to extract changes from a Change Store and store them in a QVD by using a load scrip... Show MoreThis article is currently under review.
This article explains how to extract changes from a Change Store and store them in a QVD by using a load script in Qlik Analytics.
The article also includes
- An app example with an incremental load script that will store new changes in a QVD
- Configuration instructions for the examples
Scenario
This example will create an analytics app for Vendor Reviews. The idea is that you, as a company, are working with multiple vendors. Once a quarter, you want to review these vendors.
The example is simplified, but it can be extended with additional data for real-world examples or for other “review” use cases like employee reviews, budget reviews, and so on.
The data model
The app’s data model is a single table “Vendors” that contains a Vendor ID, Vendor Name, and City:
Vendors:
Load * inline [
"Vendor ID","Vendor Name","City"
1,Dunder Mifflin,Ghent
2,Nuka Cola,Leuven
3,Octan, Brussels
4,Kitchen Table International,Antwerp
];
The Write Table
The Write Table contains two data model fields: Vendor ID and Vendor Name. They are both configured as primary keys to demonstrate how this can work for composite keys.
The Write Table is then extended with three editable columns:
- Quarter (Single select)
- Action required? (Single select)
- Comment (Manual user input)
Prerequisites
- A shared space
- A managed space (optional but advised for the tutorial)
- A connection to the Change-stores API to the Analytics REST connector in the shared space. A step-by-step guide on creating this connection is available in Extracting write table changes with the REST connector in Qlik Cloud.
Steps
- Upload the attached .QVF file to a shared space
- Open the private sheet Vendor Reviews
- Click the Reload App (A) button and make sure data appears (B) in the top table
- Go to Edit sheet (A) mode
- Drag a Write Table Chart (B) on the top table, and choose the option Convert to: Write Table (C).
This transforms the table into a Write Table with two data model columns Vendor ID and Vendor Name.
- Go to the Data section in the Write Table’s Properties menu and add an editable column
- This prompts you to define a primary key inside the table. Click Define (A) in the table and use both Vendor ID and Vendor Name as primary keys (B).
You can also just use Vendor ID, but we want to show that this also supports composite primary keys. - Configure the editable column:
- Title: Quarter
- Show content: Single selection
- Add options for Q1Y26 through Q4Y26.
Tip! Also add an empty option by clicking the Add button without specifying a value.
- Add another Editable column with the below configuration
- Title: Action required
- Type: Single select
- Options: Yes and No
- Add another Editable column with the below configuration
- Title: Review
- Type: Single select
- Options: Yes and No
- The Write Table is now set up.
Go to the Write Table’s properties and locate the Change store (A) section. Copy the Change store ID (B).
- Leave the Edit sheet mode. Then add changes for at least two records. Save those changes.
- Go to the app’s load script editor and uncomment the second script section by first selecting all lines in the script section (CTRL+A or CMD+A) (A) and then clicking the comment button (B) in the toolbar.
- Configure the settings in the CONFIGURATION part at the end of the load script
- Update the load script with the IDs of the editable columns.
The easiest solution to get these IDs is to test your connection. Make sure the connection URL is configured to use the /changes/tabular-views endpoint and uses the correct change store ID.
- Copy and paste the example load script (for the editable columns only) and paste it in the app’s load script SQL Select statement that starts on line 159:
- Replace the corresponding * symbols in the LOAD statement that starts on line 176:
- Choose which records you want to track in your table by configuring the Exists Key on line 216.
This key will be used to filter the “granularity” on which we want to store changes in the QVD and data model, as the load script will only load unique existing keys (line 235).
- $(vExistsKeyFormula) is a pipe-separated list of the primary keys.
- In this example, Quarter is added as an additional part of the exists key to keep track of changes by Quarter.
- Optionally, this can be extended with createdBy and updatedAt to extend the granularity to every change made:
- Reload the app and verify that the correct change store table is created in your data model. The second table in the sheet should also successfully show vendors and their reviews.
Environment
- Qlik Cloud Analytics
-
Qlik Discovery Agent FAQ
This article answers the most frequently asked questions about Qlik Discovery Agent. It is split into five sub-sections: General FAQAvailability and I... Show MoreThis article answers the most frequently asked questions about Qlik Discovery Agent. It is split into five sub-sections:
- General FAQ
- Availability and Integration
- How does Discovery Agent work?
- Technical FAQ
- Insight Generation Logic
If you are looking for information on how to get started, check out the Discovery Agent Interactive Walkthrough and our Discovery Agent Documentation.
General FAQ
What is Qlik Discovery Agent?
Discovery Agent is an AI-powered, always-on monitoring capability in Qlik Cloud that automatically detects meaningful changes, anomalies, and trends in your data. It requires no rules, thresholds, or manual setup. Discovery Agent identifies spikes, drops, trend shifts, baseline changes, and data quality issues, then delivers clear, plain-language insights in a prioritized feed.
What makes Discovery Agent different from traditional alerting?
Traditional BI alerts rely on predefined thresholds or manual logic. Discovery Agent uses the Qlik Analytics Engine and its associative capabilities to evaluate wide combinations of data relationships automatically and proactively surface only those insights that matter. It is context aware, adaptive, and far more scalable than rules driven systems.
Who is Discovery Agent for?
- Executives who want high-level visibility into what changed
- Business users who need easy-to-read insights without deep analytics skills
- Non-technical users who do not want to build dashboards or rules
- Analysts who want automated detection to replace repetitive KPI monitoring
Availability and Integration
Does Discovery Agent work with Qlik Cloud Analytics?
Yes. Discovery Agent is built directly into Qlik Cloud Analytics and leverages the Qlik Analytics Engine for associative, large scale anomaly detection.
A Premium or Enterprise subscription is required. See Qlik Pricing for details or contact your Qlik account representative.
Does Discovery Agent integrate with Qlik Answers?
Yes. You can ask questions directly from an insight card, and context from the insight will be transferred into Qlik Answers.
Is Discovery Agent available on Qlik Sense Enterprise Client-Managed?
No. Discovery Agent is built exclusively for Qlik Cloud.
Does Discovery Agent impact app performance?
No. Monitoring runs outside active dashboards, ensuring no performance impact on live analytics experiences.
Does Discovery Agent follow Qlik Cloud security and governance rules?
Yes. Insight delivery respects user permissions, governed access, and security boundaries.
How does Discovery Agent work?
How does Discovery Agent detect insights?
Discovery Agent analyzes updated app data models using associative evaluation to identify:
- Spikes or dips
- Trend shifts
- New or emerging baselines
- Record highs and lows
- Values above or below expected patterns
- Missing or inconsistent data
No rules or thresholds are required.
Is Discovery Agent real-time?
Discovery Agent is always on, but processes changes when the application’s data model updates. Insights refresh after reload and appear in the feed once the system evaluates new data. Updated are currently capped at one reload per day.
How often does the feed refresh?
The feed automatically refreshes upon reload. For most apps, this occurs once per day or whenever new data is introduced.
Can I customize the insights I see?
Yes. You can follow specific apps or insight categories once the Following tab is released. Filtering options are also planned to help tailor results.
Technical FAQ
What are Insight Triggers?
Insight Triggers are structured metric definitions that serve as the foundation for generating analytical insights within the application. Each trigger is composed of a measure or expression, such as a calculated field or KPI, along with a set of additional configuration parameters. These parameters include the frequency at which the trigger evaluates data and the type of calculation to be applied (example: sum, average, count).
Together, these elements define the conditions under which an insight is surfaced to the user.
Do I Have to Set a Date Period for Each Trigger?
Yes, a date period is required for every trigger you configure.
All insights generated by the system are trend-based, meaning they analyze data over time to identify patterns, changes, or anomalies. This requires a date period to be added to the trigger's associated group. Without a defined time range, the system cannot perform the temporal comparisons necessary to produce meaningful insights.
How Do I Refresh the Insight Feed?
The Insight Feed refreshes automatically each time the page is reloaded. No manual refresh action is required. The feed itself is regenerated once per day, and this regeneration is triggered by the introduction of new data into the application or applications that contain active triggers. As a result, the feed will always reflect the most recent data available as of the last daily reload cycle.
Can I Filter Individual Values in a Dimension?
Filtering functionality is available in the Feed. A Filter button is currently visible at the top of the feed during the preview phase of the application. Users can use this to find specific insights in the feed.
How Many Triggers Can I Create?
- Each application supports a maximum of 50 triggers. For each trigger that has been configured, the system will calculate and present up to 5 insights per reload cycle.
- A tenant-wide guardrail exists to help control the volume of insights in the feed, providing broad analytical coverage across your defined metrics and expressions.
Where Are Triggers Stored?
Triggers are stored directly within the application in which they are created. They are not stored externally or in a centralized repository. That means each application manages its own set of triggers independently, and triggers defined in one application will not carry over to or affect another application.
Can I Ask Questions Directly in the Feed?
Direct question-and-answer functionality within the feed is available.
The Insight Feed is integrated with Qlik Answers, enabling users to ask natural language questions without leaving the feed interface. Because each card displayed in the feed is tied to a specific application, context from the relevant card will be automatically transferred to Qlik Answers to ensure accurate, contextually appropriate responses.
Why Am I Seeing a Large Number of Old Insights?
This behavior is expected and occurs specifically after the first reload following the creation of new triggers.
During this initial reload, the system performs a comprehensive scan of all available historical data, rather than only the most recent data. This allows it to identify any and all qualifying insights across the full dataset. This is a one-time process. All subsequent reloads after this initial one will only evaluate and surface insights based on newly introduced data, so the volume of older insights will not continue to grow with each reload.
Does This Feature Require the Cross-Region Inference Toggle?
Yes. The Insight Feed and its associated trigger functionality require the cross-region inference toggle to be enabled. Please ensure this setting is activated in your environment before attempting to configure triggers or access the feed. If you are unsure how to enable the cross-region inference toggle, contact your system administrator or refer to the relevant configuration documentation.
How Do I Remove Insights from the Feed?
To remove specific insights from the Insight Feed, you must delete the trigger that is generating those insights. Because the feed is dynamically generated based on active triggers, removing a trigger will prevent its associated insights from appearing in future feed reloads.
Deleting a trigger is a permanent action.
If you wish to stop surfacing certain insights temporarily, consider whether disabling or modifying the trigger may be a more appropriate course of action, depending on your platform's available options.
Does This Feature Support Section Access?
Section Access is not currently supported for applications used with the Insight Feed.
Any application that has Section Access enabled is incompatible with this feature at this time. As a result, all users who have been granted access to a given application will be able to see the insights generated from that application's triggers, regardless of any Section Access restrictions that may otherwise apply within that application.
This is an important consideration when deciding which applications to configure with triggers, particularly for datasets that contain sensitive or role-restricted data. Support for Section Access may be introduced in a future release.
Insight Generation Logic
How many data points are required to generate an insight?
Below is the minimum data requirement:
Weekly/Monthly/Quarterly/Yearly aggregation
- Spike detection, record high/low, model deviation: 4–50 data points
- Trend/baseline change: 20–50 data points
Daily aggregation
- Spike detection, record high/low, model deviation: 7–365 data points
- Trend/baseline change: 20–365 data points
Why am I not getting any insights?
Missing dates in the date field may prevent calculations. Creating a master calendar in the
load script can resolve this. Qlik is exploring options for date imputation. -
Qlik Analytics: Expressions with RangeSum() and Inter-record functions give inco...
The same expression with aggregation functions and an Inter-record function can yield different results depending on the situation, especially when da... Show MoreThe same expression with aggregation functions and an Inter-record function can yield different results depending on the situation, especially when data is loaded from different QVDs.
Affected Inter-record functions can be Above(), Below(), Bottom(), Top(), NoOfRows().
The results shown in the app when it is loaded on-premises may differ from those when the app is loaded on Qlik Cloud.
An example of an expression that can be affected by the problem is:
Aggr(RangeSum(Above(Sum(CHK_ORDER_ID), 0, RowNo())), CUSTOMER_ID), '')
Resolution
To avoid this problem, add a structured sort parameter directly inside the Aggregation function, forcing a consistent evaluation order regardless of how the underlying data arrived.
For example, the formula above should be:
Aggr(RangeSum(Above(Sum(CHK_ORDER_ID), 0, RowNo())), (CUSTOMER_ID, (Numeric, Ascending)))
Because Above() is used, sorting on other columns in the same straight table is disabled by design in Qlik Cloud. The same is valid for other functions, like Below().
The Aggr() sort parameter controls the order used for the running total calculation itself, but you will need to keep that sort definition aligned with the order you actually want the counter to reflect. If CUSTOMER_ID is a date or text field rather than numeric, replace (Numeric, Ascending) with (Text, Ascending) or (Date, Ascending) accordingly.
Cause
Inter-record functions depend entirely on the physical row order of the data as the engine sees it, and that order can change for different reasons, producing inconsistent results. For example, on-premises and Qlik Cloud can handle the internal sort of concatenated data differently, which explains why the counter is not the same in the two environments.
A reference to the problem can be found in the Community post Solved: Above Function in qlik sense.
Environment
- Qlik Cloud Analytics
- Qlik Sense Enterprise on Windows

-
Data Connections Pane in Qlik Sense Hub not loading: Unknown Connection type
Note that in October 2022, a set of Microsoft patches interfered with SSL handshakes. See Qlik Sense Enterprise on Windows: Internal Error while acces... Show MoreNote that in October 2022, a set of Microsoft patches interfered with SSL handshakes. See Qlik Sense Enterprise on Windows: Internal Error while accessing Data Load Editor, Data Manager, and creating a new App for details.
The Qlik Sense Data Manager and Data Connection do not load when opening the Data Load Editor or Add Data Wizard. The Qlik Sense hub does not load a data connection, or takes too long to load it.
This issue happens predominantly in Deployments within Environments with restricted Internet access. The workaround is to remove the Custom Data Connectors from the installation folder.Other symptoms might include:
- ErrorCode.11041 occurs when opening up an App
- ErrorCode.11043 occurs when creating a Database connection in the data load editor.
Another possible symptom and root cause is:
- After changing the Domain or service user, all connectors are unavailable, even the existing data connections, which are marked "Unknown Connection type" in the data load editor. Reloading apps also fails.
- The connector error shows "Handling QVX_GET_EXECUTE_ERROR", and Proxy log shows "Authentication failed because the remote party closed the transport stream".
In most cases, depending on the environment, the Data Connections will eventually load after 10 to 30 minutes. However, this is not an ideal solution as the connections have to be loaded every time the Data Load Editor or Add Data Wizard is accessed.Cause
Qlik connectors are cryptographically signed for authenticity verification. The .NET framework verification procedure used for this signing includes checking OCSP and Certificate Revocation List information, which are fetched from an online resource if the system doesn't have a cached local copy. These requests will timeout due to a lack of access to online resources in environments with restricted, slow, or no internet connection. Due to an authenticity check failure, the connector will not run, and the app reload fails.
Resolution
Verify if your system is affected by Microsoft patches interfering with SSL handshakes. See Qlik Sense Enterprise on Windows: Internal Error while accessing Data Load Editor, Data Manager, and creating a new App.
If you are not affected by the SSL handshake issue, proceed with one of the below workarounds.
Workaround 1
Follow the instructions ad documented in An error occurred / Failed to load connection error message in Qlik Sense - Server Has No Internet
Workaround 2
Enable internet access.
Alternatively, using a third-party tool such as Fiddler or built-in browser debug tools, identify the addresses used and add them to allow lists on firewalls/proxies, otherwise blocking internet traffic.
Workaround 3
Temporarily move the following files outside of Program Files:
- OvOdbcConnectorPackage and OvDataMarketConnector
Files can be found in: C:\Program Files\Common Files\Qlik\Custom Data
In a multi node environment, please do it for all the nodes. You can also try removing only the OvOdbcConnectorPackage, as the OvDataMarketConnector does not always fail.
Note that when moving the files, you will not be able to use the Data Market Connector or the ODBC Package.

-
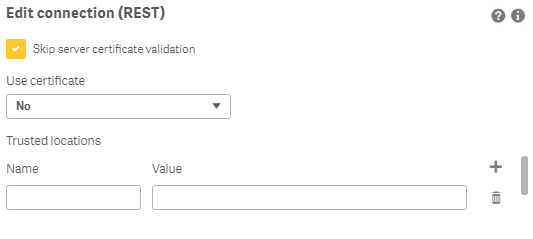
How to create NPrinting GET and POST REST connections
NPrinting has a library of APIs that can be used to customize many native NPrinting functions outside the NPrinting Web Console. Environment: Qlik N... Show MoreNPrinting has a library of APIs that can be used to customize many native NPrinting functions outside the NPrinting Web Console.
Environment:
An example of two of the more common capabilities available via NPrinting APIs are as follows
- Connection reloads
- Publish Task executions
These and many other public NPrinting APIs can be found here: Qlik NPrinting API
In the Qlik Sense data load editor of your Qlik Sense app, two REST connections are required (These two REST Connectors must also be configured in the QlikView Desktop application>load where the API's are used. See Nprinting Rest API Connection through QlikView desktop)
- GET
- POST
Requirements of REST user account:
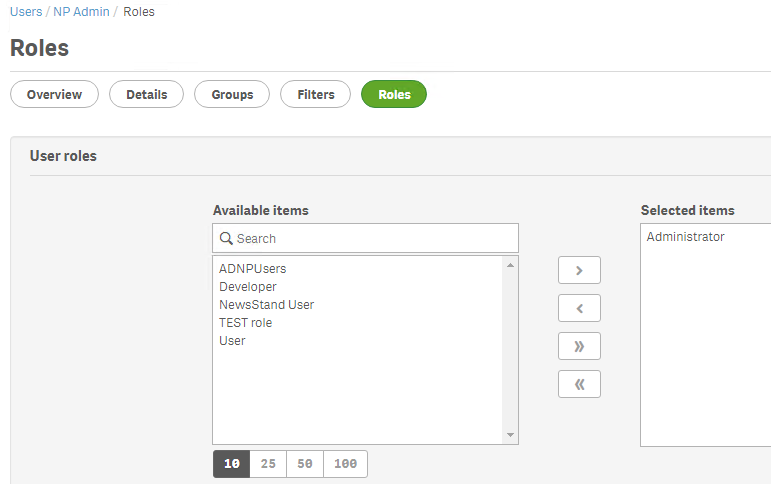
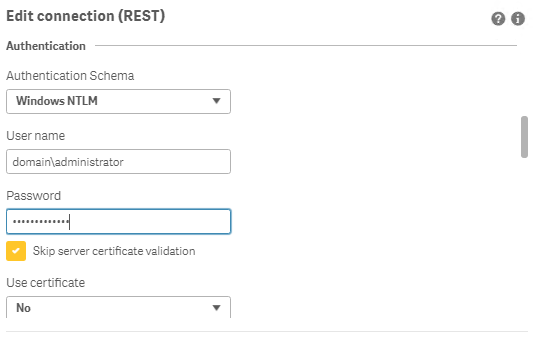
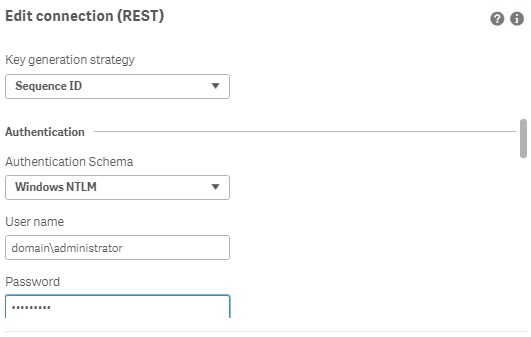
- Windows Authentication is required in both these connectors. The required user account is the NPrinting service account (which is also ROOTADMIN on the Qlik Sense server)
- This user account must also be a member of the NPrinting 'Administrators' Security Role on the NPrinting Server.
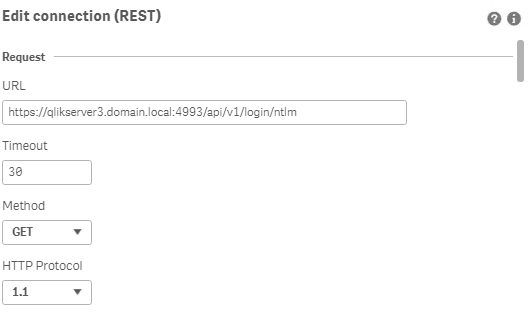
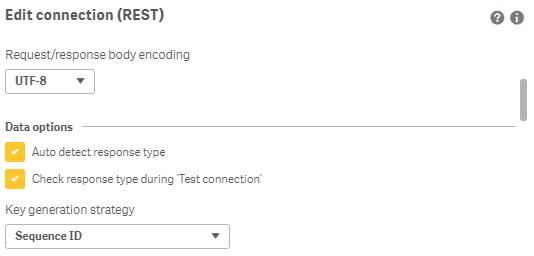
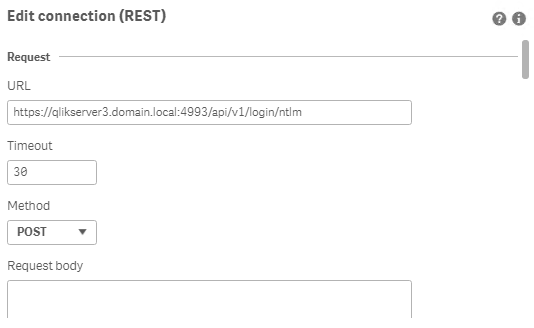
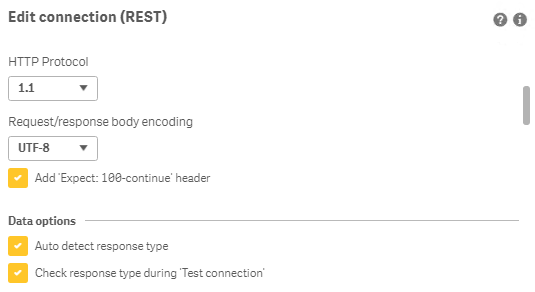
Creating REST "GET" connections
Note: Replace QlikServer3.domain.local with the name and port of your NPrinting Server
NOTE: replace domain\administrator with the domain and user name of your NPrinting service user account
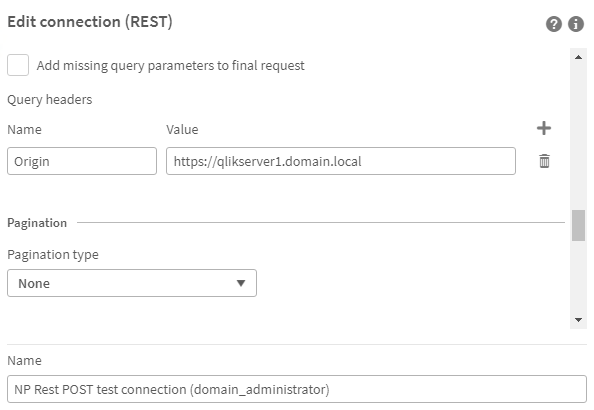
Creating REST "POST" connections
Note: Replace QlikServer3.domain.local with the name and port of your NPrinting Server
NOTE: replace domain\administrator with the domain and user name of your NPrinting service user account
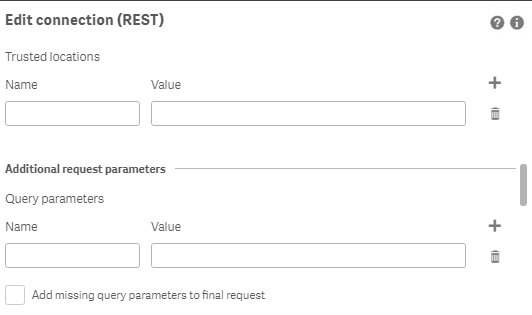
Ensure to enter the 'Name' Origin and 'Value' of the Qlik Sense (or QlikView) server address in your POST REST connection only.
Replace https://qlikserver1.domain.local with your Qlik sense (or QlikView) server address.
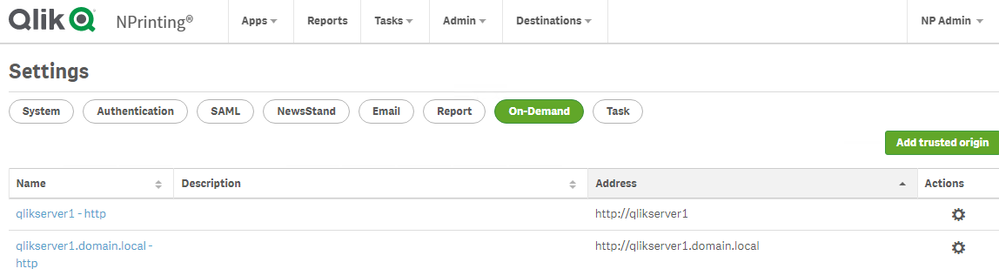
Ensure that the 'Origin' Qlik Sense or QlikView server is added as a 'Trusted Origin' on the NPrinting Server computer
Related Content
- Distribute NPrinting reports after reloading a Qlik App
- Extending Qlik NPrinting
- Run a Qlik NPrinting API POST command via QlikView reload script
- Troubleshooting Common NPrinting API Errors
NOTE: The information in this article is provided as-is and to be used at own discretion. NPrinting API usage requires developer expertise and usage therein is significant customization outside the turnkey NPrinting Web Console functionality. Depending on tool(s) used, customization(s), and/or other factors ongoing, support on the solution below may not be provided by Qlik Support.
-
About the deprecation of Qlik Analytics charts
Qlik constantly refines its Analytics, over time replacing old charts with new, modernized alternatives. These deprecations are announced well in adva... Show MoreQlik constantly refines its Analytics, over time replacing old charts with new, modernized alternatives. These deprecations are announced well in advance and include instructions on how best to replace these old charts, whether that is to use a new one, several new ones, or to make use of new settings.
As an example, seven visualization bundle charts are scheduled for deprecation in May 2027, most of which have already been removed from the asset panel and are no longer in use in recent applications. See Upcoming deprecation of Qlik Analytics charts in May 2027.
What do I use instead?
Charts that are up for deprecation are often no longer in use. However, if you happen to still have a very old application and need to replace it, see Visualization bundle > Deprecated charts for more information on what to use instead. The list will be updated whenever a new set of charts is deprecated.
How do I find out if my apps are using the deprecated charts?
Qlik recommends reviewing your apps for old charts. Depending on your platform (Qlik Cloud or Client-managed), there are different methods you can deploy.
Qlik Cloud
Qlik Cloud administrators should use the Qlik Cloud Monitoring Apps to track the usage. The App Analyzer has a sheet dedicated to where deprecated charts are being used on a tenant in Qlik Cloud. The App Analyzer is based on usage events rather than scanning every app. Use the App Analyzer to find which apps and sheets have charts that need to be updated to newer and more modern alternatives. The easiest way to install and update the Qlik Cloud Monitoring Apps is to use the automation template. If you already have the App Analyzer, just remove the automation and install a new one to get the latest version of the App Analyzer.
Client-managed
For client-managed installations, use the Content Monitor app, included in every Qlik Sense Enterprise on Windows installation beginning with the May 2026 release.
The Content Monitor has a sheet for tracking deprecated charts. At reload, the Content Monitor app scans every app in the installation to list all applications and sheets that are using charts that are being deprecated. It also lists the installed extensions and their deprecation status.
If you want to track usage in prior versions, download the Qlik Sense Content Monitor from the Qlik download page. It comes bundled with the required Object Scanner.
Environment
- Qlik Cloud Analytics
- Qlik Sense Enterprise on Windows
-
Quota is exceeded error displayed when publishing an app in Qlik Sense client-ma...
Publishing an app in a Qlik Sense Enterprise on Windows (client-managed) environment may fail with the error: Quota is exceeded Resolution Reduce the ... Show MorePublishing an app in a Qlik Sense Enterprise on Windows (client-managed) environment may fail with the error:
Quota is exceeded
Resolution
Reduce the size of files attached to the app. Alternatively, delete unnecessary files you have attached to it.
You can review what files you have attached to the app from the Qlik Sense Management Console:
- Open the Qlik Sense Management Console in a supported browser
- Go to Apps
- Locate and highlight the app you cannot publish
- Click Edit
- Open the App content menu tab on the right side of the screen; this will provide an overview of your attached files and how large they are.
You can now choose to review the files and reduce them in size, or: - Choose the file you wish to delete and click Delete
Cause
The maximum file size of an individual file attached to an app is 50 MB, while the maximum total size of files attached to the app (including image files uploaded to the media library) is 200 MB.
See Attaching data files and adding the data to the app for details.
Related Content
Attaching data files and adding the data to the app | Qlik Sense on Windows Help
Environment
- Qlik Sense Enterprise for Windows
-
Qlik Sense Analytics: Unable to sort measures when using chart function
In Qlik Sense Enterprise Analytics, using the Above() function in a measure can lead to unexpected behavior when sorting; when a measure includes the ... Show MoreIn Qlik Sense Enterprise Analytics, using the Above() function in a measure can lead to unexpected behavior when sorting; when a measure includes the Above() function, sorting (including other measures on the same chart or table) is not supported.
Example:
In the following Straight Table, the third column (Running Total) uses an expression in its measure to calculate a running total by adding the previous row's value.
rangesum(above(Sum(SalesAmount),0,RowNo()))
In this case, you cannot change the sorting order to ascending or descending for the second column, "Sum(sales)", or the third column, "Running Total", since the Above() function is used in the third column.
This is working as designed:
Sorting on y-values in charts or sorting by expression columns in tables is not allowed when the chart function (Above, Below, Bottom, Column, Dimensionality) is used in any of the chart's expressions. These sort alternatives are therefore automatically disabled. When you use this chart function in a visualization or table, the sorting of the visualization will revert back to the sorted input to this function.
Source: Above - chart function | Limitations
Resolution
As a workaround, you can use a structured (sort) parameter in the Aggr() function.
For example, you change the expression like the following:
sum(Aggr(Rangesum(Above(Sum(SalesAmount),0,rowno())),(SalesAmount, (Numeric, Ascending)) ))Now you can change the sort to ascending or descending order in measure columns.
However, it does not recalculate based on the new sorting order due to a limitation of the Aggr() function, which returns results based on the calculated hypercube. The expression (Numeric, Ascending) part will have to be modified in order to reflect another sort order if necessary.
Internal Investigation ID(s)
SUPPORT-9243
Environment
- Qlik Sense Enterprise on Windows
- Qlik Cloud
-
How to extract changes from the Change Store (Write Table) and store them in a d...
This article explains how to extract changes from a Change Store by using the Qlik Cloud Services connector in Qlik Automate and how to sync them to a... Show MoreThis article explains how to extract changes from a Change Store by using the Qlik Cloud Services connector in Qlik Automate and how to sync them to a database.
The example will use a MySQL database, but can easily be modified to use other database connectors supported in Qlik Automate, such as MSSQL, Postgres, AWS DynamoDB, AWS Redshift, Google BigQuery, Snowflake.
The article also includes:
- Two automation examples you can download and import (see Qlik Automate: How to import and export automations):
- Automation Example to Extract Change Store History to MySQL Incremental.json
- Automation Example to Bulk Extract Change Store History to MySQL Incremental.json
- Configuration instructions for the examples
Content
- Prerequisites
- Creating the automation
- Insert changes in MySQL one by one
- Making this incremental
- Bulk updates
- Attachment configuration instructions
- Bonus!
- Replace field names
- User email instead of user id
- Triggering the automation from a sheet
Prerequisites
- A working Write Table with a set of editable columns and some example values already stored in it. More information about the Write Table chart can be found in Write Table | help.qlik.com.
- A MySQL (or similar) database table with columns that match your editable columns.
- Setting up the database, extend your database with metadata fields:
- userId: to store the user ID of the user who made a change
- updatedAt: to store the datetime when a change was saved
Here is an example of an empty database table for a change store with:
- a single PK “productId”
- editable columns are “AmountToOrder”, “Priority”, and “Note”.
- additional columns “userId” and “updatedAt”, which will be used to log user activity and merge separate changes into the same record
Creating the automation
- Create a new automation. See Qlik Automate for details.
- Add the List Change Store History block from the Qlik Cloud Services connector.
- Configure this block with the change store ID. You can copy this from the write table chart.
- Perform a manual run of the automation to make sure some records are returned. The List Change Store History block will return a list of objects for each cell that contains one or more changes. Every object includes the combination of primary key(s), the editable column for that cell, and a list of all values belonging to that cell.
- You have two options on how to perform this sync:
- Insert changes one by one
- Insert changes in bulk (this option is more complex but also more performant)
Insert changes in MySQL one by one
- Add a Loop block (A)inside the List Change Store History block and configure it to loop over the list of changes inside each object returned by the List Change Store History block (B) :
- Search for the MySQL connector (A) in the automation block library and drag the Upsert Record block inside the Loop block (B) :
- Create a new connection (C) to your MySQL database in the Connection tab of the Upsert Record block and activate it for the block by clicking it once created.
- Configure the Upsert Record block as follows
- Table: the database table you have created for the Write Table
- Where: the key:value mappings for the granularity on which you want to save the changes. In this example, it is a combination of the primary key (productId) with userId and updatedAt.
- productId (primary key): this comes from the cellKey in the List Change Store History block.
- userId and createdAt: these are defined for each change, so they should be retrieved from the item in the Loop block.
The userId maps to the createdBy parameter.
- productId (primary key): this comes from the cellKey in the List Change Store History block.
- Record: this is the key:value mapping for the individual change that should get updated. The Key maps to the columnName that is returned by the List Change Store History block, the Value maps to the cellValue parameter that is returned in the Loop block:
- This is what your automation will look like now:
Run the automation manually by clicking the Run button in the automation editor and review that you have records showing in the MySQL table:
Making this incremental
Currently, there is no incremental version yet for the Get Change Store History block. While this is on our roadmap, the automation from this article can be extended to do incremental loads, by first retrieving the highest updatedAt value from the MySQL table. The below steps explain how the automation can be extended:
- Add a Do Query block from the MySQL connector to the automation and configure the query as follows:
SELECT MAX(updatedAT) FROM <your database table>
- Run a test run of the automation without the other blocks attached to verify the result in the Do Query block’s History tab:
- Add a Condition block (A) to the automation and configure it to evaluate the MAX(updatedAt) (B) field from the Do Query block.
Because the Do Query block returns the value as part of a list, the automation editor prompts you to specify which item of the list you want to use. Use the default version option Select first item from list (C).
- Configure the operator in the Condition block to is not empty. If an updatedAt timestamp is found, the Yes part of the Condition block will be executed. If no timestamp is found, the No part will be executed.
- Add a Variable block (A)to the Yes part of the Condition block and create a new variable of type String named Filter. The setting is accessed from the Manage variables (B) button in the Variables block.
- Add an operation to the Variable block to Set value of Filter and type updatedAt gt “ in the input field.
Click in the input field to add a reference to the timestamp in the Do Query block, mirroring the Condition block configuration.
After the mapping is added, append it with an additional double quote character: - Right-click the Variable block and duplicate it, then add the duplicated block to the No part of the Condition (A).
Remove the Set value of Filter step and replace it with the Empty Variable (B) operation.
Right-click each Variable block and add a comment explaining the respective function.
- Reattach the original automation after the Condition block.
Verify that it is attached after the block and not inside the Yes or No sections.
- In the List Change Store History block (A), map the Filter variable to the Filter parameter (B) :
- Run the automation and confirm it only picks up new changes on new runs.
Bulk updates
The solution documented in the previous section will execute the Upsert Record block once for each cell with changes in the change store. This may create too much traffic for some use cases. To address this, the automation can be extended to support bulk operations and insert multiple records in a single database operation.
The approach is to transform the output of the List Change Store History block from a nested list of changes into a list of records that contains the changes grouped by primary key, userId, and updatedAt timestamp.
See the attached automation example: Automation Example to Bulk Extract Change Store History to MySQL Incremental.json.
- Drag the Loop and Upsert Record block outside the List Change Store History loop, but do not delete them:
- Add a Variable block inside the List Change Store History block loop (A) and create a new variable partialChangeRecord of type Object (B).
This variable will be used to map each cell value to the primary key(s), userId and updatedAt timestamp. - Add the first operation to the Variable to Empty it (A).
This is important to ensure that for every item in the loop, we start with an empty partialChangeRecord variable.
Next, add a Set key/values operation to set the primary key(s) (B).
In our example, we have a single primary key, productId, but if you have multiple fields, you should add them one by one.
Set it to the cellKey.rowKey parameter returned in the output from List Change Store History
- Drag the Loop block back into the automation and attach it to the Variable block.
Disconnect the Upsert Record block. - Add a new Variable block inside the Loop block and configure the Variable parameter to the partialChangeRecord object.
Now set additional Key/values in the variable for the primary userId, updatedAt, and the cellValue:
- userId: createdBy parameter returned in the loop
- updatedAt: updatedAt parameter returned in the loop
- For the Cell value, set the key to the columnName returned by the List Change Store History block and set the Value to the cellValue returned from the Loop block:
- uniqueKey: add a fourth keyValue pair uniqueKey.
This will be used later to merge various cell changes into a single record.
This combines the primary key(s), userId, and updatedAt timestamp, each separated by a pipe (|) symbol.
Click the input field, map the first parameter, then type a | -symbol, and click the input field again to map the next parameter:
- Add another Variable block inside the Loop block (A) and create a new list type variable listOfPartialChanges.
Add an Add item operation to add the partialChangeRecord variable (B) to this list.
- Add a Merge Lists block after the List Change Store History block.
The Merge Lists block will be used to merge the partial change records into full records for each change.
Configure both List parameters in the Merge Lists block to use the listOfPartialChanges variable.
- Go to the Settings tab of the Merge Lists block and apply this configuration:
- Item merge strategy: Merge list 1 item and list 2 item in one new item (default)
- List 1 unique key: uniqueKey
- List 2 unique key: uniqueKey
- On duplicate unique key: Merge item from list 2 into item from list 1
- When a property exists on both lists: Keep value from list 1 (default)
Due to an ongoing defect, this parameter is only available after refreshing the automation editor. As the parameters use the default values, this should not impact you.
- Perform a manual run of the automation to verify that the Merge Lists block output is merging.
You will notice that this list contains many duplicates. - Add a Deduplicate List block (A) and configure the List parameter to use the output from the Merge Lists block, then set the key to uniqueKey (B).
- Perform another manual run and confirm that the Deduplicate List block now only contains unique entries.
- The output still contains the uniqueKey parameter that is not compatible with the database.
There are two options: either extend the database or remove uniqueKey.
To remove it, add a Transform List block and set the Input List parameter to the Deduplicate list block:
- Configure the Fields in output list parameter from the Transform List block.
To make this easier, it is best to have example data from a manual run. If you haven’t performed a manual run yet, do one now.
Click the Add Field button and configure new fields:
- For the Field parameter, click the input field and start by mapping your primary keys
- For the Value parameter, do the same and select the corresponding parameter in the Item in input list option
- Repeat this for all other items in the list except for the uniqueKey
- For the Field parameter, click the input field and start by mapping your primary keys
- Add a Loop batch block (A) to the automation and configure it to loop over the Transform List block output in batches of 50 (B).
Adjust this batch size depending on your database and the number of editable columns.
- Add an Insert Bulk block from the MySQL connector within the Loop Batch block loop.
Configure it to use your database table variable (or hardcode your table name) and set the Values parameter to the Batch in Loop Batch parameter. - Run the automation and confirm that the database gets updated.
- Optionally, collapse all empty loop blocks to clean up the automation and provide comments to explain what the blocks and functions do.
This will help you understand this automation when you revisit it in the future.
To add a comment, right-click on the block and click Edit comment.
Attachment configuration instructions
The provided automations will require additional configuration after being imported, such as changing the store, database, and primary key setup.
Automation Example to Extract Change Store History to MySQL Incremental.json
- Variable - databaseTable -> configure with the name of your database table
- Variable - changeStoreId -> configure with your change store ID
- Upsert Record - MySQL -> replace the productId with your primary key, add additional primary keys if necessary
Automation Example to Bulk Extract Change Store History to MySQL Incremental.json
- Variable - databaseTable -> configure with the name of your database table
- Variable - changeStoreId -> configure with your change store id
- Variable - partialChangeRecord -> replace the productId with your primary key, add additional primary keys if necessary
- Variable - partialChangeRecord in Loop block -> Update the uniqueKey field by replacing the productId with your primary key, add additional primary keys if necessary
- Transform List -> replace the productId with your primary key, add additional primary keys if necessary
Bonus!
Replace field names
If field names in the change store don't match the database (or another destination), the Replace Field Names In List block can be used to translate the field names from one system to another.
- Search the Replace Field Names List block and add it to your automation.
- Provide the translations for the field names that need to be changed to match the destination system.
User email instead of user id
To add a more readable parameter to track the user who made changes, the Get User block from the Qlik Cloud Services connector can be used to map User IDs into email addresses or names.
- Search the Get user block (A) in the Qlik Cloud services connector and add it to your automation.
Configure it to use the createdBy parameter (B). - Update the Upsert Record block to use the output from Get User.
A user's name might not be sufficient as a unique identifier. Instead, combine it with a user ID or user email.
Triggering the automation from a sheet
Add a button chart object to the sheet that contains the Write Table, allowing users to start the automation from within the Qlik app. See How to run an automation with custom parameters through the Qlik Sense button for more information.
Environment
- Qlik Cloud Analytics
- Qlik Automate
- Two automation examples you can download and import (see Qlik Automate: How to import and export automations):
-
Optimizing Qlik Cloud App Performance
This Techspert Talks session covers: App performance evaluation tools How to improve app performance Development best practices Chapters: 01:5... Show More
-
How to recreate the content of the Operations Monitor
If the Operations Monitor contains data that doesn't look reliable (for instance: some weeks contain no data), the content can be reset and recreated.... Show MoreIf the Operations Monitor contains data that doesn't look reliable (for instance: some weeks contain no data), the content can be reset and recreated.
Environment:
Qlik Sense Enterprise on Windows
Resolution:
- Remove the current version of the app
- Delete the .qvds in C:\ProgramData\Qlik\Sense\Log
- Log in with administrator account(Account must be a ContentAdmin or RootAdmin).
- Import the Operations Monitor application from C:\ProgramData\Qlik\Sense\Repository\DefaultApps.
- Publish the imported app to the application to the Governance stream
- Reload the application again
For more detailed information about the Operations Monitor, and Qlik Sense's other monitor apps, see -
What is the difference between the options Share: Invite, and Share: Manage Acce...
When clicking the meatball (ellipses) menu to view more options for an Analytics app, you will find two Share options: Share > Invite and Share Share... Show MoreWhen clicking the meatball (ellipses) menu to view more options for an Analytics app, you will find two Share options:
- Share > Invite and Share
- Share > Manage Access
How are they different?
While they are described differently in Apps (Insights and Analytics) | help.qlik.com, there is no functional difference.
It is a conscious design decision to cover certain keywords and let users find a term that matches their intent and confidently trust that the click will take them to the right features.
One single combined button would muddle clarity in the text and iconography, so it was decided to keep them separate.
Environment
- Qlik Cloud
-
Qlik Automate “Update variable” changes don’t show in the Qlik Sense app
After calling the Change Variable block in Qlik Automate, the changes made are not shown in the sheet. Resolution In Qlik Cloud, automations make c... Show MoreAfter calling the Change Variable block in Qlik Automate, the changes made are not shown in the sheet.
Resolution
In Qlik Cloud, automations make changes inside their own engine session. Those changes are not immediately visible to other sessions (such as in the Qlik Sense app UI) unless you explicitly save the app from that session.
Without a save, distribution to other sessions can take 20 to 40 minutes or not reflect at all in active UI sessions. The Save App block is intended ot be used in this instance.
Triggering the Save App block (available in the Qlik Cloud connector) signals the engine to do a DoSave, saving the app and reloading it in all open sessions.
- Pass inputs from the app to the automation using the Execute automation button (in the app).
- In the app, click Copy input block, then paste those blocks at the start of your automation.
- Use Update variable (target the correct app and variable; set the definition or value as needed).
- (Recommended) Immediately Get variable to verify the new value in the same run. Verify the output.
- Add Save App (Qlik Cloud connector) once at the end of the flow so the UI reflects the change.
Since the Save App block is computationally heavy and limited to one execution per session. Place it once at the end of your automation.
Environment
- Qlik Cloud
- Qlik Automate
-
How to prepare your Qlik App for Qlik Answers
This article provides a practical guide for data modelers, BI admins, and analytics engineers. Qlik Answers is a powerful solution - it lets your busi... Show MoreThis article provides a practical guide for data modelers, BI admins, and analytics engineers.
Qlik Answers is a powerful solution - it lets your business users ask questions in plain language and get accurate, contextual answers directly from your data model. No dashboard navigation, no waiting on report requests. Just ask, and get an answer.
Out of the box, Qlik Answers already understands a remarkable amount of business language. But like any intelligent tool, the quality of its answers depends on the quality of what it has to work with. A data model with ambiguous field names or undocumented metrics might work fine when a developer manually hand-picks the right fields for a chart - but when an AI resolves a natural language question against that same model, those small inconsistencies start to matter.
Here’s a quick example. When someone asks “What’s our discount rate?”, Qlik Answers intelligently maps that question to fields in your semantic layer. If your model exposes Discount_Amount, Discount_Amount_Final_V1, Discount_Amount_Final_Sep24, Discount_Value, Discount1, and Discount2, the engine has to make a choice, and without clear naming, even the smartest AI can’t be sure which one you intended. It’s a signal that the model could use a little attention.
The great news is that with some straightforward preparation, you can unlock the full potential of Qlik Answers and give your users an experience that feels almost magical. This guide walks you through exactly how to get there.
What Qlik Answers Already Handles
If you’ve configured Business Logic for Insight Advisor before, you might be wondering: “Do I need to do all of that again?”
No - and that’s one of the best things about Qlik Answers. It uses an LLM-based approach that already understands common business language out of the box. Terms like “sales,” “revenue,” “customer,” “average,” and “quarter” just work. Standard aggregations, temporal concepts, and general business vocabulary are understood without any configuration on your part.
Where Qlik Answers benefits from your help is with your organization’s specific context. It doesn’t yet know that Discount1 is actually a coupon discount and Discount2 is a loyalty discount. And it can’t tell which of your three revenue fields is the current authoritative version. That is the context only you can provide.
With a few focused preparation steps, you’ll set Qlik Answers up to deliver accurate, trustworthy results from day one.
Before You Start
Three things worth doing before diving into your data model:
- Understand your complete field list. Scan for ambiguous names (Revenue_v1, Revenue_Final), technical fields (IDs, keys, ETL flags), and fields with similar names that represent different concepts.
- Identify your top 10–20 business metrics. For each, document the authoritative calculation, the plain-language definition, and common synonyms.
- Talk to your business users. Find out what terms they actually use. “Churn” might mean “Customer Attrition Rate” in your model. “CAC” might not map to anything. This tells you where vocabulary mappings and renaming are needed.
Step 1: Clarify Field Names
This tends to be the highest-impact change you can make. Ambiguous field names are the most common cause of incorrect field selection.
For every group of similarly named fields, ask: do these represent different business concepts, or are they redundant versions of the same thing?
If they’re different concepts, give them distinct, business-aligned names:
Before After Discount_Amount, Discount_Value, Discount1, Discount2
Product Discount, Promotional Discount, Coupon Discount, Loyalty Discount
If they’re redundant versions, pick the authoritative one, create a master measure if the calculation is complex, and hide the rest using Business Logic visibility controls.
Naming principles:
- Use full wording: Customer Name instead of CUST_NM_V1_Final
- Add contextual qualifiers: Customer City and Store City instead of two fields both named City1_V1_Final and City_ST
- Indicate the field’s role: use words like count, total, amount, or percentage to clarify the aggregative nature
- For Booleans, use proposition prefixes: is_active, has_churned
- Try to steer clear of cryptic abbreviations, bare adjectives, and generic nouns without context. A field called Amount doesn’t communicate what it’s an amount of.
Step 2: Streamline the Data Model
Every visible field is a candidate answer to a user’s question, so fewer irrelevant fields means fewer wrong answers. A streamlined model is also faster to index.
Hide technical fields. In Business Logic → Logical Model → Visibility, set these to Hidden:
- Primary and foreign keys (CustomerID, OrderID, ProductKey)
- ETL metadata (load timestamps, row numbers, processing flags)
- Staging and intermediate calculation fields
- Internal-use fields (prefixed with % or _ for expression use). You can also prefix field names with % in the load script to automatically hide them.
Consolidate redundant fields. If your model has Revenue_Old, Revenue_New, and Revenue_Current, users asking about “revenue” will get inconsistent results. It’s worth picking the authoritative version and hiding the rest.
Hidden fields remain fully functional for calculations, expressions, and existing charts. You’re only removing them from the Qlik Answers query scope, so nothing breaks.
Step 3: Check Date Field Formats
Time-based queries are among the most common in natural language analytics (“revenue by month,” “trends over time,” “compare this quarter to last”). If your date fields are loaded as plain text, Qlik Answers won’t recognize them as dates. That means no auto-calendar, no chronological sorting, and no correct time-based analysis.
In Data Manager or Model Viewer, check the tags on every date-related field. You want Date or Timestamp tags. If you see $ascii or Text, fix it in the load script:
Date(Date#([SourceDateField], 'MM/DD/YYYY')) as [Order Date]
Timestamp(Timestamp#([SourceTimestamp], 'MM/DD/YYYY hh:mm:ss')) as [Order Timestamp]
After fixing, test with queries like “Show me trends over time” and “Sales by month” to confirm the engine applies chronological logic correctly.
Step 4: Create Master Items with Descriptions
Master items are one of your strongest levers for improving Qlik Answers accuracy - and this is where the platform really shines. When processing questions, Qlik Answers intelligently gives greater weight to master items than to raw fields in the data model, because it recognizes that master items represent curated business intent. It’s a great example of how the engine is designed to work with you.
For each of your top metrics, create a master measure with a validated expression and a clear description. The description matters - Qlik Answers uses it to understand context and match user intent. A good description explains what the metric measures, how it’s calculated, and when to use it.
For detailed guidance on writing effective master item descriptions, see the help documentation: Writing master item descriptions for Qlik Answers.
Step 5: Configure Vocabulary (Selectively)
Qlik’s Business Logic vocabulary feature lets you define synonyms and map business terms to fields. It’s a useful tool, though you may need less of it than you’d expect. Because Qlik Answers is powered by an LLM, it already has a strong grasp of standard business terms: “sales,” “revenue,” “customer,” “average,” and “quarter” all work right out of the box. You only need to step in for the terminology that’s unique to your organization.
Where vocabulary adds value:
- Internal product codes or KPI nicknames that users reference by shorthand
- Legacy terminology that doesn’t match current field names
- Domain-specific language that is not widely used outside your industry
What to watch out for:
- Synonyms that duplicate existing field values; this adds ambiguity, not clarity
- Assigning the same synonym to multiple fields (such as “sales” mapped to two different measures)
- Vague terms like “top” or “bottom” that can be interpreted multiple and conflicting ways
Configure in Business Logic → Vocabulary. Map each synonym to a specific field or master item, and test with queries using those terms to confirm the mapping resolves correctly.
Step 6: Validate with Real Queries
It’s helpful to run representative queries across these categories and verify the results:
Category Example queries Basic aggregations
"Total revenue," "Customer count," "Average order value"
Time-based
"Revenue by month," "Sales trends over time," "Compare Q3 to Q4"
Filtered
"Revenue for Product X," "Customers in Region Y"
Comparative
"Top 10 customers by revenue," "Highest margin product?"
Vocabulary "Show me CAC," "What’s our churn rate?" (if configured)
Use the reasoning panel. In the Source tab, click View Reasoning to see exactly which fields the engine selected and why. This is the fastest way to diagnose incorrect results and trace them back to a semantic layer issue.
For each test query, check:
- Did the engine select the correct field?
- Do the numbers match expected values?
- Are hidden fields excluded from results?
- Are master items being used where defined?
- Do time-based queries return chronologically correct results?
If a query doesn’t resolve correctly:
- Trace it back to the model
- Rename a field, add a vocabulary entry, hide a competing field
- Then re-test until your top metrics consistently resolve as expected
The Bottom Line
You don’t need a perfect data model to get great results from Qlik Answers. You just need a clear one.
There’s no need to define what “revenue” or “quarter” means. By making sure your model is unambiguous, your dates are properly typed, your key metrics are defined, and your field list is clean, you’re giving Qlik Answers everything it needs to deliver the kind of instant, accurate insights your business users have been waiting for.
These are established data modeling best practices that have always mattered — Qlik Answers just makes the payoff more immediate and visible. Invest a little time in preparation, and you’ll be amazed at what your users can accomplish.
Are you ready to learn more?
- Continue with Part Two, which details what Qlik Answers is doing when it reads your apps and expands your understanding of why those six steps move the needle.
- For the complete technical reference, including detailed guidance on field naming conventions, master item descriptions, and synonym configuration, see the official documentation: Best practices for preparing applications for Qlik Answers.
Environment
- Qlik Answers
- Qlik Cloud
-
Qlik Sense Insight Advisor ignores Alternate States
Insight Advisor does not filter data when a sheet is using Alternate States. Instead, it operates exclusively in the default state. This is working a... Show MoreInsight Advisor does not filter data when a sheet is using Alternate States. Instead, it operates exclusively in the default state.
This is working as expected.
As of January 2026, Insight Advisor is no longer actively in development. Look into Qlik Answers for a feature-rich replacement (available on Qlik Cloud).
Environment
- Qlik Insight Advisor
- Qlik Cloud
- Qlik Sense Enterprise on Windows
-
How to automatically make multiple selections on sheet open with Qlik Analytics
Qlik allows you to automatically make multiple selections when opening an app sheet. This is configured in the Sheet Properties using an Action: Ope... Show MoreQlik allows you to automatically make multiple selections when opening an app sheet. This is configured in the Sheet Properties using an Action:
- Open the Sheet you want to configure with an action
- Click Edit Sheet to enter edit mode
- Click Properties
- Expand Actions and click Add action
If Properties does not show the Actions tab, but instead lists Chart suggestions and other data display options, deselect the currently selected chart.
- Click the drop-down arrow and choose Select values in a field
- In the Field input, either search for or select the field from the drop-down
- In the Value input, enter the values you want to select, separating them with semicolons (example:
A;Borvalue1,value2) - Exit the Edit Sheet mode; this saves your changes
The defined selections will now apply whenever the sheet is opened.
Environment
- Qlik Sense Enterprise on Windows
- Qlik Cloud
-
Cannot edit/delete ODAG links when changing app owner
When an On-Demand App Generation (ODAG) link is created in a selection app and the app is transferred to another owner, then the new owner can only se... Show MoreWhen an On-Demand App Generation (ODAG) link is created in a selection app and the app is transferred to another owner, then the new owner can only see the option "Add to App Navigation" in the right-click context menu. Options "Edit" and "Delete" are missing.
The same issue happens when the selection app is duplicated by another user.Resolution:
This is a known limitation of Qlik Sense and has been reported in defectQLIK-83203.There are default security rules: CreateOdagLinks and ReadOdagLinks.
But no default rule for Update/ Delete of ODAG links.
A work-around solution at the moment is to create custom security rules that grants Update/ Delete access of ODAG links to the new app owner, similar to the followings:
ODAG links are meant to be managed similar to Data connections, where a connection created in one app can be used in other apps. However, while the QMC provides a Data connections tab to list down all connections and control related ownership/ permissions, such management GUI is not available for ODAG links. R&D is considering the ODAG link management page in future releases of the product. -
Enhancing Analytics with Qlik Predict
This Techspert Talks session covers: How ML Experiments work Real World Predictive use cases Time Series Chapters: 01:33 - Machine Learning Mo... Show More
-
Qlik Talend ESB tRestRequest Component Integration with Auth0 JWT Bearer Token
When you need to integrate auth0 JWT Bear Token auth with Talend tRestRequest component, it is possible to use JWT Bearer Token with Keystore Type : J... Show MoreWhen you need to integrate auth0 JWT Bear Token auth with Talend tRestRequest component, it is possible to use JWT Bearer Token with Keystore Type : Java Keystore *.jks to achive this.
How To
Please follow the some similar steps from Obtaining a JWT from Microsoft Entra ID | Qlik Help
- Open https://dev-xxxx.us.auth0.com/.well-known/jwks.json in a Web browser.
Reference: json-web-key-sets| auth0.com - Copy the String value from the x5c field of the matched key and save it to a text file.
Convert the text file to an talend-esb.cer file, for example:-----BEGIN CERTIFICATE-----
MGLqj98VNLoXaFfpJCBpgB4JaKs
-----END CERTIFICATE----- - Import this trusted key into your keystore JKS using Java keytool.
keytool -import -keystore talend-esb.jks -storepass changeit -alias talend-esb talend-esb.cer -noprompt
- Use this talend-esb.jks in tRestRequest with the following configurations
Security: JWT Bearer Token
Keystore File: /path_to/talend-esb.jks
Keystore Password : changeit
Keystore Alias : talend-esb
Audience: "https://dev-xxxx.us.auth0.com/api/v2/" - Use the bear token fetched from https://dev-xxxx.us.auth0.com/oauth/token to send request to tRestRequest defined endpoint for testing.
Environment
- Open https://dev-xxxx.us.auth0.com/.well-known/jwks.json in a Web browser.
-
Qlik Sense Enterprise on Windows: Binary load fails with General Script Error wh...
A binary load command that refers to the app ID (example Binary[idapp];) does not work and fails with: General Script Error or Binary load fails with ... Show MoreA binary load command that refers to the app ID (example Binary[idapp];) does not work and fails with:
General Script Error
or
Binary load fails with error Cannot open file
Before Qlik Sense Enterprise on Windows November 2024 Patch 8, the Qlik Engine permitted an unsupported and insecure method of binary loading from applications managed by Qlik Sense Enterprise on Windows.
Due to security hardening, this unsupported and insecure action is now denied.
Binary loads of Qlik Sense applications require a QVF file extension. In practice, this will require exporting the Qlik Sense app from the Qlik Sense Enterprise on Windows site to a folder location from which a binary load can be performed. See Binary Load and Limitations for details.
Example of a valid binary load:
Binary [lib://My_Extract_Apps/Sales_Model.qvf];Example of an invalid binary load:
"Binary [lib://Apps/777a0a66-555x-8888-xx7e-64442fa4xxx44];"Environment
- Qlik Sense Enterprise on Windows November 2024 Patch 8 and any later releases