Unlock a world of possibilities! Login now and discover the exclusive benefits awaiting you.
Product Innovation
By reading the Product Innovation blog, you will learn about what's new across all of the products in our growing Qlik product portfolio.
Support Updates
The Support Updates blog delivers important and useful Qlik Support information about end-of-product support, new service releases, and general support topics.
Qlik Academic Program
This blog was created for professors and students using Qlik within academia.
Community News
Hear it from your Community Managers! The Community News blog provides updates about the Qlik Community Platform and other news and important announcements.
Qlik Digest
The Qlik Digest is your essential monthly low-down of the need-to-know product updates, events, and resources from Qlik.
Qlik Learning
The Qlik Learning blog offers information about the latest updates to our courses and programs, as well as insights from the Qlik Learning team.
Recent Blog Posts
-
Check Out Qlik Cloud's New Look!
Today, Qlik Cloud is introducing its new navigation. Our platform now supports multiple user-centric experiences, including insights, analytics, data integration, and administration. -
Developer menu in Qlik Sense client
Did you know there's a secret developer menu in Qlik Sense? I'm going to let you in on the secret and show you how to access it and what it contains. Just remember, this isn't documented or officially supported, and is subject to change in the future. To access the developer menu, follow the steps below: Open a sheet in a Qlik Sense app in your browserAdd /options/developer to the urlRight click on an object and choose "Developer" You can get the... Show MoreDid you know there's a secret developer menu in Qlik Sense? I'm going to let you in on the secret and show you how to access it and what it contains. Just remember, this isn't documented or officially supported, and is subject to change in the future.
To access the developer menu, follow the steps below:
- Open a sheet in a Qlik Sense app in your browser
- Add /options/developer to the url
- Right click on an object and choose "Developer"
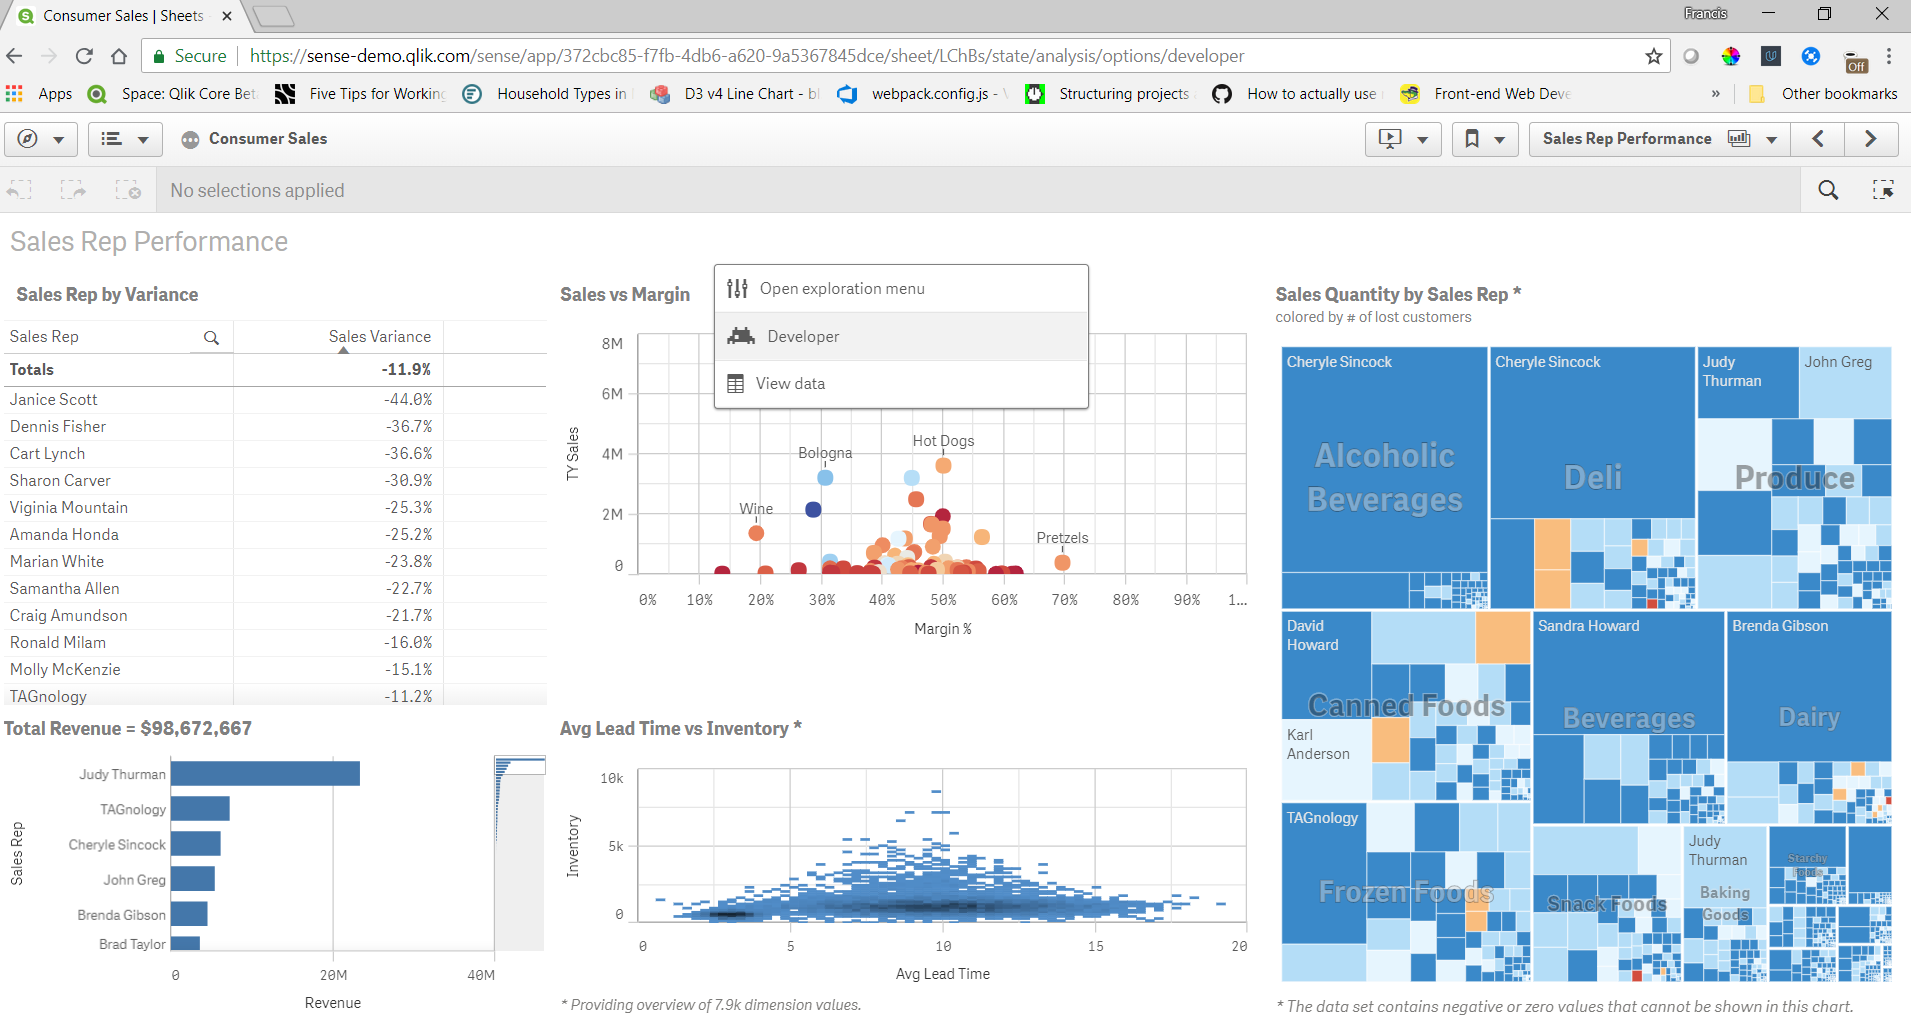
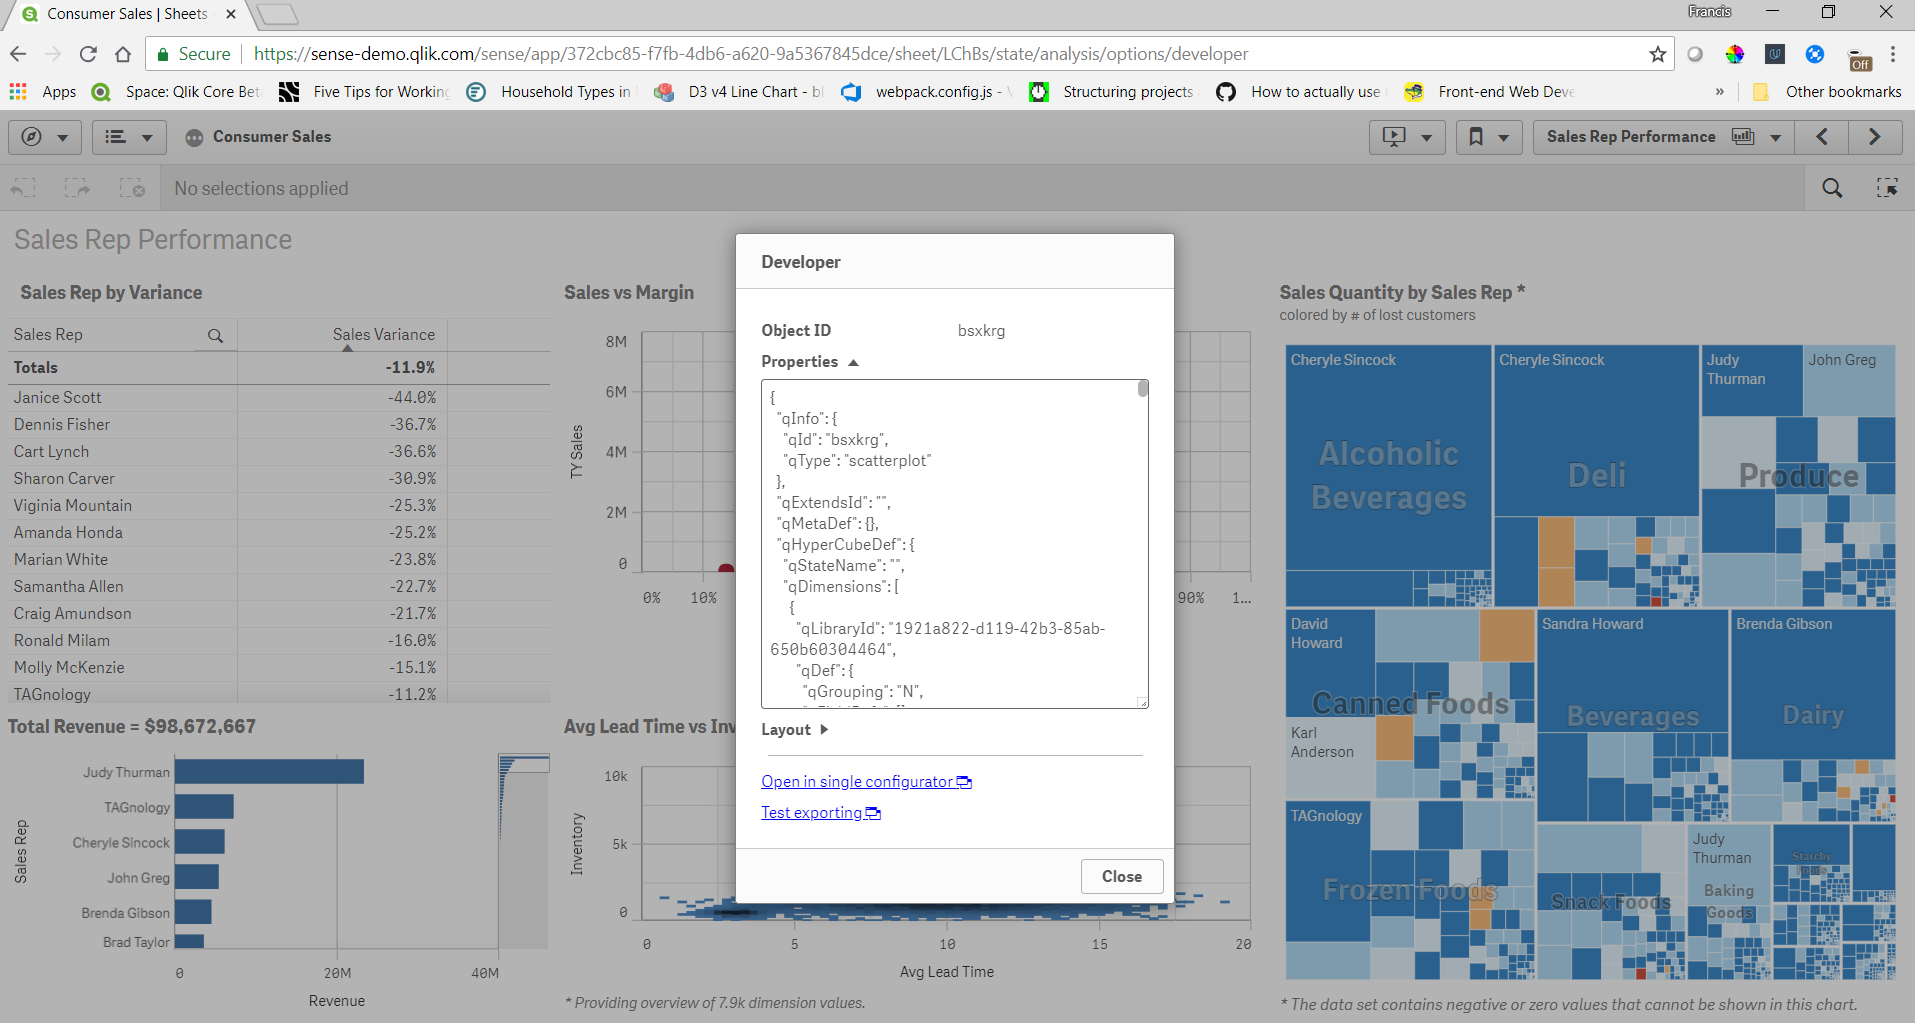
You can get the object id, properties, and layout of any object this way. There's also a link to open the object in single configurator, and test exporting. The object id's are useful for embedding visualizations. The properties are useful if you are creating your own objects and want to check the properties of an object in a Qlik Sense app for reference. In my opinion this is the most useful feature of the developer menu. Sometimes if I don't know the correct properties to set to achieve what I want I'll create a similar object in the Qlik Sense client just to check the properties. The layout shows what is returned by the engine for the layout of the object, and can be useful to see what the layout will look like before you actually create an object yourself. And the single configurator link is a handy way to get to the single configurator of an object directly from a sheet.
And now you know about the secret developer menu.
-
Qlik Cloud Wordpress plugin
Happy Friday everyone. If you have a Wordpress website and you want to incorporate visualizations from our Qlik Cloud, then you are at the right place. Below are the steps needed to install, configure and use the plugin by iframing an entire app sheet or creating a page with nebula.js and pulling just by ids. Installation into WordPressLogin to your WordPress Admin Portal.On the left navigation panel, select "Plugins".Towards the top of the plugi... Show MoreHappy Friday everyone. If you have a Wordpress website and you want to incorporate visualizations from our Qlik Cloud, then you are at the right place. Below are the steps needed to install, configure and use the plugin by iframing an entire app sheet or creating a page with nebula.js and pulling just by ids.
Installation into WordPress
- Login to your WordPress Admin Portal.
- On the left navigation panel, select "Plugins".
- Towards the top of the plugins list, click the "Add New" button.
- In the search box towards the right-hand side, type "Qlik" and hit enter to search.
- The Qlik Saas plugin is currently one of only two results returned. Click the "Install Now" button next to it.
- WordPress will then download and install the plugin for you. Once complete, "Install Now" button will change to "Activate". Click the "Activate" button to complete the installation.
Configure Qlik Cloud
- Create a public / private key pair for signing JWTs
- Configure JWT identity provider
- Add the public key to the configuration
- Input Issuer & Key ID
https://qlik.dev/tutorials/create-signed-tokens-for-jwt-authorization#input-issuer-and-key-id-values
Configure plugin
- Add Host of Qlik Saas as <tenant>.<region>.qlikcloud.com
- Add your WebIntegrationID
https://qlik.dev/tutorials/implement-jwt-authorization#configure-a-web-integration-id
- Add you AppID
- Add your Private key from previous step “Create a public / private key pair for signing JWTs”
- Add the Key ID created from previous step
https://qlik.dev/tutorials/create-signed-tokens-for-jwt-authorization#input-issuer-and-key-id-values
Using the plugin
- iFrame an entire sheet by adding the shortcode into your page
[qlik-saas-single-sheet id="1ff88551-9c4d-41e0-b790-37f4c11d3df8" height="400" width="500"]- Add object by adding the object id or "selections" for the current selections toolbar, with a shortcode into your page
[qlik_saas_object id="selections" height="50"][qlik_saas_object id="CSxZqS" height="400"]iFrame sheet shortcodeiFrame sheet previewMashup shortcodesMashup Helpdesk sheet 1 and 2 with nebula.js and object IDsSheet 2That's it!/Yianni -
Unlock Qlik Answers
Qlik has launched a plug-and-play Generative AI-powered Retrieval Augmented Generation (RAG) solution, Qlik Answers. Here, organizations can tap into their unstructured sources like document repositories, knowledge libraries, or even operational systems. You’ll be able to leverage trusted enterprise connectors to connect to a broad range of systems and platform out of the box, ask questions directly to the prebuilt UI, and have access to trusted ... Show MoreQlik has launched a plug-and-play Generative AI-powered Retrieval Augmented Generation (RAG) solution, Qlik Answers. Here, organizations can tap into their unstructured sources like document repositories, knowledge libraries, or even operational systems. You’ll be able to leverage trusted enterprise connectors to connect to a broad range of systems and platform out of the box, ask questions directly to the prebuilt UI, and have access to trusted content which will empower your users to substantiate answers.
Watch our quick demo below to see how you can bring knowledge to your fingerprints from your unstructured data with just a simple question.
Add Qlik Answers to your solution set by contacting us.
For those who have already made the move, you’ll be able to create Qlik Answer cases in your Customer Portal starting Thursday, August 8, 2024. If you need any troubleshooting assistance prior, please don’t hesitate to contact us through our live chat.
Thanks for choosing Qlik!
Qlik Global Support
-

-
Exploring the Latest Developments in Qlik Embedding
In previous blog posts (1, 2, 3) , we explored different topics around Qlik's embedding library, qlik-embed, and how to integrate it seamlessly with OAuth for authentication. Today, we'll delve into the latest updates and new features, including embedding Qlik Answers, go over UI capabilities, and advanced configuration options. Recap: What is qlik-embed? qlik-embed is a versatile library designed to facilitate the embedding of Qlik Sense analyti... Show MoreIn previous blog posts (1, 2, 3) , we explored different topics around Qlik's embedding library, qlik-embed, and how to integrate it seamlessly with OAuth for authentication. Today, we'll delve into the latest updates and new features, including embedding Qlik Answers, go over UI capabilities, and advanced configuration options.
Recap: What is qlik-embed?
qlik-embed is a versatile library designed to facilitate the embedding of Qlik Sense analytics into web applications. By using web components, it allows developers to easily integrate Qlik's powerful analytics capabilities without dealing with the complexities of traditional embedding methods. The library supports various authentication methods, including Qlik Cloud API keys, OAuth2 clients, and Qlik Sense Enterprise interactive login.
In our previous discussions, we highlighted the ease of use and the flexibility qlik-embed offers, supporting components such as chart, field, selections, and entire app.
New Feature: Embedding Qlik Answers
One of the most exciting additions to qlik-embed is the ability to embed Qlik Answers. Qlik Answers leverages AI to provide natural language querying capabilities, allowing users to interact with their data using conversational language (If you haven’t already checked that out, visit this Community post or watch this demo video). The new UI component ai/assistant enables this functionality directly right within your web app.
Here's an example of how you can integrate Qlik Answers into your application:
<qlik-embed
  ui="ai/assistant"
  assistant-id="<assistant-id>"
  appearance="qlik-light"> // or "qlik-dark"
</qlik-embed>
This simple integration can greatly enhance user interaction by allowing them to ask questions and receive insights in real-time, making data exploration more intuitive and user-friendly.
More on UIs and Parameters
As I mentioned before, the qlik-embed framework supports a variety of UIs, each designed for specific purposes. Let’s take a quick overview on each one:
- analytics/sheet: For embedding entire Qlik Sense sheets with full selectivity but without additional features like alerts or notes. (Supports sheets that contain only nebula.js visualizations, for a full list: see here: https://qlik.dev/embed/foundational-knowledge/visualizations/)
<qlik-embed id="visualization" ui="analytics/sheet" app-id="13b05004-2752-4f39-a077-7a71c5816997" object-id="bdGHw"></qlik-embed> - analytics/chart: For embedding single chart objects or creating charts on the fly with better performance. (Supports nebula.js objects only, see full list above)
<qlik-embed id="visualization" ui="analytics/chart" app-id="13b05004-2752-4f39-a077-7a71c5816997" object-id="hshG"></qlik-embed> - analytics/field: A lightweight listbox for a specific field (dimension or measure)
(To find the library-id, you can add /options/developer to the URL when editing a sheet, right click on a object containing your master dimension or measure then click on Developer and look for the qLibraryId value)<qlik-embed id="visualization" ui="analytics/field" app-id="13b05004-2752-4f39-a077-7a71c5816997" library-id="BfXheUu" type="dimension"></qlik-embed> - analytics/selections: Displays a selection bar with controls for managing selections.
<qlik-embed id="visualization" ui="analytics/selections" app-id="13b05004-2752-4f39-a077-7a71c5816997"></qlik-embed> - classic/app: Provides a full-featured Qlik Sense sheet analysis and authoring experience.
<qlik-embed id="visualization" ui="classic/app" app-id="13b05004-2752-4f39-a077-7a71c5816997"></qlik-embed> - classic/chart: Backwards-compatible for single chart objects (legacy), including support for extensions.
<qlik-embed id="visualization" ui="classic/chart" app-id="13b05004-2752-4f39-a077-7a71c5816997" object-id="hshG" iframe="true"></qlik-embed>
Each UI type can be configured with various parameters to customize the appearance and functionality. For example, you can set the theme, dimensions, measures, and even complex properties for charts.
Here’s an example of embedding a dynamic chart (See here for more info about Charts on the Fly)
<qlik-embed
  ui="analytics/chart"
  app-id="YOUR_APP_ID"
  type="barchart"
  dimensions='["Category"]'
  measures='["Sum(Sales)"]'
  properties='{"orientation": "horizontal"}'>
</qlik-embed>
This flexibility allows you to create highly dynamic and interactive dashboards that can adapt to users' needs in real-time.
Advanced Configuration: Context Parameters and Themes
A cool feature of qlik-embed is the ability to pass context parameters using the context__json attribute. This allows for more granular control over the embedded visualizations, enabling customization of themes, interactions, and other properties directly within the web component.
Reference my previous post about this here.
Accessing the App Model through qlik-embed
With qlik-embed, you can access the metadata of a Qlik Sense application, including, but not limited to, obtaining a list of sheets and adding them to a dropdown list element for instance.
Keep in mind that this won't work with the classic/app UI
<!DOCTYPE html>
<html lang="en">

<head>
    <meta charset="UTF-8" />
    <meta name="viewport" content="width=device-width, initial-scale=1.0" />
    <meta http-equiv="X-UA-Compatible" content="ie=edge" />
    <style>
        body,
        html {
            margin: 0;
            padding: 0;
            font-family: sans-serif;
            font-size: 14px;
            background-color: #f5f5f5;
            color: #333;
            height: 100%;
            width: 100%;
        }

        .container {
            padding: 8px;
            gap: 8px;
            position: relative;
            flex: 1 0 auto;
            display: flex;
            flex-direction: column;
            align-items: stretch;
            box-sizing: border-box;
        }

        .classic-app {
            height: 800px;
            width: 1200px;
            border: 1px solid #bbb;
            flex-grow: 1;
            border-radius: 3px;
            box-shadow: 1px 1px 10px rgba(0, 0, 0, 0.2);
            position: relative;
            box-sizing: border-box;
            overflow: auto;
            position: relative;
        }

        .viz {
            width: 1200px;
            height: 900px;
            padding: 16px;
            border: 1px solid #bbb;
            border-radius: 3px;
            box-shadow: 1px 1px 10px rgba(0, 0, 0, 0.2);
            position: relative;
        }
    </style>
    <title>@qlik/embed-web-components example - using OAuth</title>
    <script crossorigin="anonymous" type="application/javascript"
        src="https://cdn.jsdelivr.net/npm/@qlik/embed-web-components"
        data-host="https://YOUR_TENANT.us.qlikcloud.com" data-client-id="CLIENT_ID"
        data-redirect-uri="https://localhost:3000/index_oauth_object.html" data-access-token-storage="session"></script>

    <script type="module">
        const embeddedObject = document.getElementById("visualization");
        const refApi = await embeddedObject.getRefApi();
        console.log('refApi -> ', refApi);
        const doc = await refApi.getDoc();
        const appSheetList = await doc.getSheetList();

        //add the sheet references to a dropdown list
        let dd = document.getElementById('sheetdrop');
        dd.length = 0;
        let defaultOption = document.createElement('option');
        defaultOption.text = "Select a sheet to navigate to";
        dd.add(defaultOption);
        dd.selectedIndex = 0;

        let option;
        for (let i = 0; i < appSheetList.length; i++) {
            option = document.createElement('option');
            option.text = appSheetList[i].qMeta.title;
            option.value = appSheetList[i].qMeta.id;
            dd.add(option);
        }

        //add a listener to change the object-id property in the qlik-embed element
        dd.addEventListener("change", function () {
            if (dd.selectedIndex > 0) {
                let selOption = dd.options[dd.selectedIndex];
                console.log(selOption.value);
                embeddedObject.setAttribute('object-id', selOption.value);
            }
        });
    </script>
</head>

<body>

    <div id="main-app">
        <div class="container">
            <h1>@qlik/embed-web-components Example</h1>
        </div>

        <div>
            <select id="sheetdrop" name="SheetList">
            </select>
        </div>

        <div id="analytics-chart" class="container">
            <div class="viz">
                <qlik-embed id="visualization" ui="analytics/sheet" app-id="27018b4a-eaa7-4658-a8c2-ecf48d321371"
                    object-id="d568340d-1264-473e-bbdf-68d2555f007e"></qlik-embed>
            </div>
        </div>
</body>

</html>
The continuous evolution of qlik-embed brings exciting new features that enhance the integration of Qlik analytics into web applications. Stay tuned for more updates and explore the full potential of qlik-embed on qlik.dev. - analytics/sheet: For embedding entire Qlik Sense sheets with full selectivity but without additional features like alerts or notes. (Supports sheets that contain only nebula.js visualizations, for a full list: see here: https://qlik.dev/embed/foundational-knowledge/visualizations/)
-
Summer fun means Qlik Community enhancements!
Qlik Community enhancements for late June/early July -
Qlik Sense SAML – A standardized approach to authentication
Hello everyone, today I have the pleasure of introducing Jeff Goldberg as our guest blogger - (jog) - Jeff is a Senior Enterprise Architect on the Americas Pre-sales team who has worked in various technology positions for over 15 years. In between running half-marathons and crushing crossfit workouts , Jeff focuses on integration, deployment, automation, security, and api topics across a wide range of software. If you have a technical challenge... Show More
Hello everyone, today I have the pleasure of introducing Jeff Goldberg as our guest blogger - (jog) - Jeff is a Senior Enterprise Architect on the Americas Pre-sales team who has worked in various technology positions for over 15 years. In between running half-marathons and crushing crossfit workouts , Jeff focuses on integration, deployment, automation, security, and api topics across a wide range of software. If you have a technical challenge, Jeff can put you on a path to figuring out the best way to overcome it. Jeff has the extreme pleasure of introducing you to SAML authentication with Qlik Sense, not only in text - but as well in supporting videos. Thanks for this valuable contribution Jeff!
Qlik Sense SAML
With the release of Qlik Sense 2.0, we introduced SAML as an authentication option between enterprise identity management systems (known as identity providers) and Qlik Sense. While SAML is a standard for authentication and authorization, it is open to interpretation and variability in its implementation. Consequently, implementing SAML can be a bit tricky. The goal of this blog post is to demystify SAML and provide some examples you can use to implement it with Qlik Sense.
SAML stands for Security Assertion Markup Language, an xml based authentication and authorization standard for web applications to exchange user credentials and attributes. SAML works between two parties, an identity provider (IdP) and a service provider (SP), to facilitate single sign-on access to secure content for a user.
Identity providers come in a variety of shapes and sizes. Salesforce.com, Active Directory Federation Services, and Ping Federate are just a few of the options available for handling the authentication components of the SAML handshake. The service provider is the system with the content we want to access. In this case, Qlik Sense is the service provider.
The figure below illustrates the SAML authentication process.
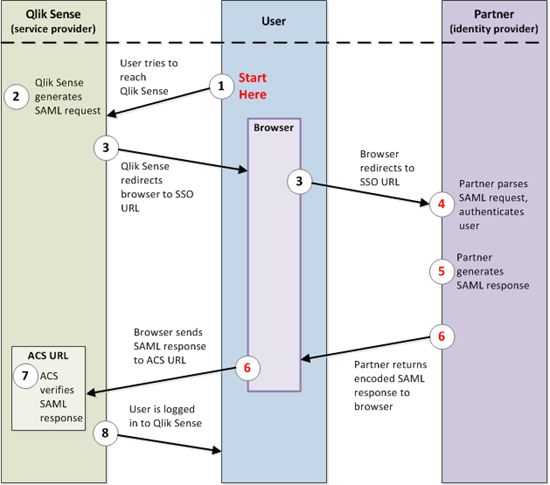
Keep in mind the SAML protocol is an open standard, therefore, implementing the solution between the SP and the IdP differs based on the requirements of the chosen provider.
For example:
- ADFS metadata contains a whole section of information that needs to be removed before it is imported into Qlik Sense.
- With Ping Federate, the IdP configuration needs to have the name ID format for the SAML response manually set to transient or the user authentication to Qlik Sense will fail.
- One login doesn’t care about the name ID format for the response.
Bottom line, expect some trial and error when configuring SAML, regardless if it’s with Qlik Sense or some other solution.
To ease the pain and hopefully reduce frustration, we have created some videos to help walk through configuring different SAML identity providers with Qlik Sense. As we encounter more flavors of IdP, we will create content to help with configuration.
For now, have a watch of the following videos, enjoy!

-
【オンデマンド配信】25 年の Excel 体制から脱却なるか!?BI ツール導入奮闘記
企業のビジネス活動において、データはこれまで以上に必要不可欠な資産となっています。増え続けるデータを管理・統合・分析し、データでアクションを起こす必要性が増している現在、成功している企業はどのようなデータ戦略を実行しているのか?本 Web セミナーシリーズでは、Qlik でデータからアクションを起こすデータ主導のビジネスで成功しているお客様より、課題から導入の経緯、デモンストレーション、活用例などをご紹介します。 ※ 参加費無料。パソコン・タブレット・スマートフォンで、どこからでもご視聴いただけます。 【オンデマンド配信】25 年の Excel 体制から脱却なるか!?BI ツール導入奮闘記 株式会社イノベーションでは、Excel ・スプレッドシートによる分析と共有の文化が根強く、有効なデータ活用が進んでいませんでした。情報をデータベース化して Qlik Sense に取り込むことで、あらゆる指標の日次データを取得し、顧客別など細分化されたレベルの分析が可能になりました。本講演では、最近 ... Show More企業のビジネス活動において、データはこれまで以上に必要不可欠な資産となっています。増え続けるデータを管理・統合・分析し、データでアクションを起こす必要性が増している現在、成功している企業はどのようなデータ戦略を実行しているのか?
本 Web セミナーシリーズでは、Qlik でデータからアクションを起こすデータ主導のビジネスで成功しているお客様より、課題から導入の経緯、デモンストレーション、活用例などをご紹介します。※ 参加費無料。パソコン・タブレット・スマートフォンで、どこからでもご視聴いただけます。
【オンデマンド配信】
25 年の Excel 体制から脱却なるか!?BI ツール導入奮闘記株式会社イノベーションでは、Excel ・スプレッドシートによる分析と共有の文化が根強く、有効なデータ活用が進んでいませんでした。情報をデータベース化して Qlik Sense に取り込むことで、あらゆる指標の日次データを取得し、顧客別など細分化されたレベルの分析が可能になりました。
本講演では、最近 Qlik を導入した背景とそのプロセス、現時点で得られた成果についてご紹介します。Excel に頼っていたデータ管理からの脱却を目指し、迅速なデータモデリングと可視化を実現するために Qlik を選んだ理由とは?1 人プロジェクトで社内の反発や課題をどのように乗り越えたのか、導入半年のリアルな姿や将来展望についてお話しします。 -
Hot Wheels Card Game
Hot Wheels Card GameBildenThis application was built with the aim of practicing and exploring the possibilities of Layout Container in QlikSense. The card game has a similar mechanic to the game Top Trumps, where the player chooses an attribute of his card and compares it with that of his opponent. It is not an application for commercial use, although many of the resources used have applications in real analytical dashboards, such as modal pop-up... Show MoreHot Wheels Card GameBilden This application was built with the aim of practicing and exploring the possibilities of Layout Container in QlikSense. The card game has a similar mechanic to the game Top Trumps, where the player chooses an attribute of his card and compares it with that of his opponent. It is not an application for commercial use, although many of the resources used have applications in real analytical dashboards, such as modal pop-ups, logic control in variables and others. I tried to make the most of the new features made available in the latest updates, such as the Layout Container, border customizations, shadows and component background images.
Discoveries
Flexibility and countless visualization possibilities with Layout Container and new features from Qlik
Impact
New ways to build interfaces, using knowledge of visual resources improved in this application
Audience
Mainly Qlik developers, but also any enthusiast of the tool who is interested in new possibilities
Data and advanced analytics
As the focus of this application is the visual part, there is no relevant data or insight to highlight.
-
Missed this amazing free webinar? We’ve got you covered!
Recently, Senior Trainer, Piter Harb, delivered an incredible session on Transforming Your Insights with AI and Augmented Analytics Capabilities in Qlik Sense The feedback received on this delivery has been amazing! "Piter Harb just delivered the best Qlik presentation I've seen in 3 years - well done and keep it up! He's excellent." "Nice presentation. Clear speaking. Good pace." What You'll Learn in the Webinar: Fundamentals of Artificial Int... Show MoreRecently, Senior Trainer, Piter Harb, delivered an incredible session on Transforming Your Insights with AI and Augmented Analytics Capabilities in Qlik Sense
The feedback received on this delivery has been amazing!
"Piter Harb just delivered the best Qlik presentation I've seen in 3 years - well done and keep it up! He's excellent."
"Nice presentation. Clear speaking. Good pace."
What You'll Learn in the Webinar:
- Fundamentals of Artificial Intelligence (AI): Understand the basics and different types of AI.
- Insight Advisor: Discover its conversational capabilities to enhance your application use.
- AutoML: Learn how it uses historical data to predict future outcomes through classification and regression algorithms.
- Qlik Cloud Analytics and Large Language Models (LLMs): See how Qlik can help you leverage their power.
Click here to access the recording.
-
Managing your Analytics lifecycle in Qlik Sense Enterprise SaaS
Our Leigh Kennedy, Master Principal Enterprise Architect, is back sharing his in the trenches experience with you. In the attached document Leigh educates you on applying software development life cycle (SDLC) concepts to your Qlik Sense Enterprise SaaS tenants. Take it away Leigh!IntroductionThe majority of customers use some form of software development lifecycle in their organizations. When moving to SaaS customers are sometimes unsure of if o... Show MoreOur Leigh Kennedy, Master Principal Enterprise Architect, is back sharing his in the trenches experience with you. In the attached document Leigh educates you on applying software development life cycle (SDLC) concepts to your Qlik Sense Enterprise SaaS tenants. Take it away Leigh!
Introduction
The majority of customers use some form of software development lifecycle in their organizations. When moving to SaaS customers are sometimes unsure of if or how to apply these techniques to a Qlik Sense Enterprise SaaS environment.
We will explore some of the technical processes that need to occur within or interacting with a Qlik Sense Enterprise SaaS tenant as part of a software development lifecycle. We look at a number of areas including setting up your SaaS tenant in a way that supports your SDLC, encouraging re-use, building context aware applications, and many other topics. This document covers Qlik Sense Enterprise SaaS only and does not focus on our Hybrid Data Delivery or Qlik Application Automation offerings - they deserve a doc of their own and we hope to bring you one in the near future!
The aim of this document is not to provide a strict SDLC process for customers to follow, rather it aims to provide examples of how SDLC processes could work in a Qlik Sense Enterprise SaaS environment. We encourage you to implement or amend the parts or this you need so Qlik Sense Enterprise SaaS fits into your organization.
PDF attached in this post.
-
【10/2(水)13:00 開催】Qlik AI Reality Tour Tokyo:最新の AI イノベーションや事例をご紹介!
AI の現実(Reality)をテーマに、 最新の AI イノベーションや事例をご紹介! 来たる 10/2(水)、「Qlik AI Reality Tour Tokyo」を開催します。 AI は既に未来ではなく、企業において今日のビジネスを支える「現実」となっています。一方で、AI をビジネスに導入するには多くの課題があることも「現実」です。 本イベントでは、この 2 つの AI の現実(Reality)をテーマに、Qlik の最新の AI イノベーションやユーザー事例をお届けします。基調講演をはじめ、Qlik のユーザーが語るデータと分析の最新事例、Qlik のパートナー企業による最新のテクノロジーやソリューション、展示ブースなど、貴社の AI 戦略を成功に導く最新情報をご紹介します。講演概要は、順次公開します。 【主な講演内容】 Qlik ユーザーおよびパートナー企業による、AI 戦略のヒントとなる先進的な事例とソリューション Qlik グローバル戦略 / 市場開発部門長 Jos... Show MoreAI の現実(Reality)をテーマに、 最新の AI イノベーションや事例をご紹介!
来たる 10/2(水)、「Qlik AI Reality Tour Tokyo」を開催します。
AI は既に未来ではなく、企業において今日のビジネスを支える「現実」となっています。一方で、AI をビジネスに導入するには多くの課題があることも「現実」です。
本イベントでは、この 2 つの AI の現実(Reality)をテーマに、Qlik の最新の AI イノベーションやユーザー事例をお届けします。基調講演をはじめ、Qlik のユーザーが語るデータと分析の最新事例、Qlik のパートナー企業による最新のテクノロジーやソリューション、展示ブースなど、貴社の AI 戦略を成功に導く最新情報をご紹介します。講演概要は、順次公開します。
【主な講演内容】
- Qlik ユーザーおよびパートナー企業による、AI 戦略のヒントとなる先進的な事例とソリューション
- Qlik グローバル戦略 / 市場開発部門長 Josh Good による、AI 活用に向けた Qlik のビジョンとロードマップ
- Qlik Talend Cloud / Qlik Answers / SAPソリューションなど、Qlikの最新技術および製品情報
お申し込みの締め切りは、9月 25日(水)17:00 までです。お早めにお申し込みください。
※ 定員に達し次第、お申し込みを締め切らせていただきます。
※ 定員を上回った場合は、参加をお断りする可能性がございますので、予めご了承ください。
※ プログラムは予告なく変更になる可能性があります。予めご了承ください。
※ 開催報告記事などのための撮影が入る予定です。お姿や資料などが認識できない形での公開に配慮いたしますが、予めご了承ください。【開催概要】
日時:2024年 10月 2日(水)13:00(12:00 受付開始)
懇親会 18:00 - 19:00
会場:大手町三井ホール&カンファレンス
東京都千代田区大手町1-2-1参加費:無料
お問い合わせ:Marketingjp@qlik.com までお問い合わせください。 -
【オンデマンド配信】2 年間で何が変わる?BI ツールによる SAP データ活用の成功と課題
企業のビジネス活動において、データはこれまで以上に必要不可欠な資産となっています。増え続けるデータを管理・統合・分析し、データでアクションを起こす必要性が増している現在、成功している企業はどのようなデータ戦略を実行しているのか?本 Web セミナーシリーズでは、Qlik でデータからアクションを起こすデータ主導のビジネスで成功しているお客様より、課題から導入の経緯、デモンストレーション、活用例などをご紹介します。 ※ 参加費無料。パソコン・タブレット・スマートフォンで、どこからでもご視聴いただけます。 【オンデマンド配信】2 年間で何が変わる?BI ツールによる SAP データ活用の成功と課題 株式会社クレハでは、 SAP のデータを Qlik Sense に取り込んで可視化し、販売の予実管理や各月の在庫の品目別推移、地図上での配送コストなどの分析を可能にしました。これにより、あまり活用されていなかった SAP データを、各担当が自分の業務に活用して組織で情報共有できるようになりました。... Show More企業のビジネス活動において、データはこれまで以上に必要不可欠な資産となっています。増え続けるデータを管理・統合・分析し、データでアクションを起こす必要性が増している現在、成功している企業はどのようなデータ戦略を実行しているのか?
本 Web セミナーシリーズでは、Qlik でデータからアクションを起こすデータ主導のビジネスで成功しているお客様より、課題から導入の経緯、デモンストレーション、活用例などをご紹介します。※ 参加費無料。パソコン・タブレット・スマートフォンで、どこからでもご視聴いただけます。
【オンデマンド配信】
2 年間で何が変わる?BI ツールによる SAP データ活用の成功と課題株式会社クレハでは、 SAP のデータを Qlik Sense に取り込んで可視化し、販売の予実管理や各月の在庫の品目別推移、地図上での配送コストなどの分析を可能にしました。これにより、あまり活用されていなかった SAP データを、各担当が自分の業務に活用して組織で情報共有できるようになりました。SAP データを Snowflake に格納し、ディープラーニングなどを含む幅広い活用のためのデータ基盤とするプロジェクトも進行中です。
どの企業でも課題となっている BI ツールの社内活用の普及は、同社でも簡単ではありませんでした。担当者が語る、2 年間にわたる具体的な施策や得られた効果とは?成功事例や失敗事例も交えてお話しします。 -
Limited Time Offer! Get Qlik Trained at Discounted Rates
Are you ready to take your Qlik skills to the next level? Then we have got exciting news for you! Qlik offers a wide variety of courses and delivery methods to suit your learning needs. Take the training you need to achieve your learning goals with these recently released promotions: Looking to take a traditional, classroom training approach, where our expert instructor leads you through demonstrations and hands-on exercises? Attend instructo... Show MoreAre you ready to take your Qlik skills to the next level?
Then we have got exciting news for you!
Qlik offers a wide variety of courses and delivery methods to suit your learning needs. Take the training you need to achieve your learning goals with these recently released promotions:
Looking to take a traditional, classroom training approach, where our expert instructor leads you through demonstrations and hands-on exercises? Attend instructor-led training virtually, available in different time zones and languages; or with a private session just for your team:
- 30% off Public training courses – Discount Code: Classroom30
- 25% off all Private Classroom training - Contact your Account Manager, Services Sales contact or e-mail us at education@qlik.com to receive a quote and schedule your training.
Purchase self-paced subscriptions to Qlik Continuous Classroom and Talend Academy where all the learning you need is right at your fingertips – anytime, anywhere, always.
- 20% off Qlik Continuous Classroom Individual & Unlimited subscriptions – Discount Code: Selfpaced20
- Business Analyst Individual Subscription
- Data Architect Individual Subscription
- Full Access Individual Subscription
- Full Access Unlimited Corporate Subscription
- 20% off Talend Academy Individual subscription - Discount Code: Selfpaced20
Discount is valid for a limited time only.
-
July Qlik Digest
Welcome to the July Qlik Digest, where you can find all of Qlik’s latest updates. This month, Gartner Magic Quadrant for Analytics & BI Platforms is out, Qlik Talend Cloud is finally generally available (GA), and more! -
【9/18(水)- 20(金)開催】オンラインイベント - IT トレンド EXPO 2024 Summer
Qlik は、「IT トレンド EXPO 2024 Summer」の「AI・業務自動化」エリアに、バーチャルブースを出展します。 年間約 2,000 万人に活用されている IT 製品の比較サイトの IT トレンドは、3 日間の日程で「IT トレンド EXPO 2024 Summer」を開催します。著名な特別ゲストによる基調講演をはじめ、エリア別に多数の企業のバーチャルブースを展開する国内最大級のオンラインイベントに、ぜひご参加ください。 Qlik は、AI 戦略をサポートするデータ統合・データ品質・分析ソリューションのリーダー企業として、「AI・業務自動化」エリアにバーチャルブースを出展します。ぜひ、Qlik バーチャルブースにお越しください! Qlik は、Gartner® Magic Quadrant のデータ統合ツール・アナリティクス / BI プラットフォームの分野で、リーダーの 1 社に評価されました。【開催概要】日時:2024年 9月 18日(水)– 20日(金)会場:オンラ... Show MoreQlik は、「IT トレンド EXPO 2024 Summer」の「AI・業務自動化」エリアに、バーチャルブースを出展します。
年間約 2,000 万人に活用されている IT 製品の比較サイトの IT トレンドは、3 日間の日程で「IT トレンド EXPO 2024 Summer」を開催します。著名な特別ゲストによる基調講演をはじめ、エリア別に多数の企業のバーチャルブースを展開する国内最大級のオンラインイベントに、ぜひご参加ください。
Qlik は、AI 戦略をサポートするデータ統合・データ品質・分析ソリューションのリーダー企業として、「AI・業務自動化」エリアにバーチャルブースを出展します。ぜひ、Qlik バーチャルブースにお越しください!
Qlik は、Gartner® Magic Quadrant のデータ統合ツール・アナリティクス / BI プラットフォームの分野で、リーダーの 1 社に評価されました。
【開催概要】
日時:2024年 9月 18日(水)– 20日(金)
会場:オンライン
参加費:無料
主催:株式会社 Innovation & Co. -
Take control of your App versions using Qlik Application Automation and GitHub
On a previous blog post, I shared a nifty tool that helps you introduce version control into your development workflow. I invite you to read about that and follow the gitoqlok and its latest updates. In this post we are going to talk about a simpler, less cumbersome way to implement a simple version control system using Qlik Application Automation and the Github connector blocks. So, if you are someone who ends up with dozens of apps named v1, v2... Show MoreOn a previous blog post, I shared a nifty tool that helps you introduce version control into your development workflow. I invite you to read about that and follow the gitoqlok and its latest updates.
In this post we are going to talk about a simpler, less cumbersome way to implement a simple version control system using Qlik Application Automation and the Github connector blocks. So, if you are someone who ends up with dozens of apps named v1, v2, v3, etc... then we're about to end that.
The setup is pretty simple, a Qlik Application Automation, a Github account, and we connect the two!
Let's start with with creating the Qlik Application Automation on your Qlik Cloud tenant. Head over to the Add New, then create a new Blank automation,
Once created, you'll be able to configure the Start block. Here, we are offered different ways to kick off the automation and in our case, we will use the WebHook run mode in order to hook into the Qlik Cloud Services.
We would like to run the automation once an App is published in our managed space. Take a look at the image below and change it to suit your needs.
Our next block is the Get Space block, you will find it under the Qlik Cloud Services section. This will allow us to find our "Git Demo Published" space and grab its ID. This is easy to do using the Do Lookup function.
Since Github doesn't allow space characters in Repository names, we will mitigate that by creating a variable which we will use to format the Space name into "git-demo-published". Notice on the image below that we use the Replace and Lowercase text functions.
Great, we now have our space information. Next, let's use the Get App Information block to grab the published app's id as shown below.
Our next step is to actually Export the App (think of this as right clicking on the app in the hub and exporting it).
Alright, we now have a nicely formatted space name that will be used as our Repository name, and we have our "published" app exported and ready to go.Our final step is to connect to Github. Qlik Application Automation makes this easy, just grab the Get Repository block under the Github section and drop it in. You will need to first authorize Qlik, so do this under the connection tab.
In the Inputs tab, enter your username and drop in the Variable we previously created as the name of the Repo.
Under Settings, make sure to change the On Error dropdown to "Ignore - Continue Automation and ignore errors". This will allow us to bypass a limitation set by Github for when a Repository is not yet created.Next, using the convenient Condition Block, we will check to see if the returned value from the Get Repository block is empty (i.e, there is No repository under that name). If YES, we create it using the Add Repository block
After the condition is met (or if we already have the existing repo), we can now push our App to github.
We will use the Create of Update File content Block to push the App qvf into the main branch. Take a look at the screenshot below to review the settings. Notice that we used the App name from the previous Get App Information block and appended it with the .qvf extension.We're all done with the Automation. You can save it now and head over to your App to publish it and test.
Publishing the app will trigger the automation to run, and if we now head over to Github, we can see that a new Repository names "git-demo-published" (our formatted Space name) has been created, and a new commit was added with our first version of the App as a qvf.
After publishing a second time, we notice a new commit with the second version of the App.
By using this workflow, we can guarantee that our app versions are automatically stored for us to got back to if needed or to collaborate with other team members in a more efficient way.
I hope you found this blog post helpful, let me know if the comments below if you have any questions!
Ouadie
-
【開催レポート】 第4回 Qlikデータソン @ 日比谷国際ビル
【開催レポート】 第4回 Qlikデータソン 7月18日、第4回Qlikデータソンを開催しました。今年も日比谷国際ビルに朝から約60名のQlikアプリ開発者が集まり、そのQlikスキルを競いました。このブログでは、第4回Qlikデータソンの様子をお届けします。 なお、受賞者のQlik Senseアプリは、日本語デモアプリサイト「Qlik Showcase」に一般公開されています。また、7月30日(火曜) 14時より「Qlikデータソンアフター配信(視聴申込はコチラ)」と題して、アワード受賞アプリのご紹介などデータソンの様子をライブ配信でお届けさせていただきます! ■朝10時、日比谷に集合!そしてデータソンスタート! まず、Qlikの中嶋よりご挨拶とデータソンの課題やデータに関する説明がありました。昨年同様、参加者には課題やデータに関する情報は一切事前に告げられておらず、このとき初めて課題とデータが提供されました。 また、今回は前回とは異なる審査方法を用いました。まず、一次審査として... Show More【開催レポート】 第4回 Qlikデータソン
7月18日、第4回Qlikデータソンを開催しました。
今年も日比谷国際ビルに朝から約60名のQlikアプリ開発者が集まり、そのQlikスキルを競いました。
このブログでは、第4回Qlikデータソンの様子をお届けします。
なお、受賞者のQlik Senseアプリは、日本語デモアプリサイト「Qlik Showcase」に一般公開されています。
また、7月30日(火曜) 14時より「Qlikデータソンアフター配信(視聴申込はコチラ)」と題して、アワード受賞アプリのご紹介などデータソンの様子をライブ配信でお届けさせていただきます!
■朝10時、日比谷に集合!そしてデータソンスタート!まず、Qlikの中嶋よりご挨拶とデータソンの課題やデータに関する説明がありました。昨年同様、参加者には課題やデータに関する情報は一切事前に告げられておらず、このとき初めて課題とデータが提供されました。
また、今回は前回とは異なる審査方法を用いました。
まず、一次審査としてQlikメンバーが成果物の机上評価を行い、ファイナリストを選出しました。
その後、ファイナリストが最終プレゼンテーションを行い、それを見た会場の参加者投票によりアワード受賞者を決めました。
データソン課題参加者は「イギリスに300以上の店舗を持つ食品小売企業のデータアナリスト」という設定で、自社の在庫と販売データの実績値と予測値を渡されて、それらを分析をすることになりました。
これまでデータソンでは主に販売系のデータのみを取り扱ってきましたが、今回は在庫のデータもあったためユニークかつ新鮮味がありました。
普段在庫データを取り扱う機会がない参加者は、課題とデータの読み取りに苦戦している様子も見受けられました。要件の一例:
"売上金額、売上損失、有効在庫比率、在庫高、手持ち在庫日数について、今週(第23週)の状況と前週(第22週)の状況を比較する。"
"店舗ごとの在庫状況(不足または過剰)を分析したい。"
"第24週に在庫が不足しそうな店舗とその商品について、店舗間で商品の移動を行うことで売上損失を削減できるか検討したい。"難しい課題やデータに対してたった4時間半の作業時間しか取れないにもかかわらず、皆さん素晴らしいQlikアプリを開発しました。
■Qlik Analytics責任者Brendan GradyによるQlik最新情報データソンの成果物を提出した後は、Qlik社のAnalytics部門責任者Brendan Gradyによる最新情報のプレゼンテーションがありました。
非構造化データを分析し、生成AI(人工知能)で回答を作成する新製品「Qlik Answers」など、従来のBIに囚われないQlikの進化を参加者へお届けしました。
また、参加者からは活発に質問が寄せられました。新生Qlikへの期待と受け止めます!■一次審査結果発表!
Brendanの発表中、Qlikメンバーによる一次審査が終わりました。
厳正なる審査のうえ、選ばれた11組のファイナリストです。・ユーザー部門
A-53 大桃 慶之
A-54 cat’s hands
A-03 Team Asagao
A-47 宮﨑 卓矢
A-12 谷町ジャンクション・パートナー部門
A-24 さわやか
A-16 島嵜 雄志
A-15 インサイトクラン
A-59 吉野 智士
A-20 チーム同期
A-39 ISL■いよいよファイナリストによるプレゼンテーション発表!
16時からは、ファイナリスト11組によるプレゼンテーションが行われました。持ち時間は1チーム7分間!
全11組の発表が終わった後、参加者の皆さんによる投票が行われました。
■緊張の瞬間!アワード授賞式!そして懇親会へ...長い一日が終わり、懇親会がスタート!乾杯の挨拶は、プリセールスチームのAPACディレクター 「アームス」ことArmstrong Mejillaが日本語で行いました。
そしてしばし歓談の後、いよいよアワード発表の時間がやってきました!Qlikの濱野と中嶋が壇上にあがり、パートナー部門、ユーザー部門それぞれの賞を発表しました。
アワード受賞者は以下の通りです。
*チーム参加の場合はチーム名を、個人参加の場合は個人名を記載しています。パートナー部門
・審査員特別賞: 吉野 智士様(アシスト)
・優秀賞: 島嵜 雄志(ビジネスブレイン太田昭和)
・最優秀賞: インサイトクラン(日立社会情報サービス)
ユーザー部門
・審査員特別賞: cat’s hands(富士通)
・優秀賞: 宮﨑 卓矢 様
・最優秀賞: Team Asagao(アステラス製薬)
受賞されたみなさま、おめでとうございます!
受賞者のQlik Senseアプリは、日本語デモアプリサイト「Qlik Showcase」に一般公開されています。ぜひ一度覗いてみてください!また、7月30日(火曜) 14時より、「Qlikデータソンアフター配信(視聴申込はコチラ)」と題して、アワード受賞アプリのご紹介など、データソンの様子をお届けさせていただきます!
■さいごに
昨年の第3回に引き続き、第4回Qlikデータソンも、参加者の皆さまのQlik LOVEがあふれた素晴らしい会となりました。
ご参加いただいた皆様、本当にありがとうございました。
今後ともQlikをどうぞよろしくお願いいたします。 -
Qlik ユーザーミートアップ開催報告
この 6月にユーザーミートアップを開催しました。今回は東京だけでなく、初めて大阪でも開催しました。登録数も200名を超え、参加率も 80% 以上と非常に盛況でした。その開催模様をご報告します。


.jpg")
.jpg")
.jpg")
.jpg")


