Unlock a world of possibilities! Login now and discover the exclusive benefits awaiting you.

Featured Content
-
How to contact Qlik Support
Qlik offers a wide range of channels to assist you in troubleshooting, answering frequently asked questions, and getting in touch with our technical e... Show MoreQlik offers a wide range of channels to assist you in troubleshooting, answering frequently asked questions, and getting in touch with our technical experts. In this article, we guide you through all available avenues to secure your best possible experience.
For details on our terms and conditions, review the Qlik Support Policy.
Index:
- Support and Professional Services; who to contact when.
- Qlik Support: How to access the support you need
- 1. Qlik Community, Forums & Knowledge Base
- The Knowledge Base
- Blogs
- Our Support programs:
- The Qlik Forums
- Ideation
- How to create a Qlik ID
- 2. Chat
- 3. Qlik Support Case Portal
- Escalate a Support Case
- Phone Numbers
- Resources
Support and Professional Services; who to contact when.
We're happy to help! Here's a breakdown of resources for each type of need.
Support Professional Services (*) Reactively fixes technical issues as well as answers narrowly defined specific questions. Handles administrative issues to keep the product up-to-date and functioning. Proactively accelerates projects, reduces risk, and achieves optimal configurations. Delivers expert help for training, planning, implementation, and performance improvement. - Error messages
- Task crashes
- Latency issues (due to errors or 1-1 mode)
- Performance degradation without config changes
- Specific questions
- Licensing requests
- Bug Report / Hotfixes
- Not functioning as designed or documented
- Software regression
- Deployment Implementation
- Setting up new endpoints
- Performance Tuning
- Architecture design or optimization
- Automation
- Customization
- Environment Migration
- Health Check
- New functionality walkthrough
- Realtime upgrade assistance
(*) reach out to your Account Manager or Customer Success Manager
Qlik Support: How to access the support you need
1. Qlik Community, Forums & Knowledge Base
Your first line of support: https://community.qlik.com/
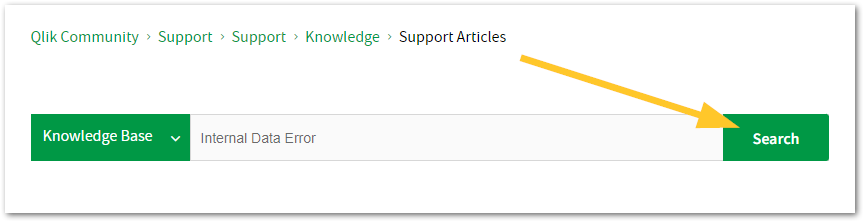
Looking for content? Type your question into our global search bar:
The Knowledge Base
Leverage the enhanced and continuously updated Knowledge Base to find solutions to your questions and best practice guides. Bookmark this page for quick access!
- Go to the Official Support Articles Knowledge base
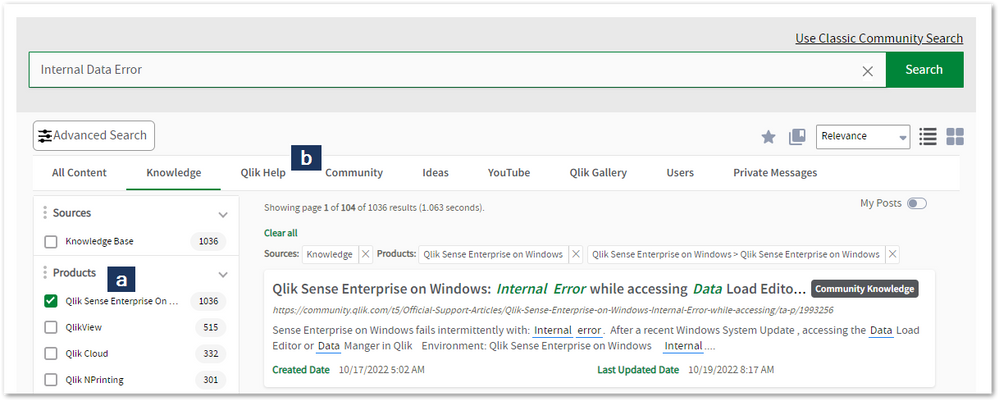
- Type your question into our Search Engine
- Need more filters?
- Filter by Product
- Or switch tabs to browse content in the global community, on our Help Site, or even on our Youtube channel
Blogs
Subscribe to maximize your Qlik experience!
The Support Updates Blog
The Support Updates blog delivers important and useful Qlik Support information about end-of-product support, new service releases, and general support topics. (click)The Qlik Design Blog
The Design blog is all about product and Qlik solutions, such as scripting, data modelling, visual design, extensions, best practices, and more! (click)The Product Innovation Blog
By reading the Product Innovation blog, you will learn about what's new across all of the products in our growing Qlik product portfolio. (click)Our Support programs:
Q&A with Qlik
Live sessions with Qlik Experts in which we focus on your questions.Techspert Talks
Techspert Talks is a free webinar to facilitate knowledge sharing held on a monthly basis.Technical Adoption Workshops
Our in depth, hands-on workshops allow new Qlik Cloud Admins to build alongside Qlik Experts.Qlik Fix
Qlik Fix is a series of short video with helpful solutions for Qlik customers and partners.The Qlik Forums
- Quick, convenient, 24/7 availability
- Monitored by Qlik Experts
- New releases publicly announced within Qlik Community forums (click)
- Local language groups available (click)
Ideation
Suggest an idea, and influence the next generation of Qlik features!
Search & Submit Ideas
Ideation GuidelinesHow to create a Qlik ID
Get the full value of the community.
Register a Qlik ID:
- Go to register.myqlik.qlik.com
If you already have an account, please see How To Reset The Password of a Qlik Account for help using your existing account. - You must enter your company name exactly as it appears on your license or there will be significant delays in getting access.
- You will receive a system-generated email with an activation link for your new account. NOTE, this link will expire after 24 hours.
If you need additional details, see: Additional guidance on registering for a Qlik account
If you encounter problems with your Qlik ID, contact us through Live Chat!
2. Chat
Incidents are supported through our Chat, by clicking Chat Now on any Support Page across Qlik Community.
To raise a new issue, all you need to do is chat with us. With this, we can:
- Answer common questions instantly through our chatbot
- Have a live agent troubleshoot in real time
- With items that will take further investigating, we will create a case on your behalf with step-by-step intake questions.
3. Qlik Support Case Portal
Log in to manage and track your active cases in the Case Portal. (click)
Before you can access the Support Portal, please complete your Community account setup. See First time access to the Qlik Customer Support Portal fails with: Unauthorized Access Please try signing out and sign in again.
Please note: to create a new case, it is easiest to do so via our chat (see above). Our chat will log your case through a series of guided intake questions.
Your advantages:
- Self-service access to all incidents so that you can track progress
- Option to upload documentation and troubleshooting files
- Option to include additional stakeholders and watchers to view active cases
- Follow-up conversations
When creating a case, you will be prompted to enter problem type and issue level. Definitions shared below:
Problem Type
Select Account Related for issues with your account, licenses, downloads, or payment.
Select Product Related for technical issues with Qlik products and platforms.
Priority
If your issue is account related, you will be asked to select a Priority level:
Select Medium/Low if the system is accessible, but there are some functional limitations that are not critical in the daily operation.
Select High if there are significant impacts on normal work or performance.
Select Urgent if there are major impacts on business-critical work or performance.
Severity
If your issue is product related, you will be asked to select a Severity level:
Severity 1: Qlik production software is down or not available, but not because of scheduled maintenance and/or upgrades.
Severity 2: Major functionality is not working in accordance with the technical specifications in documentation or significant performance degradation is experienced so that critical business operations cannot be performed.
Severity 3: Any error that is not Severity 1 Error or Severity 2 Issue. For more information, visit our Qlik Support Policy.
Escalate a Support Case
If you require a support case escalation, you have two options:
- Request to escalate within the case, mentioning the business reasons.
To escalate a support incident successfully, mention your intention to escalate in the open support case. This will begin the escalation process. - Contact your Regional Support Manager
If more attention is required, contact your regional support manager. You can find a full list of regional support managers in the How to escalate a support case article.
Phone Numbers
When other Support Channels are down for maintenance, please contact us via phone for high severity production-down concerns.
- Qlik Data Analytics: 1-877-754-5843
- Qlik Data Integration: 1-781-730-4060
- Talend AMER Region: 1-800-810-3065
- Talend UK Region: 44-800-098-8473
- Talend APAC Region: 65-800-492-2269
Resources
A collection of useful links.
Qlik Cloud Status Page
Keep up to date with Qlik Cloud's status.
Support Policy
Review our Service Level Agreements and License Agreements.
Live Chat and Case Portal
Your one stop to contact us.




Recent Documents
-
Qlik Cloud: use qlik-cli to import list of users from a csv file
Using the qlik-cli it is possible to import a list of users to a tenant from a csv file.It will be then possible to assign roles, entitlements and spa... Show MoreUsing the qlik-cli it is possible to import a list of users to a tenant from a csv file.
It will be then possible to assign roles, entitlements and space permissions to the users before they log in to the tenant.
Here's a possible example of how to do that.- Create a csv file called userlist.csv in this format (see attached sample file)
Name,Email Mick Case,Mick.Case@example.com Davide Bironi,Davide.Bironi@example.com Kenny Handsley,Kenny.Handsley@example.com Leigh Kersriver,Leigh.Kersriver@example.com Gerry Vain,Gerry.Vain@example.com Tommy Ioni,Tommy.Ioni@example.com Terence Attendant,Terence.Attendant@example.com John Oughborne,John.Oughborne@example.com William Guard,William.Guard@example.com Renato Padovano,Renato.Padovano@example.com - Save the following shell script and put it in the same folder as the csv file
- Powershell version (note: if the location of the qlik-cli is not added as an Environment Variable Path you will need to modify the script to include the full path in front of the command "qlik")
# Import the csv file as an array of objects $csv = Import-Csv -Path userlist.csv # Initialize a counter for the subject $counter = 1 # Loop through each object in the array foreach ($row in $csv) { # Generate the subject using the counter $subject = "ExampleSubject" + $counter # Execute the qlik-cli command with the column values and the subject qlik user create --name $row.Name --email $row.Email --subject $subject # Increment the counter $counter++ } - Bash version for UNIX systems:
#!/bin/bash # Get the number of lines in the csv file lines=$(wc -l < userlist.csv) # Loop from the second line to the last line (skipping the header row) for ((i=2; i<=lines; i++)) do # Get the name and email values from the ith line using cut name=$(cut -d, -f1 userlist.csv | sed -n "${i}p") email=$(cut -d, -f2 userlist.csv | sed -n "${i}p") # Generate the subject using the counter subject="ExampleSubject$counter" # Execute the qlik-cli command with the column values and the subject qlik user create --name "$name" --email "$email" --subject "$subject" # Increment the counter ((counter++)) done
- Powershell version (note: if the location of the qlik-cli is not added as an Environment Variable Path you will need to modify the script to include the full path in front of the command "qlik")
- Execute the scripts according to your operating system requirements
NOTE: users will be created with a temporary SubjectId like "ExampleSubject1", "ExampleSubject2", and so so on. After the first login, users will get a proper SubjectId.
Roles, entitlements and space permissions will follow the users to the new subject.Alternatives ways of adding users via scripts might be achieved via the an /api/v1/users CALL with the POST method and a payload like:
PAYLOAD:
{
  "email": "name@example.com",
  "name": "First Lastname",
  "subject": "SubjectXYZ"
}
The information and the files in this article are provided as-is and will be used at your discretion. Depending on the tool(s) used, customization(s), and/or other factors, ongoing support on the solution below may not be provided by Qlik Support.
Environment
- Create a csv file called userlist.csv in this format (see attached sample file)
-
The Qlik Sense Monitoring Applications for Cloud and On Premise
Qlik Sense Enterprise Client-Managed offers a range of Monitoring Applications that come pre-installed with the product. Qlik Cloud offers the Data Ca... Show MoreQlik Sense Enterprise Client-Managed offers a range of Monitoring Applications that come pre-installed with the product.
Qlik Cloud offers the Data Capacity Reporting App for customers on a capacity subscription, and additionally customers can opt to leverage the Qlik Cloud Monitoring apps.
This article provides information on available apps for each platform.
Content:
- Qlik Cloud
- Data Capacity Reporting App
- Access Evaluator for Qlik Cloud
- Answers Analyzer for Qlik Cloud
- App Analyzer for Qlik Cloud
- Automation Analyzer for Qlik Cloud
- Entitlement Analyzer for Qlik Cloud
- Reload Analyzer for Qlik Cloud
- Report Analyzer for Qlik Cloud
- How to automate the Qlik Cloud Monitoring Apps
- Other Qlik Cloud Monitoring Apps
- OEM Dashboard for Qlik Cloud
- Monitoring Apps for Qlik Sense Enterprise on Windows
- Operations Monitor, License Monitor, and Content Monitor
- App Metadata Analyzer
- The Monitoring & Administration Topic Group
- Other Apps
Qlik Cloud
Data Capacity Reporting App
The Data Capacity Reporting App is a Qlik Sense application built for Qlik Cloud, which helps you to monitor the capacity consumption for your license at both a consolidated and a detailed level. It is available for deployment via the administration activity center in a tenant with a capacity subscription.
The Data Capacity Reporting App is a fully supported app distributed within the product. For more information, see Qlik Help.
You can automate daily distribution of the latest app using the Capacity consumption app deployer template in Qlik Automate.
Access Evaluator for Qlik Cloud
The Access Evaluator is a Qlik Sense application built for Qlik Cloud, which helps you to analyze user roles, access, and permissions across a tenant.
The app provides:
- User and group access to spaces
- User, group, and share access to apps
- User roles and associated role permissions
- Group assignments to roles
For more information, see Qlik Cloud Access Evaluator.
Answers Analyzer for Qlik Cloud
The Answers Analyzer provides a comprehensive Qlik Sense dashboard to analyze Qlik Answers metadata across a Qlik Cloud tenant.
It provides the ability to:
- Track user questions across knowledgebases, assistants, and source documents
- Analyze user behavior to see what types of questions users are asking about what content
- Optimize knowledgebase sizes and increase answer accuracy by removing inaccurate, unused, and unreferenced documents
- Track and monitor page size to quota
- Ensure that data is kept up to date by monitoring knowledgebase index times
- Tie alerts into metrics, (e.g. a knowledgebase hasn't been updated in over X days)
For more information, see Qlik Cloud Answers Analyzer.
App Analyzer for Qlik Cloud
The App Analyzer is a Qlik Sense application built for Qlik Cloud, which helps you to analyze and monitor Qlik Sense applications in your tenant.
The app provides:
- User sessions by app, sheets viewed
- Large App consumption monitoring
- App, Table and Field memory footprints
- Synthetic keys and island tables to help improve app development
- Threshold analysis for fields, tables, rows and more
- Reload times and peak RAM utilization by app
For more information, see Qlik Cloud App Analyzer.
Automation Analyzer for Qlik Cloud
The Automation Analyzer is a Qlik Sense application built for Qlik Cloud, which helps you to analyze and monitor Qlik Application Automation runs in your tenant.
Some of the benefits of this application are as follows:
- Track number of automations by type and by user
- Analyze concurrent automations
- Compare current month vs prior month runs
- Analyze failed runs - view all schedules and their statuses
- Tie in Qlik Alerting
For more information, see Qlik Cloud Automation Analyzer.
Entitlement Analyzer for Qlik Cloud
The Entitlement Analyzer is a Qlik Sense application built for Qlik Cloud, which provides Entitlement usage overview for your Qlik Cloud tenant for user-based subscriptions.
The app provides:
- Which users are accessing which apps
- Consumption of Professional, Analyzer and Analyzer Capacity entitlements
- Whether you have the correct entitlements assigned to each of your users
- Where your Analyzer Capacity entitlements are being consumed, and forecasted usage
For more information, see The Entitlement Analyzer.
Reload Analyzer for Qlik Cloud
The Reload Analyzer is a Qlik Sense application built for Qlik Cloud, which provides an overview of data refreshes for your Qlik Cloud tenant.
The app provides:
- The number of reloads by type (Scheduled, Hub, In App, API) and by user
- Data connections and used files of each app’s most recent reload
- Reload concurrency and peak reload RAM
- Reload tasks and their respective statuses
For more information, see Qlik Cloud Reload Analyzer.
Report Analyzer for Qlik Cloud
The Report Analyzer provides a comprehensive dashboard to analyze metered report metadata across a Qlik Cloud tenant.
The app provides:
- Current Month Reports Metric
- History of Reports Metric
- Breakdown of Reports Metric by App, Event, Executor (and time periods)
- Failed Reports
- Report Execution Duration
For more information, see Qlik Cloud Report Analyzer.
How to automate the Qlik Cloud Monitoring Apps
Do you want to automate the installation, upgrade, and management of your Qlik Cloud Monitoring apps? With the Qlik Cloud Monitoring Apps Workflow, made possible through Qlik's Application Automation, you can:
- Install/update the apps with a fully guided, click-through installer using an out-of-the-box Qlik Application Automation template.
- Programmatically rotate the API key that is required for the data connection on a schedule using an out-of-the-box Qlik Application Automation template. This ensures that the data connection is always operational.
- Get alerted whenever a new version of a monitoring app is available using Qlik Data Alerts.
For more information and usage instructions, see Qlik Cloud Monitoring Apps Workflow Guide.
Other Qlik Cloud Monitoring Apps
OEM Dashboard for Qlik Cloud
The OEM Dashboard is a Qlik Sense application for Qlik Cloud designed for OEM partners to centrally monitor usage data across their customers’ tenants. It provides a single pane to review numerous dimensions and measures, compare trends, and quickly spot issues across many different areas.
Although this dashboard is designed for OEMs, it can also be used by partners and customers who manage more than one tenant in Qlik Cloud.
For more information and to download the app and usage instructions, see Qlik Cloud OEM Dashboard & Console Settings Collector.
With the exception of the Data Capacity Reporting App, all Qlik Cloud monitoring applications are provided as-is and are not supported by Qlik. Over time, the APIs and metrics used by the apps may change, so it is advised to monitor each repository for updates and to update the apps promptly when new versions are available.
If you have issues while using these apps, support is provided on a best-efforts basis by contributors to the repositories on GitHub.
Monitoring Apps for Qlik Sense Enterprise on Windows
Operations Monitor, License Monitor, and Content Monitor
The Operations Monitor loads service logs to populate charts covering the performance history of hardware utilization, active users, app sessions, results of reload tasks, and errors and warnings. It also tracks changes made in the QMC that affect the Operations Monitor.
- Basic information can be found in Operations Monitor | help.qlik.com
- Detailed descriptions of sheets and visualizations are accessible in the About the Operations Monitor story available from the app overview page under Stories
The License Monitor loads service logs to populate charts and tables covering token allocation, usage of login and user passes, and errors and warnings.
- Basic information can be found in License Monitor | help.qlik.com
- Detailed descriptions of sheets and visualizations are accessible in the About the License Monitor story available from the app overview page under Stories
The Content Monitor loads from the APIs and logs to present key metrics on the content, configuration, and usage of the platform, allowing administrators to understand the evolution and origin of specific behaviors of the platform.
- Basic information can be found in Content Monitor | help.qlik.com
- Each sheet in the Content Monitor includes an About text box to describe its content.
All three apps come pre-installed with Qlik Sense.
If a direct download is required: Sense License Monitor | Sense Operations Monitor | Content Monitor (download page). Note that Support can only be provided for Apps pre-installed with your latest version of Qlik Sense Enterprise on Windows.
App Metadata Analyzer
The App Metadata Analyzer app provides a dashboard to analyze Qlik Sense application metadata across your Qlik Sense Enterprise deployment. It gives you a holistic view of all your Qlik Sense apps, including granular level detail of an app's data model and its resource utilization.
Basic information can be found here:
App Metadata Analyzer (help.qlik.com)
For more details and best practices, see:
App Metadata Analyzer (Admin Playbook)
The app comes pre-installed with Qlik Sense.
The Monitoring & Administration Topic Group
Looking to discuss the Monitoring Applications? Here we share key versions of the Sense Monitor Apps and the latest QV Governance Dashboard as well as discuss best practices, post video tutorials, and ask questions.
Other Apps
LogAnalysis App: The Qlik Sense app for troubleshooting Qlik Sense Enterprise on Windows logs
Sessions Monitor, Reloads-Monitor, Log-Monitor
Connectors Log AnalyzerAll Other Apps are provided as-is and no ongoing support will be provided by Qlik Support.
-
Qlik Sense: Legend will be disabled when 'The expression is a color code' is tur...
When setting charts' appearance with colour by the expression, the legend is hidden and the corresponding options in property manual is disabled.Chart... Show MoreWhen setting charts' appearance with colour by the expression, the legend is hidden and the corresponding options in property manual is disabled.
Charts affected: Bar chart, Combo Chart, Gauge, Line Chart, Pie Chart, Scatter plot
Charts are not applicable: Map, Table, Text&Image, Treemap, extensions with no legend support.
The reason is that 'final calculated colour' of each 'data point' will not be recognized and captured by Qlik Sense. As a result, the legend will never show the correct colour unless an expensive calculation is performed after rendering, which affects user experience of the product.
This is working as designed.
Solutions:
A recommendation to use default color scheme provided instead. Expression can be set to a value among the total range, in order to determine the color in the scheme. For instance:
Give an expression to 'color by expression' like this:
if([Actions.DueDates]='Overdue <5 days', 50,if([Actions.DueDates]='Overdue 5 - 15 days', 100,if([Actions.DueDates]='Overdue >15 days', 200,if([Actions.DueDates]='<15 days remaining', 500,if([Actions.DueDates]='>15 days remaining', 1000,if([Actions.DueDates]='Completed', 2000 ))))))
Then the color can be 'controlled' by given a score in number: 50, 100, 200...
-
Qlik Replicate task notifications don't send after changes to the mail server co...
Qlik Replicate task notifications can stop being delivered after the server-level Mail Settings (for example, the SMTP host) are changed. Since Qlik R... Show MoreQlik Replicate task notifications can stop being delivered after the server-level Mail Settings (for example, the SMTP host) are changed.
Since Qlik Replicate loads server-level settings into memory when a task starts, tasks already running when the change is committed continue to send notifications using the previous mail server configuration and will therefore fail.
Environment
- Qlik Replicate
Resolution
To restore notification delivery for the affected tasks:
- In the Qlik Replicate console, stop all affected tasks
- Restart the Qlik Replicate services
- Resume (start) the previously stopped tasks
- Trigger (or wait for) the next notification condition and confirm that the notification email is received by the configured recipients
To prevent the issue:
Whenever server-level Mail Settings or the SMTP server configuration are changed, restart the affected Qlik Replicate tasks so that they reload the updated configuration. A Qlik Replicate service restart may also be performed as part of the change procedure to ensure the new settings are fully initialized.
Environment
- Qlik Replicate
-
Unable to validate Talend Administration Center license: Data is corrupted: inte...
Using https://www.talend.com/api/get_tis_validation_token_form.php to validate the Talend Administration Center license, the following error is return... Show MoreUsing https://www.talend.com/api/get_tis_validation_token_form.php to validate the Talend Administration Center license, the following error is returned:
Data is corrupted: internal error
Resolution
Ensure the link is being used from the Talend Administration Center License validation page accessible from the UI or the DB configuration page.
A note for Air Gapped / No Internet Access environments:
- Go to the License Validation Page
- Obtain the Validation String, copy to Notepad or similar
- In the same page, right-click the link to the validation string.
- Copy the link and paste it into Notepad or similar
The link must contain some unique value in the URL iv=xxxxxxxxxx - Use the validation string and link in an environment with access to archive.talend.com to validate.
Cause
QTAC-1329 changed the validation URL from TIS Validation Token (www.talend.com) (no parameters) to TIS Validation Token (archive.talend.com). This new feature introduced a random IV that is generated together with the validation message.
Environment
- Talend Administration Center
-
Qlik MCP connection to Claude or other LLMs must be reconnected regularly
Qlik MCP may need to be regularly reconnected to Claude or other LLMs. Resolution Verify that you set offline_access to Allowed during OAuth setup, wh... Show MoreQlik MCP may need to be regularly reconnected to Claude or other LLMs.
Resolution
Verify that you set offline_access to Allowed during OAuth setup, which reduces the need to re-authenticate once every 30 days.
See Creating OAuth clients for LLM clients for details.
Environment
- Qlik MCP
-
Qlik NPrinting May 2026 SR1 HTML rendering error specific argument was out of th...
After upgrading Qlik NPrinting to either May 2026 SR1 or February 2025 SR7, HTML-type reports fail with the following engine log and NPrinting Designe... Show MoreAfter upgrading Qlik NPrinting to either May 2026 SR1 or February 2025 SR7, HTML-type reports fail with the following engine log and NPrinting Designer report preview error:
The preview request failed with message: specific argument was out of the range of valid values
System.ThrowHelper.ThrowArgumentOutOfRangeException()Resolution
This issue is caused by a defect (SUPPORT-11950) in Qlik NPrinting May 2026 SR1 and February 2025 SR7.
Workaround:
Reduce the resolution of images in the report to lower values (example: 1024x768).
Alternatively, downgrade the Qlik NPrinting Engine.
- For Qlik NPrinting February 2025: Keep the Qlik NPrinting February 2025 SR7 Server installed, but uninstall the Qlik NPrinting February 2025 SR7 Engine, then install the February 2025 SR6 Engine.
- For Qlik NPrinting May 2026: Keep the Qlik NPrinting May 2026 SR1 Server installed, but uninstall the Qlik NPrinting May 2026 SR1 Engine, then install the May 2026 IR Engine.
Upgrade all components to the fixed version as soon as possible to address the version mismatch.
Fix Version:
Fixes will be available with:
- Qlik NPrinting May 2026 SR2
- Qlik NPrinting February 2025 SR8
Information provided on this defect is given as is at the time of documenting. For up-to-date information, please review the most recent Release Notes, or contact support with the ID SUPPORT-11950 for reference.
Environment
- Qlik NPrinting May 2026 SR1 and February 2025 SR7
-
Qlik Replicate: Periodically scheduled task not listed in the Executed Jobs tab
A scheduled Qlik Replicate task does not show up in the Executed Jobs list. This is working as intended. The Executed Jobs tab will only show executed... Show MoreA scheduled Qlik Replicate task does not show up in the Executed Jobs list.
This is working as intended. The Executed Jobs tab will only show executed jobs that were scheduled to run once only. In other words, jobs scheduled to run periodically (e.g. Daily, Weekly, Monthly) will not be shown.
See Scheduling jobs.
Environment
-
Qlik Replicate Task Configuration Options
The core object of Qlik Replicate is a Task, which is the instance of a table synchronization activity reading data from the Source endpoint and writi... Show MoreThe core object of Qlik Replicate is a Task, which is the instance of a table synchronization activity reading data from the Source endpoint and writing it to the target endpoint.
Depending on the use case, Qlik Replicate has multiple task types available. In this article, we provide you with an overview of the Task Types, the Options available in your tasks, and how to Migrate/Import tasks between environments.
Content:
- Task Types
- Unidirectional
- Bidirectional
- Log Stream
- Task options
- Full load
- Apply Changes
- Store Changes
- Additional Information on Different Types of Tasks
- Task Setup
- Full Load vs CDC
- Log Stream tasks
- Bidirectional tasks
- Task Migration
- Backing up, Restoring, and moving Qlik Replicate
- Exporting, migrating, and importing tasks
- Step-by-Step Migration
Task Types
Unidirectional
The most commonly used type. It replicates data from Database A to Database B.
Bidirectional
Used when Database A also needs to be updated whenever there is any change in Database B. Consists of two separately created tasks.
Log Stream
Qlik Replicate will save the Data Changes from the Source database locally, and these changes can later be down streamed to multiple Targets in parallel, instead of having multiple tasks reading from the same source and writing to different targets.
Task options
Full load
Essentially a full copy of the Source database, Qlik Replicate will read all columns/rows from the Source DB and create the exact same copy on the Target DB (if there are no filters or transformations setup).
Apply Changes
The CDC part of Qlik Replicate. Having this enabled will make so that Qlik Replicate will read the transaction log from the Source and apply any changes (INSERT, UPDATE, DELETE) to the Target DB.
Store Changes
By default disabled, enabling this will make so that a Change or Audit table is created on the Target side and all changes are Inserted into that Table Before and After images.
A task needs at least one option enabled but it can have all 3 enabled (being a task that will Full Load, Capture Data Changes and Store Changes)
Additional Information on Different Types of Tasks
Task Setup
Before you get started with designing the features that you need for a task, you must first define the task's default behavior.
For general information on setting up tasks in Qlik Replicate, see Adding tasks | Qlik Replicate Help.
Full Load vs CDC
Qlik Replicate tasks can be configured to move data from a source DB to a Target DB. These tasks can be configured in a variety of ways to move data from the source to the target database.
For an in-depth comparison and introduction on the two, see An Introduction to Qlik Replicate Tasks: Full Load vs CDC | Official Qlik Support Article.
Log Stream tasks
Log Stream enables a dedicated Qlik Replicate task to save data changes from the transaction log of a single source database and apply them to multiple targets, thereby eliminating the overhead of reading the logs for each target separately.
For an in-depth explanation on how to use Log Stream, see Using the Log Stream | Qlik Replicate Help.
Bidirectional tasks
For information on how to set up bidirectional tasks, see Setting up Bidirectional replication | Qlik Replicate Help.
Task Migration
Backing up, Restoring, and moving Qlik Replicate
Exporting, migrating, and importing tasks
Step-by-Step Migration
- Before you begin a migration, stop all tasks.
Before stopping the Qlik Replicate services to perform a migration, it’s best to stop all running tasks. If there are Log Stream tasks running, the best practice would be to stop first all child tasks reading from the Log Stream staging folder and then stop the Parent Log Stream task. - Back up the ~/data folder.
See Qlik Replicate Backup and Restore - Export the Qlik Replicate Repository (task/endpoints/server settings).
See Backing up or Exporting Tasks from Qlik Replicate. - Import the Qlik Replicate repository to a test or UAT environment.
See Importing tasks. - Verify all functionality in your test or UAT environment.
- Import the Qlik Replicate repository to your Production environment.
See Importing tasks. - Resume/start tasks to verify all functionality.
We recommend monitoring the tasks on the new server and comparing to old task logs to confirm all tasks were resumed where they should have resumed from.
Environment
-
Backing up or Exporting Tasks from Qlik Replicate
Can tasks be exported from Qlik Replicate or is a full ~\data backup required? You can export all or individual tasks with repctl exportrepository. To... Show MoreCan tasks be exported from Qlik Replicate or is a full ~\data backup required?
You can export all or individual tasks with repctl exportrepository.
To export tasks using the command line:
- On the Qlik Replicate host where you want to export the task, open the Start menu and expand Qlik Replicate, then select Qlik Replicate Command Line
You can also open the Windows command-line console and change the directory to <product_dir>\Attunity Replicate>\bin
-
Run the following command:
repctl connect
- To export tasks:
For exporting all tasks, run: repctl exportrepository
For exporting a specific task, run: repctl exportrepository task=”task:name”
Modify either command if you use a custom data directory. Example: repctl -d <custom_data_directory> exportrepository task=task_name
- By default, the repository will be exported to the Qlik Replicate directory /imports. In case you want it to be somewhere else, specify the path by adding: folder_name=path at the end of the command.
Example: repctl -d <custom_data_directory> exportrepository task=task_name [folder_name=<path>]
Environment
The information in this article is provided as-is and to be used at own discretion. Depending on tool(s) used, customization(s), and/or other factors ongoing support on the solution below may not be provided by Qlik Support.
Related Content
- On the Qlik Replicate host where you want to export the task, open the Start menu and expand Qlik Replicate, then select Qlik Replicate Command Line
-
An Introduction to Qlik Replicate Tasks: Full Load vs CDC
Qlik Replicate tasks can be configured to move data from a source DB to a Target DB. These tasks can be configured in a variety of ways to move data f... Show MoreQlik Replicate tasks can be configured to move data from a source DB to a Target DB. These tasks can be configured in a variety of ways to move data from the source to the target database.
This article aims to compare three popular task configurations and will provide additional details for the available Full Load settings. It is a supporting document to the Techspert discussion: Full Load.
Available configurations:
FULL LOAD only
FULL LOAD tasks are probably the simplest form of a Qlik Replicate task. With a Full Load only task, the data will be copied from the source tables to the target tables (Base Tables) and then the task will stop.
The target tables are basically a mirror image of the source tables with static data based on the last time the task was run.
The target tables are not kept in sync. This type of configuration is very similar to an old-style ETL type job, where the data is copied over one time when the task runs.
This Full Load type of task can be scheduled to run using replicates built-in scheduler or the Qlik replicate command line or rest API.
The task and target tables can utilize some features of Qlik replicate such as transformations and filters.
NOTE: A full load-only task can get around a limitation with LOB columns that are in a table with no primary key.
This limitation is for CDC tasks and the following is the CDC task notification you will get:Column 'MyLob' was removed from table definition 'dbo.No_PK_LOB': the column data type is LOB and the table has no primary key or unique index
It is required that a table with LOBs has a primary key, due to the way the task will perform a lookup back to the source table to get the LOB value. As this lookup is only done during the CDC phase, it is not a limitation for a Full Load task, which will be able to read the entire LOB column when it is copying the source data to the target table.
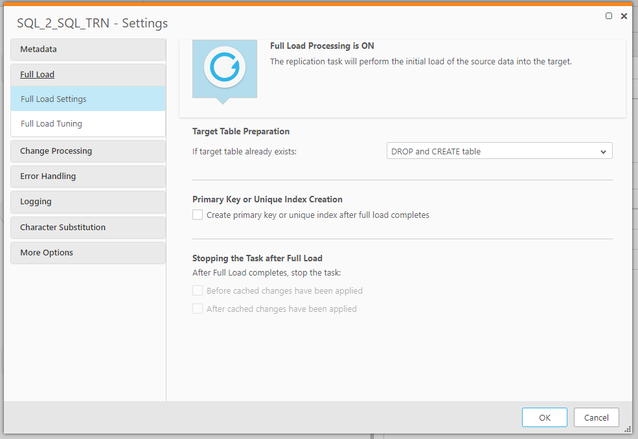
Full Load settings screen:
CDC only
CDC only tasks will capture changes from the source and write them out to the target database. In this type of task, there are typically no (Base Tables) in the target.
The Apply changes setting is typically disabled and only the Store Changes setting is enabled. With this type of configuration, the task will read changes from the source and write out the records to the Qlik Replicate Store Changes table also known as __CT tables.
This type of task configuration is typically used when the data in the target __CT table is going to feed a downstream process. The structure of these __CT tables is usually based on the source table and will contain the fields from the source as well as any transformation fields. The big feature of the __CT table is that it also contains the various header information from the source such as commit time, Operation Indicator etc.
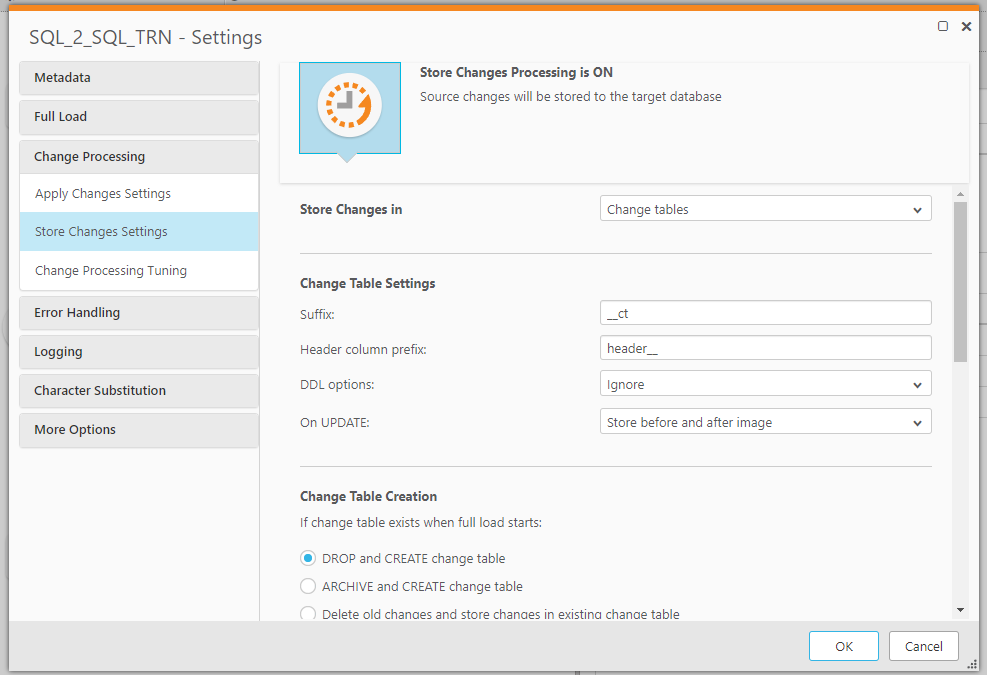
Store Changes settings screen:
FULL LOAD and CDC task
FULL LOAD and CDC tasks will typically contain the target (Base Tables) and they will populate those tables during the full load phase of a task.
Then the CDC phase of the task will capture every change to the source records and apply them to the target (Base Tables). This is a very typical configuration for a Qlik replicate task.
Note: this type of task can also have the store changes enabled (as described above in 2)
Conceptual vs. Actual task process order
Clarification of an often misunderstood task phase order related to the Full Load and CDC task:
When discussing Full Load and CDC combined in a single task, we think in terms of the Full Load phase starting first and then the CDC phase starting second to apply changes and keep the task in sync. While this is conceptually correct, the phases actually are reversed and in fact, the CDC phase is the one that starts first; capturing and caching changes.
Once the CDC phase starts, then the full load phase will start.
This order is needed in order to insure that any changes made to the table during the Full Load will be captured.
For example, if you happen to have a very large table that takes three hours to fully load and the CDC phase did not start until it was complete, you would miss those three hours of changes being applied to the table.
If you have ever seen a message in the log at the top of the log about consistency timeout this is why:
W: Transaction consistency timeout occurred. x transactions are still open
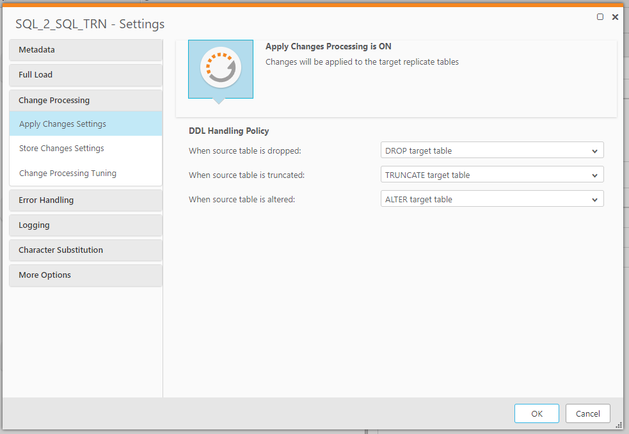
CDC - Apply changes setting screen:
Related Content
Transformation: Source - Filter for Delete
Filter for last 90 days of data in Qlik Replicate
Qlik Replicate Transaction Consistency Timeout occurred. xtransactions are still open
Qlik Replicate Full Load and CDC Split Task: ConsiderationsThe information in this article is provided as-is and to be used at own discretion. Depending on tool(s) used, customization(s), and/or other factors ongoing support on the solution below may not be provided by Qlik Support.
Environment
-
Talend Studio local patch update in an offline or air-gapped environment (withou...
Talend Studio periodically requires patch updates. In an air-gapped environment with no internet access, Talend Studio cannot reach the default update... Show MoreTalend Studio periodically requires patch updates. In an air-gapped environment with no internet access, Talend Studio cannot reach the default update site (https://update.talend.com/Studio/8/updates/latest) to download and apply patches automatically.
This article describes how to download a Studio patch on a machine with internet access, then apply it locally by pointing Talend Studio's update settings to the downloaded patch file.
- Download the required Talend Studio patch on a machine with internet access, and save it to a folder on the local machine, for example: D:/Talend_Patch/Patch_20260619_R2026-06_v1-8.0.1.zip
For information on how to download the patch, see How to download Qlik Talend Product patches. - Configure Talend Studio to use the local patch in Talend Studio:
- go to Window > Preferences > Talend > Update Settings.
- Change the Update URL field from the default update site https://update.talend.com/Studio/8/updates/latestto the local patch path, for example: jar:file:/D:/Talend_Patch/Patch_20260619_R2026-06_v1-8.0.1.zip!/
- Click Apply and Close.
- Open Feature Manager in Talend Studio, and follow the prompts to complete the local patch installation
Environment
- Talend Studio
- Download the required Talend Studio patch on a machine with internet access, and save it to a folder on the local machine, for example: D:/Talend_Patch/Patch_20260619_R2026-06_v1-8.0.1.zip
-
Qlik Replicate and DB2i source endpoint: source capture "Error parsing"
The IBM DB2 for iSeries source endpoint occasionally encounters an error during the CDC stage. This issue appears to be linked to the presence of the ... Show MoreThe IBM DB2 for iSeries source endpoint occasionally encounters an error during the CDC stage. This issue appears to be linked to the presence of the IBM i Access ODBC Driver versions 7.1.26 and 7.1.27.
The error message in the task log file:
[SOURCE_CAPTURE ]E: Error parsing [1020109] (db2i_endpoint_capture.c:652)
The issue specifically arises during the CDC stage; however, the Full Load stage operates smoothly without any complications.
Resolution:
Qlik has certified the DB2i ODBC driver version 07.01.029. An update to the official Qlik documentation is currently pending.
Either:
- Upgrade your IBM i Access ODBC client to 07.01.029,
- or downgrade from versions 07.01.027/07.01.026 to 07.01.025
For compatibility reasons, it's advisable to revert to version '07.01.025' if you choose to downgrade, as '07.01.026' exhibits the same issue.
Various factors can contribute to encountering the 'Error parsing' message, including:
• DB2i ODBC Version '07.01.027' (as described in this article)
• In a single task, the total number of captured tables exceeds 300
• The source table is created by DDS
• Garbage data in table
• Special characters in table object identifier (table name, or column name)
If you continue to encounter the error after switching to '07.01.025', please reach out to Qlik Support for further assistance.Cause:
The behavior of the IBM DB2i ODBC Versions '07.01.026' & '07.01.027' differ slightly from that of '07.01.025'. In certain scenarios, it may return incorrect column lengths
Internal Investigation ID(s):
#00158029, #00160002, QB-26413
Environment:
- Qlik Replicate All versions
- IBM DB2i All versions
- IBM DB2i Client versions '07.01.026' and '07.01.027'
-
How to prepare your Qlik App for Qlik Answers, Part Two
Your AI is only as good as what it can find. Part One of How to prepare your Qlik App for Qlik Answers laid out a six-step checklist: clarify field ... Show MoreYour AI is only as good as what it can find.
Part One of How to prepare your Qlik App for Qlik Answers laid out a six-step checklist:
- clarify field names,
- streamline the data model,
- check date formats,
- build master items with descriptions,
- configure vocabulary,
- and validate with real queries.
It ended with a simple line: you do not need a perfect data model, you need a clear one. This is what clear means underneath the surface. Keep the shortlist clean, and the model's fluency has good material to work with.
Part Two details what Qlik Answers is doing when it reads your apps and expands your understanding of why those six steps move the needle.
Content
- The mental model: retrieval rather than omniscience
- Lever 1: Visibility
- Lever 2: Names
- Lever 3: Master items
- Lever 4: Descriptions
- Lever 5: Vocabulary
- In Summary
The mental model: retrieval rather than omniscience
It is easy to assume the AI "sees" your entire app and simply needs to be clever enough to choose well. In practice it works a little differently, and for good reason. An app with 500 fields would present far more noise than signal to any model.
Instead, the system builds a search index of your app's metadata. Every visible field and master item gets a compact semantic profile, and that profile is what the system searches against.
For a master measure, that profile is built from several signals together:
- the name of the master item
- the description you have written for it
- the actual expression behind it
- any business glossary term you have linked to it
The system reads these as a whole and forms one understanding of what the asset means. When a question arrives, it retrieves the handful of assets that best match its meaning and passes them to the AI.
That single idea reframes the work. The useful question is rarely "is the AI clever enough to understand my field?" More often it is "will my field be found, and will it be the natural choice when it is?"
We'll tackle this in order, using five different levers. These levers act at different stages, which is why the sequence in which we outline them is important. Visibility decides what exists. Names influence what gets found first. Master items shape what the AI builds your numbers with and whether they carry your definitions. Descriptions help the right things get found at all. Vocabulary closes the last gap between your words and the model's understanding.
Working the later levers on an app still full of visible technical fields means refining assets that are competing with a great deal of noise. It tends to go more smoothly to start with the gate, then the definitions, then the language.
Lever 1: Visibility
The one truly decisive setting.
Hiding a field in your business logic does more than lower its priority. It takes the field entirely out of consideration. A hidden field is never profiled, never indexed, and never retrievable, so it cannot appear in an answer.
That is why visibility is worth looking at first. Every technical field left visible, every surrogate key, ETL timestamp, or FIELD_CODE_2_FINAL, competes with your real business fields. Working through a wide app and hiding the fields that should never be an answer is usually a few hours of work, sometimes less, and it improves every question asked afterwards. It is one of the most approachable, high-value things you can do to an app.
Hide with intent. If people do ask about a field, hiding it takes away their ability to get answers about it. Think of this as curation rather than cleanup.
Lever 2: Names
Names carry weight in retrieval.
When a question contains a term that closely matches an asset's name, that asset is favored strongly in the results.
So it pays to name assets the way your users actually speak. If everyone in the business says "Net Revenue", a master measure called "Net Revenue" tends to be found quickly and reliably. One called "NR_calc_v3" leaves the system to infer what you meant. It often will, and it is worth giving it a clear signal where you can do so easily.
Lever 3: Master items
Define your metrics once, with care.
Master items sit high on this list for a straightforward reason: when a well-defined master item and a raw field could both answer a question, the system leans toward the master item. It is your sanctioned, promoted answer.
The stronger argument, though, is trust rather than mechanics. The model does understand what "net sales" means in general terms. The question is whether you would prefer it to work from the general idea or from your definition.
Does your net sales exclude intercompany transfers? Is it net of returns or gross of them? Which currency, at which exchange rate, over which fiscal calendar? Answered from raw fields, each of those becomes a reasonable assumption. Answered through a master measure, it follows your business logic, your set analysis, and your exceptions, consistently. When the number reaches a report your leadership is reading, a defined metric gives everyone confidence in where it came from. Define the metric once, as a master item, and every answer built on it inherits the definition you stand behind.
It is worth building a master item for every metric that carries a real business definition, while keeping the library tidy. A collection of "Sales", "Sales 2", and "Sales New" tends to reintroduce the very ambiguity master items are meant to resolve, so clear naming here matters as much as the definitions themselves.
Lever 4: Descriptions
Think of them as configuration rather than documentation.
Descriptions are often treated as a nice-to-have for the data catalog. In an AI-ready app, they do more.
The description you write on a field or master item feeds directly into its semantic profile, which is what the system searches. A clear note on what "Net Sales" includes and excludes helps that item surface for the many ways people might phrase the question, and sets it apart from the other sales measures nearby.
There is no need to describe everything. The ones worth your time are the ambiguous ones: lookalike measures, fields whose names are abbreviations, anything a new analyst would have to ask a colleague about. If a person would want the explanation, the search index benefits from it too.
Lever 5: Vocabulary
Focus on your language, not on educating the model.
This is the lever people tend to overthink, so it is worth being clear about its purpose. You are not here to teach the AI general knowledge. There is a genuinely capable model underneath, and it already understands a great deal of the world.
It knows what revenue, profit, and margin are. It understands churn, retention, and attrition. It is comfortable with YoY, MoM, and QoQ, with fiscal quarters, gross versus net, currencies, countries and regions, standard units, and the everyday language of sales, finance, and operations. There is little value in a glossary entry explaining that "revenue" means money coming in.
Where vocabulary earns its keep is the language that is specific to you, which the model has no way to know:
- Your internal product codenames.
- An acronym only your company uses.
- The name your business gave to a segment it defined itself.
- A regional grouping that exists only on your org chart.
- If your business says "GMV" and the field is named "Gross_Merch_Value"
Those are examples the model cannot bridge on its own, and this is precisely where a vocabulary entry helps.
So a small, proprietary vocabulary tends to serve you best. A handful of terms that are truly yours will often do more than a long list restating things the model already knew. Vocabulary is a useful tool with a focused job: teaching the model your dialect rather than the dictionary.
Two items from that checklist do not appear as levers above: date formats and validation. Neither is a retrieval signal. A Date or Timestamp tag is a data type requirement your time-based questions depend on, not something the search index weighs when it ranks assets. Validating with real queries is not a lever at all. It is how you find out whether the five above actually worked.
In Summary
When people ask your app questions in plain language, the AI does not read your whole data model. It searches a curated index of your fields and master items, retrieves a small shortlist, and reasons over that. Most of what helps an app answer well comes down to making sure the right assets land on that shortlist. A sensible order to work through: hide what should never be an answer, name assets the way your users talk, define your real metrics as master items, describe the ambiguous ones, and add vocabulary for the terms that are genuinely yours.
Environment
- Qlik Cloud
- Qlik Answers
-
Qlik Sense Button object background color "none" does not work as expected
Changing the background color of the button object to none causes the button to display with its default background color (#006580). This is working a... Show MoreChanging the background color of the button object to none causes the button to display with its default background color (#006580). This is working as expected as of today.
Resolution
Qlik is reviewing QB-29806 for future improvements.
Workaround
To achieve transparency (mimicking none as the background color):
- In the button's background option, choose "By Expression"
- Fill in the expression as follows:
ARGB(0,0,0,0)
Cause
This feature predates the introduction of transparency in the colorpicker, meaning it was designed to revert to the default color when none is chosen.
Internal Investigation ID(s)
QB-29806
Environment
- Qlik Sense Enterprise on Windows August 2023 and higher
- Qlik Cloud
-
How and when to contact Qlik's Professional Services and Consulting Teams?
Consulting (often referred to as Professional Services) needs to be contacted when either one of the following is true: There is a need for step-by-s... Show MoreConsulting (often referred to as Professional Services) needs to be contacted when either one of the following is true:
- There is a need for step-by-step deployment walk-through assistance.
- The assistance needed is of a "how-to", "development task", "performance baseline/benchmark", and/or of a "health-check" nature and could not be satisfied by Posting to the Qlik Community.
- The assistance needed is not of a break/fix nature, Feature Request, report of known or potential new product defect, or an inquiry in reference to information that can be found under published resources such as Knowledge Base, Release Notes, and Qlik Help.
To begin a Consulting services engagement, begin at Support and Services or contact your Account Manager.
-
Qlik NPrinting Designer crashes when formatting data labels after defining a ran...
Qlik NPrinting Designer crashes when formatting data labels in a Microsoft Excel chart. Resolution Resolving the crash requires enabling a feature (... Show MoreQlik NPrinting Designer crashes when formatting data labels in a Microsoft Excel chart.
Resolution
Resolving the crash requires enabling a feature (DisableOfficeEmbed=1) that allows the Qlik NPrinting Designer to work without embedding Office. With the option enabled, the Designer opens on the left side of the screen, while Office opens the remaining area.
Qlik NPrinting Designer features remain unchanged.
Changes to the configuration files may impact your product. Only make changes documented by Qlik Support.
- Go to the %programdata%/NPrinting folder
- Find the NPrinting.ini file and create a backup copy of it
If the file does not exist, download the attached NPrinting.zip and extract the embedded NPrinting.ini. Then copy the downloaded NPrinting.ini into the %programdata%/NPrinting folder.
You can skip step three; the downloaded file includes the DisableOfficeEmbed=1 flag.
- Open your NPrinting.ini and add the DisableOfficeEmbed=1 feature flag.
To disable the option again, set the value to 0.
Example:
[\Software\NPrinting\Options]
DisableOfficeEmbed=1 - Save and close the file
- Restart your device
The Qlik NPrinting Designer and Server .ini files are overwritten when the product is upgraded or reinstalled. Please ensure you document any changes to this or other configuration files.
Cause
The crash is caused by a component used to embed the Office application into the Qlik NPrinting Designer.
Internal Investigation ID(s)
SUPPORT-11351
Environment
- Qlik NPrinting

- Go to the %programdata%/NPrinting folder
-
Talend Studio: CBP error when building OSGI job
Building an OSGI job in Talend Studio (version 2026-07 and 2026-08) fails with the following error: ERROR] mvn <args> -rf :job_<JOB NAME>at org.talend... Show MoreBuilding an OSGI job in Talend Studio (version 2026-07 and 2026-08) fails with the following error:
ERROR] mvn <args> -rf :job_<JOB NAME>
at org.talend.repository.ui.wizards.exportjob.scriptsmanager.BuildJobManager.buildJob(BuildJobManager.java:305)Resolution
Caused by defect QAPPINT-3008 (SUPPORT-11651) and resolved in the Talend Studio 2026-09 release. See the release notes for details.
Internal Investigation ID(s)
QAPPINT-3008, SUPPORT-11651
Environment
- Talend Studio 2026-07 and 2026-08
-
Kerberos authentication with Qlik Sense Enterprise on Windows
This article explains the steps to configure Kerberos with Qlik Sense Enterprise on Windows. Note that the actual setup, implementation, and configura... Show MoreThis article explains the steps to configure Kerberos with Qlik Sense Enterprise on Windows.
Note that the actual setup, implementation, and configuration of Kerberos for use with Qlik Sense Enterprise on Windows is the responsibility of the local IT administrator.
The following requires appropriate permissions in Active Directory to add Service Principal Names to the account running the Qlik Sense services.
A Service Principal Name may be registered using the following command:setspn -A http/HOST serviceaccount
Where:
- HOST is the name of the server hosting Qlik Sense Enterprise on Windows
- serviceaccount is the account running the services
Once the SPN has been registered:
- Open a command prompt with administrative privileges and type:
setspn -U -S http/QlikServer1 COMPANYX\serviceAccount
Review the command for your respective Windows version.
setspn -U -S http/QlikServer1.companyx.local COMPANYX\serviceAccount - Go to the Qlik Sense Management Console (QMC) > Proxy > Edit the proxy you wish to use
- Tick the Enable Kerberos checkbox.
An SPN must be set for both the short hostname and FQDN for the target Qlik Sense server for Kerberos to work correctly. This is not related to URLs configured in the Web Client allowlist under the Virtual Proxy configuration.
For more information about Service Principal Names, see: Service principal names | learn.microsoft.com.
Important note for Monitoring Apps: If Kerberos is enabled on the proxy service, Windows authentication will fail as the REST connector does not support Kerberos. See Qlik Sense: Modify REST connections for Monitoring Apps to use JWT authentication.
-
How to extract changes from the change store (Write table) and store them in a Q...
This article is currently under review. This article explains how to extract changes from a Change Store and store them in a QVD by using a load scrip... Show MoreThis article is currently under review.
This article explains how to extract changes from a Change Store and store them in a QVD by using a load script in Qlik Analytics.
The article also includes
- An app example with an incremental load script that will store new changes in a QVD
- Configuration instructions for the examples
Scenario
This example will create an analytics app for Vendor Reviews. The idea is that you, as a company, are working with multiple vendors. Once a quarter, you want to review these vendors.
The example is simplified, but it can be extended with additional data for real-world examples or for other “review” use cases like employee reviews, budget reviews, and so on.
The data model
The app’s data model is a single table “Vendors” that contains a Vendor ID, Vendor Name, and City:
Vendors:
Load * inline [
"Vendor ID","Vendor Name","City"
1,Dunder Mifflin,Ghent
2,Nuka Cola,Leuven
3,Octan, Brussels
4,Kitchen Table International,Antwerp
];
The Write Table
The Write Table contains two data model fields: Vendor ID and Vendor Name. They are both configured as primary keys to demonstrate how this can work for composite keys.
The Write Table is then extended with three editable columns:
- Quarter (Single select)
- Action required? (Single select)
- Comment (Manual user input)
Prerequisites
- A shared space
- A managed space (optional but advised for the tutorial)
- A connection to the Change-stores API to the Analytics REST connector in the shared space. A step-by-step guide on creating this connection is available in Extracting write table changes with the REST connector in Qlik Cloud.
Steps
- Upload the attached .QVF file to a shared space
- Open the private sheet Vendor Reviews
- Click the Reload App (A) button and make sure data appears (B) in the top table
- Go to Edit sheet (A) mode
- Drag a Write Table Chart (B) on the top table, and choose the option Convert to: Write Table (C).
This transforms the table into a Write Table with two data model columns Vendor ID and Vendor Name.
- Go to the Data section in the Write Table’s Properties menu and add an editable column
- This prompts you to define a primary key inside the table. Click Define (A) in the table and use both Vendor ID and Vendor Name as primary keys (B).
You can also just use Vendor ID, but we want to show that this also supports composite primary keys. - Configure the editable column:
- Title: Quarter
- Show content: Single selection
- Add options for Q1Y26 through Q4Y26.
Tip! Also add an empty option by clicking the Add button without specifying a value.
- Add another Editable column with the below configuration
- Title: Action required
- Type: Single select
- Options: Yes and No
- Add another Editable column with the below configuration
- Title: Review
- Type: Single select
- Options: Yes and No
- The Write Table is now set up.
Go to the Write Table’s properties and locate the Change store (A) section. Copy the Change store ID (B).
- Leave the Edit sheet mode. Then add changes for at least two records. Save those changes.
- Go to the app’s load script editor and uncomment the second script section by first selecting all lines in the script section (CTRL+A or CMD+A) (A) and then clicking the comment button (B) in the toolbar.
- Configure the settings in the CONFIGURATION part at the end of the load script
- Update the load script with the IDs of the editable columns.
The easiest solution to get these IDs is to test your connection. Make sure the connection URL is configured to use the /changes/tabular-views endpoint and uses the correct change store ID.
- Copy and paste the example load script (for the editable columns only) and paste it in the app’s load script SQL Select statement that starts on line 159:
- Replace the corresponding * symbols in the LOAD statement that starts on line 176:
- Choose which records you want to track in your table by configuring the Exists Key on line 216.
This key will be used to filter the “granularity” on which we want to store changes in the QVD and data model, as the load script will only load unique existing keys (line 235).
- $(vExistsKeyFormula) is a pipe-separated list of the primary keys.
- In this example, Quarter is added as an additional part of the exists key to keep track of changes by Quarter.
- Optionally, this can be extended with createdBy and updatedAt to extend the granularity to every change made:
- Reload the app and verify that the correct change store table is created in your data model. The second table in the sheet should also successfully show vendors and their reviews.
Environment
- Qlik Cloud Analytics